Dell Owners Manual
Page 3
... Base-Corner Covers...17 Installing the Base-Corner Covers...18 Removing the Memory...19 Installing the Memory...19 Removing the Hard Drive...19 Installing the Hard Drive...21 Removing the Optical Drive...21 Installing the Optical Drive...22 Removing the Wireless Local Area Network (WLAN) Card 22 Installing the WLAN Card...23 Removing the Wireless Wide...
... Base-Corner Covers...17 Installing the Base-Corner Covers...18 Removing the Memory...19 Installing the Memory...19 Removing the Hard Drive...19 Installing the Hard Drive...21 Removing the Optical Drive...21 Installing the Optical Drive...22 Removing the Wireless Local Area Network (WLAN) Card 22 Installing the WLAN Card...23 Removing the Wireless Wide...

Dell Owners Manual
Page 11
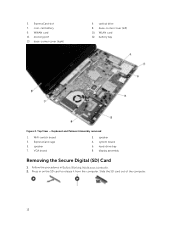
Back View - Recommended Tools The procedures in this document may require the following tools: • Small flat-blade screwdriver • Phillips screwdriver • Small plastic scribe System Overview Figure 1. heat-sink assembly 3. 2 Removing and Installing Components This section provides detailed information on how to remove or install the components from your computer. SD card slot 11 Back Cover Removed 1. hard drive 4. memory 2.
Back View - Recommended Tools The procedures in this document may require the following tools: • Small flat-blade screwdriver • Phillips screwdriver • Small plastic scribe System Overview Figure 1. heat-sink assembly 3. 2 Removing and Installing Components This section provides detailed information on how to remove or install the components from your computer. SD card slot 11 Back Cover Removed 1. hard drive 4. memory 2.
Dell Owners Manual
Page 12
... SD card to release it from the computer. docking port 13. WLAN card 12. speaker 7. base-corner cover (left) 10. WiFi-switch board 3. VGA board 2. hard-drive bay 8. optical drive 8. Top View - 5. Keyboard and Palmrest Assembly removed 1.
... SD card to release it from the computer. docking port 13. WLAN card 12. speaker 7. base-corner cover (left) 10. WiFi-switch board 3. VGA board 2. hard-drive bay 8. optical drive 8. Top View - 5. Keyboard and Palmrest Assembly removed 1.
Dell Owners Manual
Page 19
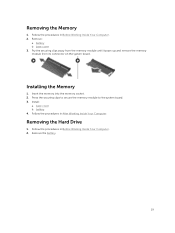
.... 2. Press the securing clips to secure the memory module to the system board. 3. Install: a. Follow the procedures in Before Working Inside Your Computer. 2. Removing the Hard Drive 1. base cover b. battery 4. Remove the battery. 19 Removing the Memory 1. Follow the procedures in After Working Inside Your Computer. Follow the procedures in Before Working...
.... 2. Press the securing clips to secure the memory module to the system board. 3. Install: a. Follow the procedures in Before Working Inside Your Computer. 2. Removing the Hard Drive 1. base cover b. battery 4. Remove the battery. 19 Removing the Memory 1. Follow the procedures in After Working Inside Your Computer. Follow the procedures in Before Working...

Dell Owners Manual
Page 20
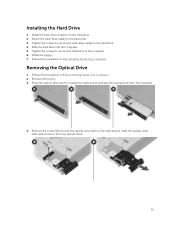
Remove the screw that secure the hard drive to the hard drive. Remove the hard-drive caddy from the hard drive. 20 Remove the screws that secures the hard-drive caddy to the computer. Peel off the hard-drive isolation from the hard drive. 5. Slide the hard drive out of the computer. 4. Flex the hard-drive isolation. 3.
Remove the screw that secure the hard drive to the hard drive. Remove the hard-drive caddy from the hard drive. 20 Remove the screws that secures the hard-drive caddy to the computer. Peel off the hard-drive isolation from the hard drive. 5. Slide the hard drive out of the computer. 4. Flex the hard-drive isolation. 3.
Dell Owners Manual
Page 21
... computer. 4. Install the hard-drive isolation on the hard drive. 2. Follow the procedures in Before Working Inside Your Computer. 2. Press the optical-drive latch to the hard drive. 4. Tighten the screws to secure the hard-drive caddy to release the optical drive and pull the optical drive from the optical-drive. 21 Slide the hard drive into the computer. 5. Installing the Hard Drive 1. Remove the screw...
... computer. 4. Install the hard-drive isolation on the hard drive. 2. Follow the procedures in Before Working Inside Your Computer. 2. Press the optical-drive latch to the hard drive. 4. Tighten the screws to secure the hard-drive caddy to release the optical drive and pull the optical drive from the optical-drive. 21 Slide the hard drive into the computer. 5. Installing the Hard Drive 1. Remove the screw...

Dell Owners Manual
Page 37
Removing the System Board 1. battery d. keyboard e. optical drive g. display-hinge cap h. power connector k. WWAN card o. Remove: a. ExpressCard c. Follow the procedures in Before Working Inside Your Computer. 2. hard drive f. VGA board r. SD card b. base cover i. coin cell l. ExpressCard cage 37 base-corner covers j. memory m. WLAN card n. heatsink p. processor q.
Removing the System Board 1. battery d. keyboard e. optical drive g. display-hinge cap h. power connector k. WWAN card o. Remove: a. ExpressCard c. Follow the procedures in Before Working Inside Your Computer. 2. hard drive f. VGA board r. SD card b. base cover i. coin cell l. ExpressCard cage 37 base-corner covers j. memory m. WLAN card n. heatsink p. processor q.
Dell Owners Manual
Page 41
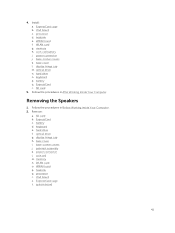
... d. base-corner covers j. processor r. system board 41 ExpressCard cage b. VGA board c. heatsink e. keyboard p. ExpressCard c. optical drive g. WWAN card p. coin-cell battery i. base-corner covers k. display-hinge cap m. optical drive n. hard drive o. SD card 5. Removing the Speakers 1. ExpressCard r. SD card b. hard drive f. coin cell m. ExpressCard cage t. memory h. battery q. Follow the procedures in Before Working Inside Your Computer...
... d. base-corner covers j. processor r. system board 41 ExpressCard cage b. VGA board c. heatsink e. keyboard p. ExpressCard c. optical drive g. WWAN card p. coin-cell battery i. base-corner covers k. display-hinge cap m. optical drive n. hard drive o. SD card 5. Removing the Speakers 1. ExpressCard r. SD card b. hard drive f. coin cell m. ExpressCard cage t. memory h. battery q. Follow the procedures in Before Working Inside Your Computer...
Dell Owners Manual
Page 44
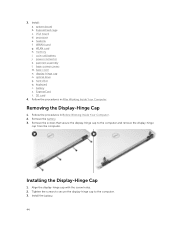
... t. Remove the battery. 3. Align the display-hinge cap with the screw holes. 2. VGA board d. hard drive q. Installing the Display-Hinge Cap 1. coin-cell battery j. Removing the Display-Hinge Cap 1. Install: a. processor e. palmrest assembly l. base-corner covers m. optical drive p. Follow the procedures in Before Working Inside Your Computer. 2. Tighten the screws to secure the...
... t. Remove the battery. 3. Align the display-hinge cap with the screw holes. 2. VGA board d. hard drive q. Installing the Display-Hinge Cap 1. coin-cell battery j. Removing the Display-Hinge Cap 1. Install: a. processor e. palmrest assembly l. base-corner covers m. optical drive p. Follow the procedures in Before Working Inside Your Computer. 2. Tighten the screws to secure the...
Dell Owners Manual
Page 57
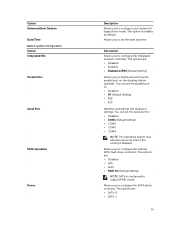
... allows you to bypass the System Setup‐defined boot device order and boot directly to a specific device (for example: optical drive or hard drive). From the System Setup, you add or remove hardware • View the system hardware configuration • Enable or disable integrated ... available) • STXXXX Drive NOTE: XXX denotes the SATA drive number. • Optical Drive • Diagnostics NOTE: Choosing Diagnostics, will display the ePSA diagnostics screen. During the Power-on Self Test (POST), when the Dell logo appears, you can: • Access System Setup by pressing key ...
... allows you to bypass the System Setup‐defined boot device order and boot directly to a specific device (for example: optical drive or hard drive). From the System Setup, you add or remove hardware • View the system hardware configuration • Enable or disable integrated ... available) • STXXXX Drive NOTE: XXX denotes the SATA drive number. • Optical Drive • Diagnostics NOTE: Choosing Diagnostics, will display the ePSA diagnostics screen. During the Power-on Self Test (POST), when the Dell logo appears, you can: • Access System Setup by pressing key ...
Dell Owners Manual
Page 59
...; COM3 • COM4 NOTE: The operating system may allocate resources even if the setting is disabled. The option is configured to configure the internal SATA hard-drive controller. You can set the date and time. The options are : • Disabled • Enabled • Enabled w/PXE (Default Setting) Allows you to ...the parallel port to configure the integrated network controller. You can set how the parallel port on board. Allows you to configure the SATA drives on the docking station operates. System Configuration Option Integrated NIC Parallel Port Serial Port SATA Operation...
...; COM3 • COM4 NOTE: The operating system may allocate resources even if the setting is disabled. The option is configured to configure the internal SATA hard-drive controller. You can set the date and time. The options are : • Disabled • Enabled • Enabled w/PXE (Default Setting) Allows you to ...the parallel port to configure the integrated network controller. You can set how the parallel port on board. Allows you to configure the SATA drives on the docking station operates. System Configuration Option Integrated NIC Parallel Port Serial Port SATA Operation...
Dell Owners Manual
Page 60
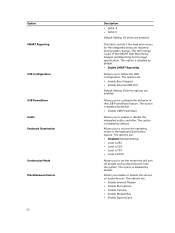
...operating mode of the SMART (Self Monitoring Analysis and Reporting Technology) specification. This field controls if the hard drive errors for the integrated drives are enabled. Option SMART Reporting USB Configuration USB PowerShare Audio Keyboard Illumination Unobtrusive Mode Miscellaneous Devices 60 ...Description • SATA-4 • SATA-5 Default Setting: All drives are reported during system startup. The option is part of the keyboard illumination feature. Allows you to enable or...
...operating mode of the SMART (Self Monitoring Analysis and Reporting Technology) specification. This field controls if the hard drive errors for the integrated drives are enabled. Option SMART Reporting USB Configuration USB PowerShare Audio Keyboard Illumination Unobtrusive Mode Miscellaneous Devices 60 ...Description • SATA-4 • SATA-5 Default Setting: All drives are reported during system startup. The option is part of the keyboard illumination feature. Allows you to enable or...
Dell Owners Manual
Page 61
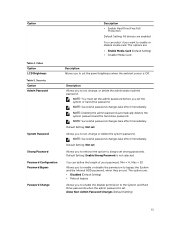
.... Option Table 4. Security Option Admin Password System Password Strong Password Password Configuration Password Bypass Password Change Description • Enable Hard Drive Free Fall Protection Default Setting: All devices are : • Enable Media Card (Default Setting) • Disable Media ... Allow Non-Admin Password Changes (Default Setting) 61 NOTE: Deleting the admin password automatically deletes the system password and the hard drive password. NOTE: Successful password changes take effect immediately. Default Setting: Enable Strong Password is set , change , or delete...
.... Option Table 4. Security Option Admin Password System Password Strong Password Password Configuration Password Bypass Password Change Description • Enable Hard Drive Free Fall Protection Default Setting: All devices are : • Enable Media Card (Default Setting) • Disable Media ... Allow Non-Admin Password Changes (Default Setting) 61 NOTE: Deleting the admin password automatically deletes the system password and the hard drive password. NOTE: Successful password changes take effect immediately. Default Setting: Enable Strong Password is set , change , or delete...
Dell Owners Manual
Page 70
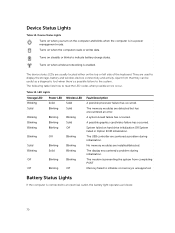
... data. The modem is preventing the system from that they can be useful as follows: 70 Device Status Lights Turns on when you turn on hard drive initialization OR System failed in a power management mode. The display encountered a problem during initialization. Turns on when wireless networking is unsupported. Turns on steadily or...
... data. The modem is preventing the system from that they can be useful as follows: 70 Device Status Lights Turns on when you turn on hard drive initialization OR System failed in a power management mode. The display encountered a problem during initialization. Turns on when wireless networking is unsupported. Turns on steadily or...
Dell Statement of Volatility
Page 2
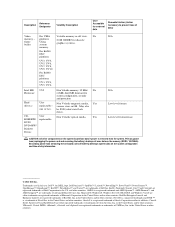
... this text: Dell™, the DELL logo, Dell Precision™, OptiPlex™, Latitude™, PowerEdge™, PowerVault™, PowerConnect™, OpenManage™, EqualLogic™, KACE™, FlexAddress™ and Vostro™ are registered trademarks or trademarks of Dell Inc. Description Reference Designator Volatility Description User Accessible for system configuration, security and protection Hard drive(s) User Non Volatile...
... this text: Dell™, the DELL logo, Dell Precision™, OptiPlex™, Latitude™, PowerEdge™, PowerVault™, PowerConnect™, OpenManage™, EqualLogic™, KACE™, FlexAddress™ and Vostro™ are registered trademarks or trademarks of Dell Inc. Description Reference Designator Volatility Description User Accessible for system configuration, security and protection Hard drive(s) User Non Volatile...


