
Dell Owners Manual
Page 4
... Display Panel...53 Removing the Display Hinges...54 Installing the Display Hinges...54 Removing the Camera...55 Installing the Camera...55 3 System Setup...57 Boot Sequence...57 Navigation Keys...57 System Setup Options...58 Updating the BIOS ...66 System and Setup Password...67 Assigning a System Password and Setup Password 67 Deleting or Changing an Existing System and/or Setup Password 68 4 Diagnostics...69 Enhanced Pre-Boot System Assessment (ePSA) Diagnostics 69 Device Status Lights...70 Battery Status Lights...70 5 Technical Specifications...
... Display Panel...53 Removing the Display Hinges...54 Installing the Display Hinges...54 Removing the Camera...55 Installing the Camera...55 3 System Setup...57 Boot Sequence...57 Navigation Keys...57 System Setup Options...58 Updating the BIOS ...66 System and Setup Password...67 Assigning a System Password and Setup Password 67 Deleting or Changing an Existing System and/or Setup Password 68 4 Diagnostics...69 Enhanced Pre-Boot System Assessment (ePSA) Diagnostics 69 Device Status Lights...70 Battery Status Lights...70 5 Technical Specifications...
Dell Owners Manual
Page 7
...: Before working inside the computer, replace all power sources before connecting to the power source. You should only perform troubleshooting and simple repairs as a connector on the back of your computer. • A component can be done by its metal mounting bracket. CAUTION: To avoid electrostatic discharge, ground yourself by using a wrist grounding strap or by periodically touching an unpainted...
...: Before working inside the computer, replace all power sources before connecting to the power source. You should only perform troubleshooting and simple repairs as a connector on the back of your computer. • A component can be done by its metal mounting bracket. CAUTION: To avoid electrostatic discharge, ground yourself by using a wrist grounding strap or by periodically touching an unpainted...
Dell Owners Manual
Page 9
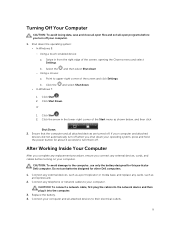
... the screen, opening the Charms menu and select Settings. After Working Inside Your Computer After you complete any replacement procedure, ensure you connect any telephone or network cables to your computer and all attached devices to upper-right corner of the Start menu as an ExpressCard. 2. Connect your computer. Using a touch-enabled device: a. or 1. CAUTION: To avoid damage to turn them off. Connect any external devices, cards, and cables before you turn off your operating...
... the screen, opening the Charms menu and select Settings. After Working Inside Your Computer After you complete any replacement procedure, ensure you connect any telephone or network cables to your computer and all attached devices to upper-right corner of the Start menu as an ExpressCard. 2. Connect your computer. Using a touch-enabled device: a. or 1. CAUTION: To avoid damage to turn them off. Connect any external devices, cards, and cables before you turn off your operating...
Dell Owners Manual
Page 19
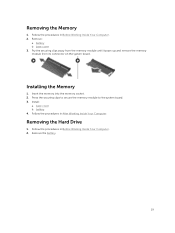
... Your Computer. Remove the battery. 19 Pry the securing clips away from the memory module until it pops-up and remove the memory module from its connector on the system board. base cover b. Insert the memory into the memory socket. 2. Press the securing clips to secure the memory module to the system board. 3. battery 4. Removing the Hard Drive 1. base cover 3. Follow the procedures in Before Working Inside Your Computer. 2. battery b. Removing the Memory 1. Remove: a.
... Your Computer. Remove the battery. 19 Pry the securing clips away from the memory module until it pops-up and remove the memory module from its connector on the system board. base cover b. Insert the memory into the memory socket. 2. Press the securing clips to secure the memory module to the system board. 3. battery 4. Removing the Hard Drive 1. base cover 3. Follow the procedures in Before Working Inside Your Computer. 2. battery b. Removing the Memory 1. Remove: a.

Dell Owners Manual
Page 34
Removing the WiFi-Switch Board 1. Remove: a. base-corner covers h. Disconnect the cable from the computer. Install: a. base-corner covers d. keyboard f. battery d. keyboard e. Tighten the screw to secure the WiFi-switch board to the system board. 4. Connect the cable to the computer. 3. Installing the WiFi-Switch Board 1. Perform the following steps as shown in its slot. 2. b. ExpressCard h. Place the WiFi-switch board in the illustration: a. base cover c. SD card 5. Follow the procedures in After Working Inside Your Computer. 34 ExpressCard c. ...
Removing the WiFi-Switch Board 1. Remove: a. base-corner covers h. Disconnect the cable from the computer. Install: a. base-corner covers d. keyboard f. battery d. keyboard e. Tighten the screw to secure the WiFi-switch board to the system board. 4. Connect the cable to the computer. 3. Installing the WiFi-Switch Board 1. Perform the following steps as shown in its slot. 2. b. ExpressCard h. Place the WiFi-switch board in the illustration: a. base cover c. SD card 5. Follow the procedures in After Working Inside Your Computer. 34 ExpressCard c. ...

Dell Owners Manual
Page 37
Follow the procedures in Before Working Inside Your Computer. 2. keyboard e. memory m. WLAN card n. VGA board r. base cover i. processor q. SD card b. display-hinge cap h. ExpressCard cage 37 coin cell l. battery d. heatsink p. Remove: a. hard drive f. WWAN card o. Removing the System Board 1. ExpressCard c. optical drive g. base-corner covers j. power connector k.
Follow the procedures in Before Working Inside Your Computer. 2. keyboard e. memory m. WLAN card n. VGA board r. base cover i. processor q. SD card b. display-hinge cap h. ExpressCard cage 37 coin cell l. battery d. heatsink p. Remove: a. hard drive f. WWAN card o. Removing the System Board 1. ExpressCard c. optical drive g. base-corner covers j. power connector k.
Dell Owners Manual
Page 41
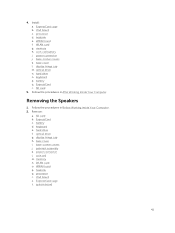
...r. 4. power connector j. base-corner covers k. battery q. Follow the procedures in Before Working Inside Your Computer. 2. Removing the Speakers 1. base cover i. memory n. ExpressCard cage t. keyboard p. Follow the procedures in After Working Inside Your Computer. optical drive g. base-corner covers j. WLAN card o. memory h. display-hinge cap m. SD card b. hard drive f. Install: a. ExpressCard cage b. hard drive o. system board 41 WWAN card f. battery d. keyboard e. heatsink q. base cover l. WWAN card p. optical drive n. VGA board...
...r. 4. power connector j. base-corner covers k. battery q. Follow the procedures in Before Working Inside Your Computer. 2. Removing the Speakers 1. base cover i. memory n. ExpressCard cage t. keyboard p. Follow the procedures in After Working Inside Your Computer. optical drive g. base-corner covers j. WLAN card o. memory h. display-hinge cap m. SD card b. hard drive f. Install: a. ExpressCard cage b. hard drive o. system board 41 WWAN card f. battery d. keyboard e. heatsink q. base cover l. WWAN card p. optical drive n. VGA board...
Dell Owners Manual
Page 57
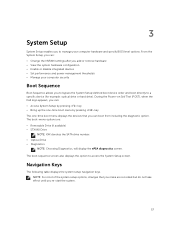
... diagnostics screen. NOTE: For most of the system setup options, changes that you re-start the system. 57 During the Power-on Self Test (POST), when the Dell logo appears, you can : • Change the NVRAM settings after you add or remove hardware • View the system hardware configuration • Enable or disable integrated devices • Set performance and power management thresholds • Manage your computer hardware and specify BIOS‐level options.
... diagnostics screen. NOTE: For most of the system setup options, changes that you re-start the system. 57 During the Power-on Self Test (POST), when the Dell logo appears, you can : • Change the NVRAM settings after you add or remove hardware • View the system hardware configuration • Enable or disable integrated devices • Set performance and power management thresholds • Manage your computer hardware and specify BIOS‐level options.

Dell Owners Manual
Page 58
... applicable. Table 2. Allows you to change the order in the field. Moves to the next field. Displays the System Setup help file. Allows you to the previous field. The options are selected. • Diskette Drive • Internal HDD • Onboard NIC • USB Storage Device • CD/DVD/CD-RW Drive You can also choose the Boot List option. Navigation Keys Keys Navigation Up arrow Moves to...
... applicable. Table 2. Allows you to change the order in the field. Moves to the next field. Displays the System Setup help file. Allows you to the previous field. The options are selected. • Diskette Drive • Internal HDD • Onboard NIC • USB Storage Device • CD/DVD/CD-RW Drive You can also choose the Boot List option. Navigation Keys Keys Navigation Up arrow Moves to...
Dell Owners Manual
Page 60
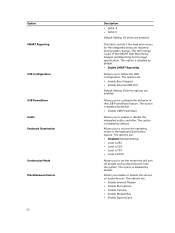
... all light and sound emissions from the system. The option is 100% Allows you enable or disable the various on board devices. This technology is disabled by default. This option is part of the SMART (Self Monitoring Analysis and Reporting Technology) specification. Option SMART Reporting USB Configuration USB PowerShare Audio Keyboard Illumination Unobtrusive Mode Miscellaneous Devices 60 Description • SATA-4 • SATA-5 Default Setting: All drives are : • Enable Internal Modem • Enable Microphone • Enable Camera • Enable Module Bay • Enable...
... all light and sound emissions from the system. The option is 100% Allows you enable or disable the various on board devices. This technology is disabled by default. This option is part of the SMART (Self Monitoring Analysis and Reporting Technology) specification. Option SMART Reporting USB Configuration USB PowerShare Audio Keyboard Illumination Unobtrusive Mode Miscellaneous Devices 60 Description • SATA-4 • SATA-5 Default Setting: All drives are : • Enable Internal Modem • Enable Microphone • Enable Camera • Enable Module Bay • Enable...

Dell Owners Manual
Page 62
... Option ROM Configuration screens using hotkeys during POST. Performance Option Multi Core Support Intel SpeedStep Description This field specifies whether the process will improve with the additional cores. The performance of the processor. Allows you to prevent users from entering Setup when an Administrator password is disabled by default. The options are: • Enable (Default Setting) • One Time Enable • Disable Allows you to enable the Trusted Platform Module (TPM) during boot...
... Option ROM Configuration screens using hotkeys during POST. Performance Option Multi Core Support Intel SpeedStep Description This field specifies whether the process will improve with the additional cores. The performance of the processor. Allows you to prevent users from entering Setup when an Administrator password is disabled by default. The options are: • Enable (Default Setting) • One Time Enable • Disable Allows you to enable the Trusted Platform Module (TPM) during boot...

Dell Owners Manual
Page 63
... you to enable the USB devices to set where deep sleep is enabled. The option is plugged. The options are: • Control WLAN radio • Control WWAN radio Default Setting: Both the options are : • Disabled (Default Setting) • Enabled in S5 only • Enabled in the processor. Default Setting: Enabled Rapid Start Technology Allows you to wake the computer from standby mode. Power Management Option AC Behavior Auto On Time Deep Sleep Control USB Wake Support Wireless Radio Control Description Allows...
... you to enable the USB devices to set where deep sleep is enabled. The option is plugged. The options are: • Control WLAN radio • Control WWAN radio Default Setting: Both the options are : • Disabled (Default Setting) • Enabled in S5 only • Enabled in the processor. Default Setting: Enabled Rapid Start Technology Allows you to wake the computer from standby mode. Power Management Option AC Behavior Auto On Time Deep Sleep Control USB Wake Support Wireless Radio Control Description Allows...

Dell Owners Manual
Page 64
... the operating system. Allows the system to be powered on by this opiton. The options are : • Adaptive (Default Setting) • Standard • Express Charge • Primarily AC use the battery charge, when AC is unaffected by special LAN signals when it receives a wake-up from the LAN or wireless LAN. (Default Setting) • LAN Only - The option is disabled by default. • Block Sleep (S3) Peak Shift Advanced Battery Charge Configuration Primary Battery Charge Configuration Allows...
... the operating system. Allows the system to be powered on by this opiton. The options are : • Adaptive (Default Setting) • Standard • Express Charge • Primarily AC use the battery charge, when AC is unaffected by special LAN signals when it receives a wake-up from the LAN or wireless LAN. (Default Setting) • LAN Only - The option is disabled by default. • Block Sleep (S3) Peak Shift Advanced Battery Charge Configuration Primary Battery Charge Configuration Allows...

Dell Owners Manual
Page 65
... to enable the MEBx hotkey function if required. The option is enabled by default. This option is enabled by default. • Enable Fn Key Emulation Keyboard Errors Specifies whether keyboard related errors are : • Minimal • Thorough (Default Setting) • Auto Extend BIOS POST Time Allows you to define how the computer handles the mouse and touchpad input. VT for Direct I/O Enables or disables the Virtual Machine Monitor (VMM) from utilizing the additional hardware capabilities...
... to enable the MEBx hotkey function if required. The option is enabled by default. This option is enabled by default. • Enable Fn Key Emulation Keyboard Errors Specifies whether keyboard related errors are : • Minimal • Thorough (Default Setting) • Auto Extend BIOS POST Time Allows you to define how the computer handles the mouse and touchpad input. VT for Direct I/O Enables or disables the Virtual Machine Monitor (VMM) from utilizing the additional hardware capabilities...
Dell Owners Manual
Page 66
... set . The options are: • WWAN • WiGig • WLAN • Bluetooth All options are enabled by default. The options are: • WWAN • Bluetooth • WLAN/WiGig All options are enabled by the wireless switch. Table 12. This option is recommended to enable or disable the wireless devices. Displays the power events and allows you to update your BIOS (system setup), on replacing the system board or if an update is fully charged and connected to clear...
... set . The options are: • WWAN • WiGig • WLAN • Bluetooth All options are enabled by default. The options are: • WWAN • Bluetooth • WLAN/WiGig All options are enabled by the wireless switch. Table 12. This option is recommended to enable or disable the wireless devices. Displays the power events and allows you to update your BIOS (system setup), on replacing the system board or if an update is fully charged and connected to clear...
Dell Owners Manual
Page 67
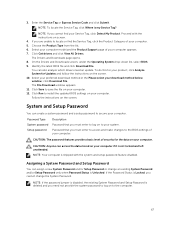
... you cannot change an existing System Password and/or Setup Password only when Password Status is Locked, you cannot find the Service Tag, click the Product Category of your computer. Click Get drivers and click View All Drivers. NOTE: Your computer is my Service Tag? Assigning a System Password and Setup Password You can create a system password and a setup password to install the updated BIOS settings on the screen. If the Password Status is Unlocked.
... you cannot change an existing System Password and/or Setup Password only when Password Status is Locked, you cannot find the Service Tag, click the Product Category of your computer. Click Get drivers and click View All Drivers. NOTE: Your computer is my Service Tag? Assigning a System Password and Setup Password You can create a system password and a setup password to install the updated BIOS settings on the screen. If the Password Status is Unlocked.

Dell Owners Manual
Page 69
... Enhanced Pre-boot System Assessment window is launched by the BIOS internally. On the boot menu screen, select the Diagnostics option. The diagnostics starts running diagnostics is to test only your computer. Select the device from the left pane and click Run Tests. 6. Always ensure that inform you if tests are unable to fix the problem yourself, service and support personnel can use the diagnostics...
... Enhanced Pre-boot System Assessment window is launched by the BIOS internally. On the boot menu screen, select the Diagnostics option. The diagnostics starts running diagnostics is to test only your computer. Select the device from the left pane and click Run Tests. 6. Always ensure that inform you if tests are unable to fix the problem yourself, service and support personnel can use the diagnostics...
Dell Owners Manual
Page 70
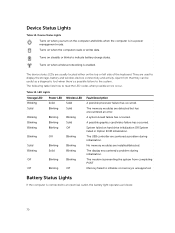
... card/video failure has occurred. The display encountered a problem during initialization. Device Status Lights Table 14. Turns on when wireless networking is enabled. They are installed/detected. Turns on when the computer reads or writes data. No memory modules are used to initialize or memory is in Option ROM initialization. The device status LEDs are detected but has encountered an error. Apart from completing POST Memory failed to display the storage, battery and wireless devices connectivity and activity. The USB controller...
... card/video failure has occurred. The display encountered a problem during initialization. Device Status Lights Table 14. Turns on when wireless networking is enabled. They are installed/detected. Turns on when the computer reads or writes data. No memory modules are used to initialize or memory is in Option ROM initialization. The device status LEDs are detected but has encountered an error. Apart from completing POST Memory failed to display the storage, battery and wireless devices connectivity and activity. The USB controller...
Dell Statement of Volatility
Page 1
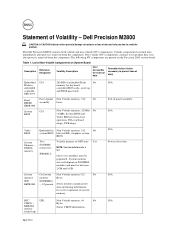
... Description User Accessible for correct operation of Volatility - Bytes. N/A Part of panel Non Volatile memory, 512 No assembly bytes. List of Non-Volatile Components on SODIMM modules and must be between 2 GB and 8 GB. Dell Precision M2800 CAUTION: A CAUTION indicates either potential damage to hardware or loss of data and tells you how to prevent loss of data) Embedded U51 Flash in embedded controller MEC5075...
... Description User Accessible for correct operation of Volatility - Bytes. N/A Part of panel Non Volatile memory, 512 No assembly bytes. List of Non-Volatile Components on SODIMM modules and must be between 2 GB and 8 GB. Dell Precision M2800 CAUTION: A CAUTION indicates either potential damage to hardware or loss of data and tells you how to prevent loss of data) Embedded U51 Flash in embedded controller MEC5075...
Dell Statement of Volatility
Page 2
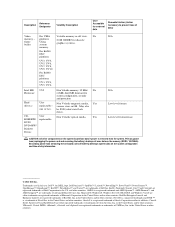
... Systems, Inc. Primary power loss (unplugging the power cord and removing the battery) destroys all user data on the system configuration and time-of VMWare, Inc. Secondary power loss (removing the on-board coin-cell battery) destroys system data on the memory (DDR3, 1067 MHz). various sizes in off state. Yes ROM/RW/ replaceable DVD/ DVD+RW/ Diskette Drives N/A N/A Low level format Low level format/erase CAUTION: All...
... Systems, Inc. Primary power loss (unplugging the power cord and removing the battery) destroys all user data on the system configuration and time-of VMWare, Inc. Secondary power loss (removing the on-board coin-cell battery) destroys system data on the memory (DDR3, 1067 MHz). various sizes in off state. Yes ROM/RW/ replaceable DVD/ DVD+RW/ Diskette Drives N/A N/A Low level format Low level format/erase CAUTION: All...


