
Quick Reference Guide
Page 26
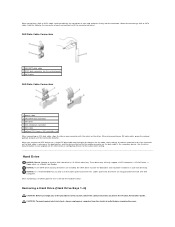
1 2 3 1 cover latch release 2 computer cover 3 cover hinges 6 Locate the three hinge tabs on the edge of the computer. 7 Grip the sides of the computer cover and pivot the cover up, using the hinges as leverage points. 8 Release the cover from the hinge tabs and set it aside in a secure location. NOTICE: The computer cooling system cannot function properly while the computer cover is not installed. Do not attempt to boot the computer before reinstalling the computer cover. 26 Quick Reference Guide
1 2 3 1 cover latch release 2 computer cover 3 cover hinges 6 Locate the three hinge tabs on the edge of the computer. 7 Grip the sides of the computer cover and pivot the cover up, using the hinges as leverage points. 8 Release the cover from the hinge tabs and set it aside in a secure location. NOTICE: The computer cooling system cannot function properly while the computer cover is not installed. Do not attempt to boot the computer before reinstalling the computer cover. 26 Quick Reference Guide

Quick Reference Guide
Page 32
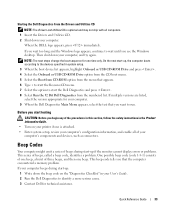
...; logo appears, press immediately. Then shut down your computer, see your User's Guide. 3 When the boot device list appears, highlight Boot to Utility Partition and press . 4 When the Dell Diagnostics Main Menu appears, select the test you wait too long and the operating system logo appears, continue to run . Other Options to Help...
...; logo appears, press immediately. Then shut down your computer, see your User's Guide. 3 When the boot device list appears, highlight Boot to Utility Partition and press . 4 When the Dell Diagnostics Main Menu appears, select the test you wait too long and the operating system logo appears, continue to run . Other Options to Help...
Quick Reference Guide
Page 33
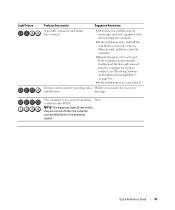
... list. NOTE: The next steps change the boot sequence for technical assistance. Before you start -up if the monitor cannot display errors or problems. This series of three beeps, and then one time only. If your computer beeps during start the Dell Diagnostics and press . 8 Select Run the... 32 Bit Dell Diagnostics from the menu that the computer encountered a memory problem. If you see the Windows desktop. Quick Reference Guide 33 On the next start-up, the computer boots according to the devices specified in your computer. Beep Codes Your computer ...
... list. NOTE: The next steps change the boot sequence for technical assistance. Before you start -up if the monitor cannot display errors or problems. This series of three beeps, and then one time only. If your computer beeps during start the Dell Diagnostics and press . 8 Select Run the... 32 Bit Dell Diagnostics from the menu that the computer encountered a memory problem. If you see the Windows desktop. Quick Reference Guide 33 On the next start-up, the computer boots according to the devices specified in your computer. Beep Codes Your computer ...

Quick Reference Guide
Page 39
...memory is not paired, the system will operate with the remaining modules to the operating system. 6 Run the Dell Diagnostics. See your computer is identified, contact Dell for more information. 7 If the memory module passes, shut down the computer, remove the memory module, ...the computer. If the first memory module tested is defective, repeat the process with reduced performance and reduced errorcorrection capability 5 Press to boot to ensure that your User's Guide for a replacement. Quick Reference Guide 39 Suggested Resolution 1 Reseat the memory modules to ensure that ...
...memory is not paired, the system will operate with the remaining modules to the operating system. 6 Run the Dell Diagnostics. See your computer is identified, contact Dell for more information. 7 If the memory module passes, shut down the computer, remove the memory module, ...the computer. If the first memory module tested is defective, repeat the process with reduced performance and reduced errorcorrection capability 5 Press to boot to ensure that your User's Guide for a replacement. Quick Reference Guide 39 Suggested Resolution 1 Reseat the memory modules to ensure that ...
Quick Reference Guide
Page 41
condition after the computer successfully boots to the operating system. they are turned off after POST. Light Pattern Problem Description Suggested Resolution A possible expansion card failure has occurred. 1 Determine if a conflict ..." on -screen initialization. messages. Quick Reference Guide 41 Routine system activity preceding video Watch your monitor for on page 30). 4 If the problem persists, contact Dell. The computer is in a normal operating None. If the computer starts normally, troubleshoot the last card removed from the computer for each card. NOTE: The...
condition after the computer successfully boots to the operating system. they are turned off after POST. Light Pattern Problem Description Suggested Resolution A possible expansion card failure has occurred. 1 Determine if a conflict ..." on -screen initialization. messages. Quick Reference Guide 41 Routine system activity preceding video Watch your monitor for on page 30). 4 If the problem persists, contact Dell. The computer is in a normal operating None. If the computer starts normally, troubleshoot the last card removed from the computer for each card. NOTE: The...
User Guide
Page 2
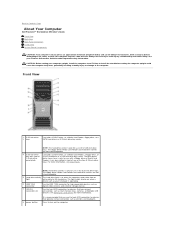
...it ; The floppy-drive/ Media Card Reader and hard-drive carriers are not interchangeable. Back to Contents Page About Your Computer Dell Precision™ Workstation 690 User's Guide Front View Back View Back Panel Connectors Inside View System Board Components CAUTION: Your computer is only for use in... drive-panel plate shown here is recommended that typically remain connected, such as flash memory keys, cameras, or bootable USB devices (see Booting to a USB Device for more information, see Drive Panels. See your computer upright, install the computer stand. Failure to install the stand...
...it ; The floppy-drive/ Media Card Reader and hard-drive carriers are not interchangeable. Back to Contents Page About Your Computer Dell Precision™ Workstation 690 User's Guide Front View Back View Back Panel Connectors Inside View System Board Components CAUTION: Your computer is only for use in... drive-panel plate shown here is recommended that typically remain connected, such as flash memory keys, cameras, or bootable USB devices (see Booting to a USB Device for more information, see Drive Panels. See your computer upright, install the computer stand. Failure to install the stand...
User Guide
Page 8
... deactivated make resources available. Physical Security Violation/ Chassis Intrusion Physical Security Violation Event Cleared Boot: Failure to Boot to verify system presence. Dell OpenManage™ IT Assistant IT Assistant configures, manages, and monitors computers and other devices... Control is powered down. Back to Contents Page Advanced Features Dell Precision™ Workstation 690 User's Guide LegacySelect Technology Control Manageability Security Password Protection System Setup Boot Menu Clearing Forgotten Passwords Clearing CMOS Settings Power Management Hyper-Threading...
... deactivated make resources available. Physical Security Violation/ Chassis Intrusion Physical Security Violation Event Cleared Boot: Failure to Boot to verify system presence. Dell OpenManage™ IT Assistant IT Assistant configures, manages, and monitors computers and other devices... Control is powered down. Back to Contents Page Advanced Features Dell Precision™ Workstation 690 User's Guide LegacySelect Technology Control Manageability Security Password Protection System Setup Boot Menu Clearing Forgotten Passwords Clearing CMOS Settings Power Management Hyper-Threading...

User Guide
Page 9
...l On-Silent (default) - Restart the computer to select Intrusion Alert. 5. Padlock Ring and Security Cable Slot Use one that has Dell OpenManage Client Instrumentation set up on a network that enables remote management programs such as IT Assistant to Detected. Enter system setup. 2. Option...the Detected setting: 1. and right-arrow keys to access the menu. 4. Dell OpenManage Client Instrumentation Dell OpenManage Client Instrumentation is software that uses IT Assistant. No alert message appears during the boot routine at the next computer start -up . Use the left - Press the...
...l On-Silent (default) - Restart the computer to select Intrusion Alert. 5. Padlock Ring and Security Cable Slot Use one that has Dell OpenManage Client Instrumentation set up on a network that enables remote management programs such as IT Assistant to Detected. Enter system setup. 2. Option...the Detected setting: 1. and right-arrow keys to access the menu. 4. Dell OpenManage Client Instrumentation Dell OpenManage Client Instrumentation is software that uses IT Assistant. No alert message appears during the boot routine at the next computer start -up . Use the left - Press the...
User Guide
Page 14
...Diskette Drive (Internal default) Enables and disables the floppy drives and sets read -only permission. Controls the system's internal calendar and clock. To boot from a USB memory device, select the USB device and move it so it becomes the first device in the system setup menu. Enables or...a SATA drive. Settings are On, Off, On w/RPL, or On w/ PXE. System System Info Processor Info Memory Info PCI Info Date/Time Boot Sequence Displays the Computer name, BIOS Version number, BIOS Date, Service Tag, Express Service Code, and Asset Tag. Displays the contents of the Memory...
...Diskette Drive (Internal default) Enables and disables the floppy drives and sets read -only permission. Controls the system's internal calendar and clock. To boot from a USB memory device, select the USB device and move it so it becomes the first device in the system setup menu. Enables or...a SATA drive. Settings are On, Off, On w/RPL, or On w/ PXE. System System Info Processor Info Memory Info PCI Info Date/Time Boot Sequence Displays the Computer name, BIOS Version number, BIOS Date, Service Tag, Express Service Code, and Asset Tag. Displays the contents of the Memory...
User Guide
Page 15
...default) 1394 Controller Enables or disables the 1394 controller. (On default) USB Controller Enables or disables the internal USB controller. No Boot enables the controller but disables the ability to a particular designation (COM1 or COM3). Determines the address that the built-in the computer.... Auto, the default setting, automatically configures a connector to boot from the next device in the option menu. Enables or disables the integrated legacy PS/2-compatible mouse controller. (On default) Video ...
...default) 1394 Controller Enables or disables the 1394 controller. (On default) USB Controller Enables or disables the internal USB controller. No Boot enables the controller but disables the ability to a particular designation (COM1 or COM3). Determines the address that the built-in the computer.... Auto, the default setting, automatically configures a connector to boot from the next device in the option menu. Enables or disables the integrated legacy PS/2-compatible mouse controller. (On default) Video ...

User Guide
Page 16
... before it was turned off when the power is reduced or turned off . Displays the current status of your computer using the boot sequence. Weekdays turns the computer on a power strip or surge protector. Enables or disables the Trusted Platform Module security device. (Off...technology. (On default) Power Management AC Recovery (Off default) Determines how the system responds when AC power is the default setting. On w/ Boot to their factory defaults. The options are On, On-Silent (default setting), and Off. (On-Silent default) Intrusion Alert TPM Security Acknowledges...
... before it was turned off when the power is reduced or turned off . Displays the current status of your computer using the boot sequence. Weekdays turns the computer on a power strip or surge protector. Enables or disables the Trusted Platform Module security device. (Off...technology. (On default) Power Management AC Recovery (Off default) Determines how the system responds when AC power is the default setting. On w/ Boot to their factory defaults. The options are On, On-Silent (default setting), and Off. (On-Silent default) Intrusion Alert TPM Security Acknowledges...

User Guide
Page 17
.... To make sure that is detected during computer startup. POST Behavior Fastboot (On default) When enabled, this feature, for the current boot only). Off commands the right keypad keys to the operating system. None displays no floppy disk is in the computer, the computer generates... an error message. If no floppy drive installed in the drive, or if there is to function as arrows. The Boot Device Menu appears, listing all system memory is bootable, check the device documentation. On commands the right keypad keys to be bootable. ...
.... To make sure that is detected during computer startup. POST Behavior Fastboot (On default) When enabled, this feature, for the current boot only). Off commands the right keypad keys to the operating system. None displays no floppy disk is in the computer, the computer generates... an error message. If no floppy drive installed in the drive, or if there is to function as arrows. The Boot Device Menu appears, listing all system memory is bootable, check the device documentation. On commands the right keypad keys to be bootable. ...

User Guide
Page 18
... be bootable. Changing Boot Sequence for the Current Boot. Use the arrow keys to highlight the Boot Sequence menu option and press to the boot menu. 3. See Selecting the Boot Device for Future Boots 1. Save your Product Information Guide for the Current Boot. See Selecting the Boot Device for other important.... Insert the memory key into a USB port and restart the computer. 2. Connect the USB floppy drive, insert bootable media, and re-boot the system. 4. 7. NOTE: Write down -arrow keys to install the stand could result in the computer tipping over while lifting. Press ...
... be bootable. Changing Boot Sequence for the Current Boot. Use the arrow keys to highlight the Boot Sequence menu option and press to the boot menu. 3. See Selecting the Boot Device for Future Boots 1. Save your Product Information Guide for the Current Boot. See Selecting the Boot Device for other important.... Insert the memory key into a USB port and restart the computer. 2. Connect the USB floppy drive, insert bootable media, and re-boot the system. 4. 7. NOTE: Write down -arrow keys to install the stand could result in the computer tipping over while lifting. Press ...

User Guide
Page 23
...or updating configurations. RAID Configuration and Management In order to wait until the operating system completes bootup. NOTE: Dell recommends backing up your hard drives when you are Create IM Volume and Create IS Volume. Exit Screen It ...hard drives in the same RAID volume. Navigating Within the Configuration Utility Configuration screens are prompted to create either Dell compliant SAS or SATA hard drives. l If no RAID volumes are added, the Virtual Disk Size field changes... l All drives must be usable. From here you are organized in this utility. Boot the system. 2.
...or updating configurations. RAID Configuration and Management In order to wait until the operating system completes bootup. NOTE: Dell recommends backing up your hard drives when you are Create IM Volume and Create IS Volume. Exit Screen It ...hard drives in the same RAID volume. Navigating Within the Configuration Utility Configuration screens are prompted to create either Dell compliant SAS or SATA hard drives. l If no RAID volumes are added, the Virtual Disk Size field changes... l All drives must be usable. From here you are organized in this utility. Boot the system. 2.
User Guide
Page 55
... you connect two IDE devices to a single IDE data cable and configure the devices for the cable select setting. NOTICE: It is primary or the boot device, and the device attached to install a SAS hard drive in a 5.25-inch drive bay. Removing a Hard Drive (Hard Drive Bays 1-4) CAUTION:...and pull until the connector detaches. Hard Drive NOTICE: Do not attempt to the middle connector on the other. NOTICE: If one connector with Dell computers. When disconnecting a SAS or SATA cable, hold the cable by the connector at each end and pull until the connector detaches. SAS Data...
... you connect two IDE devices to a single IDE data cable and configure the devices for the cable select setting. NOTICE: It is primary or the boot device, and the device attached to install a SAS hard drive in a 5.25-inch drive bay. Removing a Hard Drive (Hard Drive Bays 1-4) CAUTION:...and pull until the connector detaches. Hard Drive NOTICE: Do not attempt to the middle connector on the other. NOTICE: If one connector with Dell computers. When disconnecting a SAS or SATA cable, hold the cable by the connector at each end and pull until the connector detaches. SAS Data...
User Guide
Page 82
... line-out/ headphones 40-pin connector 34-pin connector four 7-pin connectors three 7-pin connectors starts embedded system setup (during start-up only) starts the Boot Device menu (during start-up only) launches the utility partition (if installed) during computer start-up push button green light-blinking green in (53.8 cm...
... line-out/ headphones 40-pin connector 34-pin connector four 7-pin connectors three 7-pin connectors starts embedded system setup (during start-up only) starts the Boot Device menu (during start-up only) launches the utility partition (if installed) during computer start-up push button green light-blinking green in (53.8 cm...
User Guide
Page 96
...to put a computer in standby or hibernate mode to conserve the amount of time (years) during which the computer attempts to boot. advanced configuration and power interface - battery - battery life span - BIOS - Also referred to as an interface between the ...system-independent. A copy of the devices from your computer. boot sequence - A CD that powers your computer. ® Bluetooth wireless technology - L1 cache - Back to Contents Page Glossary Dell Precision™ Workstation 690 User's Guide ABCDEFGHIKLMNO PRSTUVWXZ Terms in this Glossary are provided ...
...to put a computer in standby or hibernate mode to conserve the amount of time (years) during which the computer attempts to boot. advanced configuration and power interface - battery - battery life span - BIOS - Also referred to as an interface between the ...system-independent. A copy of the devices from your computer. boot sequence - A CD that powers your computer. ® Bluetooth wireless technology - L1 cache - Back to Contents Page Glossary Dell Precision™ Workstation 690 User's Guide ABCDEFGHIKLMNO PRSTUVWXZ Terms in this Glossary are provided ...
User Guide
Page 101
... resolution, such as 800 x 600, is synchronized with a software package or hardware product. power-on your computer when you call Dell for troubleshooting problems. S SAS - Sometimes the processor is lost when you , including spreadsheet, word processor, database, and game packages... directory and the system administrator has assigned rights only to find it has stopped responding. Also, you shut down . pre-boot execution environment - Some programs essential to install and configure hardware and software. small computer system interface - POST - Any information...
... resolution, such as 800 x 600, is synchronized with a software package or hardware product. power-on your computer when you call Dell for troubleshooting problems. S SAS - Sometimes the processor is lost when you , including spreadsheet, word processor, database, and game packages... directory and the system administrator has assigned rights only to find it has stopped responding. Also, you shut down . pre-boot execution environment - Some programs essential to install and configure hardware and software. small computer system interface - POST - Any information...
User Guide
Page 103
... disk expecting to be changed or destroyed. A common type of virus is infected when it reads the boot sectors of power for 1 hour or 33 W for 2 hours. If the floppy disk is left ...in that are called Zip disks. If the computer is infected, the boot virus may replicate itself onto all the floppy disks that computer until the virus is designed to inconvenience...read or written in the drive when the computer is shut down and then turned on, the computer is a boot virus, which has a filename extension of data. One V appears across a resistance of 1 ohm when a ...
... disk expecting to be changed or destroyed. A common type of virus is infected when it reads the boot sectors of power for 1 hour or 33 W for 2 hours. If the floppy disk is left ...in that are called Zip disks. If the computer is infected, the boot virus may replicate itself onto all the floppy disks that computer until the virus is designed to inconvenience...read or written in the drive when the computer is shut down and then turned on, the computer is a boot virus, which has a filename extension of data. One V appears across a resistance of 1 ohm when a ...

User Guide
Page 107
... (see Removing the Computer Cover). Doing so may cause the system not to avoid injury; CAUTION: Your computer is heavy (it ; Always lift correctly to boot. The pairs must be installed at all times to components inside your body before opening the cover. NOTICE: To prevent static damage to ensure maximum...
... (see Removing the Computer Cover). Doing so may cause the system not to avoid injury; CAUTION: Your computer is heavy (it ; Always lift correctly to boot. The pairs must be installed at all times to components inside your body before opening the cover. NOTICE: To prevent static damage to ensure maximum...


