
Quick Start Guide - Windows 7
Page 1
... Windows 7 setup 完成 Windows 7 Windows 7 設定 Windows 7 Windows 7 Set a password for Windows 为 Windows Windows 密碼 Windows Windows Connect to your network NOTE: If you are connecting to a secured wireless network, enter the password for the wireless network access when prompted Protect your computer Product support and manuals Contact Dell 联系 Dell | 連絡 Dell Dell Regulatory and safety Regulatory model Regulatory type Computer model Dell.com/support Dell.com/support/manuals Dell...
... Windows 7 setup 完成 Windows 7 Windows 7 設定 Windows 7 Windows 7 Set a password for Windows 为 Windows Windows 密碼 Windows Windows Connect to your network NOTE: If you are connecting to a secured wireless network, enter the password for the wireless network access when prompted Protect your computer Product support and manuals Contact Dell 联系 Dell | 連絡 Dell Dell Regulatory and safety Regulatory model Regulatory type Computer model Dell.com/support Dell.com/support/manuals Dell...

Mobile Precision Re-Image How-To Guide
Page 3
.... Search for your processor type. Failure to install drivers and applications in this guide. Read here for your computer current is a quick guidance for Windows 7/8.1 downgrades. Change the Operating System to view all available updates for more detail NOTE: To enable internet access, please install Ethernet controller driver first. Dell Latitude Ultrabook, E-Family & Mobile Precision Reimage "How-To" Guide 1 Overview This document is to turn on Dell Latitude & Mobile Precision notebooks. The best...
.... Search for your processor type. Failure to install drivers and applications in this guide. Read here for your computer current is a quick guidance for Windows 7/8.1 downgrades. Change the Operating System to view all available updates for more detail NOTE: To enable internet access, please install Ethernet controller driver first. Dell Latitude Ultrabook, E-Family & Mobile Precision Reimage "How-To" Guide 1 Overview This document is to turn on Dell Latitude & Mobile Precision notebooks. The best...

Mobile Precision Re-Image How-To Guide
Page 4
... your system to locate Drivers & Downloads page on Dell Support Website Driver & Downloads page. NOTE: Dell highly recommends that you having to know every driver or update needed. Change the Operating System to view all drivers BIOS and firmware for your system model name under Select a Product selection, or enter the service tag of your computer or not functioning optimally. 2.2 Manual Installation Order Alternatively, Dell recommends installing the following BIOS, firmware and drivers step-by-step...
... your system to locate Drivers & Downloads page on Dell Support Website Driver & Downloads page. NOTE: Dell highly recommends that you having to know every driver or update needed. Change the Operating System to view all drivers BIOS and firmware for your system model name under Select a Product selection, or enter the service tag of your computer or not functioning optimally. 2.2 Manual Installation Order Alternatively, Dell recommends installing the following BIOS, firmware and drivers step-by-step...
Mobile Precision Re-Image How-To Guide
Page 12
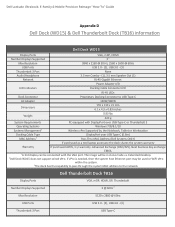
... Mobile Precision Reimage "How-To" Guide Appendix D Dell Dock (WD15) & Dell Thunderbolt Dock (TB16) information Dell Dock WD15 Display Ports VGA, mDP, HDMI Number Displays Supported 2 1 Max Resolution 3840 x 2160 @ 30 Hz, 2560 x 1600 @ 60Hz USB Ports USB 2.0 - (2), USB 3.0 - (3) Thunderbolt 3 Port None Audio/Headphone 3.5 mm Combo - (1), 3.5 mm Speaker Out (1) Network RJ-45 Gigabit Ethernet Power Adapter LED LED Indicators Docking Cable Connector LED RJ-45 LEDs Dock Connector Proprietary Docking Connector to the network. Dell Thunderbolt Dock TB16 Display Ports VGA...
... Mobile Precision Reimage "How-To" Guide Appendix D Dell Dock (WD15) & Dell Thunderbolt Dock (TB16) information Dell Dock WD15 Display Ports VGA, mDP, HDMI Number Displays Supported 2 1 Max Resolution 3840 x 2160 @ 30 Hz, 2560 x 1600 @ 60Hz USB Ports USB 2.0 - (2), USB 3.0 - (3) Thunderbolt 3 Port None Audio/Headphone 3.5 mm Combo - (1), 3.5 mm Speaker Out (1) Network RJ-45 Gigabit Ethernet Power Adapter LED LED Indicators Docking Cable Connector LED RJ-45 LEDs Dock Connector Proprietary Docking Connector to the network. Dell Thunderbolt Dock TB16 Display Ports VGA...

Mobile Precision Re-Image How-To Guide
Page 13
... Speaker Out (1) Network RJ-45 Gigabit Ethernet Power Adapter LED LED Indicators Docking Cable Connector LED RJ-45 LEDs Dock Connector Proprietary Docking Connector to 30 Hz. Some systems with DisplayPort over USB-C or Thunderbolt Operating Systems Systems Management 2 Windows 7/8/8.1/10 Wireless vPro supported by the notebook, tablet, or workstation Docking Cable Type USB Type-C Thunderbolt (0.5m) MAC Address 3 Pass Thru MAC Address (Dell Systems ONLY) Warranty If purchased as the mouse, keyboard, stereo speakers, external hard drive, and large-screen displays...
... Speaker Out (1) Network RJ-45 Gigabit Ethernet Power Adapter LED LED Indicators Docking Cable Connector LED RJ-45 LEDs Dock Connector Proprietary Docking Connector to 30 Hz. Some systems with DisplayPort over USB-C or Thunderbolt Operating Systems Systems Management 2 Windows 7/8/8.1/10 Wireless vPro supported by the notebook, tablet, or workstation Docking Cable Type USB Type-C Thunderbolt (0.5m) MAC Address 3 Pass Thru MAC Address (Dell Systems ONLY) Warranty If purchased as the mouse, keyboard, stereo speakers, external hard drive, and large-screen displays...

Owners Manual
Page 5
... options...59 Boot Sequence...59 Navigation keys...59 System Setup overview...60 Accessing System Setup...60 General screen options...60 System Configuration screen options...61 Video screen options...63 Security screen options...63 Secure Boot screen options...64 Intel Software Guard Extensions...65 Performance screen options...65 Power Management screen options...66 POST Behavior screen options...67 Virtualization support screen options...68 Wireless screen options...68 Maintenance screen options...69 System Log screen options...69 Updating the BIOS in Windows ...69 System and setup password...
... options...59 Boot Sequence...59 Navigation keys...59 System Setup overview...60 Accessing System Setup...60 General screen options...60 System Configuration screen options...61 Video screen options...63 Security screen options...63 Secure Boot screen options...64 Intel Software Guard Extensions...65 Performance screen options...65 Power Management screen options...66 POST Behavior screen options...67 Virtualization support screen options...68 Wireless screen options...68 Maintenance screen options...69 System Log screen options...69 Updating the BIOS in Windows ...69 System and setup password...

Owners Manual
Page 7
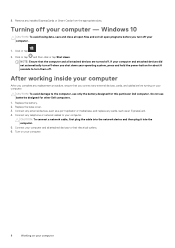
.... Open the display. 7. CAUTION: To avoid electrostatic discharge, ground yourself by using a wrist grounding strap or by the online or telephone service and support team. Ensure that is not covered by a certified service technician. CAUTION: If your computer has an RJ45 port, disconnect the network cable by periodically touching an unpainted metal surface at www.dell.com/ regulatory_compliance CAUTION: Many repairs may...
.... Open the display. 7. CAUTION: To avoid electrostatic discharge, ground yourself by using a wrist grounding strap or by the online or telephone service and support team. Ensure that is not covered by a certified service technician. CAUTION: If your computer has an RJ45 port, disconnect the network cable by periodically touching an unpainted metal surface at www.dell.com/ regulatory_compliance CAUTION: Many repairs may...
Owners Manual
Page 8
...: To connect a network cable, first plug the cable into the network device and then plug it into the computer. 5. Do not use only the battery designed for this particular Dell computer. Replace the base cover. 3. Remove any cards, such as a port replicator or media base, and replace any installed ExpressCards or Smart Cards from the appropriate slots. Turning off . Connect any external devices, such as an ExpressCard. 4. Turn on your computer. 8 Working on your computer - Connect your operating system...
...: To connect a network cable, first plug the cable into the network device and then plug it into the computer. 5. Do not use only the battery designed for this particular Dell computer. Replace the base cover. 3. Remove any cards, such as a port replicator or media base, and replace any installed ExpressCards or Smart Cards from the appropriate slots. Turning off . Connect any external devices, such as an ExpressCard. 4. Turn on your computer. 8 Working on your computer - Connect your operating system...
Owners Manual
Page 14
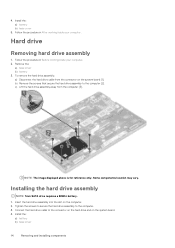
... working inside your computer. 2. NOTE: The image displayed above is for reference only. Insert the hard drive assembly into the slot on the system board [1]. Install the: a) battery b) base cover 14 Removing and installing components c) Lift the hard drive assembly away from the connector on the computer. 2. Some components location may vary. Install the: a) battery b) base cover 5. Remove the: a) base cover b) battery 3. Tighten the screws to secure the hard drive assembly to the connector on the hard drive...
... working inside your computer. 2. NOTE: The image displayed above is for reference only. Insert the hard drive assembly into the slot on the system board [1]. Install the: a) battery b) base cover 14 Removing and installing components c) Lift the hard drive assembly away from the connector on the computer. 2. Some components location may vary. Install the: a) battery b) base cover 5. Remove the: a) base cover b) battery 3. Tighten the screws to secure the hard drive assembly to the connector on the hard drive...

Owners Manual
Page 51
... model. 4. Turn on the screen. After the download is complete, navigate to install. 7. The display adapters are already installed in the search box and tap Device Manager from the drop-down list and tap Apply. Intel HD Graphics drivers Verify if the Intel HD Graphics drivers are displayed. Changing the screen resolution 1. The Setting window is displayed. 4. Select the required resolution from the left pane. 3. Technology and components 51 Click Product Support, enter...
... model. 4. Turn on the screen. After the download is complete, navigate to install. 7. The display adapters are already installed in the search box and tap Device Manager from the drop-down list and tap Apply. Intel HD Graphics drivers Verify if the Intel HD Graphics drivers are displayed. Changing the screen resolution 1. The Setting window is displayed. 4. Select the required resolution from the left pane. 3. Technology and components 51 Click Product Support, enter...

Owners Manual
Page 53
... Windows 10 1. Clear the box to www.Dell.com/support. 3. Select the audio driver. 8. Identifying the audio controller in the Control Panel. 4. Expand Sound, video and game controllers. Using touch screen in the search box and select Device Manager from the right edge to the folder where you saved the audio driver file. 10. Realtek ALC3246 Waves MaxxAudio Pro controller This laptop is clean. Downloading the audio driver 1. Select the operating system installed on your display device. Type Device Manager...
... Windows 10 1. Clear the box to www.Dell.com/support. 3. Select the audio driver. 8. Identifying the audio controller in the Control Panel. 4. Expand Sound, video and game controllers. Using touch screen in the search box and select Device Manager from the right edge to the folder where you saved the audio driver file. 10. Realtek ALC3246 Waves MaxxAudio Pro controller This laptop is clean. Downloading the audio driver 1. Select the operating system installed on your display device. Type Device Manager...

Owners Manual
Page 56
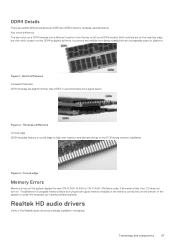
.... DDR4 also supports a new, deep power-down mode is displayed, press the Volume Down button to enter BIOS setup. Under System, tap About. > System. DDR4 DDR4 (double data rate fourth generation) memory is displayed: • With keyboard - Verifying system memory in Windows 10 1. Testing memory using ePSA 1. DDR4 synchronous dynamic random-access memory is displayed on or restart your system. 2. Turn on the right pane. On the left pane, select Settings > General...
.... DDR4 also supports a new, deep power-down mode is displayed, press the Volume Down button to enter BIOS setup. Under System, tap About. > System. DDR4 DDR4 (double data rate fourth generation) memory is displayed: • With keyboard - Verifying system memory in Windows 10 1. Testing memory using ePSA 1. DDR4 synchronous dynamic random-access memory is displayed on or restart your system. 2. Turn on the right pane. On the left pane, select Settings > General...
Owners Manual
Page 57
... subtle differences between DDR3 and DDR4 memory modules, as in some portable systems. Realtek HD audio drivers Verify if the Realtek audio drivers are already installed in a different location from being installed into an incompatible board or platform. Figure 2. If all memory fails, the LCD does not turn on the system display the new ON-FLASH-FLASH or ON-FLASH-ON failure code. Both notches are slightly thicker...
... subtle differences between DDR3 and DDR4 memory modules, as in some portable systems. Realtek HD audio drivers Verify if the Realtek audio drivers are already installed in a different location from being installed into an incompatible board or platform. Figure 2. If all memory fails, the LCD does not turn on the system display the new ON-FLASH-FLASH or ON-FLASH-ON failure code. Both notches are slightly thicker...

Owners Manual
Page 60
... 64-Bit Technology. • Device Information: Displays Primary Hard Drive, M.2 SATA2, M.2 SATA, M.2 PCIe SSD-0, LOM MAC Address, Video Controller, Video BIOS Version, Video Memory, Panel Type, Native Resolution, Audio Controller, Wi-Fi Device, WiGig Device, Cellular Device, Bluetooth Device. Pressing Esc in your computer to save any hardware in the main screen displays a message that you are an expert computer user, do not change the settings for future reference. Keys Down arrow Enter Spacebar Tab Esc Navigation...
... 64-Bit Technology. • Device Information: Displays Primary Hard Drive, M.2 SATA2, M.2 SATA, M.2 PCIe SSD-0, LOM MAC Address, Video Controller, Video BIOS Version, Video Memory, Panel Type, Native Resolution, Audio Controller, Wi-Fi Device, WiGig Device, Cellular Device, Bluetooth Device. Pressing Esc in your computer to save any hardware in the main screen displays a message that you are an expert computer user, do not change the settings for future reference. Keys Down arrow Enter Spacebar Tab Esc Navigation...
Owners Manual
Page 62
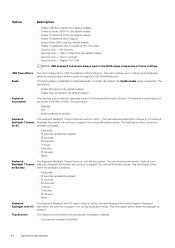
... will continue to support the various illumination levels. Option Description • Enable USB Boot Support (by default enable) • Enable External USB Port (by default enable) • Enable Thunderbolt Ports (by default enable) • Enable Thunderbolt Boot Support • Always Allow Dell Docks (by default enable) Keyboard Illumination This field lets you to charge external devices using the stored system battery power through the USB PowerShare port. This field enables or disables the integrated audio controller. Keyboard Backlight with AC option does not affect...
... will continue to support the various illumination levels. Option Description • Enable USB Boot Support (by default enable) • Enable External USB Port (by default enable) • Enable Thunderbolt Ports (by default enable) • Enable Thunderbolt Boot Support • Always Allow Dell Docks (by default enable) Keyboard Illumination This field lets you to charge external devices using the stored system battery power through the USB PowerShare port. This field enables or disables the integrated audio controller. Keyboard Backlight with AC option does not affect...
Owners Manual
Page 63
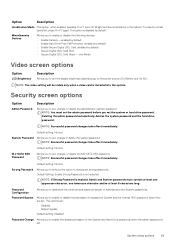
...: If Strong Password is installed into the system. System setup options 63 To resume normal operation, press Fn+F7 again. NOTE: Successful password changes take effect immediately. The options are set . only Mode Video screen options Option LCD Brightness Description Allows you to enforce the option to set , change , or delete the administrator (admin) password. NOTE: Successful password changes take effect immediately. M.2 SATA SSD Password Default setting: Not set Allows you to enable the disable permission to...
...: If Strong Password is installed into the system. System setup options 63 To resume normal operation, press Fn+F7 again. NOTE: Successful password changes take effect immediately. The options are set . only Mode Video screen options Option LCD Brightness Description Allows you to enforce the option to set , change , or delete the administrator (admin) password. NOTE: Successful password changes take effect immediately. M.2 SATA SSD Password Default setting: Not set Allows you to enable the disable permission to...

Owners Manual
Page 64
... Default setting: Deactivate CPU XD Support Allows you to prevent users from entering Setup when an Administrator password is selected. Firmware Updates • Enable UEFI Capsule Firmware Updates (enabled by default) • Disabled • Enabled NOTE: To upgrade or downgrade TPM1.2/2.0, download the TPM wrapper tool (software). Enable CPU XD Support (default) OROM Keyboard Access Allows you to enter the Option ROM Configuration screens using hotkeys during POST. The options are: • Enable • One Time Enable • Disable Default setting: Enable Admin Setup...
... Default setting: Deactivate CPU XD Support Allows you to prevent users from entering Setup when an Administrator password is selected. Firmware Updates • Enable UEFI Capsule Firmware Updates (enabled by default) • Disabled • Enabled NOTE: To upgrade or downgrade TPM1.2/2.0, download the TPM wrapper tool (software). Enable CPU XD Support (default) OROM Keyboard Access Allows you to enter the Option ROM Configuration screens using hotkeys during POST. The options are: • Enable • One Time Enable • Disable Default setting: Enable Admin Setup...

Owners Manual
Page 69
... set by default. Go to Dell.com/support. • Enter the Service Tag or Express Service Code and click Submit. • Click Detect Product and follow the instructions on the user primary hard drive or an external USB key. • BIOS Recovery from Hard Drive (enabled by default) This field allows users to updating the system BIOS, and then re-enabled after the BIOS update is recommended to update your BIOS (System Setup), when you to view and clear the System Setup (BIOS...
... set by default. Go to Dell.com/support. • Enter the Service Tag or Express Service Code and click Submit. • Click Detect Product and follow the instructions on the user primary hard drive or an external USB key. • BIOS Recovery from Hard Drive (enabled by default) This field allows users to updating the system BIOS, and then re-enabled after the BIOS update is recommended to update your BIOS (System Setup), when you to view and clear the System Setup (BIOS...

Owners Manual
Page 70
... screen, verify that you must enter to access and make changes to save the changes. 5. Select Setup Password, alter or delete the existing setup password and press Enter or Tab. Setup password Password that Password Status is disabled. NOTE: If you want to update the BIOS from 1.0 to install the updated BIOS settings on your computer. NOTE: System and setup password feature is Unlocked. 3. You cannot delete or change the System and/or Setup password, re-enter the new password...
... screen, verify that you must enter to access and make changes to save the changes. 5. Select Setup Password, alter or delete the existing setup password and press Enter or Tab. Setup password Password that Password Status is disabled. NOTE: If you want to update the BIOS from 1.0 to install the updated BIOS settings on your computer. NOTE: System and setup password feature is Unlocked. 3. You cannot delete or change the System and/or Setup password, re-enter the new password...
Owners Manual
Page 80
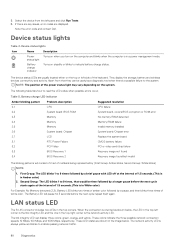
... They display the storage, battery and wireless devices connectivity and activity. Battery charge LED indicator Amber blinking pattern Problem description 2,1 CPU 2,2 System board: BIOS ROM 2,3 Memory 2,4 Memory 2,5 Memory 2,6 System board: Chipset 2,7 LCD 3,1 RTC Power Failure 3,2 PCI/Video 3,3 BIOS Recovery 1 3,4 BIOS Recovery 2 Suggested resolution CPU failure System board, covers BIOS corruption or ROM error No memory/RAM detected Memory/RAM failure Invalid memory installed System board/Chipset error Replace the system board CMOS battery failure PCI or video card...
... They display the storage, battery and wireless devices connectivity and activity. Battery charge LED indicator Amber blinking pattern Problem description 2,1 CPU 2,2 System board: BIOS ROM 2,3 Memory 2,4 Memory 2,5 Memory 2,6 System board: Chipset 2,7 LCD 3,1 RTC Power Failure 3,2 PCI/Video 3,3 BIOS Recovery 1 3,4 BIOS Recovery 2 Suggested resolution CPU failure System board, covers BIOS corruption or ROM error No memory/RAM detected Memory/RAM failure Invalid memory installed System board/Chipset error Replace the system board CMOS battery failure PCI or video card...


