
Rack Installation Guide
Page 3
... Instructions 1-1 Installation Instructions 1-2 RapidRails Rack Kit Contents 1-2 Dell Rack Requirements 1-3 VersaRails Rack Kit Contents 1-3 Non-Dell Rack Requirements 1-4 Before You Begin 1-4 Important Safety Information 1-4 Rack Stabilizer Feet 1-4 Recommended Tools and Supplies 1-5 Installation Tasks 1-5 Removing the Rack Doors 1-5 Marking the Rack 1-5 Installing the RapidRails Mounting Rails 1-7 Installing the VersaRails Mounting Rails 1-9 Installing the Tower-to-Rack Conversion Kit 1-10 Removing the...
... Instructions 1-1 Installation Instructions 1-2 RapidRails Rack Kit Contents 1-2 Dell Rack Requirements 1-3 VersaRails Rack Kit Contents 1-3 Non-Dell Rack Requirements 1-4 Before You Begin 1-4 Important Safety Information 1-4 Rack Stabilizer Feet 1-4 Recommended Tools and Supplies 1-5 Installation Tasks 1-5 Removing the Rack Doors 1-5 Marking the Rack 1-5 Installing the RapidRails Mounting Rails 1-7 Installing the VersaRails Mounting Rails 1-9 Installing the Tower-to-Rack Conversion Kit 1-10 Removing the...

Rack Installation Guide
Page 4
Figure 1-4. Figure 1-7. Figure 1-10. Figure 1-5. Figure 1-8. RapidRails Rack Kit Contents 1-3 VersaRails Rack Kit Contents 1-3 One Rack Unit 1-6 Marking the Vertical Rails 1-7 Installing the RapidRails Mounting Rails 1-8 Installing the VersaRails Mounting Rails 1-9 Removing the Front Bezel 1-11 Removing the Tower System Cover 1-12 Installing the Rack Front Panel 1-14 Installing the System in the Rack 1-15 4 Contents Figure 1-2. Figure 1-3. Figures Figure 1-1. Figure 1-6. Figure 1-9.
Figure 1-4. Figure 1-7. Figure 1-10. Figure 1-5. Figure 1-8. RapidRails Rack Kit Contents 1-3 VersaRails Rack Kit Contents 1-3 One Rack Unit 1-6 Marking the Vertical Rails 1-7 Installing the RapidRails Mounting Rails 1-8 Installing the VersaRails Mounting Rails 1-9 Removing the Front Bezel 1-11 Removing the Tower System Cover 1-12 Installing the Rack Front Panel 1-14 Installing the System in the Rack 1-15 4 Contents Figure 1-2. Figure 1-3. Figures Figure 1-1. Figure 1-6. Figure 1-9.
Rack Installation Guide
Page 5
...be sure that a minimum of system and rack kit in a non-Dell rack cabinet evaluated for joined multiple racks before installing components in a rack, never pull more than one component out of the rack, it is your system and rack kit in any non-Dell rack cabinet has not been approved by yourself.... If you install the kit in any other rack, be installed in a Dell rack cabinet using the Dell customer rack kit. Safety Instructions Use the following...
...be sure that a minimum of system and rack kit in a non-Dell rack cabinet evaluated for joined multiple racks before installing components in a rack, never pull more than one component out of the rack, it is your system and rack kit in any non-Dell rack cabinet has not been approved by yourself.... If you install the kit in any other rack, be installed in a Dell rack cabinet using the Dell customer rack kit. Safety Instructions Use the following...

Rack Installation Guide
Page 6
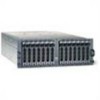
... position, and then slide the component into or out of one or more systems in the rack cabinet. RapidRails Rack Kit Contents The RapidRails rack kit consists of a rack; www.dell.com | support.dell.com • Always load the rack from the rack. • Use caution when pressing the component rail release latches and sliding a component into the...
... position, and then slide the component into or out of one or more systems in the rack cabinet. RapidRails Rack Kit Contents The RapidRails rack kit consists of a rack; www.dell.com | support.dell.com • Always load the rack from the rack. • Use caution when pressing the component rail release latches and sliding a component into the...

Rack Installation Guide
Page 7
...-head screw with 32 threads per -inch. VersaRails Rack Kit Contents 10-32 x 0.5-inch pan-head Phillips screws (8) VersaRails mounting rails Rack Installation Guide 1-3 RapidRails Rack Kit Contents RapidRails mounting rails Dell Rack Requirements NOTICE: This rack kit is intended to be sure that is installed in a Dell rack by size and number of threads-per inch is...
...-head screw with 32 threads per -inch. VersaRails Rack Kit Contents 10-32 x 0.5-inch pan-head Phillips screws (8) VersaRails mounting rails Rack Installation Guide 1-3 RapidRails Rack Kit Contents RapidRails mounting rails Dell Rack Requirements NOTICE: This rack kit is intended to be sure that is installed in a Dell rack by size and number of threads-per inch is...
Rack Installation Guide
Page 8
... you install your System Information booklet for instructions on installing and anchoring the stabilizer feet. 1-4 Rack Installation Guide See the documentation provided with the rack cabinet for additional information. www.dell.com | support.dell.com Non-Dell Rack Requirements NOTICE: This rack kit is intended to be installed by trained service technicians in this document, as well...
... you install your System Information booklet for instructions on installing and anchoring the stabilizer feet. 1-4 Rack Installation Guide See the documentation provided with the rack cabinet for additional information. www.dell.com | support.dell.com Non-Dell Rack Requirements NOTICE: This rack kit is intended to be installed by trained service technicians in this document, as well...
Rack Installation Guide
Page 9
... vertical rails (see the procedures in the rack 6 Replacing the rack doors NOTE: The procedures that follow apply to both Dell rack cabinets and rack cabinets not manufactured by Dell that meet EIA-310 standards have a rack cabinet not manufactured by yourself. If you install... space) of three holes per U with your Dell 24-U and 42-U rack cabinets. Dell rack cabinets and rack cabinets not manufactured by Dell unless identified as specific to one or the other. Rack Installation Guide 1-5 If you are installing a VersaRails rack kit, skip to the procedure, "Installing the ...
... vertical rails (see the procedures in the rack 6 Replacing the rack doors NOTE: The procedures that follow apply to both Dell rack cabinets and rack cabinets not manufactured by Dell that meet EIA-310 standards have a rack cabinet not manufactured by yourself. If you install... space) of three holes per U with your Dell 24-U and 42-U rack cabinets. Dell rack cabinets and rack cabinets not manufactured by Dell unless identified as specific to one or the other. Rack Installation Guide 1-5 If you are installing a VersaRails rack kit, skip to the procedure, "Installing the ...

Rack Installation Guide
Page 10
...) inches) 12.7 mm (0.5 inch) 15.9 mm (0.625 inch) 15.9 mm (0.625 inch) 12.7 mm (0.5 inch) For more information about requirements for installing components in a Dell rack, see Figure 1-3). 1-6 Rack Installation Guide CAUTION: If you are installing more than one system, install the mounting rails so that the first system is at http://support...
...) inches) 12.7 mm (0.5 inch) 15.9 mm (0.625 inch) 15.9 mm (0.625 inch) 12.7 mm (0.5 inch) For more information about requirements for installing components in a Dell rack, see Figure 1-3). 1-6 Rack Installation Guide CAUTION: If you are installing more than one system, install the mounting rails so that the first system is at http://support...

Rack Installation Guide
Page 11
... system Installing the RapidRails Mounting Rails NOTE: If you are installing VersaRails rails, see "Installing the VersaRails Mounting Rails." 1 At the front of the rack cabinet, position one of the mounting rails so that its mounting-bracket flange fits between the marks or tape you placed on the... rack (see Figure 1-5). 2 Align the rail mounting-bracket flange (on the front of the rail) with the square holes in a rack that meets EIA-310 standards) and mark the rack's front vertical rails with a felt-tipped marker or place masking...
... system Installing the RapidRails Mounting Rails NOTE: If you are installing VersaRails rails, see "Installing the VersaRails Mounting Rails." 1 At the front of the rack cabinet, position one of the mounting rails so that its mounting-bracket flange fits between the marks or tape you placed on the... rack (see Figure 1-5). 2 Align the rail mounting-bracket flange (on the front of the rail) with the square holes in a rack that meets EIA-310 standards) and mark the rack's front vertical rails with a felt-tipped marker or place masking...
Rack Installation Guide
Page 12
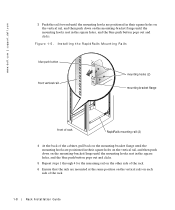
Figure 1-5. www.dell.com | support.dell.com 3 Push the rail forward until the mounting hooks are mounted at the same ...and clicks. 5 Repeat steps 1 through 4 for the remaining rail on the other side of the rack. 1-8 Rack Installation Guide Installing the RapidRails Mounting Rails blue push button front vertical rail mounting hooks (2) mounting bracket flange front of... hooks are positioned in their square holes on the vertical rail, and then push down on each side of the rack. 6 Ensure that the rails are positioned in their square holes on the vertical rail, and then push down on...
Figure 1-5. www.dell.com | support.dell.com 3 Push the rail forward until the mounting hooks are mounted at the same ...and clicks. 5 Repeat steps 1 through 4 for the remaining rail on the other side of the rack. 1-8 Rack Installation Guide Installing the RapidRails Mounting Rails blue push button front vertical rail mounting hooks (2) mounting bracket flange front of... hooks are positioned in their square holes on the vertical rail, and then push down on each side of the rack. 6 Ensure that the rails are positioned in their square holes on the vertical rail, and then push down on...

Rack Installation Guide
Page 13
...the VersaRails Mounting Rails NOTE: If you have already installed RapidRails mounting rails, skip this section. 1 At the front of the rack cabinet, position one of the cabinet, pull back on the back mounting-bracket flange until the mounting holes are aligned with the ... 4 At the back of the mounting rails so that its mounting-bracket flange fits at the location you have selected in rack cabinets may be round or square. Rack Installation Guide 1-9 Figure 1-6. Installing the VersaRails Mounting Rails vertical rail holes may be round or square mounting holes (2) mounting-...
...the VersaRails Mounting Rails NOTE: If you have already installed RapidRails mounting rails, skip this section. 1 At the front of the rack cabinet, position one of the cabinet, pull back on the back mounting-bracket flange until the mounting holes are aligned with the ... 4 At the back of the mounting rails so that its mounting-bracket flange fits at the location you have selected in rack cabinets may be round or square. Rack Installation Guide 1-9 Figure 1-6. Installing the VersaRails Mounting Rails vertical rail holes may be round or square mounting holes (2) mounting-...

Rack Installation Guide
Page 14
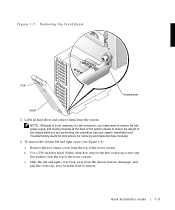
...to move the system by yourself. Removing the Bezel, Drives, Covers, and Front Panel 1 Shut down from the system until it aside. 1-10 Rack Installation Guide b Swing the bezel away and down and turn off power to your system and disconnect your power and peripheral cables. 2 To remove ...to the front panel (see Figure 1-7): a Using the system key, unlock the front bezel. CAUTION: Your system may be very large and heavy. www.dell.com | support.dell.com 5 Using two 10-32 x 0.5 Phillips screws, secure the back mounting-bracket flange to the back vertical rail. 6 Repeat steps 1 through 5 for...
...to move the system by yourself. Removing the Bezel, Drives, Covers, and Front Panel 1 Shut down from the system until it aside. 1-10 Rack Installation Guide b Swing the bezel away and down and turn off power to your system and disconnect your power and peripheral cables. 2 To remove ...to the front panel (see Figure 1-7): a Using the system key, unlock the front bezel. CAUTION: Your system may be very large and heavy. www.dell.com | support.dell.com 5 Using two 10-32 x 0.5 Phillips screws, secure the back mounting-bracket flange to the back vertical rail. 6 Repeat steps 1 through 5 for...
Rack Installation Guide
Page 15
c Slide the left and right covers (see Figure 1-8): a Remove the two round covers from the top of the tower system. Rack Installation Guide 1-11 NOTE: Although it is not necessary for the conversion, you might want to remove the two power-supply and cooling modules at ...
c Slide the left and right covers (see Figure 1-8): a Remove the two round covers from the top of the tower system. Rack Installation Guide 1-11 NOTE: Although it is not necessary for the conversion, you might want to remove the two power-supply and cooling modules at ...

Rack Installation Guide
Page 16
Figure 1-8. b Use a 3/16-inch hex-head (Allen) wrench to remove the two hex-socket cap screws and flat washers from the base of the tower chassis c Remove the base and set it aside (see Figure 1-8). Re moving the Towe r Syst em Cover round covers (2) hex-socket cap screw (4) flat washer (4) left and right covers base 1-12 Rack Installation Guide www.dell.com | support.dell.com 5 To remove the tower system base: a Lay the system on its right side.
Figure 1-8. b Use a 3/16-inch hex-head (Allen) wrench to remove the two hex-socket cap screws and flat washers from the base of the tower chassis c Remove the base and set it aside (see Figure 1-8). Re moving the Towe r Syst em Cover round covers (2) hex-socket cap screw (4) flat washer (4) left and right covers base 1-12 Rack Installation Guide www.dell.com | support.dell.com 5 To remove the tower system base: a Lay the system on its right side.

Rack Installation Guide
Page 17
... the system so that the front panel extends about 2.5 centimeters (1 inch) beyond the edge of the table or work surface. Installing the Rack Front Panel 1 Position the rack front panel on the front of the system chassis, using care to install the five light pipes in their holes before tightening any... pan head black T-10 Torx screws that secure the tower front panel to avoid damaging the five plastic light pipes that you removed in the Rack," is completed. c Remove the front panel from the system chassis, taking care to the chassis. 6 To remove the tower system front panel (see Figure...
... the system so that the front panel extends about 2.5 centimeters (1 inch) beyond the edge of the table or work surface. Installing the Rack Front Panel 1 Position the rack front panel on the front of the system chassis, using care to install the five light pipes in their holes before tightening any... pan head black T-10 Torx screws that secure the tower front panel to avoid damaging the five plastic light pipes that you removed in the Rack," is completed. c Remove the front panel from the system chassis, taking care to the chassis. 6 To remove the tower system front panel (see Figure...
Rack Installation Guide
Page 18
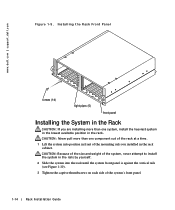
...system, install the heaviest system in the lowest available position in the rack. www.dell.com | support.dell.com Figure 1-9. Installing the Rack Front Panel screws (14) light pipes (5) front panel Installing the System in the Rack CAUTION: If you installed in front of the system's front panel.... 1-14 Rack Installation Guide CAUTION: Because of the size and weight of the...
...system, install the heaviest system in the lowest available position in the rack. www.dell.com | support.dell.com Figure 1-9. Installing the Rack Front Panel screws (14) light pipes (5) front panel Installing the System in the Rack CAUTION: If you installed in front of the system's front panel.... 1-14 Rack Installation Guide CAUTION: Because of the size and weight of the...
Rack Installation Guide
Page 19
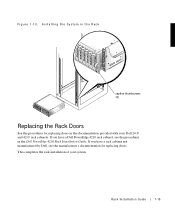
If you have a rack cabinet not manufactured by Dell, see the procedures in the Dell PowerEdge 4210 Rack Installation Guide. If you have a Dell PowerEdge 4210 rack cabinet, see the manufacturer's documentation for replacing doors in the Rack captive thumbscrews (2) Replacing the Rack Doors See the procedures for replacing doors. This completes the rack installation of your Dell 24-U and 42-U rack cabinets. Installing the System in the documentation provided with your system. Rack Installation Guide 1-15 Figure 1-10.
If you have a rack cabinet not manufactured by Dell, see the procedures in the Dell PowerEdge 4210 Rack Installation Guide. If you have a Dell PowerEdge 4210 rack cabinet, see the manufacturer's documentation for replacing doors in the Rack captive thumbscrews (2) Replacing the Rack Doors See the procedures for replacing doors. This completes the rack installation of your Dell 24-U and 42-U rack cabinets. Installing the System in the documentation provided with your system. Rack Installation Guide 1-15 Figure 1-10.

Rack Installation Guide
Page 21
Index C contents of rack kit, 1-2, 1-3 M marking the rack, 1-5 D Dell rack requirements, 1-3 Dell Web site, 1-6 doors removing, 1-5 replacing, 1-15 I installation tasks, 1-5 installing rack front panel, 1-13 RapidRails mounting rails, 1-7, 1-8 system in rack, 1-14, 1-15 tower-to-rack kit, 1-10 VersaRails mounting rails, 1-9 K kit contents illustrated, 1-3 list of, 1-2, 1-3 RapidRails kit, 1-2 VersaRails kit, 1-3 N non-Dell rack requirements, 1-4 R rack marking, 1-5 stabilizer feet, 1-4 rack kit contents illustrated, 1-3 installing...
Index C contents of rack kit, 1-2, 1-3 M marking the rack, 1-5 D Dell rack requirements, 1-3 Dell Web site, 1-6 doors removing, 1-5 replacing, 1-15 I installation tasks, 1-5 installing rack front panel, 1-13 RapidRails mounting rails, 1-7, 1-8 system in rack, 1-14, 1-15 tower-to-rack kit, 1-10 VersaRails mounting rails, 1-9 K kit contents illustrated, 1-3 list of, 1-2, 1-3 RapidRails kit, 1-2 VersaRails kit, 1-3 N non-Dell rack requirements, 1-4 R rack marking, 1-5 stabilizer feet, 1-4 rack kit contents illustrated, 1-3 installing...
Rack-to-Tower Conversion Guide
Page 3
... as a component for use in any non-Dell rack cabinet has not been approved by yourself. Thus, "component" refers to the rack installation documentation accompanying the system and the rack for rack stability and safety. The weight of the rack on Gui de 1-1 It is required for ...responsibility to be very heavy when fully loaded. Servers, storage systems, and appliances are considered to be components in a non-Dell rack cabinet evaluated for each system to have the final combination of your System Information document. For complete safety, regulatory, and warranty...
... as a component for use in any non-Dell rack cabinet has not been approved by yourself. Thus, "component" refers to the rack installation documentation accompanying the system and the rack for rack stability and safety. The weight of the rack on Gui de 1-1 It is required for ...responsibility to be very heavy when fully loaded. Servers, storage systems, and appliances are considered to be components in a non-Dell rack cabinet evaluated for each system to have the final combination of your System Information document. For complete safety, regulatory, and warranty...

Rack-to-Tower Conversion Guide
Page 4
... er C on v e r si on Guide www.dell.com | support.dell.com • Before working on the rack. • Always load the rack from the bottom up, and load the heaviest item in the rack first. • Make sure that the rack is level and stable before working on the rack, make sure that the stabilizers are secured...
... er C on v e r si on Guide www.dell.com | support.dell.com • Before working on the rack. • Always load the rack from the bottom up, and load the heaviest item in the rack first. • Make sure that the rack is level and stable before working on the rack, make sure that the stabilizers are secured...
