
User Guide
Page 4
... (Internal 2-4 Option Switches (Internal, External 2-5 Mounting Holes for 5.25" (Internal 2-6 Orientation 2-7 Loading Device Drivers 2-7 Native Operating System Backup Utilities 2-7 Tape Backup Applications 2-7 Chapter 3 Using the Autoloader 3-1 Autoloader Modes of Operation 3-1 Front Panel 3-2 Front Panel LCD 3-3 Front Panel LEDs 3-3 Operator Action 3-4 Loading and Unloading Definition 3-4 Magazine 3-4 Eight Cartridge Setting 3-4 iv
... (Internal 2-4 Option Switches (Internal, External 2-5 Mounting Holes for 5.25" (Internal 2-6 Orientation 2-7 Loading Device Drivers 2-7 Native Operating System Backup Utilities 2-7 Tape Backup Applications 2-7 Chapter 3 Using the Autoloader 3-1 Autoloader Modes of Operation 3-1 Front Panel 3-2 Front Panel LCD 3-3 Front Panel LEDs 3-3 Operator Action 3-4 Loading and Unloading Definition 3-4 Magazine 3-4 Eight Cartridge Setting 3-4 iv
User Guide
Page 5
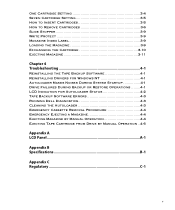
... 3-11 Chapter 4 Troubleshooting 4-1 Reinstalling the Tape Backup Software 4-1 Reinstalling Drivers for Windows NT 4-1 Autoloader Makes Noises During System Startup 4-1 Drive Failures During Backup or Restore Operations ........4-1 LCD Indication for Autoloader Status 4-2 Tape Backup Software Errors 4-3 Running Dell Diagnostics 4-3 Cleaning the Autoloader 4-3 Emergency Cassette Removal Procedure 4-4 Emergency Ejecting a Magazine 4-4 Ejecting Magazine by Manual Operation 4-4 Ejecting...
... 3-11 Chapter 4 Troubleshooting 4-1 Reinstalling the Tape Backup Software 4-1 Reinstalling Drivers for Windows NT 4-1 Autoloader Makes Noises During System Startup 4-1 Drive Failures During Backup or Restore Operations ........4-1 LCD Indication for Autoloader Status 4-2 Tape Backup Software Errors 4-3 Running Dell Diagnostics 4-3 Cleaning the Autoloader 4-3 Emergency Cassette Removal Procedure 4-4 Emergency Ejecting a Magazine 4-4 Ejecting Magazine by Manual Operation 4-4 Ejecting...
User Guide
Page 6
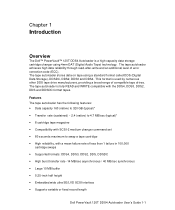
... 10 MB buffer • 5.25-inch half height • Embedded wide ultra SE/LVD SCSI interface • Supports variable or fixed record length Dell PowerVault 120T DDS4 Autoloader User's Guide 1-1 Features The tape autoloader has the following features: • Data capacity 160 (native) to 320 GB (typical)* • Transfer rate (sustained) ~ 2.4 (native) to 4.7 MB/sec (typical...
... 10 MB buffer • 5.25-inch half height • Embedded wide ultra SE/LVD SCSI interface • Supports variable or fixed record length Dell PowerVault 120T DDS4 Autoloader User's Guide 1-1 Features The tape autoloader has the following features: • Data capacity 160 (native) to 320 GB (typical)* • Transfer rate (sustained) ~ 2.4 (native) to 4.7 MB/sec (typical...
User Guide
Page 7
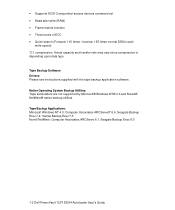
... ARCServeIT 6.6, Seagate Backup Exec 7.2, Veritas Backup Exec 7.3 Novell NetWare: Computer Associates ARCServe 6.1, Seagate Backup Exec 8.0 1-2 Dell PowerVault 120T DDS4 Autoloader User's Guide Actual capacity and transfer rate may vary since compression is depending upon data type. Native Operating System Backup Utilities: Tape... autoloaders are not supported by Microsoft® Windows NT® 4.0 and Novell® NetWare® native backup utilities....
... ARCServeIT 6.6, Seagate Backup Exec 7.2, Veritas Backup Exec 7.3 Novell NetWare: Computer Associates ARCServe 6.1, Seagate Backup Exec 8.0 1-2 Dell PowerVault 120T DDS4 Autoloader User's Guide Actual capacity and transfer rate may vary since compression is depending upon data type. Native Operating System Backup Utilities: Tape... autoloaders are not supported by Microsoft® Windows NT® 4.0 and Novell® NetWare® native backup utilities....
User Guide
Page 8
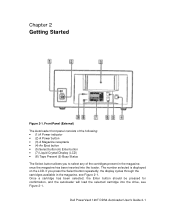
The number selected is displayed on the LCD. Dell PowerVault 120T DDS4 Autoloader User's Guide 2-1 Front Panel (External) The Autoloader front panel consists of the cartridges present in the magazine, see Figure 2-1. If you to select any of the following: • (1) A Power indicator • (2) A Power ... the magazine has been inserted into the drive, see Figure 2-1. Once a cartridge has been selected, the Enter button should be pressed for confirmation, and the autoloader will load the selected cartridge into the loader. Chapter 2 Getting Started Figure 2-1.
The number selected is displayed on the LCD. Dell PowerVault 120T DDS4 Autoloader User's Guide 2-1 Front Panel (External) The Autoloader front panel consists of the cartridges present in the magazine, see Figure 2-1. If you to select any of the following: • (1) A Power indicator • (2) A Power ... the magazine has been inserted into the drive, see Figure 2-1. Once a cartridge has been selected, the Enter button should be pressed for confirmation, and the autoloader will load the selected cartridge into the loader. Chapter 2 Getting Started Figure 2-1.
User Guide
Page 9
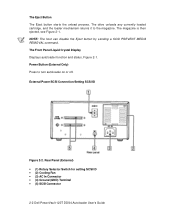
...AC In Connector • (4) Ground (GND) Terminal • (5) SCSI Connector 2-2 Dell PowerVault 120T DDS4 Autoloader User's Guide The drive unloads any currently loaded cartridge, and the loader mechanism returns it to turn autoloader on or off. External Power/SCSI Connection/Setting SCSI ID Figure 2-2. The magazine is then... ejected, see Figure 2-1. The Front Panel Liquid Crystal Display Displays autoloader function and status, Figure 2-1. NOTE: The host can disable the Eject button by sending a SCSI PREVENT MEDIA REMOVAL ...
...AC In Connector • (4) Ground (GND) Terminal • (5) SCSI Connector 2-2 Dell PowerVault 120T DDS4 Autoloader User's Guide The drive unloads any currently loaded cartridge, and the loader mechanism returns it to turn autoloader on or off. External Power/SCSI Connection/Setting SCSI ID Figure 2-2. The magazine is then... ejected, see Figure 2-1. The Front Panel Liquid Crystal Display Displays autoloader function and status, Figure 2-1. NOTE: The host can disable the Eject button by sending a SCSI PREVENT MEDIA REMOVAL ...
User Guide
Page 10
... Single Ended (SE) / Low Voltage Differential (LVD) SCSI bus. NOTE: Turn off the power with the power switch on the front panel. Dell PowerVault 120T DDS4 Autoloader User's Guide 2-3 Termination Please make sure to apply supplied External SE / LVD Terminator to 0, see Figure 2-2. The default SCSI ID is set to... the last device on the rear panel. Before changing the SCSI ID setting, be sure to turn off the host computer and autoloader power before connecting the supplied SCSI cable. SCSI Connector Connects to the SCSI bus, see Figure-2-2. NOTE: The SCSI ID must be...
... Single Ended (SE) / Low Voltage Differential (LVD) SCSI bus. NOTE: Turn off the power with the power switch on the front panel. Dell PowerVault 120T DDS4 Autoloader User's Guide 2-3 Termination Please make sure to apply supplied External SE / LVD Terminator to 0, see Figure 2-2. The default SCSI ID is set to... the last device on the rear panel. Before changing the SCSI ID setting, be sure to turn off the host computer and autoloader power before connecting the supplied SCSI cable. SCSI Connector Connects to the SCSI bus, see Figure-2-2. NOTE: The SCSI ID must be...

User Guide
Page 11
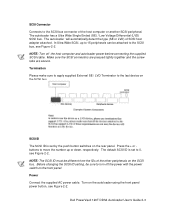
In this case, installation instructions are shipped as part of a system. If the software has been recently upgraded, however, you may need to install the software. Rear Connectors and Jumpers (Internal) NOTE: Dell performs the installation and setup of tape autoloaders that are provided with the software. 2-4 Dell PowerVault 120T DDS4 Autoloader User's Guide Internal SCSI Connection/Setting the SCSI ID/Power Figure 2-3.
In this case, installation instructions are shipped as part of a system. If the software has been recently upgraded, however, you may need to install the software. Rear Connectors and Jumpers (Internal) NOTE: Dell performs the installation and setup of tape autoloaders that are provided with the software. 2-4 Dell PowerVault 120T DDS4 Autoloader User's Guide Internal SCSI Connection/Setting the SCSI ID/Power Figure 2-3.
User Guide
Page 12
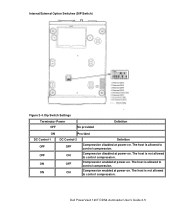
... allowed to control compression. Internal/External Option Switches (DIP Switch) Figure 2-4. ON Compression disabled at power-on . The host is not allowed to control compression. Dell PowerVault 120T DDS4 Autoloader User's Guide 2-5 Dip Switch Settings Terminator Power OFF No provided Definition ON DC Control-1 OFF OFF ON ON Provided DC Control-2 Definition OFF Compression disabled...
... allowed to control compression. Internal/External Option Switches (DIP Switch) Figure 2-4. ON Compression disabled at power-on . The host is not allowed to control compression. Dell PowerVault 120T DDS4 Autoloader User's Guide 2-5 Dip Switch Settings Terminator Power OFF No provided Definition ON DC Control-1 OFF OFF ON ON Provided DC Control-2 Definition OFF Compression disabled...
User Guide
Page 14
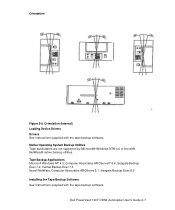
Dell PowerVault 120T DDS4 Autoloader User's Guide 2-7 Orientation Figure 2-6. Orientation (Internal) Loading Device Drivers Drivers See instructions supplied with the tape backup software. Native Operating System Backup Utilities Tape autoloaders are not supported by Microsoft® Windows NT® 4.0 or Novell® NetWare® native backup utilities. Tape Backup Applications Microsoft Windows NT 4.0: Computer Associates ...
Dell PowerVault 120T DDS4 Autoloader User's Guide 2-7 Orientation Figure 2-6. Orientation (Internal) Loading Device Drivers Drivers See instructions supplied with the tape backup software. Native Operating System Backup Utilities Tape autoloaders are not supported by Microsoft® Windows NT® 4.0 or Novell® NetWare® native backup utilities. Tape Backup Applications Microsoft Windows NT 4.0: Computer Associates ...
User Guide
Page 15
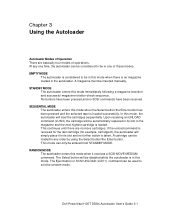
... UNLOAD (LUN 1) command can be entered from STANDBY MODE. A cartridge can be loaded in any one time, the autoloader can only be used to be in its slot and no magazine loaded in one of operations. Dell PowerVault 120T DDS4 Autoloader User's Guide 3-1 This mode can be considered to exit the random mode. STANDBY MODE The...
... UNLOAD (LUN 1) command can be entered from STANDBY MODE. A cartridge can be loaded in any one time, the autoloader can only be used to be in its slot and no magazine loaded in one of operations. Dell PowerVault 120T DDS4 Autoloader User's Guide 3-1 This mode can be considered to exit the random mode. STANDBY MODE The...
User Guide
Page 16
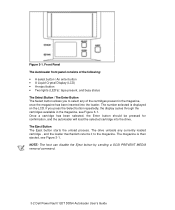
...: The host can disable the Eject button by sending a SCSI PREVENT MEDIA removal command. 3-2 Dell PowerVaullt 120T DDS4 Autoloader User's Guide Once a cartridge has been selected, the Enter button should be pressed for confirmation, and the autoloader will load the selected cartridge into the loader. The magazine is displayed on the LCD. The... , and the loader mechanism returns it to the magazine. The Eject Button The Eject button starts the unload process. Front Panel The Autoloader front panel consists of the cartridges present in the magazine, see Figure 3-1. Figure 3-1.
...: The host can disable the Eject button by sending a SCSI PREVENT MEDIA removal command. 3-2 Dell PowerVaullt 120T DDS4 Autoloader User's Guide Once a cartridge has been selected, the Enter button should be pressed for confirmation, and the autoloader will load the selected cartridge into the loader. The magazine is displayed on the LCD. The... , and the loader mechanism returns it to the magazine. The Eject Button The Eject button starts the unload process. Front Panel The Autoloader front panel consists of the cartridges present in the magazine, see Figure 3-1. Figure 3-1.
User Guide
Page 17
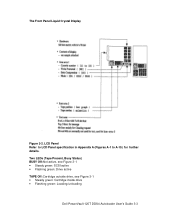
LCD Panel Refer to LCD Panel specification in Appendix A (Figures A-1 to A-15) for further details. Two LEDs (Tape Present, Busy Status) BUSY Off: Not active, see Figure 3-1 • Steady green: SCSI active • Flashing green: Drive active TAPE Off: Cartridge outside drive, see Figure 3-1 • Steady green: Cartridge inside drive • Flashing green: Loading/unloading Dell PowerVault 120T DDS4 Autoloader User's Guide 3-3 The Front Panel Liquid Crystal Display Figure 3-2.
LCD Panel Refer to LCD Panel specification in Appendix A (Figures A-1 to A-15) for further details. Two LEDs (Tape Present, Busy Status) BUSY Off: Not active, see Figure 3-1 • Steady green: SCSI active • Flashing green: Drive active TAPE Off: Cartridge outside drive, see Figure 3-1 • Steady green: Cartridge inside drive • Flashing green: Loading/unloading Dell PowerVault 120T DDS4 Autoloader User's Guide 3-3 The Front Panel Liquid Crystal Display Figure 3-2.
User Guide
Page 18
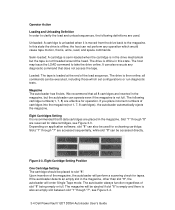
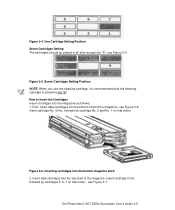
... is, write, read, and space commands. Upon insertion of cartridges into the magazine(not 1, 7, 8 cartridges), the autoloader automatically ejects the magazine. We recommend that 8 data cartridges are inserted in the magazine. Eight Cartridge Setting Position One Cartridge... for tapes. If you place incorrect numbers of the magazine, the autoloader will enter Single Tape mode. Slot "1" through "7" are effective for data cartridges, see Figure 3-4. 3-4 Dell PowerVaullt 120T DDS4 Autoloader User's Guide Operator Action Loading and Unloading Definition In order to clarify...
... is, write, read, and space commands. Upon insertion of cartridges into the magazine(not 1, 7, 8 cartridges), the autoloader automatically ejects the magazine. We recommend that 8 data cartridges are inserted in the magazine. Eight Cartridge Setting Position One Cartridge... for tapes. If you place incorrect numbers of the magazine, the autoloader will enter Single Tape mode. Slot "1" through "7" are effective for data cartridges, see Figure 3-4. 3-4 Dell PowerVaullt 120T DDS4 Autoloader User's Guide Operator Action Loading and Unloading Definition In order to clarify...
User Guide
Page 19
... cartridges into the top shelf of the magazine, see Figure 3-6. Figure 3-4. Insert cartridge 4 first, followed by cartridge No. 2 and No. 1 (in that order) , see Figure 3-5. Dell PowerVault 120T DDS4 Autoloader User's Guide 3-5 Insert data cartridges into the bottom magazine shelf 2.
... cartridges into the top shelf of the magazine, see Figure 3-6. Figure 3-4. Insert cartridge 4 first, followed by cartridge No. 2 and No. 1 (in that order) , see Figure 3-5. Dell PowerVault 120T DDS4 Autoloader User's Guide 3-5 Insert data cartridges into the bottom magazine shelf 2.
User Guide
Page 20
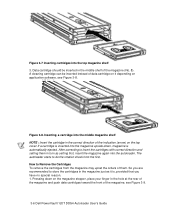
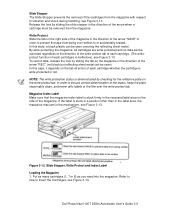
... magazine shelf NOTE : Insert the cartridge in the middle shelf of data cartridge on application software, see Figure 3-9. 3-6 Dell PowerVaullt 120T DDS4 Autoloader User's Guide The autoloader starts to insert the cartridges with correct direction and setting them . Pressing down , magazine is , provided that you are...direction of the magazine, see Figure 3-8. So you have no special reason. 1. Figure 3-7 Inserting cartridges into the autoloader. How to store the cartridges in the magazine just as setting first, insert the magazine again into the top magazine shelf 3. ...
... magazine shelf NOTE : Insert the cartridge in the middle shelf of data cartridge on application software, see Figure 3-9. 3-6 Dell PowerVaullt 120T DDS4 Autoloader User's Guide The autoloader starts to insert the cartridges with correct direction and setting them . Pressing down , magazine is , provided that you are...direction of the magazine, see Figure 3-8. So you have no special reason. 1. Figure 3-7 Inserting cartridges into the autoloader. How to store the cartridges in the magazine just as setting first, insert the magazine again into the top magazine shelf 3. ...
User Guide
Page 21
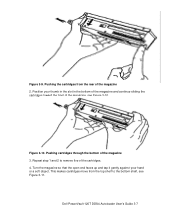
... magazine and continue sliding the cartridges toward the front of the magazine 2. This makes cartridges move from the rear of the magazine, see Figure 3-11. Dell PowerVault 120T DDS4 Autoloader User's Guide 3-7 Repeat step 1 and 2 to the bottom shelf, see Figure 3-10. Position your hand or a soft object. Pushing cartridges through the bottom of the...
... magazine and continue sliding the cartridges toward the front of the magazine 2. This makes cartridges move from the rear of the magazine, see Figure 3-11. Dell PowerVault 120T DDS4 Autoloader User's Guide 3-7 Repeat step 1 and 2 to the bottom shelf, see Figure 3-10. Position your hand or a soft object. Pushing cartridges through the bottom of the...

User Guide
Page 22
Removing cartridge from the bottom shelf. 6. Finally, remove the cartridge in the middle shelf, see Figure 3-12. Moving top-shelf cartridges to remove the cartridges from middle shelf 3-8 Dell PowerVaullt 120T DDS4 Autoloader User's Guide Figure 3-12. Figure 3-11. Repeat steps 1 and 2 to the bottom shelf 5.
Removing cartridge from the bottom shelf. 6. Finally, remove the cartridge in the middle shelf, see Figure 3-12. Moving top-shelf cartridges to remove the cartridges from middle shelf 3-8 Dell PowerVaullt 120T DDS4 Autoloader User's Guide Figure 3-12. Figure 3-11. Repeat steps 1 and 2 to the bottom shelf 5.
User Guide
Page 23
... magazine may jam in the direction of the arrow when a cartridge must be seen) In this state, a black plastic can be removed from the magazine. Dell PowerVault 120T DDS4 Autoloader User's Guide 3-9 Slide Stopper The Slide Stopper prevents the removal of the cartridges from the magazine with respect to vibration and shock during handling, see...
... magazine may jam in the direction of the arrow when a cartridge must be seen) In this state, a black plastic can be removed from the magazine. Dell PowerVault 120T DDS4 Autoloader User's Guide 3-9 Slide Stopper The Slide Stopper prevents the removal of the cartridges from the magazine with respect to vibration and shock during handling, see...
User Guide
Page 24
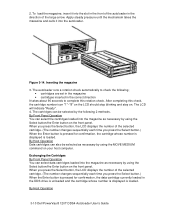
... unloaded and the cartridge whose number is displayed is loaded. The cartridges can select data cartridges loaded into the autoloader. By Host Operation 3-10 Dell PowerVaullt 120T DDS4 Autoloader User's Guide When you press the Select button, the LCD displays the number of the selected cartridge. (The... it into the magazine as necessary by using the Select button/the Enter button on your host computer. Figure 3-14. The autoloader runs a rotation check automatically to check the following 2 methods. Exchanging the Cartridges By Front Panel Operation You can be selected ...
... unloaded and the cartridge whose number is displayed is loaded. The cartridges can select data cartridges loaded into the autoloader. By Host Operation 3-10 Dell PowerVaullt 120T DDS4 Autoloader User's Guide When you press the Select button, the LCD displays the number of the selected cartridge. (The... it into the magazine as necessary by using the Select button/the Enter button on your host computer. Figure 3-14. The autoloader runs a rotation check automatically to check the following 2 methods. Exchanging the Cartridges By Front Panel Operation You can be selected ...