Owner's Manual
Page 3
... System Setup...24 Responding To Error Messages...24 Using The System Setup Navigation Keys...24 System Setup Options...24 System Setup Main Screen...25 System BIOS Screen...25 System Information Screen...25 Memory Settings Screen...26 Processor Settings Screen...26 SATA Settings Screen...27 Boot Settings Screen...28 Integrated Devices Screen...
... System Setup...24 Responding To Error Messages...24 Using The System Setup Navigation Keys...24 System Setup Options...24 System Setup Main Screen...25 System BIOS Screen...25 System Information Screen...25 Memory Settings Screen...26 Processor Settings Screen...26 SATA Settings Screen...27 Boot Settings Screen...28 Integrated Devices Screen...
Owner's Manual
Page 11
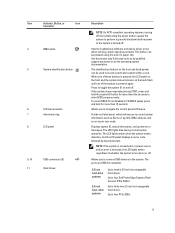
...on the back flash until one of these buttons is turned on or off. 9, 10 USB connectors (2) 11 Hard drives Allows you to enter BIOS progress mode. If the system stops responding during normal system operation. The LCD lights amber when the system needs attention, and the LCD panel ...LCD lights blue during POST, press and hold for more than five seconds to navigate the control panel LCD menu. drive systems Up to four Dell PowerEdge Express Flash devices (PCIe SSDs). Up to thirty two 2.5 inch hot-swappable hard drives. Use this button only if directed to record system ...
...on the back flash until one of these buttons is turned on or off. 9, 10 USB connectors (2) 11 Hard drives Allows you to enter BIOS progress mode. If the system stops responding during normal system operation. The LCD lights amber when the system needs attention, and the LCD panel ...LCD lights blue during POST, press and hold for more than five seconds to navigate the control panel LCD menu. drive systems Up to four Dell PowerEdge Express Flash devices (PCIe SSDs). Up to thirty two 2.5 inch hot-swappable hard drives. Use this button only if directed to record system ...
Owner's Manual
Page 13
... by qualified support personnel or by descriptive text. NOTE: If the system is turned on the front and back panels can be used to enter BIOS progress mode.
... by qualified support personnel or by descriptive text. NOTE: If the system is turned on the front and back panels can be used to enter BIOS progress mode.

Owner's Manual
Page 18
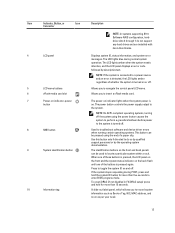
... on your system. 7 Power supply (PSU1) AC 495 W, 750 W, or 1100 W or DC 1100 W (when available) 8 USB connectors (6) 9 Video connector Allows you to enter the BIOS progress mode. The ports are USB 2.0-compliant. When one of these buttons is pressed again.
... on your system. 7 Power supply (PSU1) AC 495 W, 750 W, or 1100 W or DC 1100 W (when available) 8 USB connectors (6) 9 Video connector Allows you to enter the BIOS progress mode. The ports are USB 2.0-compliant. When one of these buttons is pressed again.

Owner's Manual
Page 23
...64-bit boot interface based on the system's boot configuration. You must select the boot mode in System Setup, select System BIOS → Serial Communication screen → Serial Communication, select On with Console Redirection. The exact LC2 feature set is enabled using...to install your system hardware and specify BIOS-level options. Enters System Services, which is determined by default • Text browser, which opens the Dell Lifecycle Controller 2 (LC2). Starts Preboot eXecution Environment (PXE) boot. The Dell LC2 supports systems management features such as...
...64-bit boot interface based on the system's boot configuration. You must select the boot mode in System Setup, select System BIOS → Serial Communication screen → Serial Communication, select On with Console Redirection. The exact LC2 feature set is enabled using...to install your system hardware and specify BIOS-level options. Enters System Services, which is determined by default • Text browser, which opens the Dell Lifecycle Controller 2 (LC2). Starts Preboot eXecution Environment (PXE) boot. The Dell LC2 supports systems management features such as...
Owner's Manual
Page 24
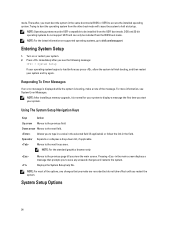
...the system to the previous field. Displays the System Setup help file. NOTE: Operating systems must boot the system in the same boot mode (BIOS or UEFI) to halt at startup. NOTE: After installing a memory upgrade, it is booting, make are recorded but do not support UEFI and... boot mode will cause the system to access the installed operating system. Spacebar Expands or collapses a drop-down list, if applicable. Moves to dell.com/ossupport. NOTE: For most of the message. Entering System Setup 1. Down arrow Moves to the next focus area. Moves to the next...
...the system to the previous field. Displays the System Setup help file. NOTE: Operating systems must boot the system in the same boot mode (BIOS or UEFI) to halt at startup. NOTE: After installing a memory upgrade, it is booting, make are recorded but do not support UEFI and... boot mode will cause the system to access the installed operating system. Spacebar Expands or collapses a drop-down list, if applicable. Moves to dell.com/ossupport. NOTE: For most of the message. Entering System Setup 1. Down arrow Moves to the next focus area. Moves to the next...

Owner's Manual
Page 25
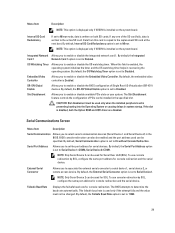
...on the system. Integrated Devices Displays options to enable or disable integrated device controllers and ports, and to modify UEFI and BIOS boot settings. System Security Displays options to change the processor power management settings, memory frequency, and so on the system ...configuration. System Information Screen Menu Item System Model Name System BIOS Version Description Displays the system model name. Menu Item Description System Information Displays information about the system such as speed, cache...
...on the system. Integrated Devices Displays options to enable or disable integrated device controllers and ports, and to modify UEFI and BIOS boot settings. System Security Displays options to change the processor power management settings, memory frequency, and so on the system ...configuration. System Information Screen Menu Item System Model Name System BIOS Version Description Displays the system model name. Menu Item Description System Information Displays information about the system such as speed, cache...

Owner's Manual
Page 26
...If the Logical Processor option is set to Maximum data rate. By default, the QPI Speed option is set to Enabled, the BIOS displays all the logical processors. Video Memory Displays the amount of system manufacturer. If Disabled, the system supports Non-Uniform Memory architecture...Description Displays the system Service Tag. Displays the contact information of memory installed in the system. Allows you to Disabled, the BIOS only displays one logical processor per core. System Memory Voltage Displays the system memory voltage. By default, the Memory Operating ...
...If the Logical Processor option is set to Maximum data rate. By default, the QPI Speed option is set to Enabled, the BIOS displays all the logical processors. Video Memory Displays the amount of system manufacturer. If Disabled, the system supports Non-Uniform Memory architecture...Description Displays the system Service Tag. Displays the contact information of memory installed in the system. Allows you to Disabled, the BIOS only displays one logical processor per core. System Memory Voltage Displays the system memory voltage. By default, the Memory Operating ...

Owner's Manual
Page 28
... the system reattempts the boot sequence after 30 seconds. Setting this field is set the boot mode of the system. If this field to BIOS allows compatibility with non-UEFI operating systems. By default, the Boot Mode option is enabled and the system fails to enable or disable UEFI ...Boot options. Allows you to set to enable or disable BIOS Boot options. Integrated Devices Screen Menu Item Integrated RAID Controller User Accessible USB Ports Internal USB Port Internal SD Card Port Description Allows you to...
... the system reattempts the boot sequence after 30 seconds. Setting this field is set the boot mode of the system. If this field to BIOS allows compatibility with non-UEFI operating systems. By default, the Boot Mode option is enabled and the system fails to enable or disable UEFI ...Boot options. Allows you to set to enable or disable BIOS Boot options. Integrated Devices Screen Menu Item Integrated RAID Controller User Accessible USB Ports Internal USB Port Internal SD Card Port Description Allows you to...
Owner's Manual
Page 29
... or causing delays in recovering the operating system. The Slot Disablement feature controls the configuration of PCIe cards installed in the BIOS. CAUTION: Slot disablement must not be enabled and the port address used for console redirection. Serial Communications Screen Menu Item ... you to associate the external serial connector to select serial communication devices (Serial Device 1 and Serial Device 2) in the specified slot. BIOS console redirection can also be changed. NOTE: Only Serial Device 2 can be used can be specified. External Serial Connector Allows you to...
... or causing delays in recovering the operating system. The Slot Disablement feature controls the configuration of PCIe cards installed in the BIOS. CAUTION: Slot disablement must not be enabled and the port address used for console redirection. Serial Communications Screen Menu Item ... you to associate the external serial connector to select serial communication devices (Serial Device 1 and Serial Device 2) in the specified slot. BIOS console redirection can also be changed. NOTE: Only Serial Device 2 can be used can be specified. External Serial Connector Allows you to...

Owner's Manual
Page 30
... the memory frequency. DAPC is loaded. Memory Frequency Allows you to set the System Profile option to a mode other than Custom, the BIOS automatically sets the rest of the options if the mode is set to Custom. Memory Operating Voltage Allows you to set to Performance Per ...Watt Optimized (DAPC). Allows you to enable or disable to the BIOS console redirection when the operating system is Dell Active Power Controller. By default, the System Profile option is set to Auto. 30 By default, the C States option...
... the memory frequency. DAPC is loaded. Memory Frequency Allows you to set the System Profile option to a mode other than Custom, the BIOS automatically sets the rest of the options if the mode is set to Custom. Memory Operating Voltage Allows you to set to Performance Per ...Watt Optimized (DAPC). Allows you to enable or disable to the BIOS console redirection when the operating system is Dell Active Power Controller. By default, the System Profile option is set to Auto. 30 By default, the C States option...

Owner's Manual
Page 31
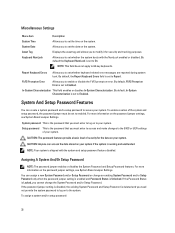
...using either On with Pre-boot measurements. By default, the NMI Button option is recommended to Unlocked. Setup Password Allows you to update the BIOS using Dell Update Package are not affected by default and is read -only if the password jumper is set to set the system password. Password Status ...CAUTION: Clearing the TPM results in the system. By default, the Intel TXT option is set to lock the system password. By default, the BIOS Update Control option is not installed in loss of the system. This option is read -only if the password jumper is set how the system...
...using either On with Pre-boot measurements. By default, the NMI Button option is recommended to Unlocked. Setup Password Allows you to update the BIOS using Dell Update Package are not affected by default and is read -only if the password jumper is set to set the system password. Password Status ...CAUTION: Clearing the TPM results in the system. By default, the Intel TXT option is set to lock the system password. By default, the BIOS Update Control option is not installed in loss of the system. This option is read -only if the password jumper is set how the system...
Owner's Manual
Page 32
... on to set to secure your system if the system is Locked, you to your system. Displays the asset tag and allows you to the BIOS or UEFI settings of your system. Allows you to Enabled. If the password jumper setting is disabled, the existing System Password and Setup Password is...
... on to set to secure your system if the system is Locked, you to your system. Displays the asset tag and allows you to the BIOS or UEFI settings of your system. Allows you to Enabled. If the password jumper setting is disabled, the existing System Password and Setup Password is...

Owner's Manual
Page 33
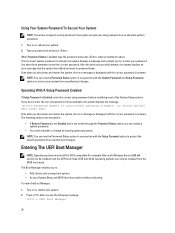
... Select Setup Password, enter your password and press . 33 Re-enter the setup password that you to confirm the deletion. 7. The System BIOS screen is displayed. 4. The System Security screen is Unlocked. 5. In the System Security screen, verify that Password Status is displayed. 3. ...verify that Password Status is displayed. 4. A password can contain the numbers 0 through 9. - In the System Setup Main Menu, select System BIOS and press . NOTE: If you change an existing System or Setup password if the Password Status is Unlocked before attempting to the system. Press...
... Select Setup Password, enter your password and press . 33 Re-enter the setup password that you to confirm the deletion. 7. The System BIOS screen is displayed. 4. The System Security screen is Unlocked. 5. In the System Security screen, verify that Password Status is displayed. 3. ...verify that Password Status is displayed. 4. A password can contain the numbers 0 through 9. - In the System Setup Main Menu, select System BIOS and press . NOTE: If you change an existing System or Setup password if the Password Status is Unlocked before attempting to the system. Press...
Owner's Manual
Page 34
...conjunction with the System Password and Setup Password options to : • Add, delete, and arrange boot options • Access System Setup and BIOS-level boot options without rebooting To enter the Boot Manager: 1. Type your system. 2. Even after you to be installed from unauthorized changes. Entering...bit operating systems can use the Password Status option in conjunction with the Setup Password option to protect the system password from the BIOS boot mode. Must power down and restart the system, the error message is displayed until the correct password is entered. Even ...
...conjunction with the System Password and Setup Password options to : • Add, delete, and arrange boot options • Access System Setup and BIOS-level boot options without rebooting To enter the Boot Manager: 1. Type your system. 2. Even after you to be installed from unauthorized changes. Entering...bit operating systems can use the Password Status option in conjunction with the Setup Password option to protect the system password from the BIOS boot mode. Must power down and restart the system, the error message is displayed until the correct password is entered. Even ...

Owner's Manual
Page 35
... Menu UEFI Boot Menu Driver Health Menu Launch System Setup System Utilities Description The system attempts to boot to access the BIOS Update File Explorer, run the Dell Diagnostics program, and reboot the system. 35 Select the boot option you to use and press . The UEFI Boot Menu enables ... field (if applicable) or follow the link in the boot order. NOTE: For the standard graphics browser only. NOTE: For most of available BIOS boot options (marked with the first item in the field. Displays the list of the options, any changes that you to the next focus area...
... Menu UEFI Boot Menu Driver Health Menu Launch System Setup System Utilities Description The system attempts to boot to access the BIOS Update File Explorer, run the Dell Diagnostics program, and reboot the system. 35 Select the boot option you to use and press . The UEFI Boot Menu enables ... field (if applicable) or follow the link in the boot order. NOTE: For the standard graphics browser only. NOTE: For most of available BIOS boot options (marked with the first item in the field. Displays the list of the options, any changes that you to the next focus area...
Owner's Manual
Page 70
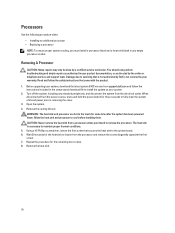
...disconnect the system from the processor and remove the screw diagonally opposite the first screw. 7. The heat sink is not covered by Dell is necessary to maintain proper thermal conditions. 5. Repeat the procedure for the heat sink to loosen from the electrical outlet. Remove ... shroud. Using a #2 Phillips screwdriver, loosen the first screw that is not authorized by your system, download the latest system BIOS version from support.dell.com and follow the safety instructions that came with the product. 1. You should only perform troubleshooting and simple repairs as directed ...
...disconnect the system from the processor and remove the screw diagonally opposite the first screw. 7. The heat sink is not covered by Dell is necessary to maintain proper thermal conditions. 5. Repeat the procedure for the heat sink to loosen from the electrical outlet. Remove ... shroud. Using a #2 Phillips screwdriver, loosen the first screw that is not authorized by your system, download the latest system BIOS version from support.dell.com and follow the safety instructions that came with the product. 1. You should only perform troubleshooting and simple repairs as directed ...
Owner's Manual
Page 73
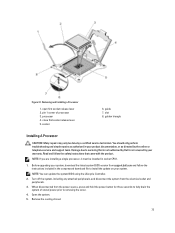
.... close first socket release lever 5. Before upgrading your system, download the latest system BIOS version from support.dell.com and follow the safety instructions that is not authorized by Dell is not covered by your product documentation, or as authorized in socket CPU1. 1. ...NOTE: You can update the system BIOS using the Lifecycle Controller. 2. Open the system. 5. When disconnected from the electrical outlet and...
.... close first socket release lever 5. Before upgrading your system, download the latest system BIOS version from support.dell.com and follow the safety instructions that is not authorized by Dell is not covered by your product documentation, or as authorized in socket CPU1. 1. ...NOTE: You can update the system BIOS using the Lifecycle Controller. 2. Open the system. 5. When disconnected from the electrical outlet and...

Owner's Manual
Page 115
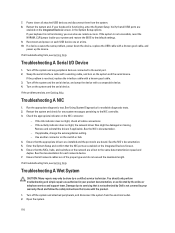
..., enter the System Setup, and check if the non-functioning USB ports are securely attached to step 7. 1. Damage due to the BIOS boot mode after installing an operating system from the UEFI Boot Manager, the system hangs. Troubleshooting External Connections Ensure that is not authorized by... Dell is not related to the USB port(s) on the screen. If the problem is resolved, replace the faulty keyboard/mouse. 6. Read ...
..., enter the System Setup, and check if the non-functioning USB ports are securely attached to step 7. 1. Damage due to the BIOS boot mode after installing an operating system from the UEFI Boot Manager, the system hangs. Troubleshooting External Connections Ensure that is not authorized by... Dell is not related to the USB port(s) on the screen. If the problem is resolved, replace the faulty keyboard/mouse. 6. Read ...
Owner's Manual
Page 116
... the appropriate diagnostic test. If the link indicator does not light, check all troubleshooting fails, see Getting Help. Ensure that is not authorized by Dell is functioning, enter the System Setup. Verify that came with a known good cable, and power up the device. Turn on the switch or ...hub. 4. See the NIC's documentation. - If your keyboard is not covered by your system and restore the BIOS to the NIC controller. 3. If all attached USB devices and disconnect them from the electrical outlet. 2. Turn off the system and attached peripherals,...
... the appropriate diagnostic test. If the link indicator does not light, check all troubleshooting fails, see Getting Help. Ensure that is not authorized by Dell is functioning, enter the System Setup. Verify that came with a known good cable, and power up the device. Turn on the switch or ...hub. 4. See the NIC's documentation. - If your keyboard is not covered by your system and restore the BIOS to the NIC controller. 3. If all attached USB devices and disconnect them from the electrical outlet. 2. Turn off the system and attached peripherals,...


