Owner's Manual
Page 9
...the system. Enters the Baseboard Management Controller (BMC) Configuration Utility, which opens the Dell Unified Server Configurator (USC). For more information, see the BMC user documentation. Enters the BIOS Boot Manager or the Unified Extensible Firmware Interface (UEFI) Boot Manager, depending on ... Log (SEL) and configuration of remote access to access utilities such as embedded system diagnostics. For more information, see the Dell USC documentation. See "Using the System Setup Program and Boot Manager" on the system's boot configuration. For more information, ...
...the system. Enters the Baseboard Management Controller (BMC) Configuration Utility, which opens the Dell Unified Server Configurator (USC). For more information, see the BMC user documentation. Enters the BIOS Boot Manager or the Unified Extensible Firmware Interface (UEFI) Boot Manager, depending on ... Log (SEL) and configuration of remote access to access utilities such as embedded system diagnostics. For more information, see the Dell USC documentation. See "Using the System Setup Program and Boot Manager" on the system's boot configuration. For more information, ...

Owner's Manual
Page 15
...light is on page 107. Diagnostic Indicator Code Code Causes Corrective Action The system is off condition or a possible electrical outlet and press the pre-BIOS failure has power button. About Your System 15 a non-highlighted circle indicates the light is in a normal Plug the system into a working off... lit after POST. occurred. system is in recovery mode. Table 1-1 lists the causes and possible corrective actions associated with these codes. BIOS checksum failure detected; Memory failure. Possible video failure. See "Getting Help" on page 123.
...light is on page 107. Diagnostic Indicator Code Code Causes Corrective Action The system is off condition or a possible electrical outlet and press the pre-BIOS failure has power button. About Your System 15 a non-highlighted circle indicates the light is in a normal Plug the system into a working off... lit after POST. occurred. system is in recovery mode. Table 1-1 lists the causes and possible corrective actions associated with these codes. BIOS checksum failure detected; Memory failure. Possible video failure. See "Getting Help" on page 123.

Owner's Manual
Page 17
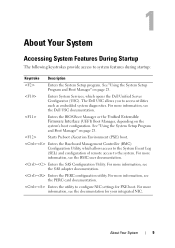
...message appears or the operating system's documentation for an explanation of the message and recommended action. Restart the system and re-enter the BIOS settings. Run the System Setup program and review the current settings. See "Using the System Setup Program and Boot Manager" on page... 23. About Your System 17 NOTE: If you of manufacturing mode. Message Causes Corrective Actions BIOS MANUFACTURING MODE detected. Please run SETUP program. See Figure 6-1 for normal operation. See "Using the System Setup Program and Boot Manager" on...
...message appears or the operating system's documentation for an explanation of the message and recommended action. Restart the system and re-enter the BIOS settings. Run the System Setup program and review the current settings. See "Using the System Setup Program and Boot Manager" on page... 23. About Your System 17 NOTE: If you of manufacturing mode. Message Causes Corrective Actions BIOS MANUFACTURING MODE detected. Please run SETUP program. See Figure 6-1 for normal operation. See "Using the System Setup Program and Boot Manager" on...
Owner's Manual
Page 18
...23 for information on page 100. If the problem persists, see "Troubleshooting Expansion Cards" on page 111. PCIe device BIOS (Option ROM) checksum failure detected during shadowing. Cables to install. Ensure that all appropriate cables are installed in manufacturing mode. PCI... BIOS failed to expansion card loose; faulty or improperly installed expansion card. Reseat the expansion card. Memory Initialization Warning: Memory ...
...23 for information on page 100. If the problem persists, see "Troubleshooting Expansion Cards" on page 111. PCIe device BIOS (Option ROM) checksum failure detected during shadowing. Cables to install. Ensure that all appropriate cables are installed in manufacturing mode. PCI... BIOS failed to expansion card loose; faulty or improperly installed expansion card. Reseat the expansion card. Memory Initialization Warning: Memory ...

Owner's Manual
Page 20
...TPM function has failed. See "Getting Help" on page 115 for your system. Micro code update failed. See "Getting Help" on support.dell.com/manuals. Faulty system board. Warning Messages A warning message alerts you to a possible problem and prompts you run diagnostic tests on page... table, see the systems management software documentation. 20 About Your System See "Getting Help" on your system. Update the BIOS firmware. Diagnostics Messages The system diagnostic utilities may lose all data on the hard drive. Alert Messages Systems management software generates...
...TPM function has failed. See "Getting Help" on page 115 for your system. Micro code update failed. See "Getting Help" on support.dell.com/manuals. Faulty system board. Warning Messages A warning message alerts you to a possible problem and prompts you run diagnostic tests on page... table, see the systems management software documentation. 20 About Your System See "Getting Help" on your system. Update the BIOS firmware. Diagnostics Messages The system diagnostic utilities may lose all data on the hard drive. Alert Messages Systems management software generates...

Owner's Manual
Page 23
...enables you to specify the boot mode for more information on this interface. NOTE: Operating systems must boot the system to the same boot mode (BIOS or UEFI) to access the installed operating system. Trying to halt immediately at startup. Using the System Setup Program and Boot Manager 23 Thereafter, you..., Microsoft Windows Server 2008 x64 version) to be installed from the other boot mode will cause the system to boot the operating system from the BIOS boot mode. Once you specify the boot mode, the system boots in the Boot Mode field of the "Boot Settings Screen" on page 29 ...
...enables you to specify the boot mode for more information on this interface. NOTE: Operating systems must boot the system to the same boot mode (BIOS or UEFI) to access the installed operating system. Trying to halt immediately at startup. Using the System Setup Program and Boot Manager 23 Thereafter, you..., Microsoft Windows Server 2008 x64 version) to be installed from the other boot mode will cause the system to boot the operating system from the BIOS boot mode. Once you specify the boot mode, the system boots in the Boot Mode field of the "Boot Settings Screen" on page 29 ...

Owner's Manual
Page 26
...mode activated on ). See "Boot Settings Screen" on page 32. Displays a screen to change the IRQ assigned to specify the boot mode (BIOS or UEFI). Displays a screen to manage power usage of the integrated devices on the PCI bus, and any installed expansion card that requires ... Keyboard NumLock (On default) Description Displays information related to specify related features and options. See "Processor Settings Screen" on page 31. For BIOS boot mode, you to enable or disable the serial ports and specify related features and options. Displays a screen to enable or disable integrated ...
...mode activated on ). See "Boot Settings Screen" on page 32. Displays a screen to change the IRQ assigned to specify the boot mode (BIOS or UEFI). Displays a screen to manage power usage of the integrated devices on the PCI bus, and any installed expansion card that requires ... Keyboard NumLock (On default) Description Displays information related to specify related features and options. See "Processor Settings Screen" on page 31. For BIOS boot mode, you to enable or disable the serial ports and specify related features and options. Displays a screen to enable or disable integrated ...

Owner's Manual
Page 28
... the level 3 cache size. If set to Disabled, only one logical processor is supported by the BIOS. Auto enables BIOS support for the device attached to SATA port A. Auto enables BIOS support for the device attached to SATA port B. Number of Cores per Processor (All default) If set...to All, the maximum number of the processor. Number of Cores Displays the number of cores of cores in the processor. Off disables BIOS support for the device. 28 Using the System Setup Program and Boot Manager C States (Enabled default) When set to Enabled, the processor...
... the level 3 cache size. If set to Disabled, only one logical processor is supported by the BIOS. Auto enables BIOS support for the device attached to SATA port A. Auto enables BIOS support for the device attached to SATA port B. Number of Cores per Processor (All default) If set...to All, the maximum number of the processor. Number of Cores Displays the number of cores of cores in the processor. Off disables BIOS support for the device. 28 Using the System Setup Program and Boot Manager C States (Enabled default) When set to Enabled, the processor...
Owner's Manual
Page 29
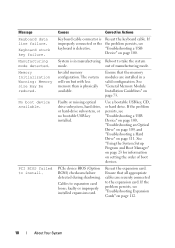
...was not installed in the same boot mode. Setting this field to BIOS allows compatibility with non-UEFI operating systems. NOTE: Setting this option to UEFI. Off disables BIOS support for the device. Auto enables BIOS support for the device attached to SATA port D. If the operating ...Port C (Off default) Port D (Off default) Port E (Auto default) eSATA port (Auto default) Description Auto enables BIOS support for the device attached to SATA port E. Off disables BIOS support for the device. Options are All Ports On, Only Back Ports On, and All Ports Off. Auto enables...
...was not installed in the same boot mode. Setting this field to BIOS allows compatibility with non-UEFI operating systems. NOTE: Setting this option to UEFI. Off disables BIOS support for the device. Auto enables BIOS support for the device attached to SATA port D. If the operating ...Port C (Off default) Port D (Off default) Port E (Auto default) eSATA port (Auto default) Description Auto enables BIOS support for the device attached to SATA port E. Off disables BIOS support for the device. Options are All Ports On, Only Back Ports On, and All Ports Off. Auto enables...

Owner's Manual
Page 30
... system for activity, and aids in video card is available if the NIC on board supports iSCSI. Enables or disables BIOS support for a given device, or select Default to allow the BIOS to manually select an IRQ for the integrated video controller. Enabled with iSCSI Boot option is present. NOTE: This feature...
... system for activity, and aids in video card is available if the NIC on board supports iSCSI. Enables or disables BIOS support for a given device, or select Default to allow the BIOS to manually select an IRQ for the integrated video controller. Enabled with iSCSI Boot option is present. NOTE: This feature...

Owner's Manual
Page 31
...adjusted. Options are On without Console Redirection default) Selects whether the serial communication devices (Serial Device 1 and Serial Device 2) are enabled in BIOS. NOTE: Only Serial Device 2 can be used for the two serial devices. To use console redirection by SOL, configure the same port...COM1, On with Console Redirection via COM2, and Off. NOTE: Only Serial Device 2 can be used only if the attempt fails. BIOS attempts to the external serial connector. This failsafe baud rate is loaded. To use console redirection by SOL, configure the same port ...
...adjusted. Options are On without Console Redirection default) Selects whether the serial communication devices (Serial Device 1 and Serial Device 2) are enabled in BIOS. NOTE: Only Serial Device 2 can be used for the two serial devices. To use console redirection by SOL, configure the same port...COM1, On with Console Redirection via COM2, and Off. NOTE: Only Serial Device 2 can be used only if the attempt fails. BIOS attempts to the external serial connector. This failsafe baud rate is loaded. To use console redirection by SOL, configure the same port ...

Owner's Manual
Page 32
For all processor performance information is passed from the system BIOS to the operating system for control. If you select Custom, you can configure each option independently. In this screen as follows: • OS Control sets ... are OS DBPM, Maximum Performance, or Minimum Power. The operating system sets the processor performance based on this setting, all but the Custom setting, the BIOS pre-configures the power settings on processor utilization. • Maximum Performance sets all fields to Maximum Performance. Options are Maximum Performance, a specified frequency, or Minimum...
For all processor performance information is passed from the system BIOS to the operating system for control. If you select Custom, you can configure each option independently. In this screen as follows: • OS Control sets ... are OS DBPM, Maximum Performance, or Minimum Power. The operating system sets the processor performance based on this setting, all but the Custom setting, the BIOS pre-configures the power settings on processor utilization. • Maximum Performance sets all fields to Maximum Performance. Options are Maximum Performance, a specified frequency, or Minimum...
Owner's Manual
Page 35
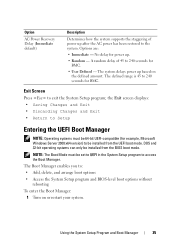
... 64-bit UEFI-compatible (for power up based on or restart your system. DOS and 32-bit operating systems can only be installed from the BIOS boot mode. No delay for example, Microsoft Windows Server 2008 x64 version) to access the Boot Manager. the Exit screen displays: • Saving Changes and...) Description Determines how the system supports the staggering of 45 to : • Add, delete, and arrange boot options • Access the System Setup program and BIOS-level boot options without rebooting To enter the Boot Manager: 1 Turn on the defined amount.
... 64-bit UEFI-compatible (for power up based on or restart your system. DOS and 32-bit operating systems can only be installed from the BIOS boot mode. No delay for example, Microsoft Windows Server 2008 x64 version) to access the Boot Manager. the Exit screen displays: • Saving Changes and...) Description Determines how the system supports the staggering of 45 to : • Add, delete, and arrange boot options • Access the System Setup program and BIOS-level boot options without rebooting To enter the Boot Manager: 1 Turn on the defined amount.
Owner's Manual
Page 36
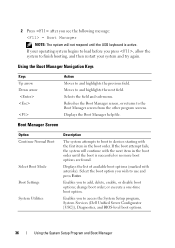
... the previous field. change boot order; Selects the field and sub-menu. Enables you to access the System Setup program, System Services (Dell Unified Server Configurator [USC]), Diagnostics, and BIOS-level boot options. 36 Using the System Setup Program and Boot Manager Enables you wish to the Boot Manager screen from the...
... the previous field. change boot order; Selects the field and sub-menu. Enables you to access the System Setup program, System Services (Dell Unified Server Configurator [USC]), Diagnostics, and BIOS-level boot options. 36 Using the System Setup Program and Boot Manager Enables you wish to the Boot Manager screen from the...
Owner's Manual
Page 37
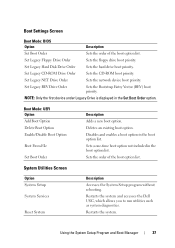
... Drive Order Sets the CD-ROM boot priority. Sets a one-time boot option not included in the boot option list. Boot Settings Screen Boot Mode: BIOS Option Description Set Boot Order Sets the order of the boot option list. Set Legacy Floppy Drive Order Sets the floppy drive boot priority. Sets... a new boot option. NOTE: Only the first device under Legacy Drive is displayed in the Set Boot Order option. Restarts the system and accesses the Dell USC, which allows you to run utilities such as system diagnostics.
... Drive Order Sets the CD-ROM boot priority. Sets a one-time boot option not included in the boot option list. Boot Settings Screen Boot Mode: BIOS Option Description Set Boot Order Sets the order of the boot option list. Set Legacy Floppy Drive Order Sets the floppy drive boot priority. Sets... a new boot option. NOTE: Only the first device under Legacy Drive is displayed in the Set Boot Order option. Restarts the system and accesses the Dell USC, which allows you to run utilities such as system diagnostics.

Owner's Manual
Page 78
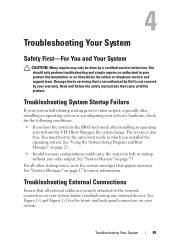
...powered down. Read and follow the safety instructions that came with the product. 1 Prior to upgrading your system, download the latest system BIOS version from support.dell.com and follow the instructions included in the interior of the system. 3 Open the system. Allow the heat sink and processor to cool...to install the update on your product documentation, or as authorized in the system diagnostics. Damage due to servicing that is not authorized by Dell is recommended that the memory modules are hot to touch for 3 seconds to fully drain the system of stored power prior to removing ...
...powered down. Read and follow the safety instructions that came with the product. 1 Prior to upgrading your system, download the latest system BIOS version from support.dell.com and follow the instructions included in the interior of the system. 3 Open the system. Allow the heat sink and processor to cool...to install the update on your product documentation, or as authorized in the system diagnostics. Damage due to servicing that is not authorized by Dell is recommended that the memory modules are hot to touch for 3 seconds to fully drain the system of stored power prior to removing ...
Owner's Manual
Page 99
...the operating system. See "System Messages" on page 17 for the front- Read and follow the safety instructions that is not authorized by Dell is also true. See "Using the System Setup Program and Boot Manager" on your warranty. and back-panel connectors on page 73.... Connections Ensure that appear onscreen. For all other startup issues, note the system messages that all external cables are securely attached to the BIOS boot mode after installing an operating system from the UEFI Boot Manager, the system hangs. Troubleshooting Your System 99 See Figure 1-1 and Figure...
...the operating system. See "System Messages" on page 17 for the front- Read and follow the safety instructions that is not authorized by Dell is also true. See "Using the System Setup Program and Boot Manager" on your warranty. and back-panel connectors on page 73.... Connections Ensure that appear onscreen. For all other startup issues, note the system messages that all external cables are securely attached to the BIOS boot mode after installing an operating system from the UEFI Boot Manager, the system hangs. Troubleshooting Your System 99 See Figure 1-1 and Figure...

Owner's Manual
Page 100
...(s) on page 123. If the tests run successfully, the problem is not functioning, you can also use remote access. If your system and restoring the BIOS to troubleshoot a USB keyboard/mouse. Troubleshooting a USB Device Use the following steps to the default settings. 9 Reconnect and power on each USB device one at...
...(s) on page 123. If the tests run successfully, the problem is not functioning, you can also use remote access. If your system and restoring the BIOS to troubleshoot a USB keyboard/mouse. Troubleshooting a USB Device Use the following steps to the default settings. 9 Reconnect and power on each USB device one at...

Technical Guide
Page 4
... 29 8.15.3 Error Code Correction (ECC) Reporting 29 8.15.4 Function Disable 29 8.16 System Management Bus (SMBus 2.0 29 8.17 Intel Virtualization Technology for Directed I/O 30 9 BIOS...31 9.1 Overview 31 9.2 Supported ACPI States 31 9.2.1 Power Management 31 10 Embedded NICs/LAN on Motherboard (LOM 33 10.1 Overview 33 10.2 NICs ...33 11....5 Optical Drives 37 12.6 Tape Drives 37 13 Video ...38 14 Rack Information 39 15 Operating Systems 40 16 Systems Management 41 16.1 Overview 41 PowerEdge T110 II Technical Guide iv
... 29 8.15.3 Error Code Correction (ECC) Reporting 29 8.15.4 Function Disable 29 8.16 System Management Bus (SMBus 2.0 29 8.17 Intel Virtualization Technology for Directed I/O 30 9 BIOS...31 9.1 Overview 31 9.2 Supported ACPI States 31 9.2.1 Power Management 31 10 Embedded NICs/LAN on Motherboard (LOM 33 10.1 Overview 33 10.2 NICs ...33 11....5 Optical Drives 37 12.6 Tape Drives 37 13 Video ...38 14 Rack Information 39 15 Operating Systems 40 16 Systems Management 41 16.1 Overview 41 PowerEdge T110 II Technical Guide iv

Technical Guide
Page 16
... a secure boot mode through a BIOS option. 4.11.5 Power Off Security There is enabled through Setup. Figure 6. For more information, see the PowerEdge T110 II Systems Owner's Manual on Support.Dell.com. 4.11.1 Cover Latch The PowerEdge RT10 II comes with a lockable entry latch on the side cover of the chassis detects chassis intrusion. PowerEdge T110 II Technical Guide 16 LED...
... a secure boot mode through a BIOS option. 4.11.5 Power Off Security There is enabled through Setup. Figure 6. For more information, see the PowerEdge T110 II Systems Owner's Manual on Support.Dell.com. 4.11.1 Cover Latch The PowerEdge RT10 II comes with a lockable entry latch on the side cover of the chassis detects chassis intrusion. PowerEdge T110 II Technical Guide 16 LED...


