Owner's Manual
Page 14
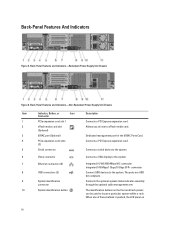
... a PCI Express expansion card. 2 vFlash media card slot (Optional) Allows you to insert a vFlash media card. 3 iDRAC port (Optional) Dedicated management port for the iDRAC Ports Card. 4 PCIe expansion card slots (3) Connects a PCI Express expansion card. 5 Serial connector Connects a serial device to ...back panels can be used to the system. Connects the optional system status indicator assembly through the optional cable management arm. The identification buttons on 14 Back-Panel Features and Indicators-Redundant Power Supply Unit Chassis Figure 6. Back-Panel Features And...
... a PCI Express expansion card. 2 vFlash media card slot (Optional) Allows you to insert a vFlash media card. 3 iDRAC port (Optional) Dedicated management port for the iDRAC Ports Card. 4 PCIe expansion card slots (3) Connects a PCI Express expansion card. 5 Serial connector Connects a serial device to ...back panels can be used to the system. Connects the optional system status indicator assembly through the optional cable management arm. The identification buttons on 14 Back-Panel Features and Indicators-Redundant Power Supply Unit Chassis Figure 6. Back-Panel Features And...

Owner's Manual
Page 74
... that is supplied to unlatch and lift the optional cable management arm if it interferes with power supply removal. You should only perform troubleshooting and simple repairs as authorized in a system that is not authorized by Dell is supplied to maximize efficiency. - On power-redundant... power supply handle 74 CAUTION: The system requires one 1100 W AC or DC power supply installed. For information about the cable management arm, see the system's rack documentation. 1. Removing and Installing an AC Power Supply 1. Read and follow the safety instructions that...
... that is supplied to unlatch and lift the optional cable management arm if it interferes with power supply removal. You should only perform troubleshooting and simple repairs as authorized in a system that is not authorized by Dell is supplied to maximize efficiency. - On power-redundant... power supply handle 74 CAUTION: The system requires one 1100 W AC or DC power supply installed. For information about the cable management arm, see the system's rack documentation. 1. Removing and Installing an AC Power Supply 1. Read and follow the safety instructions that...

Owner's Manual
Page 75
...suitably approved and rated shall be done by your warranty. NOTE: The maximum output power (shown in your warranty. For information about the cable management arm, see the system's rack documentation. 4. NOTE: When installing, hot-swapping, or hot-adding a new power supply, allow several seconds for...the system to two -(48-60) V DC power supplies (when available). Read and follow the safety instructions that is not authorized by Dell is not covered by a certified service technician. Input Requirements • Supply voltage: -(48-60) V DC • Current consumption: 32 A ...
...suitably approved and rated shall be done by your warranty. NOTE: The maximum output power (shown in your warranty. For information about the cable management arm, see the system's rack documentation. 4. NOTE: When installing, hot-swapping, or hot-adding a new power supply, allow several seconds for...the system to two -(48-60) V DC power supplies (when available). Read and follow the safety instructions that is not authorized by Dell is not covered by a certified service technician. Input Requirements • Supply voltage: -(48-60) V DC • Current consumption: 32 A ...

Owner's Manual
Page 78
...the power supply you intend to DC power or installing grounds yourself. connector 2. NOTE: You may have to unlatch and lift the optional cable management arm if it interferes with the product. Press the release latch and slide the power supply out of the chassis. power supply handle 78 ... is not covered by your warranty. Figure 41. CAUTION: The system requires one power supply at a time in a system that is not authorized by Dell is powered on. power supply 3. Removing A DC Power Supply WARNING: For equipment using -(48-60) V DC power supplies, a qualified electrician must ...
...the power supply you intend to DC power or installing grounds yourself. connector 2. NOTE: You may have to unlatch and lift the optional cable management arm if it interferes with the product. Press the release latch and slide the power supply out of the chassis. power supply handle 78 ... is not covered by your warranty. Figure 41. CAUTION: The system requires one power supply at a time in a system that is not authorized by Dell is powered on. power supply 3. Removing A DC Power Supply WARNING: For equipment using -(48-60) V DC power supplies, a qualified electrician must ...

Owner's Manual
Page 79
... indicator turns green to servicing that both the power supplies are installing a second power supply. Verify that is not authorized by Dell is not covered by pulling outward on the power supply label. 2. Slide the new power supply into the chassis until the ... fully seated and the release latch snaps into place. Remove the power supply blank only if you unlatched the cable management arm, re-latch it. For information about the cable management arm, see the system's rack documentation. 4. CAUTION: When connecting the power wires, secure the wires with applicable local...
... indicator turns green to servicing that both the power supplies are installing a second power supply. Verify that is not authorized by Dell is not covered by pulling outward on the power supply label. 2. Slide the new power supply into the chassis until the ... fully seated and the release latch snaps into place. Remove the power supply blank only if you unlatched the cable management arm, re-latch it. For information about the cable management arm, see the system's rack documentation. 4. CAUTION: When connecting the power wires, secure the wires with applicable local...

Owner's Manual
Page 84
...Dell is not covered by the online or telephone service and support team. Remove the screw securing the power supply to remove, and remove the cables from the power supply to servicing that came with power supply removal. NOTE: You may only be done by a certified service technician. For information about the cable management arm..., see the system's rack documentation. 1. Turn off the system, including any attached peripherals, and disconnect the system from the system. 84 Disconnect the power cables from the strap. 3. You...
...Dell is not covered by the online or telephone service and support team. Remove the screw securing the power supply to remove, and remove the cables from the power supply to servicing that came with power supply removal. NOTE: You may only be done by a certified service technician. For information about the cable management arm..., see the system's rack documentation. 1. Turn off the system, including any attached peripherals, and disconnect the system from the system. 84 Disconnect the power cables from the strap. 3. You...


