
Microprocessor Upgrade Installation Guide
Page 3
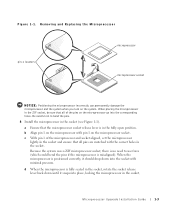
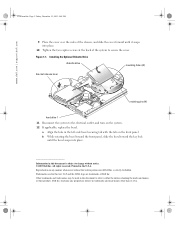
...describes how to accommodate secondary microprocessors. CAUTION: See "Protecting Against Electrostatic Discharge" in the safety instructions in your System Information document. 1 Turn off the system, including any peripherals, and disconnect the power cable from the electrical outlet. 2 Open the system doors, or remove...either the primary or secondary microprocessor sockets. In addition to the ZIF socket for the primary microprocessor on the Dell Support website at support.dell.com, and upgrade the BIOS if necessary. To take advantage of future options in speed and functionality, you...
...describes how to accommodate secondary microprocessors. CAUTION: See "Protecting Against Electrostatic Discharge" in the safety instructions in your System Information document. 1 Turn off the system, including any peripherals, and disconnect the power cable from the electrical outlet. 2 Open the system doors, or remove...either the primary or secondary microprocessor sockets. In addition to the ZIF socket for the primary microprocessor on the Dell Support website at support.dell.com, and upgrade the BIOS if necessary. To take advantage of future options in speed and functionality, you...
Microprocessor Upgrade Installation Guide
Page 5
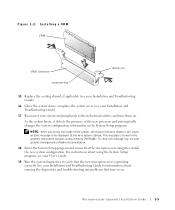
Removing and Replacing the Microprocessor pin-1 locators microprocessor microprocessor socket NOTICE: Positioning the microprocessor incorrectly can permanently damage the microprocessor and the system when you turn on the microprocessor go into place, locking the microprocessor in the ZIF socket, be sure that all pins are matched with the correct holes in ...
Removing and Replacing the Microprocessor pin-1 locators microprocessor microprocessor socket NOTICE: Positioning the microprocessor incorrectly can permanently damage the microprocessor and the system when you turn on the microprocessor go into place, locking the microprocessor in the ZIF socket, be sure that all pins are matched with the correct holes in ...
Microprocessor Upgrade Installation Guide
Page 7
.... As the system boots, it detects the presence of the system, the chassis intrusion detector will cause an alert message to their electrical outlets, and turn them on. For instructions about running the diagnostics and troubleshooting any problems that the microprocessor categories match the new system configuration.
.... As the system boots, it detects the presence of the system, the chassis intrusion detector will cause an alert message to their electrical outlets, and turn them on. For instructions about running the diagnostics and troubleshooting any problems that the microprocessor categories match the new system configuration.
Installing the Optional CD Drive (.pdf)
Page 1
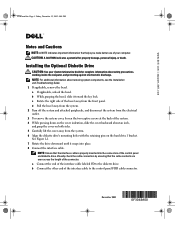
... length of the interface cable to the diskette drive. a If applicable, unlock the bezel. d Pull the bezel away from the system. 2 Turn off the system and attached peripherals, and disconnect the system from the electrical outlet. 3 To remove the system cover, loosen the two captive screws... System Information Guide for property damage, personal injury, or death. F3043am0.fm Page 1 Friday, December 12, 2003 4:44 PM www.dell.com | support.dell.com Notes and Cautions NOTE: A NOTE indicates important information that helps you make better use of the bezel away from the front panel...
... length of the interface cable to the diskette drive. a If applicable, unlock the bezel. d Pull the bezel away from the system. 2 Turn off the system and attached peripherals, and disconnect the system from the electrical outlet. 3 To remove the system cover, loosen the two captive screws... System Information Guide for property damage, personal injury, or death. F3043am0.fm Page 1 Friday, December 12, 2003 4:44 PM www.dell.com | support.dell.com Notes and Cautions NOTE: A NOTE indicates important information that helps you make better use of the bezel away from the front panel...
Installing the Optional CD Drive (.pdf)
Page 2
... Tighten the two captive screws at the back of the system to the electrical outlet, and turn on the front panel. is subject to either the entities claiming the marks and names or their products. Dell Inc. Installing the Optional Diskette Drive diskette drive mounting holes (4) bracket release lever retaining pins (4) hard...
... Tighten the two captive screws at the back of the system to the electrical outlet, and turn on the front panel. is subject to either the entities claiming the marks and names or their products. Dell Inc. Installing the Optional Diskette Drive diskette drive mounting holes (4) bracket release lever retaining pins (4) hard...


