Configuration Guide
Page 7
...and I/O modules are shared resources for the server modules in your system may also ship with an optional external USB diskette drive and an optional external USB optical drive, which you can include up to set up to eight memory modules. In addition, your system. ...modules. Additional information is inserted into an enclosure that supports power supplies, fan modules, a management module (Dell™ Remote Access Controller/Modular Chassis [DRAC/MC]), a keyboard/video/mouse (KVM) switch module, and at all times with either a module or with a blank. Each server module ...
...and I/O modules are shared resources for the server modules in your system may also ship with an optional external USB diskette drive and an optional external USB optical drive, which you can include up to set up to eight memory modules. In addition, your system. ...modules. Additional information is inserted into an enclosure that supports power supplies, fan modules, a management module (Dell™ Remote Access Controller/Modular Chassis [DRAC/MC]), a keyboard/video/mouse (KVM) switch module, and at all times with either a module or with a blank. Each server module ...
Configuration Guide
Page 12
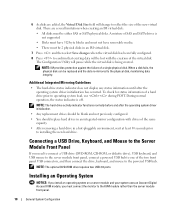
... You should replace hard drives in an integrated-mirror configuration with the creation of the two front panel USB connectors, and then connect the drive, keyboard, and mouse to the KVM module rather than the server module front panel. 10 General System Configuration Installing an Operating System NOTICE: If...on a server module and your system uses an Avocent Digital Access KVM module, you need to connect a USB drive (DVD-ROM, CD-ROM, or diskette drive), USB keyboard, and USB mouse to the server module front panel, connect a powered USB hub to one of the virtual disk. There are added, ...
... You should replace hard drives in an integrated-mirror configuration with the creation of the two front panel USB connectors, and then connect the drive, keyboard, and mouse to the KVM module rather than the server module front panel. 10 General System Configuration Installing an Operating System NOTICE: If...on a server module and your system uses an Avocent Digital Access KVM module, you need to connect a USB drive (DVD-ROM, CD-ROM, or diskette drive), USB keyboard, and USB mouse to the server module front panel, connect a powered USB hub to one of the virtual disk. There are added, ...

Configuration Guide
Page 47
... on the device. Using Virtual Media NOTE: You must install the Java plug-in , go to use the Virtual Media feature. Configuring the KVM Switch Module 45 To adjust the video quality, perform the following steps: 1 At the bottom of video synchronization, click Refresh in the window ..."Using the Video Viewer"). The device will be able to see it is physically attached to that allow you to connect a diskette device, a USB device, CD or DVD device to optimize the video for the DRAC/MC. Adjusting the Video Quality The Viewer Application provides video adjustments that server...
... on the device. Using Virtual Media NOTE: You must install the Java plug-in , go to use the Virtual Media feature. Configuring the KVM Switch Module 45 To adjust the video quality, perform the following steps: 1 At the bottom of video synchronization, click Refresh in the window ..."Using the Video Viewer"). The device will be able to see it is physically attached to that allow you to connect a diskette device, a USB device, CD or DVD device to optimize the video for the DRAC/MC. Adjusting the Video Quality The Viewer Application provides video adjustments that server...
Hardware Owner's Manual (PDF)
Page 3
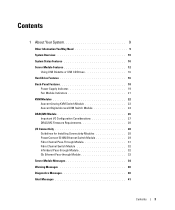
... 10 System Status Features 10 Server Module Features 12 Using USB Diskette or USB CD Drives 16 Hard-Drive Features 16 Back-Panel Features 18 Power Supply Indicator 19 Fan Module Indicators 21 KVM Modules 22 Avocent Analog KVM Switch Module 22 Avocent Digital Access KVM Switch Module 24 DRAC/MC Module 26 Important I/O Configuration...
... 10 System Status Features 10 Server Module Features 12 Using USB Diskette or USB CD Drives 16 Hard-Drive Features 16 Back-Panel Features 18 Power Supply Indicator 19 Fan Module Indicators 21 KVM Modules 22 Avocent Analog KVM Switch Module 22 Avocent Digital Access KVM Switch Module 24 DRAC/MC Module 26 Important I/O Configuration...
Hardware Owner's Manual (PDF)
Page 10
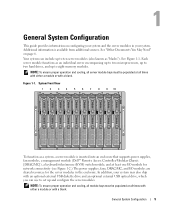
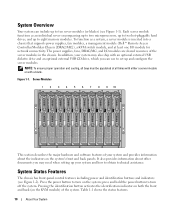
... panels. NOTE: To ensure proper operation and cooling, all times with either a server module or with an optional external USB diskette drive and an optional external USB CD drive, which you may also ship with a blank. Figure 1-1. Table 1-1 shows the status features. 10 About ...as a system, a server module is inserted into a chassis that supports power supplies, fan modules, a management module (Dell™ Remote Access Controller/Modular Chassis [DRAC/MC]), a KVM switch module, and at all bays must be populated at least one I /O modules are shared resources of the system....
... panels. NOTE: To ensure proper operation and cooling, all times with either a server module or with an optional external USB diskette drive and an optional external USB CD drive, which you may also ship with a blank. Figure 1-1. Table 1-1 shows the status features. 10 About ...as a system, a server module is inserted into a chassis that supports power supplies, fan modules, a management module (Dell™ Remote Access Controller/Modular Chassis [DRAC/MC]), a KVM switch module, and at all bays must be populated at least one I /O modules are shared resources of the system....

Hardware Owner's Manual (PDF)
Page 12
...be turned off by using the custom cable supplied with your system to connect this port to two USB devices (for example, USB diskette drive, USB CD drive, USB mouse) and to video. Use the custom cable included with the system. 12 About Your System Will... stop blinking when the error is being identified. Amber, fast System error. The server module also has a custom port on the front (see Figure 1-3). The indicators include a power indicator, network link indicators, and a KVM...
...be turned off by using the custom cable supplied with your system to connect this port to two USB devices (for example, USB diskette drive, USB CD drive, USB mouse) and to video. Use the custom cable included with the system. 12 About Your System Will... stop blinking when the error is being identified. Amber, fast System error. The server module also has a custom port on the front (see Figure 1-3). The indicators include a power indicator, network link indicators, and a KVM...

Hardware Owner's Manual (PDF)
Page 13
Figure 1-3. USB [2] and video) server module power button 3 daughter card status indicator 6 KVM selection indicator Ethernet network indicator About Your System 13 Server Module Indicators 1 2 3 4 5 6 7 1 server module power indicator 2 4 KVM selection button 5 7 custom port (with custom cable -
Figure 1-3. USB [2] and video) server module power button 3 daughter card status indicator 6 KVM selection indicator Ethernet network indicator About Your System 13 Server Module Indicators 1 2 3 4 5 6 7 1 server module power indicator 2 4 KVM selection button 5 7 custom port (with custom cable -

Hardware Owner's Manual (PDF)
Page 22
... Avocent Digital Access KVM switch module (optional) NOTE: Earlier versions of KVM modules are not interchangeable. KVM Modules Your system includes one that you to connect a server module via Cat5 cabling to an external device such as the Dell 2161DS Digital console switch or Dell 180AS/2160AS analog ...console switches, without the need for connection to external KVM switches with your system to connect the KVM to connect two USB devices and video, and a second cable that ...
... Avocent Digital Access KVM switch module (optional) NOTE: Earlier versions of KVM modules are not interchangeable. KVM Modules Your system includes one that you to connect a server module via Cat5 cabling to an external device such as the Dell 2161DS Digital console switch or Dell 180AS/2160AS analog ...console switches, without the need for connection to external KVM switches with your system to connect the KVM to connect two USB devices and video, and a second cable that ...
Hardware Owner's Manual (PDF)
Page 24
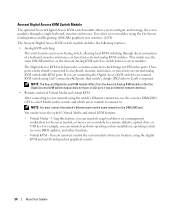
... installation, operating system recovery, BIOS updates, and other functions. - Virtual KVM - Avocent Digital Access KVM Switch Module The optional Avocent Digital Access KVM switch module allows you to a remote diskette, optical drive, or USB key. This switch uses the same OSCAR interface as the Avocent Analog... KVM switch to a keyboard, monitor, and mouse, or tiered into external analog KVM switches. These ports can remotely map local drives on a management ...
... installation, operating system recovery, BIOS updates, and other functions. - Virtual KVM - Avocent Digital Access KVM Switch Module The optional Avocent Digital Access KVM switch module allows you to a remote diskette, optical drive, or USB key. This switch uses the same OSCAR interface as the Avocent Analog... KVM switch to a keyboard, monitor, and mouse, or tiered into external analog KVM switches. These ports can remotely map local drives on a management ...

Hardware Owner's Manual (PDF)
Page 103
... KVM selection button. See Figure 1-3. Troubleshooting Your System 103 If the monitor works in the chassis, press the KVM ...keyboard does not function from the back-panel KVM module, ensure that the KVM selection indicator on the front panel of ...(KVM) custom cable • KVM module • Server module Action 1 Ensure that the server module(s) is connected to the back-panel KVM .... NOTE: After pressing the KVM selection button, allow approximately two seconds for the KVM functions to change to the ... KVM module. 4 If you are installed in ... custom cable, the KVM module or the back...
... KVM selection button. See Figure 1-3. Troubleshooting Your System 103 If the monitor works in the chassis, press the KVM ...keyboard does not function from the back-panel KVM module, ensure that the KVM selection indicator on the front panel of ...(KVM) custom cable • KVM module • Server module Action 1 Ensure that the server module(s) is connected to the back-panel KVM .... NOTE: After pressing the KVM selection button, allow approximately two seconds for the KVM functions to change to the ... KVM module. 4 If you are installed in ... custom cable, the KVM module or the back...
Hardware Owner's Manual (PDF)
Page 104
... cable • Server module Action 1 Ensure that the KVM selection indicator on a different server module, if available. 5 If the mouse does not function from the keyboard connected to a different server module. Troubleshooting the Mouse NOTE: USB mouse devices can be reseated. See Figure 1-3. See "Server Modules" on page...be faulty. 6 If two or more server modules are connecting a mouse to the back-panel custom cable. If not, press the KVM selection button. If reseating the server module does not help, the server module may need to be connected only to the front-panel ...
... cable • Server module Action 1 Ensure that the KVM selection indicator on a different server module, if available. 5 If the mouse does not function from the keyboard connected to a different server module. Troubleshooting the Mouse NOTE: USB mouse devices can be reseated. See Figure 1-3. See "Server Modules" on page...be faulty. 6 If two or more server modules are connecting a mouse to the back-panel custom cable. If not, press the KVM selection button. If reseating the server module does not help, the server module may need to be connected only to the front-panel ...
Hardware Owner's Manual (PDF)
Page 105
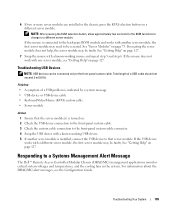
... to change to a Systems Management Alert Message The Dell™ Remote Access Controller/Modular Chassis (DRAC/MC) management applications monitor critical system voltages and temperatures, and the cooling fans in the chassis, press the KVM selection button on . 2 Check the USB device connection to the front-panel custom cable. 3 Check the custom cable...
... to change to a Systems Management Alert Message The Dell™ Remote Access Controller/Modular Chassis (DRAC/MC) management applications monitor critical system voltages and temperatures, and the cooling fans in the chassis, press the KVM selection button on . 2 Check the USB device connection to the front-panel custom cable. 3 Check the custom cable...


