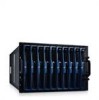
McDATA 4416 Fibre Channel Switch Module
Page 3
...; Up to six external autosensing (1, 2, and 4 Gbit/sec) Fibre Channel ports: - Universal and self-configuring: capable of a firmware-accessible table per output port • Extensive diagnostics and monitoring capabilities • Unicast and broadcast data traffic support • Four SWL small... connectors to the DRAC/MC; SilkWorm 4016 Features The SilkWorm 4016 provides the following information: • "SilkWorm 4016 Features," next • "Port Side" on page 4 • "Unpacking the SilkWorm 4016" on page 5 • "Inserting the SilkWorm 4016 into a Dell PowerEdge 1855 chassis and ...
...; Up to six external autosensing (1, 2, and 4 Gbit/sec) Fibre Channel ports: - Universal and self-configuring: capable of a firmware-accessible table per output port • Extensive diagnostics and monitoring capabilities • Unicast and broadcast data traffic support • Four SWL small... connectors to the DRAC/MC; SilkWorm 4016 Features The SilkWorm 4016 provides the following information: • "SilkWorm 4016 Features," next • "Port Side" on page 4 • "Unpacking the SilkWorm 4016" on page 5 • "Inserting the SilkWorm 4016 into a Dell PowerEdge 1855 chassis and ...
Configuration Guide
Page 5
... Telnet Console Interface 14 Using a Serial or Telnet Console 17 Redirecting the DRAC/MC Serial Console to the Ethernet Switch Module 19 Updating the DRAC/MC Module Firmware 19 Integrating the System Into the Network 22 Updating the PowerConnect Switch Module Firmware 27 Configuring the Cisco Catalyst Blade Switch 3030 29 Configuring the Cisco...
... Telnet Console Interface 14 Using a Serial or Telnet Console 17 Redirecting the DRAC/MC Serial Console to the Ethernet Switch Module 19 Updating the DRAC/MC Module Firmware 19 Integrating the System Into the Network 22 Updating the PowerConnect Switch Module Firmware 27 Configuring the Cisco Catalyst Blade Switch 3030 29 Configuring the Cisco...

Configuration Guide
Page 6
... Digital Access KVM Module 43 Configuring the Avocent Digital Access KVM Module Using the DRAC/MC 43 Using the Video Viewer 44 Using Virtual Media 45 Updating the KVM Firmware 47 Using the DRAC/MC Web-based Interface to Update the KVM Firmware 47 Using the RACADM Command Line Interface to Update the KVM...
... Digital Access KVM Module 43 Configuring the Avocent Digital Access KVM Module Using the DRAC/MC 43 Using the Video Viewer 44 Using Virtual Media 45 Updating the KVM Firmware 47 Using the DRAC/MC Web-based Interface to Update the KVM Firmware 47 Using the RACADM Command Line Interface to Update the KVM...

Configuration Guide
Page 13
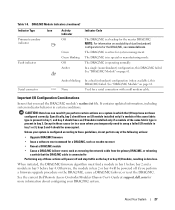
... status indicators for the DRAC/MC (see the Dell Remote Access Controller/Modular Chassis User's Guide. For detailed information on configuring the DRAC/MC and using the remote management features of 1.3 or later. NOTICE: The DRAC/MC must have a firmware version of the DRAC/MC, see Figure 1-4). Mixing two DRAC/MC modules with firmware versions earlier than 1.3 may...
... status indicators for the DRAC/MC (see the Dell Remote Access Controller/Modular Chassis User's Guide. For detailed information on configuring the DRAC/MC and using the remote management features of 1.3 or later. NOTICE: The DRAC/MC must have a firmware version of the DRAC/MC, see Figure 1-4). Mixing two DRAC/MC modules with firmware versions earlier than 1.3 may...

Configuration Guide
Page 14
.../standby indicator Off LAN is operating normally. None Used for the primary DRAC/MC (redundant DRAC/MC configurations only) The DRAC/MC is linked. DRAC/MC Configuration Interface Options You can configure the DRAC/MC and update DRAC/MC firmware using a supported Web browser through the DRAC/MC network interface. Enables you to serial and RACADM CLI commands...
.../standby indicator Off LAN is operating normally. None Used for the primary DRAC/MC (redundant DRAC/MC configurations only) The DRAC/MC is linked. DRAC/MC Configuration Interface Options You can configure the DRAC/MC and update DRAC/MC firmware using a supported Web browser through the DRAC/MC network interface. Enables you to serial and RACADM CLI commands...

Configuration Guide
Page 21
...General System Configuration 19 If the switch has been disabled by entering the following methods to Update the DRAC/MC Firmware" on page 20. • RACADM CLI - See "Using the RACADM CLI to update your current network connection. Updating the... DRAC/MC Module Firmware NOTICE: Updating your DRAC/MC firmware will turn green. See "Using the DRAC/MC Web-based Firmware Update Interface" on page 21. • Firmware Recovery Console - Redirecting the DRAC/MC Serial Console to the Ethernet Switch Module Redirect the...
...General System Configuration 19 If the switch has been disabled by entering the following methods to Update the DRAC/MC Firmware" on page 20. • RACADM CLI - See "Using the RACADM CLI to update your current network connection. Updating the... DRAC/MC Module Firmware NOTICE: Updating your DRAC/MC firmware will turn green. See "Using the DRAC/MC Web-based Firmware Update Interface" on page 21. • Firmware Recovery Console - Redirecting the DRAC/MC Serial Console to the Ethernet Switch Module Redirect the...

Configuration Guide
Page 22
...your system is complete, clear the Web browser cache. b Insert the remaining DRAC/MC module into the system. Perform the following steps if upgrading from firmware version 1.0: a Remove the updated DRAC/MC module from http://solarwinds.net. NOTICE: You must clear the Web ... install version 1.1 or version 1.1.1 before installing the latest version (1.3 or later). NOTE: To facilitate the firmware upgrade, download a TFTP server from the system. See "Accessing the DRAC/MC WebBased Interface" on installing and configuring the SolarWinds TFTP server, refer to version 1.3 or later, repeat...
...your system is complete, clear the Web browser cache. b Insert the remaining DRAC/MC module into the system. Perform the following steps if upgrading from firmware version 1.0: a Remove the updated DRAC/MC module from http://solarwinds.net. NOTICE: You must clear the Web ... install version 1.1 or version 1.1.1 before installing the latest version (1.3 or later). NOTE: To facilitate the firmware upgrade, download a TFTP server from the system. See "Accessing the DRAC/MC WebBased Interface" on installing and configuring the SolarWinds TFTP server, refer to version 1.3 or later, repeat...

Configuration Guide
Page 23
...directly to version 1.3 or later is not supported. 1 If your system is compatible with two DRAC/MC modules in a redundant configuration, you installed firmware version 1.1 or version 1.1.1 and want to update your DRAC/MC firmware to version 1.3 or later, repeat step 3 and step 4. See "Clearing the Web Browser...on page 17. 4 From the Telnet or serial interface, type a command line similar to the following steps if upgrading from firmware version 1.0: a Remove the updated DRAC/MC module from the system. 2 Copy the binary file mgmt.bin to a TFTP server root directory. 3 Log on page 22....
...directly to version 1.3 or later is not supported. 1 If your system is compatible with two DRAC/MC modules in a redundant configuration, you installed firmware version 1.1 or version 1.1.1 and want to update your DRAC/MC firmware to version 1.3 or later, repeat step 3 and step 4. See "Clearing the Web Browser...on page 17. 4 From the Telnet or serial interface, type a command line similar to the following steps if upgrading from firmware version 1.0: a Remove the updated DRAC/MC module from the system. 2 Copy the binary file mgmt.bin to a TFTP server root directory. 3 Log on page 22....

Configuration Guide
Page 24
.... To view the console, attach a null modem cable from the DRAC/MC serial port to your management station and run a terminal emulation software package to attach to the Firmware Recovery Console. Internal Network Port Mapping Module Port Server module 1 LOM 1 LOM 2 Server module 2 LOM 1 LOM 2 I/O Bay 1 ... 4 Click OK twice. 5 Close and restart the Web browser. Table 1-4. The console allows you to install the firmware through a TFTP server or through the DRAC/MC serial port. Table 1-4, Table 1-5, and Table 1-6 show the mapping of the internal and external ports. Integrating ...
.... To view the console, attach a null modem cable from the DRAC/MC serial port to your management station and run a terminal emulation software package to attach to the Firmware Recovery Console. Internal Network Port Mapping Module Port Server module 1 LOM 1 LOM 2 Server module 2 LOM 1 LOM 2 I/O Bay 1 ... 4 Click OK twice. 5 Close and restart the Web browser. Table 1-4. The console allows you to install the firmware through a TFTP server or through the DRAC/MC serial port. Table 1-4, Table 1-5, and Table 1-6 show the mapping of the internal and external ports. Integrating ...

Configuration Guide
Page 49
... name length is Running • On a server using your KVM firmware. • Web-based interfaces • RACADM CLI Using the DRAC/MC Web-based Interface to Update the KVM Firmware NOTE: You can be updated. 4 From the DRAC/MC Web-based user interface main window, click the Update tab. ...Configuring the KVM Switch Module 47 Using Virtual Media When the Server's Operating System is limited to 20 characters. 6 Click Update Firmware. 7 The TFTP download and firmware update process may take several minutes. When you connect to the media at a management station, the media is available at the ...
... name length is Running • On a server using your KVM firmware. • Web-based interfaces • RACADM CLI Using the DRAC/MC Web-based Interface to Update the KVM Firmware NOTE: You can be updated. 4 From the DRAC/MC Web-based user interface main window, click the Update tab. ...Configuring the KVM Switch Module 47 Using Virtual Media When the Server's Operating System is limited to 20 characters. 6 Click Update Firmware. 7 The TFTP download and firmware update process may take several minutes. When you connect to the media at a management station, the media is available at the ...

Configuration Guide
Page 50
... on page 14 3 Enter the racadm fwupdate command, as in the following example: racadm fwupdate -a -d -m kvm 4 The TFTP download and firmware update process may take several minutes. After the update completes, the KVM resets. 48 Configuring the KVM Switch Module Using the RACADM Command Line Interface... to the DRAC/MC Telnet or serial interface. See "Serial or Telnet Console Interface" on to Update the KVM Firmware NOTE: You can download a TFTP server from http://solarwinds.net.
... on page 14 3 Enter the racadm fwupdate command, as in the following example: racadm fwupdate -a -d -m kvm 4 The TFTP download and firmware update process may take several minutes. After the update completes, the KVM resets. 48 Configuring the KVM Switch Module Using the RACADM Command Line Interface... to the DRAC/MC Telnet or serial interface. See "Serial or Telnet Console Interface" on to Update the KVM Firmware NOTE: You can download a TFTP server from http://solarwinds.net.
Hardware Owner's Manual (PDF)
Page 3
... 19 Fan Module Indicators 21 KVM Modules 22 Avocent Analog KVM Switch Module 22 Avocent Digital Access KVM Switch Module 24 DRAC/MC Module 26 Important I/O Configuration Considerations 27 DRAC/MC Firmware Requirements 28 I/O Connectivity 28 Guidelines for Installing Connectivity Modules 28 PowerConnect 5316M Ethernet Switch Module 29 Fibre Channel Pass-Through Module...
... 19 Fan Module Indicators 21 KVM Modules 22 Avocent Analog KVM Switch Module 22 Avocent Digital Access KVM Switch Module 24 DRAC/MC Module 26 Important I/O Configuration Considerations 27 DRAC/MC Firmware Requirements 28 I/O Connectivity 28 Guidelines for Installing Connectivity Modules 28 PowerConnect 5316M Ethernet Switch Module 29 Fibre Channel Pass-Through Module...
Hardware Owner's Manual (PDF)
Page 4
... Modules 58 System Power Guidelines 58 Removing a Power Supply Module 58 Installing a Power Supply Module 59 Fan Modules 59 Removing a Fan 60 Installing a Fan 61 DRAC/MC Module 61 Removing a DRAC/MC Module 61 Installing a DRAC/MC Module 62 Important I/O Configuration Considerations 62 DRAC/MC Firmware Requirements 63 4 Contents
... Modules 58 System Power Guidelines 58 Removing a Power Supply Module 58 Installing a Power Supply Module 59 Fan Modules 59 Removing a Fan 60 Installing a Fan 61 DRAC/MC Module 61 Removing a DRAC/MC Module 61 Installing a DRAC/MC Module 62 Important I/O Configuration Considerations 62 DRAC/MC Firmware Requirements 63 4 Contents
Hardware Owner's Manual (PDF)
Page 27
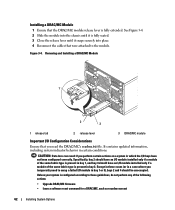
.... NOTE: For information on a system in bay 1, and bay 4 should have an I /O module installed only if a module of the following actions: • Upgrade DRAC/MC firmware • Issue a software reset command for system management. Used for the DRAC/MC, see www.dell.com. Specifically, bay 2 should have not been configured correctly. See the current...
.... NOTE: For information on a system in bay 1, and bay 4 should have an I /O module installed only if a module of the following actions: • Upgrade DRAC/MC firmware • Issue a software reset command for system management. Used for the DRAC/MC, see www.dell.com. Specifically, bay 2 should have not been configured correctly. See the current...

Hardware Owner's Manual (PDF)
Page 28
... Access Controller/Modular Chassis User's Guide at support.dell.com for I/O bay locations. • Insert a connectivity module into I/O bay 1 before installing a connectivity module into I/O bay 2. This guide also provides ... the server module. I/O Connectivity The system offers several options for your system is a daughter card installed in the server module. - DRAC/MC Firmware Requirements The minimum DRAC/MC firmware requirement for connectivity through a combination of embedded Ethernet controllers, optional I/O daughter cards on the server module, and chassis I/O modules in ...
... Access Controller/Modular Chassis User's Guide at support.dell.com for I/O bay locations. • Insert a connectivity module into I/O bay 1 before installing a connectivity module into I/O bay 2. This guide also provides ... the server module. I/O Connectivity The system offers several options for your system is a daughter card installed in the server module. - DRAC/MC Firmware Requirements The minimum DRAC/MC firmware requirement for connectivity through a combination of embedded Ethernet controllers, optional I/O daughter cards on the server module, and chassis I/O modules in ...
Hardware Owner's Manual (PDF)
Page 62
... I/O module in certain conditions. CAUTION: Data loss can result if you read the DRAC/MC's readme.txt file. Removing and Installing a DRAC/MC Module 1 2 3 1 release tab 2 release lever 3 DRAC/MC module Important I/O Configuration Considerations Ensure that you perform certain actions on a system in...if a module of the following actions: • Upgrade DRAC/MC firmware • Issue a software reset command for a DRAC/MC, such as racadm racreset 62 Installing System Options Installing a DRAC/MC Module 1 Ensure that the DRAC/MC module release lever is present in which the I/O ...
... I/O module in certain conditions. CAUTION: Data loss can result if you read the DRAC/MC's readme.txt file. Removing and Installing a DRAC/MC Module 1 2 3 1 release tab 2 release lever 3 DRAC/MC module Important I/O Configuration Considerations Ensure that you perform certain actions on a system in...if a module of the following actions: • Upgrade DRAC/MC firmware • Issue a software reset command for a DRAC/MC, such as racadm racreset 62 Installing System Options Installing a DRAC/MC Module 1 Ensure that the DRAC/MC module release lever is present in which the I/O ...
Hardware Owner's Manual (PDF)
Page 63
... Controller/Modular Chassis User's Guide at support.dell.com for more information about firmware updates and installing redundant DRAC/MC modules. Otherwise, the module in data loss. See the current Dell Remote Access Controller/Modular Chassis User's Guide at support.dell.com for more information about configuring your DRAC/MC system. Installing a KVM Module 1 Ensure that...
... Controller/Modular Chassis User's Guide at support.dell.com for more information about firmware updates and installing redundant DRAC/MC modules. Otherwise, the module in data loss. See the current Dell Remote Access Controller/Modular Chassis User's Guide at support.dell.com for more information about configuring your DRAC/MC system. Installing a KVM Module 1 Ensure that...


