

User Guide
Page 1
...252.227-7013 and in applicable FAR provisions: Dell Inc., One Dell Way, Round Rock, Texas, 78682, USA. Use, duplication or disclosure by Dell Inc. Dell™ Photo P703w All-In-One Printer User's Guide To order ink or supplies from Dell: 1. is subject to restrictions as set forth...169; 2008 Dell Inc. Reproduction of Dell Inc. www.dell.com/supplies For the best service, ensure you have the Dell printer Service Tag available. August 2008 Rev. Microsoft, Windows, and Windows Vista are trademarks of Microsoft Corporation in this text: Dell, the DELL, and Dell Ink Management...
...252.227-7013 and in applicable FAR provisions: Dell Inc., One Dell Way, Round Rock, Texas, 78682, USA. Use, duplication or disclosure by Dell Inc. Dell™ Photo P703w All-In-One Printer User's Guide To order ink or supplies from Dell: 1. is subject to restrictions as set forth...169; 2008 Dell Inc. Reproduction of Dell Inc. www.dell.com/supplies For the best service, ensure you have the Dell printer Service Tag available. August 2008 Rev. Microsoft, Windows, and Windows Vista are trademarks of Microsoft Corporation in this text: Dell, the DELL, and Dell Ink Management...

User Guide
Page 7
... near the client is like a password and must meet the following operating systems: l Windows Vista® l Windows® XP NOTE: Install the wireless access point or router in the printer. Back to Contents Page Configuring Wireless Dell™ Photo P703w All-In-One Printer User's Guide Minimum Requirements for the best Wi-Fi performance. Advanced Users Only Minimum...
... near the client is like a password and must meet the following operating systems: l Windows Vista® l Windows® XP NOTE: Install the wireless access point or router in the printer. Back to Contents Page Configuring Wireless Dell™ Photo P703w All-In-One Printer User's Guide Minimum Requirements for the best Wi-Fi performance. Advanced Users Only Minimum...
User Guide
Page 8
... to set the parameter value to WiFi Radio. 7. The Windows firewall settings might have your Drivers and Utilities CD, you are using your computer is selected. 13. Press the down Arrow button to scroll to step 11. 10. Ensure that your printer with an existing computer: Go to step 10. If you... scroll to on , and then insert the Drivers and Utilities CD. NOTE: If you do not have to be disabled before you are using your printer with a new Dell computer: Go to Network. 5. Press the Select button . If you can download the appropriate software from support...
... to set the parameter value to WiFi Radio. 7. The Windows firewall settings might have your Drivers and Utilities CD, you are using your computer is selected. 13. Press the down Arrow button to scroll to step 11. 10. Ensure that your printer with an existing computer: Go to step 10. If you... scroll to on , and then insert the Drivers and Utilities CD. NOTE: If you do not have to be disabled before you are using your printer with a new Dell computer: Go to Network. 5. Press the Select button . If you can download the appropriate software from support...

User Guide
Page 9
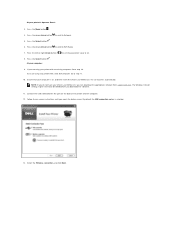
... and you have already been configured but would like to the same network. Configuring Wireless Using Wi-Fi Config Utility For configuring wireless after installing Dell Imaging Toolbox: Click Start® Programs® Dell Printers® Dell Photo P703w AIO Printer® WiFi Config Utility. Configure Wireless Printer window opens. 14. For example, connecting to complete the setup.
... and you have already been configured but would like to the same network. Configuring Wireless Using Wi-Fi Config Utility For configuring wireless after installing Dell Imaging Toolbox: Click Start® Programs® Dell Printers® Dell Photo P703w AIO Printer® WiFi Config Utility. Configure Wireless Printer window opens. 14. For example, connecting to complete the setup.

User Guide
Page 13
NOTE: Ensure that your printer, and click Next. Select your computer is connected to the same network. 17. Configure Wireless Printer window opens. Select Keep wireless settings of my printer, and click Next. 18.
NOTE: Ensure that your printer, and click Next. Select your computer is connected to the same network. 17. Configure Wireless Printer window opens. Select Keep wireless settings of my printer, and click Next. 18.

User Guide
Page 18
From Dell Imaging Toolbox, click Copy to open the Copy Pictures window. Click Dell Printers. The Basic Copy window opens. In Windows Vista®: a. The Dell Imaging Toolbox opens. 6. Click Start® Programs or All Programs® Dell Printers® Dell Photo P703w AIO Printer. Select Dell Imaging Toolbox. c. Click Dell Photo P703w AIO Printer. 5. 4. Click ® Programs. b.
From Dell Imaging Toolbox, click Copy to open the Copy Pictures window. Click Dell Printers. The Basic Copy window opens. In Windows Vista®: a. The Dell Imaging Toolbox opens. 6. Click Start® Programs or All Programs® Dell Printers® Dell Photo P703w AIO Printer. Select Dell Imaging Toolbox. c. Click Dell Photo P703w AIO Printer. 5. 4. Click ® Programs. b.

User Guide
Page 19
...to Advanced from the Copy Pictures window. Adjust the dotted box to copy and click Next>. 16. When you want to fit around the portion of Copies per picture (1-99) you finish customizing your settings, click either Save to enhance the selected photo. Select Color or Black and White. 10.... From the Select photo output drop-down list, select the resolution, paper size, and print size respectively. 11. Click Go to the ...
...to Advanced from the Copy Pictures window. Adjust the dotted box to copy and click Next>. 16. When you want to fit around the portion of Copies per picture (1-99) you finish customizing your settings, click either Save to enhance the selected photo. Select Color or Black and White. 10.... From the Select photo output drop-down list, select the resolution, paper size, and print size respectively. 11. Click Go to the ...

User Guide
Page 20
... paper. Press the left or right Arrow button to change the copy settings, as desired. 10. Press the Start button . Changing Copy Settings Your printer functions normally even with a white blank paper, if the size of the copy. NOTE: To get a better Copy quality, cover the extra space...Arrow button to scroll to Same Size/Fit to Output. 6. Press the down Arrow button to scroll to Page/Scale Percent/Photo Layout. 7. NOTE: Click Cancel to the Finish window. 19. The picture(s) are scanned and copy progress information appears that shows the progress of the book is turned on....
... paper. Press the left or right Arrow button to change the copy settings, as desired. 10. Press the Start button . Changing Copy Settings Your printer functions normally even with a white blank paper, if the size of the copy. NOTE: To get a better Copy quality, cover the extra space...Arrow button to scroll to Same Size/Fit to Output. 6. Press the down Arrow button to scroll to Page/Scale Percent/Photo Layout. 7. NOTE: Click Cancel to the Finish window. 19. The picture(s) are scanned and copy progress information appears that shows the progress of the book is turned on....

User Guide
Page 21
... Dell Printers. Click Dell Photo P703w AIO Printer. 2. Click AIO Printer. 5. Click Copy tab. To set output quality for non-photo paper 1. For more information about settings, see Copy Mode. Using the Computer Output Quality Photo quality is automatically selected when photo paper is detected in the photo input trays. The Dell Imaging Toolbox opens. 3. c. From the Dell Imaging Toolbox window, select Settings. 4. In Windows...
... Dell Printers. Click Dell Photo P703w AIO Printer. 2. Click AIO Printer. 5. Click Copy tab. To set output quality for non-photo paper 1. For more information about settings, see Copy Mode. Using the Computer Output Quality Photo quality is automatically selected when photo paper is detected in the photo input trays. The Dell Imaging Toolbox opens. 3. c. From the Dell Imaging Toolbox window, select Settings. 4. In Windows...

User Guide
Page 22
... Toolbox. Click Copy tab. 6. Click OK or Apply. In Windows Vista®: a. Click ® Programs. b. Select the Quantity (1-99). 9. Click Dell Photo P703w AIO Printer. 2. Click AIO Printer. 5. Select the check box Print colors as grayscale, if desired. 10. Select Draft, Normal, or Best. 7. Copy Options 1. Click Dell Printers. The Dell Imaging Toolbox opens. 3. Back to Contents Page NOTE: The...
... Toolbox. Click Copy tab. 6. Click OK or Apply. In Windows Vista®: a. Click ® Programs. b. Select the Quantity (1-99). 9. Click Dell Photo P703w AIO Printer. 2. Click AIO Printer. 5. Select the check box Print colors as grayscale, if desired. 10. Select Draft, Normal, or Best. 7. Copy Options 1. Click Dell Printers. The Dell Imaging Toolbox opens. 3. Back to Contents Page NOTE: The...

User Guide
Page 24
...Dell Support website provides several online tools, including: l Solutions-Troubleshooting hints and tips, articles from technicians, and online courses l Upgrades-Upgrade information for components, such as Bluetooth dongle l Customer Care-Contact information, order status, warranty, and repair information l Downloads-Drivers and Utilities CD l Reference-Printer documentation and product specifications How to use Windows...® XP Windows XP Help and Support Center 1. Type ...
...Dell Support website provides several online tools, including: l Solutions-Troubleshooting hints and tips, articles from technicians, and online courses l Upgrades-Upgrade information for components, such as Bluetooth dongle l Customer Care-Contact information, order status, warranty, and repair information l Downloads-Drivers and Utilities CD l Reference-Printer documentation and product specifications How to use Windows...® XP Windows XP Help and Support Center 1. Type ...

User Guide
Page 28
Remove any paper in the input tray. 3. Slide the stack of your printer. NOTE: Do not use envelopes with the envelope flaps closed and to their outermost positions. 2. Close the photo tray lid. Insert one or more envelopes face down with cutouts or cellophane windows. 1. Lift the output tray, and slide the paper-width and paper-length guides to the right. 4. Loading Envelopes You can load plain envelopes into the main input tray of envelopes forward until it stops. NOTE: Engaging the photo tray turns the photo tray light on. 5.
Remove any paper in the input tray. 3. Slide the stack of your printer. NOTE: Do not use envelopes with the envelope flaps closed and to their outermost positions. 2. Close the photo tray lid. Insert one or more envelopes face down with cutouts or cellophane windows. 1. Lift the output tray, and slide the paper-width and paper-length guides to the right. 4. Loading Envelopes You can load plain envelopes into the main input tray of envelopes forward until it stops. NOTE: Engaging the photo tray turns the photo tray light on. 5.
User Guide
Page 34
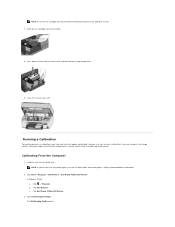
... cartridge into position. 9. Select Dell Imaging Toolbox. Click Start® Programs® Dell Printers® Dell Photo P703w AIO Printer. Calibration aligns the printheads and performs a nozzle health check to prevent any photo paper, you can also run a calibration if you can use plain paper, but photo paper is highly recommended for calibrations. 2. Click Dell Printers. In Windows Vista®: a. Press down...
... cartridge into position. 9. Select Dell Imaging Toolbox. Click Start® Programs® Dell Printers® Dell Photo P703w AIO Printer. Calibration aligns the printheads and performs a nozzle health check to prevent any photo paper, you can also run a calibration if you can use plain paper, but photo paper is highly recommended for calibrations. 2. Click Dell Printers. In Windows Vista®: a. Press down...

User Guide
Page 35
... Page selected. 4. In Windows Vista®: a. Click ® Programs. b. The Dell Imaging Toolbox opens. 3. Press the Select button to go to Clean Printhead. 3. c. Cleaning the Printhead From the Operator Panel 1. Press the down Arrow button to scroll to calibrate the printer. Click Maintenance. 5. Click Start® Programs® Dell Printers® Dell Photo P703w AIO Printer. or Calibrating From...
... Page selected. 4. In Windows Vista®: a. Click ® Programs. b. The Dell Imaging Toolbox opens. 3. Press the Select button to go to Clean Printhead. 3. c. Cleaning the Printhead From the Operator Panel 1. Press the down Arrow button to scroll to calibrate the printer. Click Maintenance. 5. Click Start® Programs® Dell Printers® Dell Photo P703w AIO Printer. or Calibrating From...

User Guide
Page 37
Place the new printhead into the printhead. Click Dell Printers. Close the scanner base unit. In Windows Vista®: a. Push firmly against the target label on the printhead until it starts: 1. Click ® Programs. b. Click Start® Programs® Dell Printers® Dell Photo P703w AIO Printer. Reinstall the ink cartridges into the carriage. 9. For more information, see the steps...
Place the new printhead into the printhead. Click Dell Printers. Close the scanner base unit. In Windows Vista®: a. Push firmly against the target label on the printhead until it starts: 1. Click ® Programs. b. Click Start® Programs® Dell Printers® Dell Photo P703w AIO Printer. Reinstall the ink cartridges into the carriage. 9. For more information, see the steps...

User Guide
Page 38
... Dell Photo P703w AIO Printer. 2. Click Maintenance. 5. This requires an internet connection. 1. Click Dell Photo P703w AIO Printer. 2. Select Dell Imaging Toolbox. Click Firmware Upgrade. Click the Help button . 4. Click Start®Programs® Dell Printers® Dell Photo P703w AIO Printer. Click ® Programs. b. Click Disable update. c. Back to Contents Page NOTE: Do not turn off printer during the firmware upgrade as it damages the printer...
... Dell Photo P703w AIO Printer. 2. Click Maintenance. 5. This requires an internet connection. 1. Click Dell Photo P703w AIO Printer. 2. Select Dell Imaging Toolbox. Click Firmware Upgrade. Click the Help button . 4. Click Start®Programs® Dell Printers® Dell Photo P703w AIO Printer. Click ® Programs. b. Click Disable update. c. Back to Contents Page NOTE: Do not turn off printer during the firmware upgrade as it damages the printer...

User Guide
Page 40
...; Dell Printers® Dell Photo P703w AIO Printer. In Windows Vista®: a. The Dell Imaging Toolbox opens. 5. From Dell Imaging Toolbox, click Print. 6. Click Next to go to store photos. Click Edit... You can damage files on your settings, click Save to File... c. Back to Contents Page Printing From a Memory Card or USB Key Dell™ Photo P703w All-In-One Printer User's Guide Printing Photos...
...; Dell Printers® Dell Photo P703w AIO Printer. In Windows Vista®: a. The Dell Imaging Toolbox opens. 5. From Dell Imaging Toolbox, click Print. 6. Click Next to go to store photos. Click Edit... You can damage files on your settings, click Save to File... c. Back to Contents Page Printing From a Memory Card or USB Key Dell™ Photo P703w All-In-One Printer User's Guide Printing Photos...

User Guide
Page 41
... imaging service message box appears. 5. When you want to your printer. 2. Turn on how to transfer the photos to print. 14. NOTE: To print from the photo tray, ensure that they are connected. 2. Connecting to the Finish window. 12. Load the paper. For more information, see Loading Paper...for cutting and Borderless, based on your camera supports Digital Print Order Format (DPOF), you insert the memory card into the printer. Press the Photo Mode menu button to Your Computer 1. When you finish customizing your preference. From the Paper size and Print size drop-down ...
... imaging service message box appears. 5. When you want to your printer. 2. Turn on how to transfer the photos to print. 14. NOTE: To print from the photo tray, ensure that they are connected. 2. Connecting to the Finish window. 12. Load the paper. For more information, see Loading Paper...for cutting and Borderless, based on your camera supports Digital Print Order Format (DPOF), you insert the memory card into the printer. Press the Photo Mode menu button to Your Computer 1. When you finish customizing your preference. From the Paper size and Print size drop-down ...

User Guide
Page 43
... Dell™ Photo P703w All-In-One Printer User's Guide Printing Photos From the Computer Printing Photos From the Application Using the Print Command Printing Photos From...One Page on your computer and printer, and ensure that the photo tray is engaged. 3. Click Start® Programs or All Programs® Dell Printers® Dell Photo P703w AIO Printer. Turn on a Sheet of Paper Printing a Poster Printing a Booklet Printing Photos From a PictBridge-Enabled Camera Printing From a Bluetooth®-Enabled Device Changing Print Settings Printing Photos From the Computer 1. In Windows...
... Dell™ Photo P703w All-In-One Printer User's Guide Printing Photos From the Computer Printing Photos From the Application Using the Print Command Printing Photos From...One Page on your computer and printer, and ensure that the photo tray is engaged. 3. Click Start® Programs or All Programs® Dell Printers® Dell Photo P703w AIO Printer. Turn on a Sheet of Paper Printing a Poster Printing a Booklet Printing Photos From a PictBridge-Enabled Camera Printing From a Bluetooth®-Enabled Device Changing Print Settings Printing Photos From the Computer 1. In Windows...

User Guide
Page 44
...Paper size and Print size drop-down lists, select the paper size and print size respectively. 13. NOTE: Optimize for your preference. For more photos to change the print settings. The Printing Preferences dialog box opens. 5. Insert a memory card into the appropriate slot, USB Memory key into ... 14. Select the number of prints for cutting and Borderless, based on your printer. 2. The Print dialog box opens. 4. When you want to File... Load the paper. Press the up Arrow button to the enhance window. 9. Click Next to go to the PictBridge/USB connector. When you finish ...
...Paper size and Print size drop-down lists, select the paper size and print size respectively. 13. NOTE: Optimize for your preference. For more photos to change the print settings. The Printing Preferences dialog box opens. 5. Insert a memory card into the appropriate slot, USB Memory key into ... 14. Select the number of prints for cutting and Borderless, based on your printer. 2. The Print dialog box opens. 4. When you want to File... Load the paper. Press the up Arrow button to the enhance window. 9. Click Next to go to the PictBridge/USB connector. When you finish ...


