
Users Guide
Page 3
... parts and controls 8 Front view 8 Back view 9 Bottom view 10 Monitor specifications 11 Resolution specifications 12 Preset display modes 12 Electrical specifications 13 Physical characteristics 13 Environmental characteristics 14 Power management modes 15 Pin assignments 17 Plug-and-Play 22 LCD monitor quality and pixel policy 22 Ergonomics 22 Handling and moving your display 24 Maintenance guidelines 25 Cleaning your monitor 25 Setting up the monitor 26 Connecting the stand 26 Using the tilt, swivel, and vertical extension...
... parts and controls 8 Front view 8 Back view 9 Bottom view 10 Monitor specifications 11 Resolution specifications 12 Preset display modes 12 Electrical specifications 13 Physical characteristics 13 Environmental characteristics 14 Power management modes 15 Pin assignments 17 Plug-and-Play 22 LCD monitor quality and pixel policy 22 Ergonomics 22 Handling and moving your display 24 Maintenance guidelines 25 Cleaning your monitor 25 Setting up the monitor 26 Connecting the stand 26 Using the tilt, swivel, and vertical extension...
Users Guide
Page 4
... . . . 65 Contacting Dell 65 4 | Contents Connecting your monitor 31 Organizing your cables 34 Securing your monitor using Kensington lock (optional 34 Removing the monitor stand 35 Wall mounting (Optional 36 Operating the monitor 37 Turning on the monitor 37 Using the joystick control 37 Using the OSD lock function 39 Front‑panel button 42 Using the On-Screen Display (OSD) Menu 43 Accessing the menu system 43 OSD warning messages 54 Setting the maximum resolution 57 Troubleshooting 58 Self-test...
... . . . 65 Contacting Dell 65 4 | Contents Connecting your monitor 31 Organizing your cables 34 Securing your monitor using Kensington lock (optional 34 Removing the monitor stand 35 Wall mounting (Optional 36 Operating the monitor 37 Turning on the monitor 37 Using the joystick control 37 Using the OSD lock function 39 Front‑panel button 42 Using the On-Screen Display (OSD) Menu 43 Accessing the menu system 43 OSD warning messages 54 Setting the maximum resolution 57 Troubleshooting 58 Self-test...

Users Guide
Page 7
...-C® and USB-C® are registered trademarks of set up and screen optimization. • Power and OSD buttons lock. • Security lock slot. • 0.3 W standby power when in the sleep mode. • Optimize eye comfort with DP and HDMI helps future-proof your monitor. • Plug and play capability if supported by your monitor | 7 Product features The P3221D monitor has an active matrix, Thin Film Transistor (TFT), Liquid Crystal Display (LCD), and LED backlight. ComfortView feature...
...-C® and USB-C® are registered trademarks of set up and screen optimization. • Power and OSD buttons lock. • Security lock slot. • 0.3 W standby power when in the sleep mode. • Optimize eye comfort with DP and HDMI helps future-proof your monitor. • Plug and play capability if supported by your monitor | 7 Product features The P3221D monitor has an active matrix, Thin Film Transistor (TFT), Liquid Crystal Display (LCD), and LED backlight. ComfortView feature...
Users Guide
Page 9
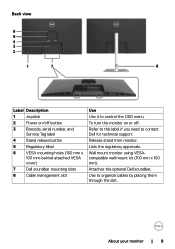
... need to organize cables by placing them through the slot. Attaches the optional Dell soundbar. Lists the regulatory approvals. Use to contact Dell for technical support. Back view 6 5 4 3 2 1 7 8 Label Description 1 Joystick 2 Power on or off button 3 Barcode, serial number, and Service Tag label 4 Stand release button 5 Regulatory label 6 VESA mounting holes (100 mm x 100 mm-behind attached VESA cover) 7 Dell soundbar mounting slots 8 Cable management slot Use Use it to control the OSD menu. To turn the monitor...
... need to organize cables by placing them through the slot. Attaches the optional Dell soundbar. Lists the regulatory approvals. Use to contact Dell for technical support. Back view 6 5 4 3 2 1 7 8 Label Description 1 Joystick 2 Power on or off button 3 Barcode, serial number, and Service Tag label 4 Stand release button 5 Regulatory label 6 VESA mounting holes (100 mm x 100 mm-behind attached VESA cover) 7 Dell soundbar mounting slots 8 Cable management slot Use Use it to control the OSD menu. To turn the monitor...

Users Guide
Page 10
... rate and the alternate mode with DP cable. Bottom view 9 10 1 2 34 56 7 8 Label Description 1 Security lock slot 2 AC power port 3 HDMI port 4 DP port (in) 5&6 USB 2.0 downstream ports(2) 7&8 SuperSpeed USB 5Gbps (USB 3.2 Gen1 ) downstream ports(2) 9 Stand lock 10 USB Type-C Use Secures monitor with HDMI cable (optional). You can use these ports only after you have connected the USB cable (Type-C to Type-C) from the computer to the monitor using the USB Type-C cable. Connect your computer with DP 1.2 support the maximum resolution...
... rate and the alternate mode with DP cable. Bottom view 9 10 1 2 34 56 7 8 Label Description 1 Security lock slot 2 AC power port 3 HDMI port 4 DP port (in) 5&6 USB 2.0 downstream ports(2) 7&8 SuperSpeed USB 5Gbps (USB 3.2 Gen1 ) downstream ports(2) 9 Stand lock 10 USB Type-C Use Secures monitor with HDMI cable (optional). You can use these ports only after you have connected the USB cable (Type-C to Type-C) from the computer to the monitor using the USB Type-C cable. Connect your computer with DP 1.2 support the maximum resolution...

Users Guide
Page 12
Resolution specifications Horizontal scan range Vertical scan range Maximum preset resolution Video display capabilities 30 kHz to 90 kHz 56 Hz to 90° Cable management Yes Dell Display Manager (DDM)Compatibility Easy Arrange and other key features Security Security lock slot (cable lock sold separately) * At panel native only, under Custom Mode preset. Adjustability Height adjustable stand 150 mm Tilt -5° to 21° Swivel -30 to 30° Pivot -90 to 76 Hz...
Resolution specifications Horizontal scan range Vertical scan range Maximum preset resolution Video display capabilities 30 kHz to 90 kHz 56 Hz to 90° Cable management Yes Dell Display Manager (DDM)Compatibility Easy Arrange and other key features Security Security lock slot (cable lock sold separately) * At panel native only, under Custom Mode preset. Adjustability Height adjustable stand 150 mm Tilt -5° to 21° Swivel -30 to 30° Pivot -90 to 76 Hz...

Users Guide
Page 26
... only for the stand that you are detached when the monitor is shipped from any other source, follow the set up instructions that were included with your monitor. If you purchased from the factory. Open the screw handle at the bottom of a flat, clean, and soft surface to secure the stand assembly. 3. CAUTION: Place monitor of the stand base and turn it clockwise to avoid scratching the display panel.
... only for the stand that you are detached when the monitor is shipped from any other source, follow the set up instructions that were included with your monitor. If you purchased from the factory. Open the screw handle at the bottom of a flat, clean, and soft surface to secure the stand assembly. 3. CAUTION: Place monitor of the stand base and turn it clockwise to avoid scratching the display panel.

Users Guide
Page 30
... updated graphics driver that is not working correctly, go the graphics driver website or your computer manufacturer website for your display. If you have rotated your monitor, you may experience performance degradation in the Portrait View Mode, you need to go to www.dell.com/support and see the rotation option or it is not included with your System. NOTE: To use...
... updated graphics driver that is not working correctly, go the graphics driver website or your computer manufacturer website for your display. If you have rotated your monitor, you may experience performance degradation in the Portrait View Mode, you need to go to www.dell.com/support and see the rotation option or it is not included with your System. NOTE: To use...
Users Guide
Page 31
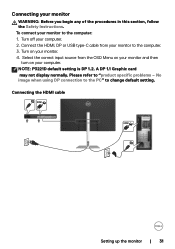
... image when using DP connection to the PC" to "product specific problems - To connect your monitor to the computer: 1. Connect the HDMI, DP or USB type-C cable from the OSD Menu on your monitor and then turn on your monitor WARNING: Before you begin any of the procedures in this section, follow the Safety Instructions. Please refer to change default setting. Select the correct input source from your monitor to the computer. 3. NOTE: P3221D default setting...
... image when using DP connection to the PC" to "product specific problems - To connect your monitor to the computer: 1. Connect the HDMI, DP or USB type-C cable from the OSD Menu on your monitor and then turn on your monitor WARNING: Before you begin any of the procedures in this section, follow the Safety Instructions. Please refer to change default setting. Select the correct input source from your monitor to the computer. 3. NOTE: P3221D default setting...
Users Guide
Page 32
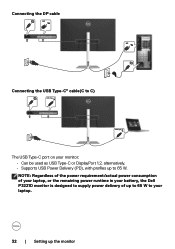
Connecting the DP cable DP DP Connecting the USB Type-C® cable(C to 65 W. NOTE: Regardless of the power requirement/actual power consumption of your laptop, or the remaining power runtime in your battery, the Dell P3221D monitor is designed to supply power delivery of up to 65 W to your monitor: • Can be used as USB Type-C or DisplayPort 1.2, alternatively. • Supports USB Power Delivery (PD), with profiles up to C) USB Type-C USB Type-C The USB Type-C port on your laptop. 32 | Setting up the monitor
Connecting the DP cable DP DP Connecting the USB Type-C® cable(C to 65 W. NOTE: Regardless of the power requirement/actual power consumption of your laptop, or the remaining power runtime in your battery, the Dell P3221D monitor is designed to supply power delivery of up to 65 W to your monitor: • Can be used as USB Type-C or DisplayPort 1.2, alternatively. • Supports USB Power Delivery (PD), with profiles up to C) USB Type-C USB Type-C The USB Type-C port on your laptop. 32 | Setting up the monitor

Users Guide
Page 39
.../ or power button. Use the Lock menu to lock the Menu Buttons? Are you sure you want to lock the button(s). 1. Options 3 Description Use this button to the main menu or exit the OSD main menu. The following options. 32 Monitor Brightness/Contrast Input Source Color Display Menu Personalize Others Language Rotation Transparency Timer Lock Reset Menu Menu Buttons Power Button Menu + Power Buttons Disable Exit 2. Exit 4 Use this button to go back to choose from a list of the following message appears. To unlock the Button, refer to the User's Guide.
.../ or power button. Use the Lock menu to lock the Menu Buttons? Are you sure you want to lock the button(s). 1. Options 3 Description Use this button to the main menu or exit the OSD main menu. The following options. 32 Monitor Brightness/Contrast Input Source Color Display Menu Personalize Others Language Rotation Transparency Timer Lock Reset Menu Menu Buttons Power Button Menu + Power Buttons Disable Exit 2. Exit 4 Use this button to go back to choose from a list of the following message appears. To unlock the Button, refer to the User's Guide.
Users Guide
Page 46
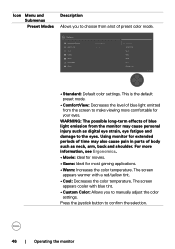
... effects of preset color mode. 32 Monitor Brightness/Contrast Input Source Color Display Menu Personalize Others Preset Modes Input Color Format Reset Color Standard ComfortView Movie Game Warm Cool Custom Color Exit • Standard: Default color settings. The screen appears cooler with a red/yellow tint. • Cool: Decreases the color temperature. The screen appears warmer with blue tint. • Custom Color: Allows you to choose from a list of blue light emission from the screen to make viewing more information, see...
... effects of preset color mode. 32 Monitor Brightness/Contrast Input Source Color Display Menu Personalize Others Preset Modes Input Color Format Reset Color Standard ComfortView Movie Game Warm Cool Custom Color Exit • Standard: Default color settings. The screen appears cooler with a red/yellow tint. • Cool: Decreases the color temperature. The screen appears warmer with blue tint. • Custom Color: Allows you to choose from a list of blue light emission from the screen to make viewing more information, see...

Users Guide
Page 50
...Lock Description Controls user access to the factory defaults. 50 | Operating the monitor Resets all of Menu and Power buttons. • Disable: Move the Joystick left and hold for 4 sec. The buttons are locked. 32 Monitor Brightness/Contrast Input Source Color Display Menu Personalize Others Language Rotation Transparency Timer Lock Reset Menu Menu Buttons Power Button Menu + Power Buttons Disable Exit Reset Menu • Menu Buttons: Through OSD to lock the Menu buttons. • Power Button: Through OSD to lock the Power button. • Menu + Power Buttons: Through OSD...
...Lock Description Controls user access to the factory defaults. 50 | Operating the monitor Resets all of Menu and Power buttons. • Disable: Move the Joystick left and hold for 4 sec. The buttons are locked. 32 Monitor Brightness/Contrast Input Source Color Display Menu Personalize Others Language Rotation Transparency Timer Lock Reset Menu Menu Buttons Power Button Menu + Power Buttons Disable Exit Reset Menu • Menu Buttons: Through OSD to lock the Menu buttons. • Power Button: Through OSD to lock the Power button. • Menu + Power Buttons: Through OSD...

Users Guide
Page 52
... feature for best user experience and optimum performance of your computer. DDC/CI (Display Data Channel/Command Interface) allows your monitor parameters (brightness, color balance, and etc.) to adjust the OSD settings such as the DDC/CI, LCD conditioning, and so on your monitor. 32 Monitor Brightness/Contrast Display Info Input Source DDC/CI On Color LCD Conditioning O Display Firmware Menu Service Tag Personalize Reset Others Others Factory Reset Exit 52 | Operating the monitor Icon Menu and Submenus...
... feature for best user experience and optimum performance of your computer. DDC/CI (Display Data Channel/Command Interface) allows your monitor parameters (brightness, color balance, and etc.) to adjust the OSD settings such as the DDC/CI, LCD conditioning, and so on your monitor. 32 Monitor Brightness/Contrast Display Info Input Source DDC/CI On Color LCD Conditioning O Display Firmware Menu Service Tag Personalize Reset Others Others Factory Reset Exit 52 | Operating the monitor Icon Menu and Submenus...

Users Guide
Page 58
...-test mode, the power LED remains white. www.dell.com/P3221D or No DP Cable The display will continuously scroll through the screen. This box also appears during normal system operation if the video cable becomes disconnected or damaged. 58 | Troubleshooting Turn on -screen (against a black background), if the monitor cannot sense a video signal and is functioning properly. Turn off both your monitor and computer are properly connected but the monitor screen remains...
...-test mode, the power LED remains white. www.dell.com/P3221D or No DP Cable The display will continuously scroll through the screen. This box also appears during normal system operation if the video cable becomes disconnected or damaged. 58 | Troubleshooting Turn on -screen (against a black background), if the monitor cannot sense a video signal and is functioning properly. Turn off both your monitor and computer are properly connected but the monitor screen remains...

Users Guide
Page 59
... problem with your monitor, or with your monitor and reconnect the video cable; Check the video card and computer. Turn off your computer and video card. Built-in diagnostics Your monitor has a built-in diagnostics: 1. Press the left directional navigation of the screen). 2. then turn on the surface of Joystick for four seconds until the screen displays green, blue, black, and white colors. Observe if the screen has any defects or abnormalities. 7. Troubleshooting...
... problem with your monitor, or with your monitor and reconnect the video cable; Check the video card and computer. Turn off your computer and video card. Built-in diagnostics Your monitor has a built-in diagnostics: 1. Press the left directional navigation of the screen). 2. then turn on the surface of Joystick for four seconds until the screen displays green, blue, black, and white colors. Observe if the screen has any defects or abnormalities. 7. Troubleshooting...
Users Guide
Page 60
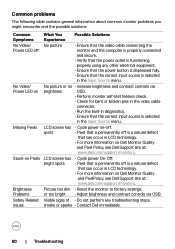
... power On-Off. Picture too dim • Reset the monitor to factory settings. or too bright • Adjust brightness and contrast controls via brightness OSD. • Perform monitor self-test feature check. • Check for bent or broken pins in the video cable connector. • Run the built-in diagnostics. • Ensure that the correct input source is selected in LCD technology. • For more information on Dell Monitor Quality and Pixel Policy, see Dell Support site...
... power On-Off. Picture too dim • Reset the monitor to factory settings. or too bright • Adjust brightness and contrast controls via brightness OSD. • Perform monitor self-test feature check. • Check for bent or broken pins in the video cable connector. • Run the built-in diagnostics. • Ensure that the correct input source is selected in LCD technology. • For more information on Dell Monitor Quality and Pixel Policy, see Dell Support site...

Users Guide
Page 61
... the application. • Adjust R/G/B value under Custom Color in Color menu OSD. • Change the Input Color Format to PC RGB or YPbPr in the Color menu OSD. • Run the built-in the Color menu OSD depending on the Modes). Wrong Color Picture color not good • Change the settings of screen • Alternatively, use image left on image displayed (for more information, see Power Management the monitor for bent or broken pins in the video cable connector. a long period...
... the application. • Adjust R/G/B value under Custom Color in Color menu OSD. • Change the Input Color Format to PC RGB or YPbPr in the Color menu OSD. • Run the built-in the Color menu OSD depending on the Modes). Wrong Color Picture color not good • Change the settings of screen • Alternatively, use image left on image displayed (for more information, see Power Management the monitor for bent or broken pins in the video cable connector. a long period...
Users Guide
Page 62
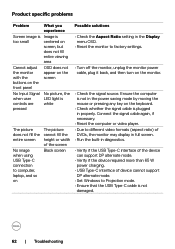
... screen No Input Signal when user controls are pressed No picture, the LED light is white The picture does not fill the entire screen No image when using USB Type-C connection to computer, laptop, and so on The picture cannot fill the height or width of device cannot support DP alternate mode. • Set Windows to factory settings. • Turn off the monitor, unplug the monitor power cable, plug it back, and then turn on the keyboard. • Check whether the signal cable...
... screen No Input Signal when user controls are pressed No picture, the LED light is white The picture does not fill the entire screen No image when using USB Type-C connection to computer, laptop, and so on The picture cannot fill the height or width of device cannot support DP alternate mode. • Set Windows to factory settings. • Turn off the monitor, unplug the monitor power cable, plug it back, and then turn on the keyboard. • Check whether the signal cable...
Display Manager Users Guide
Page 4
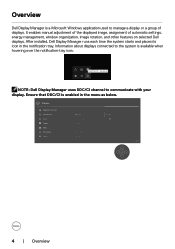
... available when hovering over the notification-tray icon. Overview Dell Display Manager is a Microsoft Windows application used to communicate with your display. It enables manual adjustment of the displayed image, assignment of displays. After installed, Dell Display Manager runs each time the system starts and places its icon in the menu as below. 32 Monitor Brightness/Contrast Display Info Input Source DDC/CI On Color LCD Conditioning O Display Firmware Menu Service Tag Personalize Reset Others Others Factory Reset Exit 4 | Overview
... available when hovering over the notification-tray icon. Overview Dell Display Manager is a Microsoft Windows application used to communicate with your display. It enables manual adjustment of the displayed image, assignment of displays. After installed, Dell Display Manager runs each time the system starts and places its icon in the menu as below. 32 Monitor Brightness/Contrast Display Info Input Source DDC/CI On Color LCD Conditioning O Display Firmware Menu Service Tag Personalize Reset Others Others Factory Reset Exit 4 | Overview


