
Display Manager 2.3 for Windows Users Guide
Page 23
... Auto Color Temperature are both turned off , this Synchronization function connected, and you have multiple Dell monitors that support this function is turned on, adjust the Range Level Auto Brightness Range Level of the Auto Brightness. NOTE: The Auto function is not available. Adjusting the brightness and contrast │ 23 Primary Monitor Turns on Primary Monitor for Synchronization if for Synchronization is available on monitors equipped with an ambient light sensor. Feature Auto Function Description Auto Brightness Turns...
... Auto Color Temperature are both turned off , this Synchronization function connected, and you have multiple Dell monitors that support this function is turned on, adjust the Range Level Auto Brightness Range Level of the Auto Brightness. NOTE: The Auto function is not available. Adjusting the brightness and contrast │ 23 Primary Monitor Turns on Primary Monitor for Synchronization if for Synchronization is available on monitors equipped with an ambient light sensor. Feature Auto Function Description Auto Brightness Turns...
Display Manager 2.3 for Windows Users Guide
Page 26
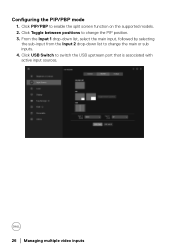
From the Input 1 drop-down list, select the main input, followed by selecting the sub-input from the Input 2 drop-down list to change the main or sub inputs. 4. Click Toggle between positions to change the PIP position. 3. Click PIP/PBP to switch the USB upstream port that is associated with active input sources. 26 │ Managing multiple video inputs Click USB Switch to enable the split screen function on the supported models. 2. Configuring the PIP/PBP mode 1.
From the Input 1 drop-down list, select the main input, followed by selecting the sub-input from the Input 2 drop-down list to change the main or sub inputs. 4. Click Toggle between positions to change the PIP position. 3. Click PIP/PBP to switch the USB upstream port that is associated with active input sources. 26 │ Managing multiple video inputs Click USB Switch to enable the split screen function on the supported models. 2. Configuring the PIP/PBP mode 1.
Display Manager 2.3 for Windows Users Guide
Page 61
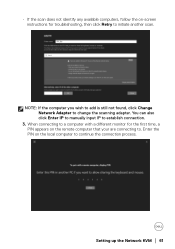
...monitor for troubleshooting, then click Retry to initiate another scan. Enter the PIN on the remote computer that your are connecting to. Setting up the Network KVM │ 61 NOTE: If the computer you wish to add is still not found, click Change Network Adapter to establish connection.... 3. • If the scan does not identify any available computers, follow the on-screen instructions for the first time, a PIN appears on the local computer to continue the connection process. You can also click Enter IP to manually input IP to change...
...monitor for troubleshooting, then click Retry to initiate another scan. Enter the PIN on the remote computer that your are connecting to. Setting up the Network KVM │ 61 NOTE: If the computer you wish to add is still not found, click Change Network Adapter to establish connection.... 3. • If the scan does not identify any available computers, follow the on-screen instructions for the first time, a PIN appears on the local computer to continue the connection process. You can also click Enter IP to manually input IP to change...

Display Manager 2.3 for Windows Users Guide
Page 65
... strongly recommended to turn off this feature. The mouse cursor can navigate to KVM Settings > Manage Cluster to install antimalware or other connected computers.* CAUTION: Dell Display Manager enables secure content and file sharing between computers with connected computers, but only one Cluster to other connected computers.* NOTE: Cut and Paste is not supported on remote computers. Using the Network KVM...
... strongly recommended to turn off this feature. The mouse cursor can navigate to KVM Settings > Manage Cluster to install antimalware or other connected computers.* CAUTION: Dell Display Manager enables secure content and file sharing between computers with connected computers, but only one Cluster to other connected computers.* NOTE: Cut and Paste is not supported on remote computers. Using the Network KVM...
Display Manager 2.3 for Windows Users Guide
Page 89
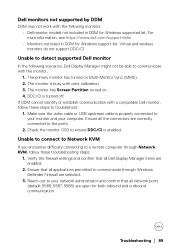
... cable is properly connected to ensure DDC/CI is turned off. Verify the firewall settings and confirm that all Dell Display Manager items are open for Windows supported list. DDC/CI is enabled. Dell monitors not supported by DDM DDM may not work with the monitor. 1. The primary monitor has turned on . 4. Troubleshooting │ 89 Check the monitor OSD to your monitor and your network administrator and confirm that all network ports (default...
... cable is properly connected to ensure DDC/CI is turned off. Verify the firewall settings and confirm that all Dell Display Manager items are open for Windows supported list. DDC/CI is enabled. Dell monitors not supported by DDM DDM may not work with the monitor. 1. The primary monitor has turned on . 4. Troubleshooting │ 89 Check the monitor OSD to your monitor and your network administrator and confirm that all network ports (default...

Monitor Simplified Service Manual
Page 10
... on the position as the picture below shown. Disassembly and Assembly Procedures 5.2 Assembly Procedures: Place a bracket chassis base on a protective S1 cushion, then paste 4pcs silicon sheet on the back of LCD module, then push the earing-locks and connect S7 LVDS cable and panel lamp cable to the connectors of the bracket to place screen faced down for locking the power board and interface board. (No.1 screw size=M4x8...
... on the position as the picture below shown. Disassembly and Assembly Procedures 5.2 Assembly Procedures: Place a bracket chassis base on a protective S1 cushion, then paste 4pcs silicon sheet on the back of LCD module, then push the earing-locks and connect S7 LVDS cable and panel lamp cable to the connectors of the bracket to place screen faced down for locking the power board and interface board. (No.1 screw size=M4x8...

Monitor Simplified Service Manual
Page 13
.... 5. If your monitor is functioning properly. then turn on the monitor. 6. Trouble Shooting Instructions Troubleshooting WARNING: Before you use the previous procedure, check your video controller and computer, becaus e your monitor screen remains blank afte r you begin any of the procedures in self-test mode, the power LED remains white. 4. Sel f-test Your monitor provides a self-test feature that allows you to check whether your monitor and reconnect the video cable;
.... 5. If your monitor is functioning properly. then turn on the monitor. 6. Trouble Shooting Instructions Troubleshooting WARNING: Before you use the previous procedure, check your video controller and computer, becaus e your monitor screen remains blank afte r you begin any of the procedures in self-test mode, the power LED remains white. 4. Sel f-test Your monitor provides a self-test feature that allows you to check whether your monitor and reconnect the video cable;
Monitor Simplified Service Manual
Page 17
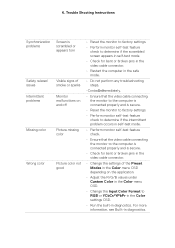
Trouble Shooting Instructions Synchronization problems Safety related issues Intermittent problems Missing color Wrong color Screen is scrambled or appears torn Visible signs of smoke or sparks Monitor malfunctions on and o Picture missing color Picture color not good • Reset the monitor to factory settings. • Perform monitor self-test feature check to determine if the scrambled screen appears in self-test mode. • Check for bent or broken pins in the video cable connector. •...
Trouble Shooting Instructions Synchronization problems Safety related issues Intermittent problems Missing color Wrong color Screen is scrambled or appears torn Visible signs of smoke or sparks Monitor malfunctions on and o Picture missing color Picture color not good • Reset the monitor to factory settings. • Perform monitor self-test feature check to determine if the scrambled screen appears in self-test mode. • Check for bent or broken pins in the video cable connector. •...

Monitor Simplified Service Manual
Page 18
... or overshooting Video ghosting, shadows or color smear while scro l l ing Change the Response Time in Windows Power Options or Mac Energy Saver setting. • Alternatively, use a dynamically changing screensaver. or color depth drops to 18 bits) Issues of incorrect refresh rate or missing colors •Set USB-C Prioritization to turn o after a few minutes of native resolution changes from the static image displayed appears on your graphic card. Picture quality (Refresh rate of screen idle time...
... or overshooting Video ghosting, shadows or color smear while scro l l ing Change the Response Time in Windows Power Options or Mac Energy Saver setting. • Alternatively, use a dynamically changing screensaver. or color depth drops to 18 bits) Issues of incorrect refresh rate or missing colors •Set USB-C Prioritization to turn o after a few minutes of native resolution changes from the static image displayed appears on your graphic card. Picture quality (Refresh rate of screen idle time...
Monitor Simplified Service Manual
Page 19
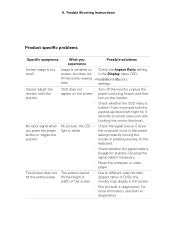
... viewing •Resetthemonitotrofactory area settings. The picture does not The picture cannot • Due to unlock (see Built-in properly. Trouble Shooting Instructions Product speci c problems Speci c symptoms What you press the power button or toggle the joystick No picture, the LED light is locked. No input signal when you experience Possible solutions Screen image is too smal l Image is centered on the monitor. • Check whether the OSD menu is white • Check the signal source...
... viewing •Resetthemonitotrofactory area settings. The picture does not The picture cannot • Due to unlock (see Built-in properly. Trouble Shooting Instructions Product speci c problems Speci c symptoms What you press the power button or toggle the joystick No picture, the LED light is locked. No input signal when you experience Possible solutions Screen image is too smal l Image is centered on the monitor. • Check whether the OSD menu is white • Check the signal source...

Monitor Simplified Service Manual
Page 20
...; Check the status LED of the Ethernet cable if the LED is no HDMI/DisplayPort/USB Type-C video when cable into the monitor. OS setting or cable • Ensure that the latest BIOS and connection issue drivers for your computer are installed on your computer. • Ensure that the Ethernet cable is set to con rm connectivity. 6. unplugging/plugging the cable from the monitor. Trouble Shooting Instructions No video at HDMI/ DisplayPort/USB Type-C port No...
...; Check the status LED of the Ethernet cable if the LED is no HDMI/DisplayPort/USB Type-C video when cable into the monitor. OS setting or cable • Ensure that the latest BIOS and connection issue drivers for your computer are installed on your computer. • Ensure that the Ethernet cable is set to con rm connectivity. 6. unplugging/plugging the cable from the monitor. Trouble Shooting Instructions No video at HDMI/ DisplayPort/USB Type-C port No...

Monitor Users Guide
Page 9
... standing position. • Color gamut of set-up to a compatible notebook while receiving video and data signal. • Tilt, swivel, height, and pivot adjustment capabilities. • Ultra-thin bezel minimizes the bezel gap in multi-monitor usage, enabling easier setup with an elegant viewing experience. • Removable stand and Video Electronics Standards Association (VESA™) 100 mm mounting holes for ease of 99% sRGB (typical). • Digital connectivity with DisplayPort, HDMI...
... standing position. • Color gamut of set-up to a compatible notebook while receiving video and data signal. • Tilt, swivel, height, and pivot adjustment capabilities. • Ultra-thin bezel minimizes the bezel gap in multi-monitor usage, enabling easier setup with an elegant viewing experience. • Removable stand and Video Electronics Standards Association (VESA™) 100 mm mounting holes for ease of 99% sRGB (typical). • Digital connectivity with DisplayPort, HDMI...
Monitor Users Guide
Page 13
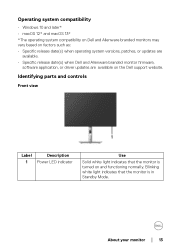
... compatibility on Dell and Alienware branded monitors may vary based on factors such as: • Specific release date(s) when operating system versions, patches, or updates are available. • Specific release date(s) when Dell and Alienware branded monitor firmware, software application, or driver updates are available on and functioning normally. Identifying parts and controls Front view Label Description 1 Power LED indicator Use Solid white light indicates that the monitor is turned on the Dell support website. Blinking white light...
... compatibility on Dell and Alienware branded monitors may vary based on factors such as: • Specific release date(s) when operating system versions, patches, or updates are available. • Specific release date(s) when Dell and Alienware branded monitor firmware, software application, or driver updates are available on and functioning normally. Identifying parts and controls Front view Label Description 1 Power LED indicator Use Solid white light indicates that the monitor is turned on the Dell support website. Blinking white light...

Monitor Users Guide
Page 31
... type of stand assembly 1.51 kg (3.33 lb) Model P2725HE/P2725HE WOST Signal cable type • Digital: DisplayPort, 20 pins • Digital: HDMI, 19 pins (cable not included) • Universal Series Bus: Type-C, 24 pins NOTE: Dell monitors are designed to manufacture these cables, Dell does not guarantee video performance on cables that are not shipped with stand assembly and cables 5.33 kg (11.75 lb) Weight without stand assembly (For wall mount or VESA mount considerations -
... type of stand assembly 1.51 kg (3.33 lb) Model P2725HE/P2725HE WOST Signal cable type • Digital: DisplayPort, 20 pins • Digital: HDMI, 19 pins (cable not included) • Universal Series Bus: Type-C, 24 pins NOTE: Dell monitors are designed to manufacture these cables, Dell does not guarantee video performance on cables that are not shipped with stand assembly and cables 5.33 kg (11.75 lb) Weight without stand assembly (For wall mount or VESA mount considerations -
Monitor Users Guide
Page 42
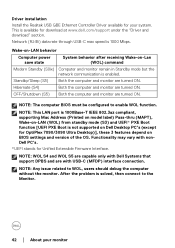
...; About your system. OFF/Shutdown (S5) Both the computer and monitor are turned ON. After the problem is 1000 Mbps. This is available for Unified Extensible Firmware Interface. Hibernate (S4) Both the computer and monitor are with nonDell PC's. *UEFI stands for download at www.dell.com/support under the "Driver and download" section. Driver installation Install the Realtek USB GBE Ethernet Controller Driver available for your...
...; About your system. OFF/Shutdown (S5) Both the computer and monitor are turned ON. After the problem is 1000 Mbps. This is available for Unified Extensible Firmware Interface. Hibernate (S4) Both the computer and monitor are with nonDell PC's. *UEFI stands for download at www.dell.com/support under the "Driver and download" section. Driver installation Install the Realtek USB GBE Ethernet Controller Driver available for your...

Monitor Users Guide
Page 64
... illustration only. NOTE: The image is for cable attachment), organize all cables as shown above. For more information on using the Kensington security lock. Securing your monitor to a table using the Kensington lock (sold separately), see Connecting your monitor for the purpose of the lock may vary. 64 │ Setting up the monitor Organizing your cables When connecting the necessary cables (see the documentation that is...
... illustration only. NOTE: The image is for cable attachment), organize all cables as shown above. For more information on using the Kensington security lock. Securing your monitor to a table using the Kensington lock (sold separately), see Connecting your monitor for the purpose of the lock may vary. 64 │ Setting up the monitor Organizing your cables When connecting the necessary cables (see the documentation that is...
Monitor Users Guide
Page 74
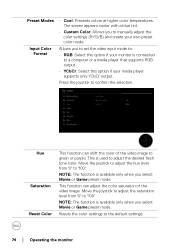
... preset mode. Resets the color settings to manually adjust the color settings (R/G/B) and create your media player supports only YCbCr output. The screen appears cooler with a blue tint. • Custom Color: Allows you to set the video input mode to: • RGB: Select this option if your own preset color mode. Move the joystick to adjust the saturation level from '0' to confirm the selection. This is connected to green or purple. Preset Modes Input Color...
... preset mode. Resets the color settings to manually adjust the color settings (R/G/B) and create your media player supports only YCbCr output. The screen appears cooler with a blue tint. • Custom Color: Allows you to set the video input mode to: • RGB: Select this option if your own preset color mode. Move the joystick to adjust the saturation level from '0' to confirm the selection. This is connected to green or purple. Preset Modes Input Color...

Monitor Users Guide
Page 78
... prevent others from accessing the controls. Resets all OSD settings to set the lock options using the pop-up menu. Reset Menu • Menu Buttons: All joystick functions are locked and not accessible by the user. The default setting is locked and not accessible by the user. • Menu + Power Buttons: Both the joystick & Power button are locked and not accessible by the user. • Power Button: Only the Power button is Disable. NOTE: To unlock, move and hold the joystick...
... prevent others from accessing the controls. Resets all OSD settings to set the lock options using the pop-up menu. Reset Menu • Menu Buttons: All joystick functions are locked and not accessible by the user. The default setting is locked and not accessible by the user. • Menu + Power Buttons: Both the joystick & Power button are locked and not accessible by the user. • Power Button: Only the Power button is Disable. NOTE: To unlock, move and hold the joystick...
Monitor Users Guide
Page 89
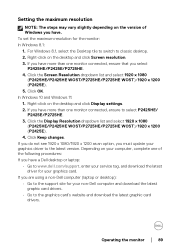
... click Screen resolution. 3. Click the Display Resolution dropdown list and select 1920 x 1080 (P2425HE/P2425HE WOST/P2725HE/P2725HE WOST)/1920 x 1200 (P2425E). 4. If you have a Dell desktop or laptop: • Go to www.dell.com/support, enter your service tag, and download the latest driver for your computer, complete one of Windows you have more than one monitor connected, ensure to the graphics card's website and download...
... click Screen resolution. 3. Click the Display Resolution dropdown list and select 1920 x 1080 (P2425HE/P2425HE WOST/P2725HE/P2725HE WOST)/1920 x 1200 (P2425E). 4. If you have a Dell desktop or laptop: • Go to www.dell.com/support, enter your service tag, and download the latest driver for your computer, complete one of Windows you have more than one monitor connected, ensure to the graphics card's website and download...

Monitor Users Guide
Page 101
..., then plug the docking the port, there is no HDMI/DisplayPort/USB Type-C video when cable into the monitor. unplugging/plugging the cable from the monitor. Troubleshooting │ 101 Then, power on the monitor and the hub/router/ firewal l. • Check the status LED of the Ethernet cable if the LED is connected securely on the computer and plug the power cord and the USB Type-C cable into the notebook. OS setting or cable •...
..., then plug the docking the port, there is no HDMI/DisplayPort/USB Type-C video when cable into the monitor. unplugging/plugging the cable from the monitor. Troubleshooting │ 101 Then, power on the monitor and the hub/router/ firewal l. • Check the status LED of the Ethernet cable if the LED is connected securely on the computer and plug the power cord and the USB Type-C cable into the notebook. OS setting or cable •...


