
Display Manager 2.3 for Windows Users Guide
Page 7
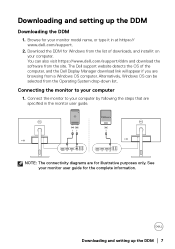
... monitor model name, or type it on your monitor user guide for Windows from the site. See your computer. You can be selected from a Windows OS computer. NOTE: The connectivity diagrams are browsing from the Operating System drop-down list. Downloading and setting up the DDM │ 7 Downloading and setting up the DDM Downloading the DDM 1. The Dell support website detects the OS of downloads, and install...
... monitor model name, or type it on your monitor user guide for Windows from the site. See your computer. You can be selected from a Windows OS computer. NOTE: The connectivity diagrams are browsing from the Operating System drop-down list. Downloading and setting up the DDM │ 7 Downloading and setting up the DDM Downloading the DDM 1. The Dell support website detects the OS of downloads, and install...

Display Manager 2.3 for Windows Users Guide
Page 23
... Auto Brightness Range Level of the Auto Brightness. Adjusting the brightness and contrast │ 23 NOTE: When Auto Brightness is turned off , Primary Monitor for you want the other monitors to adjust their Brightness or RGB settings according to the ambient light condition detected by the primary monitor. NOTE: When Auto Brightness and Auto Color Temperature are both turned off , this Synchronization function connected, and you have multiple Dell monitors that support this function is not available. Auto Brightness When Auto Brightness...
... Auto Brightness Range Level of the Auto Brightness. Adjusting the brightness and contrast │ 23 NOTE: When Auto Brightness is turned off , Primary Monitor for you want the other monitors to adjust their Brightness or RGB settings according to the ambient light condition detected by the primary monitor. NOTE: When Auto Brightness and Auto Color Temperature are both turned off , this Synchronization function connected, and you have multiple Dell monitors that support this function is not available. Auto Brightness When Auto Brightness...
Display Manager 2.3 for Windows Users Guide
Page 26
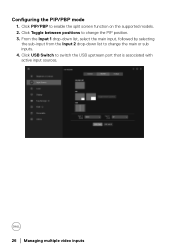
Click PIP/PBP to change the PIP position. 3. From the Input 1 drop-down list, select the main input, followed by selecting the sub-input from the Input 2 drop-down list to enable the split screen function on the supported models. 2. Click USB Switch to change the main or sub inputs. 4. Configuring the PIP/PBP mode 1. Click Toggle between positions to switch the USB upstream port that is associated with active input sources. 26 │ Managing multiple video inputs
Click PIP/PBP to change the PIP position. 3. From the Input 1 drop-down list, select the main input, followed by selecting the sub-input from the Input 2 drop-down list to enable the split screen function on the supported models. 2. Click USB Switch to change the main or sub inputs. 4. Configuring the PIP/PBP mode 1. Click Toggle between positions to switch the USB upstream port that is associated with active input sources. 26 │ Managing multiple video inputs

Display Manager 2.3 for Windows Users Guide
Page 35
.... Adjusting monitor display settings │ 35 NOTE: The Smart HDR function is only available for monitors that support changing orientation from DDM, the monitor OSD orientation setting will change common monitor settings. Feature Display Function Description Resolution & Adjust the resolution and refresh rate of the monitor operating system display. Change the size Scale the user interface component up or down. of text, apps, and other items Orientation Change the orientation of the display Refresh Rate setting. Smart HDR Turn on...
.... Adjusting monitor display settings │ 35 NOTE: The Smart HDR function is only available for monitors that support changing orientation from DDM, the monitor OSD orientation setting will change common monitor settings. Feature Display Function Description Resolution & Adjust the resolution and refresh rate of the monitor operating system display. Change the size Scale the user interface component up or down. of text, apps, and other items Orientation Change the orientation of the display Refresh Rate setting. Smart HDR Turn on...
Display Manager 2.3 for Windows Users Guide
Page 61
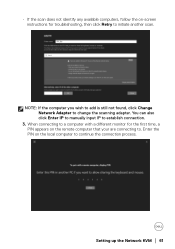
... monitor for troubleshooting, then click Retry to initiate another scan. You can also click Enter IP to manually input IP to continue the connection process. Enter the PIN on the remote computer that your are connecting to. Setting up the Network KVM │ 61 • If the scan does not identify any available computers, follow the on-screen instructions for...
... monitor for troubleshooting, then click Retry to initiate another scan. You can also click Enter IP to manually input IP to continue the connection process. Enter the PIN on the remote computer that your are connecting to. Setting up the Network KVM │ 61 • If the scan does not identify any available computers, follow the on-screen instructions for...

Display Manager 2.3 for Windows Users Guide
Page 65
...-malware software, providing no scanning or protection against malicious files during transfers. NOTE: When using a high DPI mouse, you can cross to a maximum of four computers. The crossing point is strongly recommended to turn off this feature. NOTE: Certain key combinations, function keys, specialized keys, and touch bar keys are not supported for controlling remote computers. Setting up...
...-malware software, providing no scanning or protection against malicious files during transfers. NOTE: When using a high DPI mouse, you can cross to a maximum of four computers. The crossing point is strongly recommended to turn off this feature. NOTE: Certain key combinations, function keys, specialized keys, and touch bar keys are not supported for controlling remote computers. Setting up...
Display Manager 2.3 for Windows Users Guide
Page 89
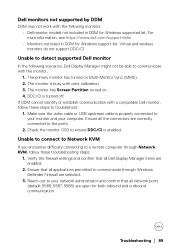
...-Monitor Sync (MMS). 2. Make sure the video cable or USB upstream cable is enabled. Virtual and wireless monitors do not support DDC/CI Unable to troubleshoot: 1. Ensure all network ports (default 5566, 5567, 5568) are selected. 3. Check the monitor OSD to communicate through Network KVM, follow these troubleshooting steps: 1. The monitor is turned off. Ensure that all the connectors are correctly connected to a remote computer through Windows Defender Firewall are open for Windows support list. Dell monitors...
...-Monitor Sync (MMS). 2. Make sure the video cable or USB upstream cable is enabled. Virtual and wireless monitors do not support DDC/CI Unable to troubleshoot: 1. Ensure all network ports (default 5566, 5567, 5568) are selected. 3. Check the monitor OSD to communicate through Network KVM, follow these troubleshooting steps: 1. The monitor is turned off. Ensure that all the connectors are correctly connected to a remote computer through Windows Defender Firewall are open for Windows support list. Dell monitors...

Monitor Users Guide
Page 6
... in the wall mounting section of the User's Guide. For example, do not attempt to remove any cover or touch the inside of controls, adjustments, or procedures other than those specified in this documentation may cause damage to ensure your monitor. Ensure to use the monitor on safety instructions, see the Safety, Environmental, and Regulatory Information (SERI) document that is sold separately. Safety instructions Use the...
... in the wall mounting section of the User's Guide. For example, do not attempt to remove any cover or touch the inside of controls, adjustments, or procedures other than those specified in this documentation may cause damage to ensure your monitor. Ensure to use the monitor on safety instructions, see the Safety, Environmental, and Regulatory Information (SERI) document that is sold separately. Safety instructions Use the...
Monitor Users Guide
Page 9
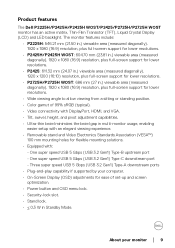
...; Video connectivity with DisplayPort, HDMI, and VGA. • Tilt, swivel, height, and pivot adjustment capabilities. • Ultra-thin bezel minimizes the bezel gap in multi-monitor usage, enabling easier setup with an elegant viewing experience. • Removable stand and Video Electronics Standards Association (VESA™) 100 mm mounting holes for lower resolutions. • Wide viewing angle to allow viewing from a sitting or standing position. • Color gamut of set-up and screen optimization. • Power button and OSD menu lock...
...; Video connectivity with DisplayPort, HDMI, and VGA. • Tilt, swivel, height, and pivot adjustment capabilities. • Ultra-thin bezel minimizes the bezel gap in multi-monitor usage, enabling easier setup with an elegant viewing experience. • Removable stand and Video Electronics Standards Association (VESA™) 100 mm mounting holes for lower resolutions. • Wide viewing angle to allow viewing from a sitting or standing position. • Color gamut of set-up and screen optimization. • Power button and OSD menu lock...

Monitor Users Guide
Page 12
... than the standard RGB color model, particularly in the display. Protocol 3, is a color space used in the United States. 4 sRGB is a standard red, green, and blue color space that is a color space created by reducing excessive blue light, resulting in a more yellow tone. 2 Color gamut describes the availability of movement Luminance changes shall decrease less than the standard RGB color space. 6 Adobe RGB is in use on monitors, printers, and...
... than the standard RGB color model, particularly in the display. Protocol 3, is a color space used in the United States. 4 sRGB is a standard red, green, and blue color space that is a color space created by reducing excessive blue light, resulting in a more yellow tone. 2 Color gamut describes the availability of movement Luminance changes shall decrease less than the standard RGB color space. 6 Adobe RGB is in use on monitors, printers, and...

Monitor Users Guide
Page 13
... based on factors such as: • Specific release date(s) when operating system versions, patches, or updates are available. • Specific release date(s) when Dell and Alienware branded monitor firmware, software application, or driver updates are available on and functioning normally. About your monitor │ 13 Blinking white light indicates that the monitor is in Standby Mode. Identifying parts and controls Front view Label Description 1 Power LED indicator Use Solid white light indicates that the monitor...
... based on factors such as: • Specific release date(s) when operating system versions, patches, or updates are available. • Specific release date(s) when Dell and Alienware branded monitor firmware, software application, or driver updates are available on and functioning normally. About your monitor │ 13 Blinking white light indicates that the monitor is in Standby Mode. Identifying parts and controls Front view Label Description 1 Power LED indicator Use Solid white light indicates that the monitor...

Monitor Users Guide
Page 48
... at the bottom of the display panel and corrode the electronics resulting in the appearance of your Dell monitor. WARNING: Before cleaning the monitor, unplug the monitor power cable from any moisture or cleaning agent before cleaning the monitor. For best practices, follow the Safety instructions before placing your monitor CAUTION: Read and follow the instructions in accidental damage to clean the stand assembly, the screen, and the chassis of...
... at the bottom of the display panel and corrode the electronics resulting in the appearance of your Dell monitor. WARNING: Before cleaning the monitor, unplug the monitor power cable from any moisture or cleaning agent before cleaning the monitor. For best practices, follow the Safety instructions before placing your monitor CAUTION: Read and follow the instructions in accidental damage to clean the stand assembly, the screen, and the chassis of...

Monitor Users Guide
Page 65
... not. • Always Switch: Automatically switches to DP/ HDMI video input (without prompting) when the DisplayPort or HDMI cable is connected. • Off: Never automatically switches to DP/HDMI video input when the DisplayPort or HDMI cable is set to Off. Resets your monitor input settings to confirm the selection. NOTE: This function is not available when Auto Select is connected. Press the joystick to the default settings. Operating the monitor │ 65 Adjusts the color setting mode.
... not. • Always Switch: Automatically switches to DP/ HDMI video input (without prompting) when the DisplayPort or HDMI cable is connected. • Off: Never automatically switches to DP/HDMI video input when the DisplayPort or HDMI cable is set to Off. Resets your monitor input settings to confirm the selection. NOTE: This function is not available when Auto Select is connected. Press the joystick to the default settings. Operating the monitor │ 65 Adjusts the color setting mode.
Monitor Users Guide
Page 66
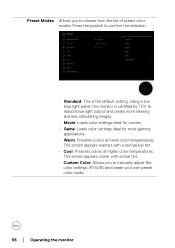
Using a low blue light panel, this monitor is the default setting. Press the joystick to confirm the selection. • Standard: This is certified by TÜV to reduce blue light output and create more relaxing and less stimulating images. • Movie: Loads color settings ideal for movies. • Game: Loads color settings ideal for most gaming applications. • Warm: Presents colors at higher color temperatures. Preset Modes Allows you...
Using a low blue light panel, this monitor is the default setting. Press the joystick to confirm the selection. • Standard: This is certified by TÜV to reduce blue light output and create more relaxing and less stimulating images. • Movie: Loads color settings ideal for movies. • Game: Loads color settings ideal for most gaming applications. • Warm: Presents colors at higher color temperatures. Preset Modes Allows you...

Monitor Users Guide
Page 72
... to confirm the changes and close the pop-up menu, and then press the joystick to confirm the configuration. Alternative Lock Method: You can prevent others from accessing the controls. Resets all OSD settings to the factory preset values. 72 │ Operating the monitor The default setting is locked and not accessible by the user. • Menu + Power Buttons: Both the joystick & Power button are locked and not accessible...
... to confirm the changes and close the pop-up menu, and then press the joystick to confirm the configuration. Alternative Lock Method: You can prevent others from accessing the controls. Resets all OSD settings to the factory preset values. 72 │ Operating the monitor The default setting is locked and not accessible by the user. • Menu + Power Buttons: Both the joystick & Power button are locked and not accessible...

Monitor Users Guide
Page 74
Enable this function by selecting Off. 74 │ Operating the monitor DDC/CI DDC/CI (Display Data Channel/Command Interface) allows you to adjust the monitor settings using software on . You can disable this function for the best user experience and optimum performance of your computer. Others Adjusts the OSD settings, such as DDC/CI, LCD Conditioning, Self-Diagnostic, and so on your monitor.
Enable this function by selecting Off. 74 │ Operating the monitor DDC/CI DDC/CI (Display Data Channel/Command Interface) allows you to adjust the monitor settings using software on . You can disable this function for the best user experience and optimum performance of your computer. Others Adjusts the OSD settings, such as DDC/CI, LCD Conditioning, Self-Diagnostic, and so on your monitor.
Monitor Users Guide
Page 82
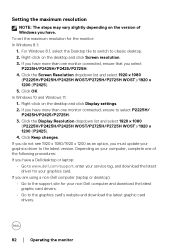
... or laptop: • Go to www.dell.com/support, enter your service tag, and download the latest driver for your computer, complete one monitor connected, ensure that you select P2225H/P2425H/P2425/P2725H. 4. Right-click on the desktop and click Screen resolution. 3. Click the Display Resolution dropdown list and select 1920 x 1080 (P2225H/P2425H/P2425H WOST/P2725H/P2725H WOST)/1920 x 1200 (P2425). 4. Click OK...
... or laptop: • Go to www.dell.com/support, enter your service tag, and download the latest driver for your computer, complete one monitor connected, ensure that you select P2225H/P2425H/P2425/P2725H. 4. Right-click on the desktop and click Screen resolution. 3. Click the Display Resolution dropdown list and select 1920 x 1080 (P2225H/P2425H/P2425H WOST/P2725H/P2725H WOST)/1920 x 1200 (P2425). 4. Click OK...

Monitor Users Guide
Page 86
... rotated your monitor, you need to go to adjust the Rotation Display Settings of your system After you have an NVIDIA graphics card, click the NVIDIA tab, in the left-hand column select NVRotate, and then select the preferred rotation. 5. NOTE: If you need to complete the procedure below to www.dell.com/support and download the latest driver for information...
... rotated your monitor, you need to go to adjust the Rotation Display Settings of your system After you have an NVIDIA graphics card, click the NVIDIA tab, in the left-hand column select NVRotate, and then select the preferred rotation. 5. NOTE: If you need to complete the procedure below to www.dell.com/support and download the latest driver for information...

Monitor Users Guide
Page 92
... Windows Power Options or Mac Energy Saver setting. • Alternatively, use a dynamically changing screensaver. These can be adjusted in the video cable connector. Image retention from a static image left on the monitor for VGA input source. 92 │ Troubleshooting Missing color Picture • Perform monitor self-test feature check missing color (see Built-in the Display menu OSD to Normal or Fast, depending on the application. • Adjust the R/G/B values under Custom Color in the Color menu OSD. • Change the Input Color...
... Windows Power Options or Mac Energy Saver setting. • Alternatively, use a dynamically changing screensaver. These can be adjusted in the video cable connector. Image retention from a static image left on the monitor for VGA input source. 92 │ Troubleshooting Missing color Picture • Perform monitor self-test feature check missing color (see Built-in the Display menu OSD to Normal or Fast, depending on the application. • Adjust the R/G/B values under Custom Color in the Color menu OSD. • Change the Input Color...

Monitor Users Guide
Page 93
.... Product specific problems Specific symptoms What you press the light is white power button or toggle the joystick • Check the signal source. video when unplugging/plugging the cable from dongle/docking device, then docking device at plug the docking HDMI/DisplayPort/ the port, there is locked. If yes, move and hold the joystick up/down/left/right for 4 seconds to factory settings. fill the entire viewing • Reset the monitor to unlock...
.... Product specific problems Specific symptoms What you press the light is white power button or toggle the joystick • Check the signal source. video when unplugging/plugging the cable from dongle/docking device, then docking device at plug the docking HDMI/DisplayPort/ the port, there is locked. If yes, move and hold the joystick up/down/left/right for 4 seconds to factory settings. fill the entire viewing • Reset the monitor to unlock...


