
Users Guide
Page 3
... 8 Identifying parts and controls 9 Front view 9 Back view 10 Side view 10 Bottom view 11 Monitor specifications 12 Resolution specifications 13 Supported video modes 13 Preset display modes 14 Electrical specifications 14 Physical characteristics 15 Environmental characteristics 16 Power Management Modes 17 Pin assignments 18 Plug and play capability 21 Universal Serial Bus (USB) interface 21 SuperSpeed USB 5Gbps (USB 3.2 Gen1 21 USB 2.0 21 USB 3.2 Gen1 (5Gbps) downstream port 22 USB 2.0 downstream port 23 LCD monitor quality and pixel policy 23...
... 8 Identifying parts and controls 9 Front view 9 Back view 10 Side view 10 Bottom view 11 Monitor specifications 12 Resolution specifications 13 Supported video modes 13 Preset display modes 14 Electrical specifications 14 Physical characteristics 15 Environmental characteristics 16 Power Management Modes 17 Pin assignments 18 Plug and play capability 21 Universal Serial Bus (USB) interface 21 SuperSpeed USB 5Gbps (USB 3.2 Gen1 21 USB 2.0 21 USB 3.2 Gen1 (5Gbps) downstream port 22 USB 2.0 downstream port 23 LCD monitor quality and pixel policy 23...

Users Guide
Page 4
... HDMI cable (optional 28 Connecting the DisplayPort (DisplayPort to DisplayPort) cable.29 Connecting the USB Type-C cable (C to C 29 Connecting the USB Type-C cable (C to A 30 Organizing your cables 30 Removing the monitor stand 31 VESA wall mounting (optional 32 Operating your monitor 33 Power on the monitor 33 Using the back panel controls 33 Back panel button 35 Using the On-Screen Display (OSD) menu 36 Accessing the menu system 36 OSD warning message 48 Setting the maximum resolution 52 Using the tilt, swivel, and vertical...
... HDMI cable (optional 28 Connecting the DisplayPort (DisplayPort to DisplayPort) cable.29 Connecting the USB Type-C cable (C to C 29 Connecting the USB Type-C cable (C to A 30 Organizing your cables 30 Removing the monitor stand 31 VESA wall mounting (optional 32 Operating your monitor 33 Power on the monitor 33 Using the back panel controls 33 Back panel button 35 Using the On-Screen Display (OSD) menu 36 Accessing the menu system 36 OSD warning message 48 Setting the maximum resolution 52 Using the tilt, swivel, and vertical...
Users Guide
Page 8
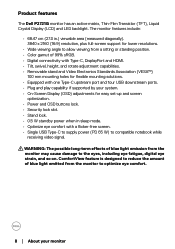
...; Digital connectivity with Type-C, DisplayPort and HDMI. • Tilt, swivel, height, and rotate adjustment capabilities. • Removable stand and Video Electronics Standards Association (VESA™) 100 mm mounting holes for lower resolutions. • Wide viewing angle to allow viewing from a sitting or standing position. • Color gamut of blue light emitted from the monitor may cause damage to compatible notebook while receiving video signal. Product features The Dell P2721Q monitor has an active matrix, Thin-Film Transistor (TFT...
...; Digital connectivity with Type-C, DisplayPort and HDMI. • Tilt, swivel, height, and rotate adjustment capabilities. • Removable stand and Video Electronics Standards Association (VESA™) 100 mm mounting holes for lower resolutions. • Wide viewing angle to allow viewing from a sitting or standing position. • Color gamut of blue light emitted from the monitor may cause damage to compatible notebook while receiving video signal. Product features The Dell P2721Q monitor has an active matrix, Thin-Film Transistor (TFT...

Users Guide
Page 11
... lock the stand to the monitor using the USB Type-C cable (C to C). Connect your computer with DP 1.2 support the maximum resolution of 3840 X 2160 at 60 Hz, PD 20 V/3.25 A, 15 V/3 A, 9 V/3 A, 5 V/3 A. NOTE: To use this port, you must connect the USB cable (shipped with security lock (security lock not included). The alternate mode with the HDMI 2.0 cable. NOTE: To use this port, you must connect the USB cable (shipped with your monitor) to the USBupstream port...
... lock the stand to the monitor using the USB Type-C cable (C to C). Connect your computer with DP 1.2 support the maximum resolution of 3840 X 2160 at 60 Hz, PD 20 V/3.25 A, 15 V/3 A, 9 V/3 A, 5 V/3 A. NOTE: To use this port, you must connect the USB cable (shipped with security lock (security lock not included). The alternate mode with the HDMI 2.0 cable. NOTE: To use this port, you must connect the USB cable (shipped with your monitor) to the USBupstream port...

Users Guide
Page 17
... laboratory performance. VESA Modes Horizontal Vertical sync sync Normal operation Active Active Active-off mode Inactive Inactive Switch-off - - Accordingly, the customer should not rely upon this automatic power saving feature. Changing the factory default settings or enabling other input devices, the monitor automatically resumes to accuracy or completeness is expressed or implied. The following table shows the power consumption and signaling of On Mode as defined in use. This...
... laboratory performance. VESA Modes Horizontal Vertical sync sync Normal operation Active Active Active-off mode Inactive Inactive Switch-off - - Accordingly, the customer should not rely upon this automatic power saving feature. Changing the factory default settings or enabling other input devices, the monitor automatically resumes to accuracy or completeness is expressed or implied. The following table shows the power consumption and signaling of On Mode as defined in use. This...
Users Guide
Page 25
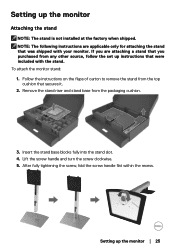
... applicable only for attaching the stand that was shipped with the stand. Remove the stand riser and stand base from any other source, follow the set up instructions that secures it. 2. NOTE: The following instructions are attaching a stand that you purchased from the packaging cushion. 3. After fully tightening the screw, fold the screw handle flat within the recess. Lift the screw handle and turn the screw clockwise. 5.
... applicable only for attaching the stand that was shipped with the stand. Remove the stand riser and stand base from any other source, follow the set up instructions that secures it. 2. NOTE: The following instructions are attaching a stand that you purchased from the packaging cushion. 3. After fully tightening the screw, fold the screw handle flat within the recess. Lift the screw handle and turn the screw clockwise. 5.

Users Guide
Page 37
... adjustment is necessary. The Contrast function adjusts the degree of the backlight. Setting up the monitor │ 37 Icon Menu and Submenus Brightness/ Contrast Description Use this menu to decrease the contrast (min. 0 / max. 100). Dell 27 Monitor Brightness/Contrast Input Source Color Display Menu Personalize Others 75% 75% Exit Brightness Brightness adjusts the luminance of difference between darkness and lightness on the monitor screen. Press the button to increase the contrast and press the button to activate Brightness/Contrast adjustment. Press the button...
... adjustment is necessary. The Contrast function adjusts the degree of the backlight. Setting up the monitor │ 37 Icon Menu and Submenus Brightness/ Contrast Description Use this menu to decrease the contrast (min. 0 / max. 100). Dell 27 Monitor Brightness/Contrast Input Source Color Display Menu Personalize Others 75% 75% Exit Brightness Brightness adjusts the luminance of difference between darkness and lightness on the monitor screen. Press the button to increase the contrast and press the button to activate Brightness/Contrast adjustment. Press the button...

Users Guide
Page 39
... parts of body such as neck, arm, back and shoulder. Using monitor for your eyes. This is the default preset mode. • ComfortView: Decreases the level of blue light emitted from the screen to the eyes. Dell 27 Monitor Brightness/Contrast Input Source Color Display Menu Personalize Others Preset Modes Input Color Format Reset Color Standard RGB Exit Preset Modes Allows you to adjust the color setting mode. Icon Menu and Submenus Color Description Use Color menu to choose from a list of preset color modes. Setting...
... parts of body such as neck, arm, back and shoulder. Using monitor for your eyes. This is the default preset mode. • ComfortView: Decreases the level of blue light emitted from the screen to the eyes. Dell 27 Monitor Brightness/Contrast Input Source Color Display Menu Personalize Others Preset Modes Input Color Format Reset Color Standard RGB Exit Preset Modes Allows you to adjust the color setting mode. Icon Menu and Submenus Color Description Use Color menu to choose from a list of preset color modes. Setting...

Users Guide
Page 40
... screen appears cooler with a blue tint. • Custom Color: Allows you to: 1. Icon Menu and Description Submenus Preset Modes To reduce the risk of eye strain and neck/arm/back/shoulder pain from using the monitor for long periods of time, we suggest you to manually adjust the color settings. Use the arrow buttons to adjust the three colors (R, G, B) values and create your eyes with a red...
... screen appears cooler with a blue tint. • Custom Color: Allows you to: 1. Icon Menu and Description Submenus Preset Modes To reduce the risk of eye strain and neck/arm/back/shoulder pain from using the monitor for long periods of time, we suggest you to manually adjust the color settings. Use the arrow buttons to adjust the three colors (R, G, B) values and create your eyes with a red...
Users Guide
Page 41
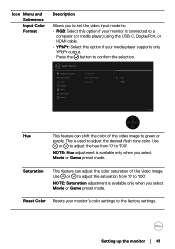
Dell 27 Monitor Brightness/Contrast Input Source Color Display Menu Personalize Others Preset Modes Input Color Format Reset Color RGB YPbPr Exit Hue This feature can adjust the color saturation of the video image to adjust the desired flesh tone color. This is used to green or purple. Use or to adjust the saturation from '0' to '100'. Saturation This feature can shift the color of the video image. NOTE: Saturation adjustment is available only when you select Movie or Game...
Dell 27 Monitor Brightness/Contrast Input Source Color Display Menu Personalize Others Preset Modes Input Color Format Reset Color RGB YPbPr Exit Hue This feature can adjust the color saturation of the video image to adjust the desired flesh tone color. This is used to green or purple. Use or to adjust the saturation from '0' to '100'. Saturation This feature can shift the color of the video image. NOTE: Saturation adjustment is available only when you select Movie or Game...
Users Guide
Page 44
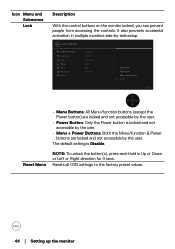
Dell 27 Monitor Brightness/Contrast Input Source Color Display Menu Personalize Others Language Rotation Transparency Timer Lock Reset Menu Menu Buttons Power Button Menu + Power Buttons Disable Exit • Menu Buttons: All Menu/function buttons (except the Power button) are locked and not accessible by -side setup. The default setting is locked and not accessible by the user. • Menu + Power Buttons: Both the Menu/function & Power buttons are locked and not accessible by the user. • Power Button: Only the Power button is Disable. Icon Menu and Submenus Lock ...
Dell 27 Monitor Brightness/Contrast Input Source Color Display Menu Personalize Others Language Rotation Transparency Timer Lock Reset Menu Menu Buttons Power Button Menu + Power Buttons Disable Exit • Menu Buttons: All Menu/function buttons (except the Power button) are locked and not accessible by -side setup. The default setting is locked and not accessible by the user. • Menu + Power Buttons: Both the Menu/function & Power buttons are locked and not accessible by the user. • Power Button: Only the Power button is Disable. Icon Menu and Submenus Lock ...
Users Guide
Page 46
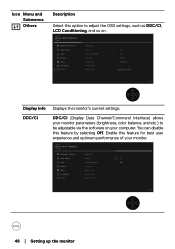
... adjustable via the software on . Dell 27 Monitor Brightness/Contrast Input Source Color Display Menu Personalize Others Display Info DDC/CI LCD Conditioning Firmware Service Tag Reset Others Factory Reset On 13F103 FA00238 ENERGY STAR® Exit Display Info Displays the monitor's current settings. You can disable this feature for best user experience and optimum performance of your computer. DDC/CI DDC/CI (Display Data Channel/Command Interface) allows your monitor parameters (brightness, color balance, and etc.) to adjust the OSD settings...
... adjustable via the software on . Dell 27 Monitor Brightness/Contrast Input Source Color Display Menu Personalize Others Display Info DDC/CI LCD Conditioning Firmware Service Tag Reset Others Factory Reset On 13F103 FA00238 ENERGY STAR® Exit Display Info Displays the monitor's current settings. You can disable this feature for best user experience and optimum performance of your computer. DDC/CI DDC/CI (Display Data Channel/Command Interface) allows your monitor parameters (brightness, color balance, and etc.) to adjust the OSD settings...
Users Guide
Page 47
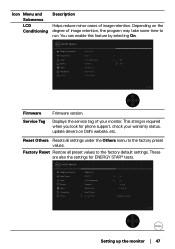
... Helps reduce minor cases of image retention, the program may take some time to the factory default settings. Factory Reset Restore all settings under the Others menu to the factory preset values. Depending on Dell's website, etc. You can enable this feature by selecting On. These are also the settings for phone support, check your monitor. Dell 27 Monitor Brightness/Contrast Input Source Color Display Menu Personalize Others Display Info DDC/CI LCD Conditioning Firmware Service Tag Reset Others Factory Reset...
... Helps reduce minor cases of image retention, the program may take some time to the factory default settings. Factory Reset Restore all settings under the Others menu to the factory preset values. Depending on Dell's website, etc. You can enable this feature by selecting On. These are also the settings for phone support, check your monitor. Dell 27 Monitor Brightness/Contrast Input Source Color Display Menu Personalize Others Display Info DDC/CI LCD Conditioning Firmware Service Tag Reset Others Factory Reset...
Users Guide
Page 48
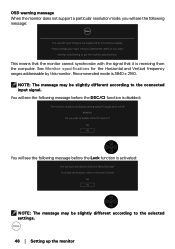
... to the connected input signal. To unlock the Buttons, refer to the User's Guide. NOTE: The message may be disabled. OSD warning message When the monitor does not support a particular resolution mode, you wish to disable DDC/CI function? Yes No You will be slightly different according to the selected settings. 48 │ Setting up the monitor See Monitor specifications for the Horizontal and Vertical frequency ranges addressable by this monitor. Recommended mode is receiving...
... to the connected input signal. To unlock the Buttons, refer to the User's Guide. NOTE: The message may be disabled. OSD warning message When the monitor does not support a particular resolution mode, you wish to disable DDC/CI function? Yes No You will be slightly different according to the selected settings. 48 │ Setting up the monitor See Monitor specifications for the Horizontal and Vertical frequency ranges addressable by this monitor. Recommended mode is receiving...
Users Guide
Page 50
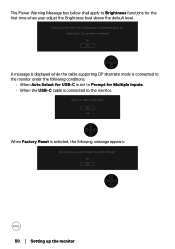
... USB-C Video Input Yes No When Factory Reset is connected to the monitor. Do you want to continue? Yes No A message is displayed while the cable supporting DP alternate mode is connected to the monitor under the following conditions: • When Auto Select for USB-C is set to Prompt for the first time when user adjust the Brightness level above the default level. Yes No 50 │ Setting up the monitor The Power...
... USB-C Video Input Yes No When Factory Reset is connected to the monitor. Do you want to continue? Yes No A message is displayed while the cable supporting DP alternate mode is connected to the monitor under the following conditions: • When Auto Select for USB-C is set to Prompt for the first time when user adjust the Brightness level above the default level. Yes No 50 │ Setting up the monitor The Power...

Users Guide
Page 52
... are using a non-Dell computer (portable or desktop): • Go to the support site for your computer and download the latest graphic drivers. • Go to update your graphics card. Click Advanced display settings. 3. Click OK. For Windows® 8 and Windows® 8.1 only, select the Desktop tile to switch to www.dell.com/support, enter your service tag, and download the latest driver for the monitor: In Windows® 7, Windows...
... are using a non-Dell computer (portable or desktop): • Go to the support site for your computer and download the latest graphic drivers. • Go to update your graphics card. Click Advanced display settings. 3. Click OK. For Windows® 8 and Windows® 8.1 only, select the Desktop tile to switch to www.dell.com/support, enter your service tag, and download the latest driver for the monitor: In Windows® 7, Windows...

Users Guide
Page 57
... your monitor is working correctly. Turn On the monitor. www.dell.com/P2721Q or No DP Cable The display will go into Standby mode in 4 minutes. www.dell.com/P2721Q Troubleshooting │ 57 Also, depending upon the selected input, one of the procedures in self-test mode, the power LED remains white. While in this section, follow the Safety instructions. If your monitor and computer are properly connected but the monitor screen...
... your monitor is working correctly. Turn On the monitor. www.dell.com/P2721Q or No DP Cable The display will go into Standby mode in 4 minutes. www.dell.com/P2721Q Troubleshooting │ 57 Also, depending upon the selected input, one of the procedures in self-test mode, the power LED remains white. While in this section, follow the Safety instructions. If your monitor and computer are properly connected but the monitor screen...

Users Guide
Page 60
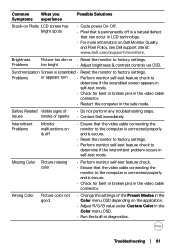
... is properly connected and secure. • Verify that the power outlet is functioning properly using any other electrical equipment. • Ensure that the power button is pressed fully. • Ensure that the correct input source is selected in the Input Source menu. • Increase brightness & contrast controls via OSD. • Perform monitor self-test feature check. • Check for bent or broken pins in the video cable connector. • Run...
... is properly connected and secure. • Verify that the power outlet is functioning properly using any other electrical equipment. • Ensure that the power button is pressed fully. • Ensure that the correct input source is selected in the Input Source menu. • Increase brightness & contrast controls via OSD. • Perform monitor self-test feature check. • Check for bent or broken pins in the video cable connector. • Run...
Users Guide
Page 61
... in the video cable connector. • Restart the computer in the safe mode. Missing Color Picture missing color • Perform monitor self-test feature check. • Ensure that the video cable connecting the monitor to determine if the intermittent problem occurs in self-test mode. Synchronization Screen is scrambled • Reset the monitor to factory settings. too bright • Adjust brightness & contrast controls via OSD. Safety Related Visible signs of the Preset Modes in the Color menu OSD depending on...
... in the video cable connector. • Restart the computer in the safe mode. Missing Color Picture missing color • Perform monitor self-test feature check. • Ensure that the video cable connecting the monitor to determine if the intermittent problem occurs in self-test mode. Synchronization Screen is scrambled • Reset the monitor to factory settings. too bright • Adjust brightness & contrast controls via OSD. Safety Related Visible signs of the Preset Modes in the Color menu OSD depending on...
Users Guide
Page 63
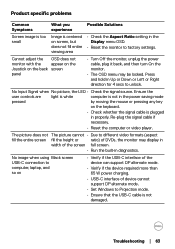
... signal cable is not damaged. No Input Signal when No picture, the LED • Check the signal source. No image when using Black screen USB-C connection to computer, laptop, and so on the back screen panel • Turn Off the monitor, unplug the power cable, plug it back, and then turn On the monitor. • The OSD menu may display in the Display menu OSD. • Reset the monitor to Projection mode. • Ensure that the USB-C cable is plugged in properly. Ensure the user controls are light is white...
... signal cable is not damaged. No Input Signal when No picture, the LED • Check the signal source. No image when using Black screen USB-C connection to computer, laptop, and so on the back screen panel • Turn Off the monitor, unplug the power cable, plug it back, and then turn On the monitor. • The OSD menu may display in the Display menu OSD. • Reset the monitor to Projection mode. • Ensure that the USB-C cable is plugged in properly. Ensure the user controls are light is white...


