
Users Guide
Page 3
Contents About your monitor 5 Package contents 5 Product features 7 Identifying parts and controls 8 Monitor specifications 12 Universal serial bus (USB) interface 23 Plug and play capability 26 LCD monitor quality and pixel policy 26 Maintenance guidelines 26 Setting up the monitor 27 Attaching the stand 27 Connecting your monitor 29 Organizing cables 31 Disconnecting the monitor stand 32 Wall mounting (optional 33 Operating your monitor 34 Power on the monitor 34 Contents | 3
Contents About your monitor 5 Package contents 5 Product features 7 Identifying parts and controls 8 Monitor specifications 12 Universal serial bus (USB) interface 23 Plug and play capability 26 LCD monitor quality and pixel policy 26 Maintenance guidelines 26 Setting up the monitor 27 Attaching the stand 27 Connecting your monitor 29 Organizing cables 31 Disconnecting the monitor stand 32 Wall mounting (optional 33 Operating your monitor 34 Power on the monitor 34 Contents | 3
Users Guide
Page 4
Using the front panel controls 34 Using the on-screen display (OSD) menu 38 Setting up your monitor 50 Using the Tilt, Swivel, and Vertical Extension 51 Operating the webcam cover shutter 53 Installing the monitor IR Camera driver 54 Setting up Windows Hello 55 Setting up the monitor webcam as default setting 58 Setting up the monitor speaker as default setting 62 Troubleshooting 66 Self-test...66 Built-in diagnostics 68 Common problems 69 Product-specific problems 71 Universal serial bus (USB) specific problems 72 Microsoft...
Using the front panel controls 34 Using the on-screen display (OSD) menu 38 Setting up your monitor 50 Using the Tilt, Swivel, and Vertical Extension 51 Operating the webcam cover shutter 53 Installing the monitor IR Camera driver 54 Setting up Windows Hello 55 Setting up the monitor webcam as default setting 58 Setting up the monitor speaker as default setting 62 Troubleshooting 66 Self-test...66 Built-in diagnostics 68 Common problems 69 Product-specific problems 71 Universal serial bus (USB) specific problems 72 Microsoft...
Users Guide
Page 7
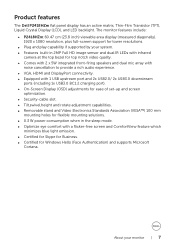
... flexible mounting solutions. ∞∞ 0.3 W power consumption when in the sleep mode. ∞∞ Optimize eye comfort with a flicker-free screen and ComfortView feature which minimizes blue light emission. ∞∞ Certified for Skype for Business. ∞∞ Certified for Windows Hello (Face Authentication) and supports Microsoft Cortana. Product features The Dell P2418HZm flat panel display has an active matrix, Thin-Film Transistor (TFT), Liquid Crystal Display (LCD), and LED backlight. The monitor...
... flexible mounting solutions. ∞∞ 0.3 W power consumption when in the sleep mode. ∞∞ Optimize eye comfort with a flicker-free screen and ComfortView feature which minimizes blue light emission. ∞∞ Certified for Skype for Business. ∞∞ Certified for Windows Hello (Face Authentication) and supports Microsoft Cortana. Product features The Dell P2418HZm flat panel display has an active matrix, Thin-Film Transistor (TFT), Liquid Crystal Display (LCD), and LED backlight. The monitor...

Users Guide
Page 11
... computer with HDMI cable(optional). About your computer to the monitor using a DP cable. To lock the stand to the monitor using a M3 x 6mm screw (screw not included). Connect your monitor | 11 Connect your computer with VGA cable. Once the cable is connected, you can use the USB connectors on the rear side and bottom side of the monitor. Bottom View 6 1 234 5 Bottom view without monitor stand Label Description 1 Power port 2 HDMI port 3 DP port 4 VGA port 5 USB connector (x2 downstream, x1 upstream) 6 Stand lock feature Use Connect the power cable.
... computer with HDMI cable(optional). About your computer to the monitor using a DP cable. To lock the stand to the monitor using a M3 x 6mm screw (screw not included). Connect your monitor | 11 Connect your computer with VGA cable. Once the cable is connected, you can use the USB connectors on the rear side and bottom side of the monitor. Bottom View 6 1 234 5 Bottom view without monitor stand Label Description 1 Power port 2 HDMI port 3 DP port 4 VGA port 5 USB connector (x2 downstream, x1 upstream) 6 Stand lock feature Use Connect the power cable.

Users Guide
Page 26
... with its Extended Display Identification Data (EDID) using detergent of any Plug and Play-compatible system. Most monitor installations are hard to clean the monitor. For more than a lighter-colored monitor. ∞∞ To help maintain the best image quality on Dell Monitor Quality and Pixel Policy, see Operating your monitor WARNING: Before cleaning the monitor, unplug the monitor power cable from the electrical outlet. For best practices, follow the Safety instructions before cleaning the monitor.
... with its Extended Display Identification Data (EDID) using detergent of any Plug and Play-compatible system. Most monitor installations are hard to clean the monitor. For more than a lighter-colored monitor. ∞∞ To help maintain the best image quality on Dell Monitor Quality and Pixel Policy, see Operating your monitor WARNING: Before cleaning the monitor, unplug the monitor power cable from the electrical outlet. For best practices, follow the Safety instructions before cleaning the monitor.

Users Guide
Page 27
... screw, fold the screw handle flat within the recess. 5. When any other stand is bought, please refer to expose the VESA area for stand assembly. Lift the screw handle and turn the screw clockwise. 4. Lift the cover, as shown, to the respective stand setup guide for a monitor with a stand. NOTE: This is applicable for the set up instructions. To attach the monitor stand. 1. Insert the stand base blocks fully into the stand slot. 3. Setting...
... screw, fold the screw handle flat within the recess. 5. When any other stand is bought, please refer to expose the VESA area for stand assembly. Lift the screw handle and turn the screw clockwise. 4. Lift the cover, as shown, to the respective stand setup guide for a monitor with a stand. NOTE: This is applicable for the set up instructions. To attach the monitor stand. 1. Insert the stand base blocks fully into the stand slot. 3. Setting...
Users Guide
Page 30
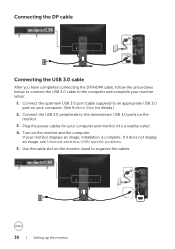
Plug the power cables for details.) 2. If your monitor displays an image, installation is complete. If it does not display an image, see Universal serial bus (USB) specific problems. 5. Connect the USB 3.0 peripherals to organize the cables. 30 | Setting up the monitor Turn on the monitor and the computer. Use the cable slot on the monitor stand to the downstream USB 3.0 ports on the monitor. 3. Connect the upstream USB 3.0 port (cable supplied) to the computer and complete your monitor setup: 1. Connecting the DP cable Connecting the USB 3.0 cable After you...
Plug the power cables for details.) 2. If your monitor displays an image, installation is complete. If it does not display an image, see Universal serial bus (USB) specific problems. 5. Connect the USB 3.0 peripherals to organize the cables. 30 | Setting up the monitor Turn on the monitor and the computer. Use the cable slot on the monitor stand to the downstream USB 3.0 ports on the monitor. 3. Connect the upstream USB 3.0 port (cable supplied) to the computer and complete your monitor setup: 1. Connecting the DP cable Connecting the USB 3.0 cable After you...

Users Guide
Page 39
... on the monitor screen. Operating your monitor | 39 NOTE: Manual adjustment of brightness is disabled when dynamic contrast is necessary. Dell P2418HZm Brightness / Contrast Auto Adjust Input Source Color Display Energy Menu Others Energy Use 75% 75% Resolution: 1920x1080, 60Hz Brightness Contrast Brightness adjusts the luminance of difference between darkness and lightness on . Press the button to increase the contrast and press the button to decrease the brightness (min. 0 / max. 100). The contrast function adjusts the degree of the backlight. Press the button to...
... on the monitor screen. Operating your monitor | 39 NOTE: Manual adjustment of brightness is disabled when dynamic contrast is necessary. Dell P2418HZm Brightness / Contrast Auto Adjust Input Source Color Display Energy Menu Others Energy Use 75% 75% Resolution: 1920x1080, 60Hz Brightness Contrast Brightness adjusts the luminance of difference between darkness and lightness on . Press the button to increase the contrast and press the button to decrease the brightness (min. 0 / max. 100). The contrast function adjusts the degree of the backlight. Press the button to...

Users Guide
Page 40
... Auto adjustment allows the monitor to self-adjust to the current input: Auto Adjustment in Progress... After using the pixel clock (coarse) and phase (fine) controls under display settings. NOTE: Auto adjust does not occur if you press the button while there are using the analog (VGA) connector. 40 | Operating your monitor by using auto adjustment, you are no active video input signals or attached cables. Auto Adjust Use this key to adjust the screen automatically. Dell P2418HZm Brightness / Contrast Auto Adjust Input Source Color Display Energy Menu Others Resolution...
... Auto adjustment allows the monitor to self-adjust to the current input: Auto Adjustment in Progress... After using the pixel clock (coarse) and phase (fine) controls under display settings. NOTE: Auto adjust does not occur if you press the button while there are using the analog (VGA) connector. 40 | Operating your monitor by using auto adjustment, you are no active video input signals or attached cables. Auto Adjust Use this key to adjust the screen automatically. Dell P2418HZm Brightness / Contrast Auto Adjust Input Source Color Display Energy Menu Others Resolution...

Users Guide
Page 41
... select the VGA input source. Dell P2418HZm Brightness / Contrast Auto Adjust Input Source Color Display Energy Menu Others Energy Use VGA DP HDMI Auto Select On Reset Input Source Resolution: 1920x1080, 60Hz VGA DP HDMI Auto Select Select VGA input when you are using the HDMI connector. Select DP input when you are using the DP connector. Push to scan for available input signals. Input Source Use the input source menu to select between the different video signals that may be connected to your monitor | 41 Push to restore default Input Source. Reset Input Source Select this...
... select the VGA input source. Dell P2418HZm Brightness / Contrast Auto Adjust Input Source Color Display Energy Menu Others Energy Use VGA DP HDMI Auto Select On Reset Input Source Resolution: 1920x1080, 60Hz VGA DP HDMI Auto Select Select VGA input when you are using the HDMI connector. Select DP input when you are using the DP connector. Push to scan for available input signals. Input Source Use the input source menu to select between the different video signals that may be connected to your monitor | 41 Push to restore default Input Source. Reset Input Source Select this...
Users Guide
Page 42
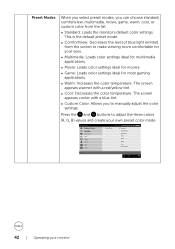
... with a red/yellow tint. ∞∞ Cool: Decreases the color temperature. The screen appears warmer with a blue tint. ∞∞ Custom Color: Allows you can choose standard, comfortview, multimedia, movie, game, warm, cool, or custom color from the screen to make viewing more comfortable for your monitor Dell P2418HZm Brightness / Contrast Auto Adjust Input Source Color Display Energy Menu Others Energy Use Preset Modes Standard ComfortView Multimedia Movie Game Warm Cool Custom Color Resolution: 1920x1080...
... with a red/yellow tint. ∞∞ Cool: Decreases the color temperature. The screen appears warmer with a blue tint. ∞∞ Custom Color: Allows you can choose standard, comfortview, multimedia, movie, game, warm, cool, or custom color from the screen to make viewing more comfortable for your monitor Dell P2418HZm Brightness / Contrast Auto Adjust Input Source Color Display Energy Menu Others Energy Use Preset Modes Standard ComfortView Multimedia Movie Game Warm Cool Custom Color Resolution: 1920x1080...
Users Guide
Page 43
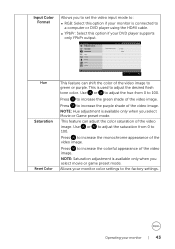
Dell P2418HZm Brightness / Contrast Auto Adjust Input Source Color Display Energy Menu Others Energy Use Input Color Format RGB YPbPr Resolution: 1920x1080, 60Hz Hue Saturation Reset Color This feature can adjust the color saturation of the video image. This is used to green or purple. Press to the factory settings. NOTE: Hue adjustment is available only when you select movie or game preset mode. NOTE: Saturation adjustment is available only when you select Movie or Game preset mode. Allows your monitor color settings to...
Dell P2418HZm Brightness / Contrast Auto Adjust Input Source Color Display Energy Menu Others Energy Use Input Color Format RGB YPbPr Resolution: 1920x1080, 60Hz Hue Saturation Reset Color This feature can adjust the color saturation of the video image. This is used to green or purple. Press to the factory settings. NOTE: Hue adjustment is available only when you select movie or game preset mode. NOTE: Saturation adjustment is available only when you select Movie or Game preset mode. Allows your monitor color settings to...

Users Guide
Page 44
... default display settings. 44 | Operating your preference. Reset Display Select this option to adjust for "VGA" input. Dell P2418HZm Brightness / Contrast Auto Adjust Input Source Color Display Energy Menu Others Resolution: 1920x1080, 60Hz Energy Use Aspect Ratio Horizontal Position Vertical Position Wide 16:9 50 50 Sharpness 50 Pixel Clock 50 Phase 12 Dynamic Contrast Response Time Normal Reset Display Aspect Ratio Adjusts the image ratio to wide 16:9, 4:3 or 5:4 Horizontal Position Use or the buttons to adjust image up and down. Vertical Position Use the or buttons...
... default display settings. 44 | Operating your preference. Reset Display Select this option to adjust for "VGA" input. Dell P2418HZm Brightness / Contrast Auto Adjust Input Source Color Display Energy Menu Others Resolution: 1920x1080, 60Hz Energy Use Aspect Ratio Horizontal Position Vertical Position Wide 16:9 50 50 Sharpness 50 Pixel Clock 50 Phase 12 Dynamic Contrast Response Time Normal Reset Display Aspect Ratio Adjusts the image ratio to wide 16:9, 4:3 or 5:4 Horizontal Position Use or the buttons to adjust image up and down. Vertical Position Use the or buttons...

Users Guide
Page 46
... the eight languages (English, Spanish, French, German, Brazilian Portuguese, Russian, Simplified Chinese, or Japanese). Dell P2418HZm Brightness / Contrast Auto Adjust Input Source Color Display Energy Menu Others Energy Use DDC/CI LCD Conditioning Firmware Enable Disable M2C101 Reset Others Factory Reset ENERGY STAR® Resolution: 1920x1080, 60Hz 46 | Operating your display rotation. You can adjust the menu according to 100. NOTE: When the OSD is selected, no user adjustments are locked. Menu Select this option to change the menu transparency by...
... the eight languages (English, Spanish, French, German, Brazilian Portuguese, Russian, Simplified Chinese, or Japanese). Dell P2418HZm Brightness / Contrast Auto Adjust Input Source Color Display Energy Menu Others Energy Use DDC/CI LCD Conditioning Firmware Enable Disable M2C101 Reset Others Factory Reset ENERGY STAR® Resolution: 1920x1080, 60Hz 46 | Operating your display rotation. You can adjust the menu according to 100. NOTE: When the OSD is selected, no user adjustments are locked. Menu Select this option to change the menu transparency by...

Users Guide
Page 47
...: 1920x1080, 60Hz NOTE: Your monitor has a built-in feature to automatically calibrate the brightness to run. You can disable this feature for best user experience and optimum performance of image retention. To start LCD conditioning, select Enable. Dell P2418HZm Brightness / Contrast Auto Adjust Input Source Color Display Energy Menu Others Energy Use LCD Conditioning Enable Disable Resolution: 1920x1080, 60Hz Firmware Reset Other Factory Reset Show your computer. Restore all settings under the Others setting menu to the factory default settings. Reset all preset values to...
...: 1920x1080, 60Hz NOTE: Your monitor has a built-in feature to automatically calibrate the brightness to run. You can disable this feature for best user experience and optimum performance of image retention. To start LCD conditioning, select Enable. Dell P2418HZm Brightness / Contrast Auto Adjust Input Source Color Display Energy Menu Others Energy Use LCD Conditioning Enable Disable Resolution: 1920x1080, 60Hz Firmware Reset Other Factory Reset Show your computer. Restore all settings under the Others setting menu to the factory default settings. Reset all preset values to...

Users Guide
Page 50
...'s Service Tag, and download the latest driver for the monitor: In Windows® 7,Windows® 8, and Windows® 8.1: 1. Right-click on the desktop and click Display settings. 2. Click Advanced display settings. 3. Click the dropdown list of Resolution and select 1920 x 1080. 4. If you may need to classic desktop. 2. In Windows® 10: 1. Click Apply. For Windows 8 and Windows 8.1, select the Desktop tile to switch to update your graphics card...
...'s Service Tag, and download the latest driver for the monitor: In Windows® 7,Windows® 8, and Windows® 8.1: 1. Right-click on the desktop and click Display settings. 2. Click Advanced display settings. 3. Click the dropdown list of Resolution and select 1920 x 1080. 4. If you may need to classic desktop. 2. In Windows® 10: 1. Click Apply. For Windows 8 and Windows 8.1, select the Desktop tile to switch to update your graphics card...
Users Guide
Page 69
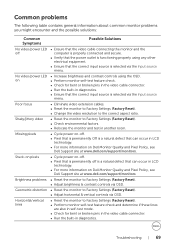
... the correct input source is selected via the Input source menu. Troubleshooting | 69 Horizontal/vertical lines ∞∞ Reset the monitor to Factory Settings (Factory Reset). ∞∞ Adjust horizontal & vertical controls via OSD. No video/power LED on Dell Monitor Quality and Pixel Policy, see Dell Support site at www.dell.com/support/monitors. Poor focus ∞∞ Eliminate video extension cables. ∞∞ Reset the monitor to Factory Settings (Factory Reset). ∞∞ Change the video resolution to Factory Settings (Factory Reset...
... the correct input source is selected via the Input source menu. Troubleshooting | 69 Horizontal/vertical lines ∞∞ Reset the monitor to Factory Settings (Factory Reset). ∞∞ Adjust horizontal & vertical controls via OSD. No video/power LED on Dell Monitor Quality and Pixel Policy, see Dell Support site at www.dell.com/support/monitors. Poor focus ∞∞ Eliminate video extension cables. ∞∞ Reset the monitor to Factory Settings (Factory Reset). ∞∞ Change the video resolution to Factory Settings (Factory Reset...

Users Guide
Page 70
... troubleshooting steps. ∞∞ Contact Dell immediately. ∞∞ Ensure that the video cable connecting the monitor to the computer is connected properly and is secure. ∞∞ Reset the monitor to Factory Settings (Factory Reset). ∞∞ Perform monitor self-test feature check to determine if the intermittent problem occurs in Color settings OSD. Missing color Wrong color ∞∞ Perform monitor self-test feature check. ∞∞ Ensure that the video cable connecting the monitor...
... troubleshooting steps. ∞∞ Contact Dell immediately. ∞∞ Ensure that the video cable connecting the monitor to the computer is connected properly and is secure. ∞∞ Reset the monitor to Factory Settings (Factory Reset). ∞∞ Perform monitor self-test feature check to determine if the intermittent problem occurs in Color settings OSD. Missing color Wrong color ∞∞ Perform monitor self-test feature check. ∞∞ Ensure that the video cable connecting the monitor...

Users Guide
Page 71
... or sleep mode by moving the mouse or pressing any key on the monitor. ∞∞ Check if the OSD menu is plugged in properly. No input signal when user controls are pressed ∞∞ Check the signal source. Cannot adjust the monitor with the buttons on the side panel ∞∞ Turn off the monitor, unplug the power cord, plug it back, and then turn on the keyboard. ∞∞ Check if the video cable is locked.
... or sleep mode by moving the mouse or pressing any key on the monitor. ∞∞ Check if the OSD menu is plugged in properly. No input signal when user controls are pressed ∞∞ Check the signal source. Cannot adjust the monitor with the buttons on the side panel ∞∞ Turn off the monitor, unplug the power cord, plug it back, and then turn on the keyboard. ∞∞ Check if the video cable is locked.

Display Manager Users Guide
Page 4
Dell P2418HZm Brightness / Contrast Auto Adjust Input Source Color Display Energy Menu Others Resolution: 1920x1080, 60Hz DDC/CI Energy Use Enable Disable 4 | Overview Overview Dell Display Manager is a Windows application used to the computer is displayed when you hover the mouse pointer over the notification tray icon. Once installed, Dell display manager runs each time the computer starts and its icon is enabled in the notification tray. Information about monitors connected to...
Dell P2418HZm Brightness / Contrast Auto Adjust Input Source Color Display Energy Menu Others Resolution: 1920x1080, 60Hz DDC/CI Energy Use Enable Disable 4 | Overview Overview Dell Display Manager is a Windows application used to the computer is displayed when you hover the mouse pointer over the notification tray icon. Once installed, Dell display manager runs each time the computer starts and its icon is enabled in the notification tray. Information about monitors connected to...


