
Users Guide
Page 3
Contents About your monitor 5 Package contents 5 Product features 7 Identifying parts and controls 8 Monitor specifications 12 Universal serial bus (USB) interface 22 Plug and play capability 25 LCD monitor quality and pixel policy 25 Maintenance guidelines 25 Setting up the monitor 26 Attaching the stand 26 Connecting your monitor 28 Organizing cables 30 Disconnecting the monitor stand 31 Wall mounting (optional 32 Operating your monitor 33 Power on the monitor 33 Using the front panel controls 33 Contents | 3
Contents About your monitor 5 Package contents 5 Product features 7 Identifying parts and controls 8 Monitor specifications 12 Universal serial bus (USB) interface 22 Plug and play capability 25 LCD monitor quality and pixel policy 25 Maintenance guidelines 25 Setting up the monitor 26 Attaching the stand 26 Connecting your monitor 28 Organizing cables 30 Disconnecting the monitor stand 31 Wall mounting (optional 32 Operating your monitor 33 Power on the monitor 33 Using the front panel controls 33 Contents | 3
Users Guide
Page 7
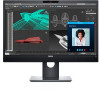
...), Image Color Matching File (ICM), and product documentation. ∞∞ Dell Display Manager Software (in the CD shipped with the monitor). ∞∞ Security-cable slot. ∞∞ Tilt,swivel,height and rotate adjustment capabilities. ∞∞ Removable stand and Video Electronics Standards Association (VESA™) 100 mm mounting holes for flexible mounting solutions. ∞∞ 0.3 W power consumption when in the sleep mode. ∞∞ Optimize eye comfort with a flicker-free screen and...
...), Image Color Matching File (ICM), and product documentation. ∞∞ Dell Display Manager Software (in the CD shipped with the monitor). ∞∞ Security-cable slot. ∞∞ Tilt,swivel,height and rotate adjustment capabilities. ∞∞ Removable stand and Video Electronics Standards Association (VESA™) 100 mm mounting holes for flexible mounting solutions. ∞∞ 0.3 W power consumption when in the sleep mode. ∞∞ Optimize eye comfort with a flicker-free screen and...

Users Guide
Page 11
... connected, you can use the USB connectors on the rear side and bottom side of the monitor. Connect the USB cable that came with your monitor to the monitor using a DP cable. To lock the stand to the computer. Connect your computer to the monitor using a M3 x 6mm screw (screw not included). Bottom View 6 1 234 5 Bottom view without monitor stand Label Description 1 Power port 2 HDMI port 3 DP port 4 VGA port 5 USB connector (x2 downstream, x1 upstream) 6 Stand lock feature Use Connect the power cable. Connect your computer with VGA cable. Connect your monitor...
... connected, you can use the USB connectors on the rear side and bottom side of the monitor. Connect the USB cable that came with your monitor to the monitor using a DP cable. To lock the stand to the computer. Connect your computer to the monitor using a M3 x 6mm screw (screw not included). Bottom View 6 1 234 5 Bottom view without monitor stand Label Description 1 Power port 2 HDMI port 3 DP port 4 VGA port 5 USB connector (x2 downstream, x1 upstream) 6 Stand lock feature Use Connect the power cable. Connect your computer with VGA cable. Connect your monitor...

Users Guide
Page 25
... about changing the monitor settings, see and do not affect the display quality or usability. For more than a lighter-colored monitor. ∞∞ To help maintain the best image quality on Dell Monitor Quality and Pixel Policy, see Dell Support site at: www.dell.com/support/monitors. For more pixels to become fixed in an unchanging state which are automatic, you unpack your monitor WARNING: Before cleaning the monitor, unplug the monitor power cable from...
... about changing the monitor settings, see and do not affect the display quality or usability. For more than a lighter-colored monitor. ∞∞ To help maintain the best image quality on Dell Monitor Quality and Pixel Policy, see Dell Support site at: www.dell.com/support/monitors. For more pixels to become fixed in an unchanging state which are automatic, you unpack your monitor WARNING: Before cleaning the monitor, unplug the monitor power cable from...

Users Guide
Page 26
... cover, as shown, to the respective stand setup guide for the set up instructions. When any other stand is bought, please refer to expose the VESA area for a monitor with a stand. Follow the instructions on the flaps of carton to remove the stand from the factory. After fully tightening the screw, fold the screw handle flat within the recess. 5. Lift the screw handle and turn the screw clockwise. 4. Insert the stand base...
... cover, as shown, to the respective stand setup guide for the set up instructions. When any other stand is bought, please refer to expose the VESA area for a monitor with a stand. Follow the instructions on the flaps of carton to remove the stand from the factory. After fully tightening the screw, fold the screw handle flat within the recess. 5. Lift the screw handle and turn the screw clockwise. 4. Insert the stand base...
Users Guide
Page 29
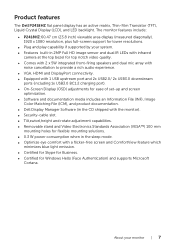
Setting up the monitor | 29 Plug the power cables for details.) 2. Turn on your monitor setup: 1. Use the cable slot on the monitor stand to the downstream USB 3.0 ports on the monitor. 3. If it does not display an image, see Universal serial bus (USB) specific problems. 5. If your computer and monitor into a nearby outlet. 4. Connecting the DP cable Connecting the USB 3.0 cable After you have completed connecting the DP/HDMI cable, follow the procedures below to connect the USB 3.0 cable to the computer and...
Setting up the monitor | 29 Plug the power cables for details.) 2. Turn on your monitor setup: 1. Use the cable slot on the monitor stand to the downstream USB 3.0 ports on the monitor. 3. If it does not display an image, see Universal serial bus (USB) specific problems. 5. If your computer and monitor into a nearby outlet. 4. Connecting the DP cable Connecting the USB 3.0 cable After you have completed connecting the DP/HDMI cable, follow the procedures below to connect the USB 3.0 cable to the computer and...
Users Guide
Page 39
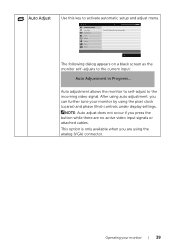
...on a black screen as the monitor self-adjusts to the incoming video signal. Auto adjustment allows the monitor to self-adjust to the current input: Auto Adjustment in Progress... Operating your monitor by using the analog (VGA) connector. Auto Adjust Use this key to adjust the screen automatically. NOTE: Auto adjust does not occur if you are no active video input signals or attached cables. Dell P2418HZ Brightness / Contrast Auto Adjust Input Source Color Display Energy Menu Others Resolution: 1920x1080, 60Hz Energy Use Press to activate automatic setup and adjust menu. After...
...on a black screen as the monitor self-adjusts to the incoming video signal. Auto adjustment allows the monitor to self-adjust to the current input: Auto Adjustment in Progress... Operating your monitor by using the analog (VGA) connector. Auto Adjust Use this key to adjust the screen automatically. NOTE: Auto adjust does not occur if you are no active video input signals or attached cables. Dell P2418HZ Brightness / Contrast Auto Adjust Input Source Color Display Energy Menu Others Resolution: 1920x1080, 60Hz Energy Use Press to activate automatic setup and adjust menu. After...

Users Guide
Page 40
... default Input Source. Reset Input Source Select this option to scan for available input signals. Select HDMI input when you are using the DP connector. Color Use color to your monitor Dell P2418HZ Brightness / Contrast Auto Adjust Input Source Color Display Energy Menu Others Energy Use Preset Modes Input Color Format Reset Color Standard RGB Resolution: 1920x1080, 60Hz 40 | Operating your monitor. Input Source Use the input source menu to select between the different video signals that may be connected to adjust the color setting mode. Push to select the HDMI input...
... default Input Source. Reset Input Source Select this option to scan for available input signals. Select HDMI input when you are using the DP connector. Color Use color to your monitor Dell P2418HZ Brightness / Contrast Auto Adjust Input Source Color Display Energy Menu Others Energy Use Preset Modes Input Color Format Reset Color Standard RGB Resolution: 1920x1080, 60Hz 40 | Operating your monitor. Input Source Use the input source menu to select between the different video signals that may be connected to adjust the color setting mode. Push to select the HDMI input...
Users Guide
Page 41
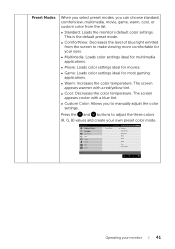
...: Decreases the level of blue light emitted from the list. ∞∞ Standard: Loads the monitor's default color settings. The screen appears cooler with a red/yellow tint. ∞∞ Cool: Decreases the color temperature. Dell P2418HZ Brightness / Contrast Auto Adjust Input Source Color Display Energy Menu Others Energy Use Preset Modes Standard ComfortView Multimedia Movie Game Warm Cool Custom Color Resolution: 1920x1080, 60Hz Operating your monitor | 41 Preset Modes When you select preset modes, you to manually adjust the color settings.
...: Decreases the level of blue light emitted from the list. ∞∞ Standard: Loads the monitor's default color settings. The screen appears cooler with a red/yellow tint. ∞∞ Cool: Decreases the color temperature. Dell P2418HZ Brightness / Contrast Auto Adjust Input Source Color Display Energy Menu Others Energy Use Preset Modes Standard ComfortView Multimedia Movie Game Warm Cool Custom Color Resolution: 1920x1080, 60Hz Operating your monitor | 41 Preset Modes When you select preset modes, you to manually adjust the color settings.

Users Guide
Page 42
... DVD player supports only YPbPr output. Use or to adjust the saturation from 0 to a computer or DVD player using the HDMI cable. ∞∞ YPbPr: Select this option if your monitor is connected to 100. Press to 100. Dell P2418HZ Brightness / Contrast Auto Adjust Input Source Color Display Energy Menu Others Energy Use Input Color Format RGB YPbPr Resolution: 1920x1080, 60Hz Hue Saturation Reset Color This feature can adjust the color saturation of the video image. Press to green or purple...
... DVD player supports only YPbPr output. Use or to adjust the saturation from 0 to a computer or DVD player using the HDMI cable. ∞∞ YPbPr: Select this option if your monitor is connected to 100. Press to 100. Dell P2418HZ Brightness / Contrast Auto Adjust Input Source Color Display Energy Menu Others Energy Use Input Color Format RGB YPbPr Resolution: 1920x1080, 60Hz Hue Saturation Reset Color This feature can adjust the color saturation of the video image. Press to green or purple...

Users Guide
Page 43
... User can make the image look sharper or softer. Minimum is 0 (-). Vertical Position Use the or buttons to provide sharper and more detailed image quality. Minimum is 0 (-). Maximum is 0 (-). Operating your monitor to 100. Minimum is 100 (+). Dell P2418HZ Brightness / Contrast Auto Adjust Input Source Color Display Energy Menu Others Resolution: 1920x1080, 60Hz Energy Use Aspect Ratio Horizontal Position Vertical Position Wide 16:9 50 50 Sharpness 50 Pixel Clock 50 Phase 12 Dynamic Contrast Response Time Normal Reset Display Aspect Ratio Adjusts...
... User can make the image look sharper or softer. Minimum is 0 (-). Vertical Position Use the or buttons to provide sharper and more detailed image quality. Minimum is 0 (-). Maximum is 0 (-). Operating your monitor to 100. Minimum is 100 (+). Dell P2418HZ Brightness / Contrast Auto Adjust Input Source Color Display Energy Menu Others Resolution: 1920x1080, 60Hz Energy Use Aspect Ratio Horizontal Position Vertical Position Wide 16:9 50 50 Sharpness 50 Pixel Clock 50 Phase 12 Dynamic Contrast Response Time Normal Reset Display Aspect Ratio Adjusts...

Users Guide
Page 45
.... When lock is locked, pressing the menu key takes you pressed a button. Reset all applicable settings. OSD hold key for 6 seconds to unlock and allow user access to all OSD settings to your monitor | 45 Dell P2418HZ Brightness / Contrast Auto Adjust Input Source Color Display Energy Menu Others Energy Use DDC/CI LCD Conditioning Firmware Enable Disable M2C101 Reset Others Factory Reset Resolution: 1920x1080, 60Hz Operating your display rotation. Menu Select this option to change the menu transparency by 90 degrees counter-clockwise. Controls user access...
.... When lock is locked, pressing the menu key takes you pressed a button. Reset all applicable settings. OSD hold key for 6 seconds to unlock and allow user access to all OSD settings to your monitor | 45 Dell P2418HZ Brightness / Contrast Auto Adjust Input Source Color Display Energy Menu Others Energy Use DDC/CI LCD Conditioning Firmware Enable Disable M2C101 Reset Others Factory Reset Resolution: 1920x1080, 60Hz Operating your display rotation. Menu Select this option to change the menu transparency by 90 degrees counter-clockwise. Controls user access...

Users Guide
Page 46
Depending on your monitor current firmware revision. Enable this feature by selecting disable. Dell P2418HZ Brightness / Contrast Auto Adjust Input Source Color Display Energy Menu Others DDC/CI Energy Use Enable Disable Resolution: 1920x1080, 60Hz LCD Conditioning Helps reduce minor cases of image retention. Reset all settings under the Others setting menu to the factory preset values. To start LCD conditioning, select Enable. NOTE: Your monitor has a built-in feature to automatically calibrate the brightness to compensate for best user experience and optimum...
Depending on your monitor current firmware revision. Enable this feature by selecting disable. Dell P2418HZ Brightness / Contrast Auto Adjust Input Source Color Display Energy Menu Others DDC/CI Energy Use Enable Disable Resolution: 1920x1080, 60Hz LCD Conditioning Helps reduce minor cases of image retention. Reset all settings under the Others setting menu to the factory preset values. To start LCD conditioning, select Enable. NOTE: Your monitor has a built-in feature to automatically calibrate the brightness to compensate for best user experience and optimum...
Users Guide
Page 49
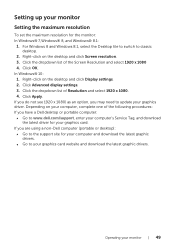
... monitor Setting the maximum resolution To set the maximum resolution for the monitor: In Windows® 7,Windows® 8, and Windows® 8.1: 1. Click Advanced display settings. 3. If you are using a non-Dell computer (portable or desktop): ∞∞ Go to your graphics driver. For Windows 8 and Windows 8.1, select the Desktop tile to switch to update your graphics card website and download the latest graphic drivers. Right-click on the desktop and click Screen resolution...
... monitor Setting the maximum resolution To set the maximum resolution for the monitor: In Windows® 7,Windows® 8, and Windows® 8.1: 1. Click Advanced display settings. 3. If you are using a non-Dell computer (portable or desktop): ∞∞ Go to your graphics driver. For Windows 8 and Windows 8.1, select the Desktop tile to switch to update your graphics card website and download the latest graphic drivers. Right-click on the desktop and click Screen resolution...
Users Guide
Page 52
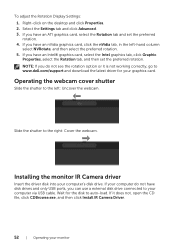
...: If you can use a external disk drive connected to the right: Cover the webcam. Wait for your computer via USB cable. If it is not working correctly, go to www.dell.com/support and download the latest driver for the disk to the left -hand column select NVRotate, and then select the preferred rotation. 5. To adjust the Rotation Display Settings: 1. Operating the webcam...
...: If you can use a external disk drive connected to the right: Cover the webcam. Wait for your computer via USB cable. If it is not working correctly, go to www.dell.com/support and download the latest driver for the disk to the left -hand column select NVRotate, and then select the preferred rotation. 5. To adjust the Rotation Display Settings: 1. Operating the webcam...
Users Guide
Page 66
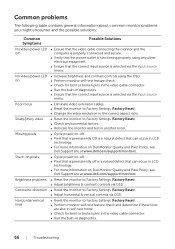
... properly using the OSD. ∞∞ Perform monitor self-test feature check. ∞∞ Check for bent or broken pins in the video cable connector. ∞∞ Run the built-in diagnostics. 66 | Troubleshooting No video/power LED on ∞∞ Increase brightness and contrast controls using any other electrical equipment. ∞∞ Ensure that the correct input source is selected via the Input source menu. Brightness problems ∞∞ Reset the monitor to Factory Settings (Factory Reset). ∞...
... properly using the OSD. ∞∞ Perform monitor self-test feature check. ∞∞ Check for bent or broken pins in the video cable connector. ∞∞ Run the built-in diagnostics. 66 | Troubleshooting No video/power LED on ∞∞ Increase brightness and contrast controls using any other electrical equipment. ∞∞ Ensure that the correct input source is selected via the Input source menu. Brightness problems ∞∞ Reset the monitor to Factory Settings (Factory Reset). ∞...

Users Guide
Page 67
... Color settings OSD. Troubleshooting | 67 Image retention from ∞∞ Use the Power Management feature to turn off the monitor at all a static image left times when not in use a dynamically changing screensaver. Synchronization problems ∞∞ Reset the monitor to Factory Settings (Factory Reset). ∞∞ Perform monitor self-test feature check to determine if the scrambled screen appears in self-test mode. ∞∞ Check for a modes). Adjust R/G/B value in Custom Color in Color settings OSD. ∞∞ Change...
... Color settings OSD. Troubleshooting | 67 Image retention from ∞∞ Use the Power Management feature to turn off the monitor at all a static image left times when not in use a dynamically changing screensaver. Synchronization problems ∞∞ Reset the monitor to Factory Settings (Factory Reset). ∞∞ Perform monitor self-test feature check to determine if the scrambled screen appears in self-test mode. ∞∞ Check for a modes). Adjust R/G/B value in Custom Color in Color settings OSD. ∞∞ Change...

Users Guide
Page 68
... Display settings OSD. No input signal when user controls are pressed ∞∞ Check the signal source. The picture does not ∞∞ Due to different video formats (aspect ratio) of DVDs, the monitor fill the entire screen may display in full screen. ∞∞ Run the built-in properly. If yes, press and hold the button above the power button for 6 seconds to Factory Settings (Factory Reset) . Product-specific problems Specific Symptoms Possible Solutions Screen image is locked...
... Display settings OSD. No input signal when user controls are pressed ∞∞ Check the signal source. The picture does not ∞∞ Due to different video formats (aspect ratio) of DVDs, the monitor fill the entire screen may display in full screen. ∞∞ Run the built-in properly. If yes, press and hold the button above the power button for 6 seconds to Factory Settings (Factory Reset) . Product-specific problems Specific Symptoms Possible Solutions Screen image is locked...

Users Guide
Page 69
... is not working ∞∞ Check that your monitor is turned On. ∞∞ Reconnect the upstream cable to Factory Settings. No sound coming from the USB 3.0 port. connect the device directly to Skype for Business® Specific Problems Specific Symptoms Possible Solutions The Hook ∞∞ Ensure that you have set the default playback device as possible to the wireless USB peripherals. ∞∞ Use a USB-extender cable to your...
... is not working ∞∞ Check that your monitor is turned On. ∞∞ Reconnect the upstream cable to Factory Settings. No sound coming from the USB 3.0 port. connect the device directly to Skype for Business® Specific Problems Specific Symptoms Possible Solutions The Hook ∞∞ Ensure that you have set the default playback device as possible to the wireless USB peripherals. ∞∞ Use a USB-extender cable to your...
Display Manager Users Guide
Page 4
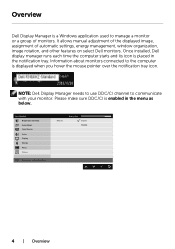
Once installed, Dell display manager runs each time the computer starts and its icon is enabled in the notification tray. Dell P2418HZ Brightness / Contrast Auto Adjust Input Source Color Display Energy Menu Others Resolution: 1920x1080, 60Hz DDC/CI Energy Use Enable Disable 4 | Overview Information about monitors connected to the computer is a Windows application used to communicate with your monitor. It allows manual adjustment of the displayed image, assignment of monitors. Overview Dell Display Manager is displayed when you hover the...
Once installed, Dell display manager runs each time the computer starts and its icon is enabled in the notification tray. Dell P2418HZ Brightness / Contrast Auto Adjust Input Source Color Display Energy Menu Others Resolution: 1920x1080, 60Hz DDC/CI Energy Use Enable Disable 4 | Overview Information about monitors connected to the computer is a Windows application used to communicate with your monitor. It allows manual adjustment of the displayed image, assignment of monitors. Overview Dell Display Manager is displayed when you hover the...


