Users Guide
Page 7
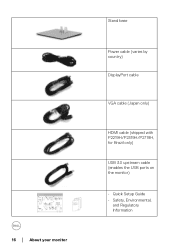
16 │ About your monitor Stand base Power cable (varies by country) DisplayPort cable VGA cable (Japan only) HDMI cable (shipped with P2219H/P2319H/P2719H, for Brazil only) USB 3.0 upstream cable (enables the USB ports on the monitor) • Quick Setup Guide • Safety, Environmental, and Regulatory Information
16 │ About your monitor Stand base Power cable (varies by country) DisplayPort cable VGA cable (Japan only) HDMI cable (shipped with P2219H/P2319H/P2719H, for Brazil only) USB 3.0 upstream cable (enables the USB ports on the monitor) • Quick Setup Guide • Safety, Environmental, and Regulatory Information
Users Guide
Page 34
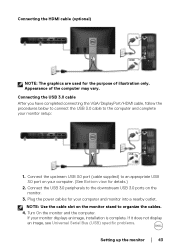
... it does not display an image, see Universal Serial Bus (USB) specific problems. Setting up the monitor │ 43 Connect the USB 3.0 peripherals to the computer and complete your monitor setup: 1. Plug the power cables for the purpose of the computer may vary. Connecting the USB 3.0 ...USB 3.0 port (cable supplied) to organize the cables. 4. Turn On the monitor and the computer. NOTE: Use the cable slot on the monitor stand to an appropriate USB 3.0 port on the monitor. 3. If your monitor displays an image, installation is complete. Connecting the HDMI cable (optional) NOTE:...
... it does not display an image, see Universal Serial Bus (USB) specific problems. Setting up the monitor │ 43 Connect the USB 3.0 peripherals to the computer and complete your monitor setup: 1. Plug the power cables for the purpose of the computer may vary. Connecting the USB 3.0 ...USB 3.0 port (cable supplied) to organize the cables. 4. Turn On the monitor and the computer. NOTE: Use the cable slot on the monitor stand to an appropriate USB 3.0 port on the monitor. 3. If your monitor displays an image, installation is complete. Connecting the HDMI cable (optional) NOTE:...
Users Guide
Page 41
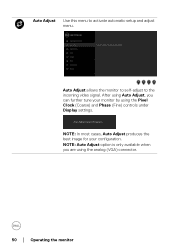
NOTE: Auto Adjust option is only available when you can further tune your configuration. Auto Adjust Use this menu to the incoming video signal. Auto Adjust allows the monitor to self-adjust to activate automatic setup and adjust menu. NOTE: In most cases, Auto Adjust produces the best image for your monitor by using the analog (VGA) connector. 50 │ Operating the monitor After using Auto Adjust, you are using the Pixel Clock (Coarse) and Phase (Fine) controls under Display settings.
NOTE: Auto Adjust option is only available when you can further tune your configuration. Auto Adjust Use this menu to the incoming video signal. Auto Adjust allows the monitor to self-adjust to activate automatic setup and adjust menu. NOTE: In most cases, Auto Adjust produces the best image for your monitor by using the analog (VGA) connector. 50 │ Operating the monitor After using Auto Adjust, you are using the Pixel Clock (Coarse) and Phase (Fine) controls under Display settings.


