
Owner's Manual
Page 2
USA Canada Mexico Puerto Rico UK Ireland France Italy Spain Germany Austria Netherlands Belgium Sweden Norway Denmark Finland Switzerland 877-465-2968 (877-Ink2You) 877-501-4803 001-800-210-7607 800-805-7545 0870 907 4574 1850 707 407 0825387247 800602705 902120385 0800 2873355 08 20 - 24 05 30 35 020 - 674 4881 02.713 1590 08 587 705 81 231622 64 3287 5215 09 2533 1411 0848 801 888 www.dell.com/supplies | support.dell.com Order toner cartridges Dell™ toner cartridges are available only through Dell. You can order toner cartridges online at www.dell.com/supplies or by phone.
USA Canada Mexico Puerto Rico UK Ireland France Italy Spain Germany Austria Netherlands Belgium Sweden Norway Denmark Finland Switzerland 877-465-2968 (877-Ink2You) 877-501-4803 001-800-210-7607 800-805-7545 0870 907 4574 1850 707 407 0825387247 800602705 902120385 0800 2873355 08 20 - 24 05 30 35 020 - 674 4881 02.713 1590 08 587 705 81 231622 64 3287 5215 09 2533 1411 0848 801 888 www.dell.com/supplies | support.dell.com Order toner cartridges Dell™ toner cartridges are available only through Dell. You can order toner cartridges online at www.dell.com/supplies or by phone.
Owner's Manual
Page 9
Contents Accessing your User's Guide 4 FCC emissions information 5 CAUTION: Safety instructions 7 1 Unpack the printer Attaching an operator panel overlay 15 2 Install printer supplies Installing the print cartridge 18 Removing toner cartridge packaging 18 3 Install the optional 250-sheet drawer 4 Install optional memory cards Removing the printer side cover 26 Removing the system board shield 28 Installing a memory card 29 Reinstalling the system board shield 31 Reattaching the printer side cover 32 Contents 9
Contents Accessing your User's Guide 4 FCC emissions information 5 CAUTION: Safety instructions 7 1 Unpack the printer Attaching an operator panel overlay 15 2 Install printer supplies Installing the print cartridge 18 Removing toner cartridge packaging 18 3 Install the optional 250-sheet drawer 4 Install optional memory cards Removing the printer side cover 26 Removing the system board shield 28 Installing a memory card 29 Reinstalling the system board shield 31 Reattaching the printer side cover 32 Contents 9

Owner's Manual
Page 14
...dust 2 Remove all items from the direct airflow of sunlight, humidity extremes, or temperature fluctuations - A firm, level surface - www.dell.com/supplies | support.dell.com 1 Select a location for your printer. • Leave enough room to allow space around the printer for assistance. Away from... the following items: Power cord Owner's Manual Overlay Drivers and Utilities CD Setup diagram • Setup diagram • Printer with toner cartridge installed • Power cord • Owner's Manual • Drivers and Utilities CD • Operator panel overlay (non-English only)...
...dust 2 Remove all items from the direct airflow of sunlight, humidity extremes, or temperature fluctuations - A firm, level surface - www.dell.com/supplies | support.dell.com 1 Select a location for your printer. • Leave enough room to allow space around the printer for assistance. Away from... the following items: Power cord Owner's Manual Overlay Drivers and Utilities CD Setup diagram • Setup diagram • Printer with toner cartridge installed • Power cord • Owner's Manual • Drivers and Utilities CD • Operator panel overlay (non-English only)...

Owner's Manual
Page 17
SECTION 2 Install printer supplies Installing the print cartridge 2
SECTION 2 Install printer supplies Installing the print cartridge 2

Owner's Manual
Page 18
Cartridge handle 3 Remove the protective foam packaging from the toner cartridge. 18 Install printer supplies www.dell.com/supplies | support.dell.com Installing the print cartridge Removing toner cartridge packaging 1 Use the finger tab to pull down the printer cover. 2 Grasp the cartridge handle (behind the packaging tag in the illustration) and pull the toner cartridge straight up.
Cartridge handle 3 Remove the protective foam packaging from the toner cartridge. 18 Install printer supplies www.dell.com/supplies | support.dell.com Installing the print cartridge Removing toner cartridge packaging 1 Use the finger tab to pull down the printer cover. 2 Grasp the cartridge handle (behind the packaging tag in the illustration) and pull the toner cartridge straight up.

Owner's Manual
Page 19
4 Pull off the plastic piece attached to distribute the toner evenly. Discard the plastic piece, foam and paper. NOTE: Do not touch the photoconductor drum on the bottom of the toner cartridge. 5 Gently shake the cartridge to the ends of the toner cartridge. Install printer supplies 19
4 Pull off the plastic piece attached to distribute the toner evenly. Discard the plastic piece, foam and paper. NOTE: Do not touch the photoconductor drum on the bottom of the toner cartridge. 5 Gently shake the cartridge to the ends of the toner cartridge. Install printer supplies 19

Owner's Manual
Page 20
b Holding the cartridge by the handle, tilt the cartridge down on either side of the cartridge with the corresponding arrows in place. 7 Close the printer cover. If you cannot close the printer cover, make sure the toner cartridge is firmly in the printer. Do not force the cover closed. 20 Install printer supplies www.dell.com/supplies | support.dell.com 6 Insert the toner cartridge: a Align the colored arrows on the cartridge until it between the toner cartridge grooves. c Push down and guide it is positioned correctly.
b Holding the cartridge by the handle, tilt the cartridge down on either side of the cartridge with the corresponding arrows in place. 7 Close the printer cover. If you cannot close the printer cover, make sure the toner cartridge is firmly in the printer. Do not force the cover closed. 20 Install printer supplies www.dell.com/supplies | support.dell.com 6 Insert the toner cartridge: a Align the colored arrows on the cartridge until it between the toner cartridge grooves. c Push down and guide it is positioned correctly.

Owner's Manual
Page 50
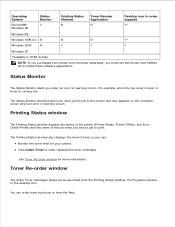
... is on but nothing prints, or if print jobs are not printing and the Error light is on , make sure the toner cartridge is firmly plugged in at the electrical outlet. Operating System Status Monitor Windows 98, Y Windows Me Windows NT® 4.0 N ...Windows 2000, N Windows XP Printing Status Window N Dell Toner Re-order Window N Local Printer Setup Utility Y N N Y Y Y Y Dell Printer Software Uninstall Y Driver Profiler Y Y Y Y Y NOTE: If you purchased your printer and computer separately, you must...
... is on but nothing prints, or if print jobs are not printing and the Error light is on , make sure the toner cartridge is firmly plugged in at the electrical outlet. Operating System Status Monitor Windows 98, Y Windows Me Windows NT® 4.0 N ...Windows 2000, N Windows XP Printing Status Window N Dell Toner Re-order Window N Local Printer Setup Utility Y N N Y Y Y Y Dell Printer Software Uninstall Y Driver Profiler Y Y Y Y Y NOTE: If you purchased your printer and computer separately, you must...

Owner's Manual
Page 51
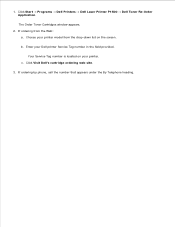
... printer and only appears on the screen. b Enter your printer 51 c Click Visit Dell's cartridge ordering web site. 3 If ordering by phone or from the Web. 1 Click Start → Programs or All Programs → Dell Printers → Dell Laser Printer P1500 → Dell Toner Re-Order Application. Your Service Tag number is located on page 51...
... printer and only appears on the screen. b Enter your printer 51 c Click Visit Dell's cartridge ordering web site. 3 If ordering by phone or from the Web. 1 Click Start → Programs or All Programs → Dell Printers → Dell Laser Printer P1500 → Dell Toner Re-Order Application. Your Service Tag number is located on page 51...

Owner's Manual
Page 69
9 SECTION 9 Appendix Contacting Dell Limited Warranties and Return Policy Dell Computer Corporation Ink and Toner Cartridges Limited Warranties Dell Software License Agreement
9 SECTION 9 Appendix Contacting Dell Limited Warranties and Return Policy Dell Computer Corporation Ink and Toner Cartridges Limited Warranties Dell Software License Agreement

Owner's Manual
Page 92
... in Canada, call 1-800-387-5757. Refer to replace the product because it with a comparable product or reimburse you for the cartridge purchase cost, at Dell's sole option. If we are not able to the appropriate limited warranty accordingly. THIS IS THE MAXIMUM AMOUNT FOR WHICH... DELL IS RESPONSIBLE. FOR U.S. Ink and Toner Cartridges Limited Warranty (U.S. THIS WARRANTY GIVES YOU SPECIFIC LEGAL RIGHTS, AND YOU MAY ALSO HAVE OTHER RIGHTS WHICH VARY FROM STATE TO ...
... in Canada, call 1-800-387-5757. Refer to replace the product because it with a comparable product or reimburse you for the cartridge purchase cost, at Dell's sole option. If we are not able to the appropriate limited warranty accordingly. THIS IS THE MAXIMUM AMOUNT FOR WHICH... DELL IS RESPONSIBLE. FOR U.S. Ink and Toner Cartridges Limited Warranty (U.S. THIS WARRANTY GIVES YOU SPECIFIC LEGAL RIGHTS, AND YOU MAY ALSO HAVE OTHER RIGHTS WHICH VARY FROM STATE TO ...

Owner's Manual
Page 93
... have been refilled or to defects resulting from material or manufacturing process for the life of the cartridge. Dell does not accept any other kind of damage caused to the consumer and/or to a third party. This warranty coverage terminates if you ...for patrimonial, emotional or any additional liability for the purchase cost. For the original purchaser of genuine Dell-branded ink cartridges, Dell warrants that may apply. In Mexico, call 1-877-839-5123. Dell's liability for the malfunction or defect of hardware after the period of the legal warranty (and specifically the...
... have been refilled or to defects resulting from material or manufacturing process for the life of the cartridge. Dell does not accept any other kind of damage caused to the consumer and/or to a third party. This warranty coverage terminates if you ...for patrimonial, emotional or any additional liability for the purchase cost. For the original purchaser of genuine Dell-branded ink cartridges, Dell warrants that may apply. In Mexico, call 1-877-839-5123. Dell's liability for the malfunction or defect of hardware after the period of the legal warranty (and specifically the...
Dell™ Laser Printer P1500 User's Guide
Page 1
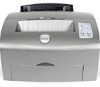
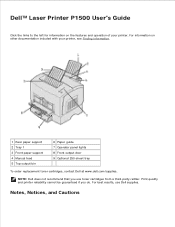
...do. Print quality and printer reliability cannot be guaranteed if you use Dell supplies. Dell™ Laser Printer P1500 User's Guide Click the links to the left for information on other documentation included with your printer. For best results, use toner cartridges from a third-party refiller. For information on the features and ... 1 3 Front paper support 4 Manual feed 5 Top output bin 6 Paper guide 7 Operator panel lights 8 Front output door 9 Optional 250-sheet tray To order replacement toner cartridges, contact Dell at www.dell.com/supplies. Notes, Notices, and Cautions
...do. Print quality and printer reliability cannot be guaranteed if you use Dell supplies. Dell™ Laser Printer P1500 User's Guide Click the links to the left for information on other documentation included with your printer. For best results, use toner cartridges from a third-party refiller. For information on the features and ... 1 3 Front paper support 4 Manual feed 5 Top output bin 6 Paper guide 7 Operator panel lights 8 Front output door 9 Optional 250-sheet tray To order replacement toner cartridges, contact Dell at www.dell.com/supplies. Notes, Notices, and Cautions
Dell™ Laser Printer P1500 User's Guide
Page 5
...window also displays the level of the job when you can: Monitor the toner level for more information. Toner Re-order window The Order Toner Cartridges dialog can order toner by phone or from the Printing Status window, the Programs window, or the desktop icon. Printing Status window The Printing ... *Available in HTML format. Operating System Microsoft® Windows 98 Status Monitor Y Printing Status Window N Toner Reorder Application N Desktop icon to order replacement toner cartridges. NOTE: If you purchased your printer. You can be launched from the Web. 1.
...window also displays the level of the job when you can: Monitor the toner level for more information. Toner Re-order window The Order Toner Cartridges dialog can order toner by phone or from the Printing Status window, the Programs window, or the desktop icon. Printing Status window The Printing ... *Available in HTML format. Operating System Microsoft® Windows 98 Status Monitor Y Printing Status Window N Toner Reorder Application N Desktop icon to order replacement toner cartridges. NOTE: If you purchased your printer. You can be launched from the Web. 1.
Dell™ Laser Printer P1500 User's Guide
Page 6
Your Service Tag number is located on your printer model from the Web: a. The Order Toner Cartridges window appears. 2. c. If ordering from the drop-down list on the screen. Click Start Programs Dell Printers Dell Laser Printer P1500 Dell Toner Re-Order Application. If ordering by phone, call the number that appears under the By Telephone heading. Click Visit Dell's cartridge ordering web site. 3. b. 1. Choose your printer. Enter your Dell printer Service Tag number in the field provided.
Your Service Tag number is located on your printer model from the Web: a. The Order Toner Cartridges window appears. 2. c. If ordering from the drop-down list on the screen. Click Start Programs Dell Printers Dell Laser Printer P1500 Dell Toner Re-Order Application. If ordering by phone, call the number that appears under the By Telephone heading. Click Visit Dell's cartridge ordering web site. 3. b. 1. Choose your printer. Enter your Dell printer Service Tag number in the field provided.

Dell™ Laser Printer P1500 User's Guide
Page 10
... light is displayed each time you have a new toner cartridge available. When the Toner Low light comes on (in your supplies. Ordering replacement toner cartridges To order replacement toner cartridges, contact Dell at www.dell.com/supplies. Replacing the toner cartridge Conserving supplies Ordering replacement toner cartridges Replacing the toner cartridge Conserving supplies Conserving supplies lowers printing costs.
... light is displayed each time you have a new toner cartridge available. When the Toner Low light comes on (in your supplies. Ordering replacement toner cartridges To order replacement toner cartridges, contact Dell at www.dell.com/supplies. Replacing the toner cartridge Conserving supplies Ordering replacement toner cartridges Replacing the toner cartridge Conserving supplies Conserving supplies lowers printing costs.
Dell™ Laser Printer P1500 User's Guide
Page 11
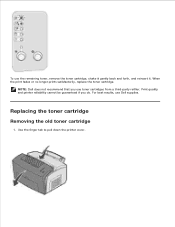
Replacing the toner cartridge Removing the old toner cartridge 1. Print quality and printer reliability cannot be guaranteed if you use toner cartridges from a third-party refiller. To use Dell supplies. Use the finger tab to pull down the printer cover. 2. For best results, use the remaining toner, remove the toner cartridge, shake it gently back and forth, and reinsert it. NOTE: Dell does not recommend that you do. When the print fades or no longer prints satisfactorily, replace the toner cartridge.
Replacing the toner cartridge Removing the old toner cartridge 1. Print quality and printer reliability cannot be guaranteed if you use toner cartridges from a third-party refiller. To use Dell supplies. Use the finger tab to pull down the printer cover. 2. For best results, use the remaining toner, remove the toner cartridge, shake it gently back and forth, and reinsert it. NOTE: Dell does not recommend that you do. When the print fades or no longer prints satisfactorily, replace the toner cartridge.
Dell™ Laser Printer P1500 User's Guide
Page 12
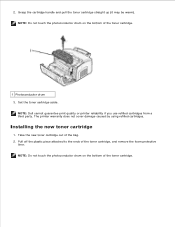
...Dell cannot guarantee print quality or printer reliability if you use refilled cartridges from a third party. Installing the new toner cartridge 1. NOTE: Do not touch the photoconductor drum on the bottom of the toner cartridge. Grasp the cartridge handle and pull the toner cartridge straight up (it may be warm). Take the new toner cartridge... out of the toner cartridge, and remove the foam protective liner. 2. Pull...
...Dell cannot guarantee print quality or printer reliability if you use refilled cartridges from a third party. Installing the new toner cartridge 1. NOTE: Do not touch the photoconductor drum on the bottom of the toner cartridge. Grasp the cartridge handle and pull the toner cartridge straight up (it may be warm). Take the new toner cartridge... out of the toner cartridge, and remove the foam protective liner. 2. Pull...
Dell™ Laser Printer P1500 User's Guide
Page 13
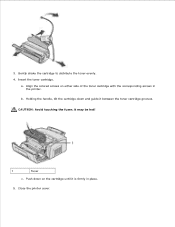
it between the toner cartridge grooves. Holding the handle, tilt the cartridge down on either side of the toner cartridge with the corresponding arrows in place. 5. Push down and guide it may be hot! 1 Fuser c. 3. CAUTION: Avoid touching the fuser; a. Insert the toner cartridge. b. Close the printer cover. Align the colored arrows on the cartridge until it is firmly in the printer. Gently shake the cartridge to distribute the toner evenly. 4.
it between the toner cartridge grooves. Holding the handle, tilt the cartridge down on either side of the toner cartridge with the corresponding arrows in place. 5. Push down and guide it may be hot! 1 Fuser c. 3. CAUTION: Avoid touching the fuser; a. Insert the toner cartridge. b. Close the printer cover. Align the colored arrows on the cartridge until it is firmly in the printer. Gently shake the cartridge to distribute the toner evenly. 4.
Dell™ Laser Printer P1500 User's Guide
Page 14
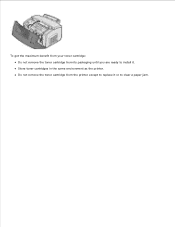
Do not remove the toner cartridge from its packaging until you are ready to clear a paper jam. Store toner cartridges in the same environment as the printer. To get the maximum benefit from your toner cartridge: Do not remove the toner cartridge from the printer except to replace it or to install it.
Do not remove the toner cartridge from its packaging until you are ready to clear a paper jam. Store toner cartridges in the same environment as the printer. To get the maximum benefit from your toner cartridge: Do not remove the toner cartridge from the printer except to replace it or to install it.


