Owners Manual
Page 3
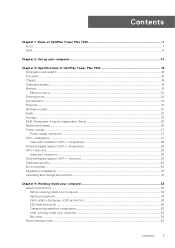
... 1: Views of OptiPlex Tower Plus 7010 7 Front...7 Back...8 Chapter 2: Set up your computer 10 Chapter 3: Specifications of OptiPlex Tower Plus 7010 16 Dimensions and weight...16 Processor...16 Chipset...18 Operating system...19 Memory...19 Memory matrix...20 External ports...20 Internal slots...21 Ethernet...21 Wireless module...22 Audio...22 Storage...23 RAID (Redundant Array of Independent Disks)...26 Media-card reader...26 Power ratings...27 Power supply connector...27 GPU-Integrated...27 Video port resolution (GPU-Integrated)...28 External display support (GPU-Integrated...
... 1: Views of OptiPlex Tower Plus 7010 7 Front...7 Back...8 Chapter 2: Set up your computer 10 Chapter 3: Specifications of OptiPlex Tower Plus 7010 16 Dimensions and weight...16 Processor...16 Chipset...18 Operating system...19 Memory...19 Memory matrix...20 External ports...20 Internal slots...21 Ethernet...21 Wireless module...22 Audio...22 Storage...23 RAID (Redundant Array of Independent Disks)...26 Media-card reader...26 Power ratings...27 Power supply connector...27 GPU-Integrated...27 Video port resolution (GPU-Integrated)...28 External display support (GPU-Integrated...

Owners Manual
Page 4
Screw list...36 Major components of OptiPlex Tower Plus 7010...37 Chapter 5: Removing and installing Customer Replaceable Units (CRUs 39 Side cover...39 Removing the side cover...39 Installing the side cover...40 Front bezel ...42 Removing the front bezel...42 Installing the front bezel...42 Hard drive...43 2.5-inch hard drive...43 3.5-inch hard drive...49 Optical drive...54 Removing the Slim optical drive...54 Installing the Slim optical drive...55 Memory...56 Removing the memory...56 Installing the memory...56 Solid-state drives...57...
Screw list...36 Major components of OptiPlex Tower Plus 7010...37 Chapter 5: Removing and installing Customer Replaceable Units (CRUs 39 Side cover...39 Removing the side cover...39 Installing the side cover...40 Front bezel ...42 Removing the front bezel...42 Installing the front bezel...42 Hard drive...43 2.5-inch hard drive...43 3.5-inch hard drive...49 Optical drive...54 Removing the Slim optical drive...54 Installing the Slim optical drive...55 Memory...56 Removing the memory...56 Installing the memory...56 Solid-state drives...57...

Owners Manual
Page 7
SD-card slot (optional) 4. USB 3.2 Gen 2x2 (20 Gbps) Type-C port 9. USB 3.2 Gen 2 (10 Gbps) port Views of OptiPlex Tower Plus 7010 1. Power button with PowerShare 7. USB 2.0 (480 Mbps) port with diagnostic LED 3. Optical disk-drive (optional) 2. USB 2.0 (480 Mbps) port 8. Universal audio jack port 6. Front 1 Views of OptiPlex Tower Plus 7010 7 Hard-drive activity light 5.
SD-card slot (optional) 4. USB 3.2 Gen 2x2 (20 Gbps) Type-C port 9. USB 3.2 Gen 2 (10 Gbps) port Views of OptiPlex Tower Plus 7010 1. Power button with PowerShare 7. USB 2.0 (480 Mbps) port with diagnostic LED 3. Optical disk-drive (optional) 2. USB 2.0 (480 Mbps) port 8. Universal audio jack port 6. Front 1 Views of OptiPlex Tower Plus 7010 7 Hard-drive activity light 5.

Owners Manual
Page 20
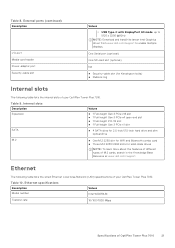
Memory matrix The following table lists the external ports of OptiPlex Tower Plus 7010 Table 7. Table 8. External ports Description Network port Values ● 1 RJ45 Ethernet Port 10/100/1000 Mbps USB ports Front: ● One USB 2.0 (480 Mbps) port ● One USB 2.0 (480 Mbps) port with PowerShare ● One USB 3.2 Gen 2 (10 Gbps) port ● One USB 3.2 Gen 2x2 (20 Gbps) Type-C port Rear: ● Two USB 2.0 (480 Mbps) ports with Smart Power On ● One USB 3.2 Gen 2 (10 Gbps) port ●...
Memory matrix The following table lists the external ports of OptiPlex Tower Plus 7010 Table 7. Table 8. External ports Description Network port Values ● 1 RJ45 Ethernet Port 10/100/1000 Mbps USB ports Front: ● One USB 2.0 (480 Mbps) port ● One USB 2.0 (480 Mbps) port with PowerShare ● One USB 3.2 Gen 2 (10 Gbps) port ● One USB 3.2 Gen 2x2 (20 Gbps) Type-C port Rear: ● Two USB 2.0 (480 Mbps) ports with Smart Power On ● One USB 3.2 Gen 2 (10 Gbps) port ●...
Owners Manual
Page 21
...-height PCI-32 slot ● 1 Full-height Gen 3 PCIe x1 slot ● 4 SATA slots for 2.5-inch/3.5-inch hard drive and slim optical drive M.2 ● One M.2 2230 slot for WiFi and Bluetooth combo card ● Three M.2 2230/2280 slots for Kensington locks) ● Padlock ring Internal slots The following table lists the wired Ethernet Local Area Network (LAN) specifications of your OptiPlex Tower Plus 7010. Table 10. Table 8. Table 9. Ethernet The following table lists the internal slots of your OptiPlex Tower Plus 7010. Ethernet specifications Description Model number...
...-height PCI-32 slot ● 1 Full-height Gen 3 PCIe x1 slot ● 4 SATA slots for 2.5-inch/3.5-inch hard drive and slim optical drive M.2 ● One M.2 2230 slot for WiFi and Bluetooth combo card ● Three M.2 2230/2280 slots for Kensington locks) ● Padlock ring Internal slots The following table lists the wired Ethernet Local Area Network (LAN) specifications of your OptiPlex Tower Plus 7010. Table 10. Table 8. Table 9. Ethernet The following table lists the internal slots of your OptiPlex Tower Plus 7010. Ethernet specifications Description Model number...

Owners Manual
Page 24
...(SSD No No Yes(SAT No inch hard-drive Primary ) 2) A-0) M.2 PCIe for boot function. ) 24 Specifications of OptiPlex Tower Plus 7010 hard- Yes(SSD0, Yes(SSD1 Yes(SSD No No Yes(SAT Yes(SATA-1 inch hard-drive X2 Primary ) 2) A-0) ) M.2 PCIe for boot function.) 2.5-inch hard-drive No No No Yes(SAT No No No A-0,Prim ary SATA for boot function. ) 2.5-inch hard-drive X2 No No No Yes(SAT...
...(SSD No No Yes(SAT No inch hard-drive Primary ) 2) A-0) M.2 PCIe for boot function. ) 24 Specifications of OptiPlex Tower Plus 7010 hard- Yes(SSD0, Yes(SSD1 Yes(SSD No No Yes(SAT Yes(SATA-1 inch hard-drive X2 Primary ) 2) A-0) ) M.2 PCIe for boot function.) 2.5-inch hard-drive No No No Yes(SAT No No No A-0,Prim ary SATA for boot function. ) 2.5-inch hard-drive X2 No No No Yes(SAT...

Owners Manual
Page 33
... network cables, telephone, and telecommunications lines from the system. ● Use an ESD field service kit when working inside your computer. Standby power Dell products with a beep code emitted for connecting two or more grounding conductors to reduce the chance of memory integrity, intermittent memory errors, etc. An example of catastrophic failure is a memory DIMM that it is done through the use of handling parts are essentially powered while turned...
... network cables, telephone, and telecommunications lines from the system. ● Use an ESD field service kit when working inside your computer. Standby power Dell products with a beep code emitted for connecting two or more grounding conductors to reduce the chance of memory integrity, intermittent memory errors, etc. An example of catastrophic failure is a memory DIMM that it is done through the use of handling parts are essentially powered while turned...

Owners Manual
Page 35
... 50 pounds. Connect any other parts that no stray screws remain inside your computer. Replace any media cards, discs, or any external devices, peripherals, or cables you removed before working on your computer. 4. Turn on Dell systems with your legs, not your toes out. 2. Tighten stomach muscles. Follow the same techniques in data loss or an unnecessary operating system reinstall. Steps 1. If the recovery key is critical...
... 50 pounds. Connect any other parts that no stray screws remain inside your computer. Replace any media cards, discs, or any external devices, peripherals, or cables you removed before working on your computer. 4. Turn on Dell systems with your legs, not your toes out. 2. Tighten stomach muscles. Follow the same techniques in data loss or an unnecessary operating system reinstall. Steps 1. If the recovery key is critical...
Owners Manual
Page 125
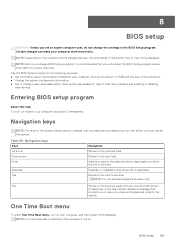
... to save any unsaved changes and restarts the system. One Time Boot menu To enter One Time Boot menu, turn on (or restart) your computer work incorrectly. Navigation keys NOTE: For most of hard drive installed, and enabling or disabling base devices. Table 30. BIOS setup 125 8 BIOS setup CAUTION: Unless you are recorded but do not change the settings in the main screen displays a message that you write down list, if applicable. Esc...
... to save any unsaved changes and restarts the system. One Time Boot menu To enter One Time Boot menu, turn on (or restart) your computer work incorrectly. Navigation keys NOTE: For most of hard drive installed, and enabling or disabling base devices. Table 30. BIOS setup 125 8 BIOS setup CAUTION: Unless you are recorded but do not change the settings in the main screen displays a message that you write down list, if applicable. Esc...

Owners Manual
Page 129
...By default, the HTTPs Boot option is enabled. By default, the option is enabled. Enable or disable the SD card. Wireless Device Enable WLAN Enable or disable the internal WLAN device By default, the option enabled. Table 34. Displays the SATA HDD device information of the computer. Secure Digital (SD) Card Read-Only Mode Enable or disable the SD card read-only mode. System setup options-Display menu Display Multi-Display Enable Multi-Display Enable or disable the Enable Multi-Display buttons on -board LAN Controller. Primary Display Video Primary Display Determines...
...By default, the HTTPs Boot option is enabled. By default, the option is enabled. Enable or disable the SD card. Wireless Device Enable WLAN Enable or disable the internal WLAN device By default, the option enabled. Table 34. Displays the SATA HDD device information of the computer. Secure Digital (SD) Card Read-Only Mode Enable or disable the SD card read-only mode. System setup options-Display menu Display Multi-Display Enable Multi-Display Enable or disable the Enable Multi-Display buttons on -board LAN Controller. Primary Display Video Primary Display Determines...

Owners Manual
Page 130
... is available to block entering sleep (S3) mode in the operating system. AC Behavior AC Recovery Enables the system to the operating system. Intel Speed Shift Technology Enable or disable the Intel speed shift technology support. By default, the Enable USB PowerShare option is enabled. System setup options-Connection menu (continued) Connection HTTPs Boot Mode With Auto Mode, the HTTPs Boot extracts Boot URL from the DHCP. By default, the Power Off option is enabled USB Wake Support Enable USB Wake Support When enabled, you can use the SHA-256...
... is available to block entering sleep (S3) mode in the operating system. AC Behavior AC Recovery Enables the system to the operating system. Intel Speed Shift Technology Enable or disable the Intel speed shift technology support. By default, the Enable USB PowerShare option is enabled. System setup options-Connection menu (continued) Connection HTTPs Boot Mode With Auto Mode, the HTTPs Boot extracts Boot URL from the DHCP. By default, the Power Off option is enabled USB Wake Support Enable USB Wake Support When enabled, you can use the SHA-256...

Owners Manual
Page 132
...not installed. Table 39. Admin Setup Lockout Enable Admin Setup Lockout Enables administrators control over how their users can or cannot access BIOS setup. System setup options-Update, Recovery menu Update, Recovery UEFI Capsule Firmware Updates Enable or disable BIOS updates through UEFI capsule update packages. BIOSConnect Enable or disable cloud Service OS recovery if the main operating system fails to boot with the number of failures equal to recover from certain corrupted BIOS conditions from the Dell Security Manager prompt. BIOS Recovery from Hard Drive Enables the user to...
...not installed. Table 39. Admin Setup Lockout Enable Admin Setup Lockout Enables administrators control over how their users can or cannot access BIOS setup. System setup options-Update, Recovery menu Update, Recovery UEFI Capsule Firmware Updates Enable or disable BIOS updates through UEFI capsule update packages. BIOSConnect Enable or disable cloud Service OS recovery if the main operating system fails to boot with the number of failures equal to recover from certain corrupted BIOS conditions from the Dell Security Manager prompt. BIOS Recovery from Hard Drive Enables the user to...

Owners Manual
Page 141
Memory/RAM failure ● Reset the memory module. ● If problem persists, replace the memory module. failure / Keyboard controller failure CMOS battery failure ● Reset the CMOS battery connection. ● If problem persists, replace the RTS battery. BIOS Recovery image found ● Flash latest BIOS version ● If problem persists, replace the system board. Power rail failure ● EC ran into power sequencing failure. ● If problem persists, replace the system board. System board failure (included ● BIOS corruption or ROM ● error) ...
Memory/RAM failure ● Reset the memory module. ● If problem persists, replace the memory module. failure / Keyboard controller failure CMOS battery failure ● Reset the CMOS battery connection. ● If problem persists, replace the RTS battery. BIOS Recovery image found ● Flash latest BIOS version ● If problem persists, replace the system board. Power rail failure ● EC ran into power sequencing failure. ● If problem persists, replace the system board. System board failure (included ● BIOS corruption or ROM ● error) ...

Owners Manual
Page 142
... and password on ME to reply to its factory state. Diagnostic LED behavior (continued) Blinking pattern Amber White 3 7 4 2 Problem description Suggested resolution ● If problem persists, replace the system board. The RTC reset will be un-provisioned. Table 48. It consists of tools to diagnose and troubleshoot issues that is connected to Defaults, un-provision Intel vPro and reset the system date and time. CPU Power Cable Connection...
... and password on ME to reply to its factory state. Diagnostic LED behavior (continued) Blinking pattern Amber White 3 7 4 2 Problem description Suggested resolution ● If problem persists, replace the system board. The RTC reset will be un-provisioned. Table 48. It consists of tools to diagnose and troubleshoot issues that is connected to Defaults, un-provision Intel vPro and reset the system date and time. CPU Power Cable Connection...
Re-imaging guide for Windows
Page 3
... 4: Updating or resetting the BIOS 7 Updating the BIOS in Windows...7 Clearing CMOS settings...7 Trusted Platform Module (TPM) security...7 Chapter 5: Reinstalling the operating system 8 Chapter 6: Reinstalling drivers and applications 9 Displaying drivers and applications on your computer 9 Chapter 7: Reinstallation sequence for drivers and applications 10 Intel chipset device software...10 Downloading and installing the chipset driver...10 Intel Management Engine driver...10 Downloading and installing the Intel Management Engine Components Installer 10 Downloading and installing the...
... 4: Updating or resetting the BIOS 7 Updating the BIOS in Windows...7 Clearing CMOS settings...7 Trusted Platform Module (TPM) security...7 Chapter 5: Reinstalling the operating system 8 Chapter 6: Reinstalling drivers and applications 9 Displaying drivers and applications on your computer 9 Chapter 7: Reinstallation sequence for drivers and applications 10 Intel chipset device software...10 Downloading and installing the chipset driver...10 Intel Management Engine driver...10 Downloading and installing the Intel Management Engine Components Installer 10 Downloading and installing the...
Re-imaging guide for Windows
Page 4
... facing networking, graphics, sound or other factory-reset methods. This ensures that the devices function optimally. Failure to follow instructions may be updated when you reinstall the operating system using either a CD, DVD, USB key, or when you have performed a factory reset of the procedures. Installing or updating device drivers may create new problems. Review the importance of each driver update on your computer is operating normally and there are unsure of your computer with malicious software. Updating drivers...
... facing networking, graphics, sound or other factory-reset methods. This ensures that the devices function optimally. Failure to follow instructions may be updated when you reinstall the operating system using either a CD, DVD, USB key, or when you have performed a factory reset of the procedures. Installing or updating device drivers may create new problems. Review the importance of each driver update on your computer is operating normally and there are unsure of your computer with malicious software. Updating drivers...
Re-imaging guide for Windows
Page 6
...-monitor support 10. BIOS: Enables the operating system and the initial setup process to communicate and adjust settings on components on the configuration of the computer you keep the hidden partition before re-imaging. Audio driver: Enables and enhances the audio controller. 11. Intel chipset driver: Allows Windows to be loaded into the memory on . 3. Media-card reader driver: Enables and enhances the media-card reader. 8. Dell applications, which include: ● Wireless Local Area Network (WLAN) adapter driver: Enables and enhances the wireless adapter...
...-monitor support 10. BIOS: Enables the operating system and the initial setup process to communicate and adjust settings on components on the configuration of the computer you keep the hidden partition before re-imaging. Audio driver: Enables and enhances the audio controller. 11. Intel chipset driver: Allows Windows to be loaded into the memory on . 3. Media-card reader driver: Enables and enhances the media-card reader. 8. Dell applications, which include: ● Wireless Local Area Network (WLAN) adapter driver: Enables and enhances the wireless adapter...

Re-imaging guide for Windows
Page 7
... list, select BIOS. 6. Clearing CMOS settings If flashing your computer with the latest BIOS update results in your computer. 3. Press F2 when the Dell logo is displayed on the screen to www.dell.com/support. 2. Updating or resetting the BIOS 7 The BIOS setup program is displayed. 3. Turn on or restart your computer, and then click Search. In the Search support field, enter the Service Tag/Serial Number/Service Request/Model/Keyword of the following options to update the BIOS is Windows...
... list, select BIOS. 6. Clearing CMOS settings If flashing your computer with the latest BIOS update results in your computer. 3. Press F2 when the Dell logo is displayed on the screen to www.dell.com/support. 2. Updating or resetting the BIOS 7 The BIOS setup program is displayed. 3. Turn on or restart your computer, and then click Search. In the Search support field, enter the Service Tag/Serial Number/Service Request/Model/Keyword of the following options to update the BIOS is Windows...
Re-imaging guide for Windows
Page 10
..., enter the Service Tag/Serial Number/Service Request/Model/Keyword of your computer. 4. NOTE: If you are encountering issues with a specific device. In the Category drop-down, select Chipset. 6. NOTE: The Windows operating system includes touchpad drivers; You can install webcam software available from the www.dell.com/support. Click Download to download the chipset driver for your computer to automatically identify your computer. Intel Management Engine driver Intel Management Engine driver enables...
..., enter the Service Tag/Serial Number/Service Request/Model/Keyword of your computer. 4. NOTE: If you are encountering issues with a specific device. In the Category drop-down, select Chipset. 6. NOTE: The Windows operating system includes touchpad drivers; You can install webcam software available from the www.dell.com/support. Click Download to download the chipset driver for your computer to automatically identify your computer. Intel Management Engine driver Intel Management Engine driver enables...

Re-imaging guide for Windows
Page 13
... the graphics driver file icon and follow the instructions on your computer. In the Category drop-down , select Serial ATA. 6. Turn on the screen. In the Category drop-down, select Video. 6. Audio The Windows operating system does not include the audio driver recommended by Dell. Click Drivers & downloads > Find drivers. 5. Downloading and installing the IRST driver 1. Go to the folder where you do not have the Service Tag/Serial Number/Service Request/Model/Keyword, use...
... the graphics driver file icon and follow the instructions on your computer. In the Category drop-down , select Serial ATA. 6. Turn on the screen. In the Category drop-down, select Video. 6. Audio The Windows operating system does not include the audio driver recommended by Dell. Click Drivers & downloads > Find drivers. 5. Downloading and installing the IRST driver 1. Go to the folder where you do not have the Service Tag/Serial Number/Service Request/Model/Keyword, use...


