
Owners Manual
Page 3
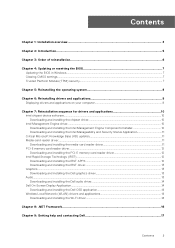
... 2: Set up your computer 11 Chapter 3: Specifications of OptiPlex Tower 7010 17 Dimensions and weight...17 Processor...17 Chipset...19 Operating system...19 Memory...19 Memory matrix...20 External ports...20 Internal slots...21 Ethernet...21 Wireless module...22 Audio...22 Storage...23 Power ratings...24 Power supply connector...24 GPU-Integrated...24 GPU-Discrete...25 Video port resolution...25 Hardware security...25 Environmental...26 Regulatory compliance...27 Operating and storage environment...27 Chapter 4: Working inside...
... 2: Set up your computer 11 Chapter 3: Specifications of OptiPlex Tower 7010 17 Dimensions and weight...17 Processor...17 Chipset...19 Operating system...19 Memory...19 Memory matrix...20 External ports...20 Internal slots...21 Ethernet...21 Wireless module...22 Audio...22 Storage...23 Power ratings...24 Power supply connector...24 GPU-Integrated...24 GPU-Discrete...25 Video port resolution...25 Hardware security...25 Environmental...26 Regulatory compliance...27 Operating and storage environment...27 Chapter 4: Working inside...

Owners Manual
Page 5
... HDMI module...91 System board...93 Removing the system board...93 Installing the system board...98 Chapter 7: Software...104 Operating system...104 Drivers and downloads...104 Chapter 8: BIOS setup...105 Entering BIOS setup program...105 Navigation keys...105 One Time Boot menu...105 System setup options...106 Updating the BIOS...115 Updating the BIOS in Windows...115 Updating the BIOS in Linux and Ubuntu...115 Updating the BIOS using the USB drive in Windows 115 Updating the BIOS from the F12 One-Time boot menu 116 Updating the BIOS...
... HDMI module...91 System board...93 Removing the system board...93 Installing the system board...98 Chapter 7: Software...104 Operating system...104 Drivers and downloads...104 Chapter 8: BIOS setup...105 Entering BIOS setup program...105 Navigation keys...105 One Time Boot menu...105 System setup options...106 Updating the BIOS...115 Updating the BIOS in Windows...115 Updating the BIOS in Linux and Ubuntu...115 Updating the BIOS using the USB drive in Windows 115 Updating the BIOS from the F12 One-Time boot menu 116 Updating the BIOS...

Owners Manual
Page 8
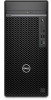
Two USB 2.0 (480 Mbps) ports 6. Power button with diagnostic LED 3. Hard-drive activity light 4. Universal audio jack port 5. Two USB 3.2 Gen 1 (5 Gbps) ports 8 Views of OptiPlex Tower 7010 Optical disk-drive (optional) 2. 1.
Two USB 2.0 (480 Mbps) ports 6. Power button with diagnostic LED 3. Hard-drive activity light 4. Universal audio jack port 5. Two USB 3.2 Gen 1 (5 Gbps) ports 8 Views of OptiPlex Tower 7010 Optical disk-drive (optional) 2. 1.
Owners Manual
Page 17
3 Specifications of OptiPlex Tower 7010 Dimensions and weight The following table lists the details of the processors supported by your OptiPlex Tower 7010. Specifications of your computer depends on the configuration ordered and manufacturing variability. ● Minimum - 5.32 kg (11.72 lb) ● Maximum - 6.52 kg (14.38 lb) Processor The following table lists the height, width, depth, and weight of OptiPlex Tower 7010 17 Dimensions and weight...
3 Specifications of OptiPlex Tower 7010 Dimensions and weight The following table lists the details of the processors supported by your OptiPlex Tower 7010. Specifications of your computer depends on the configuration ordered and manufacturing variability. ● Minimum - 5.32 kg (11.72 lb) ● Maximum - 6.52 kg (14.38 lb) Processor The following table lists the height, width, depth, and weight of OptiPlex Tower 7010 17 Dimensions and weight...

Owners Manual
Page 20
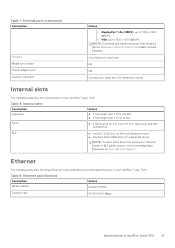
... lists the memory configurations supported on your OptiPlex Tower 7010. External ports Description Network port Values ● One RJ45 Ethernet port, 1 GHz ● One RJ45 Ethernet port, 2.5 GHz (optional) USB ports Front: ● Two USB 2.0 (480 Mbps) ports ● Two USB 3.2 Gen 1 (5 Gbps) ports Rear: ● Two USB 2.0 (480 Mbps) ports with Smart Power On ● Two USB 3.2 Gen 1 (5 Gbps) ports Audio port Universal audio jack port Video port ● One DisplayPort 1.4a (HBR2) NOTE: Maximum resolution up to 4096 x 2304 @60Hz ● One HDMI...
... lists the memory configurations supported on your OptiPlex Tower 7010. External ports Description Network port Values ● One RJ45 Ethernet port, 1 GHz ● One RJ45 Ethernet port, 2.5 GHz (optional) USB ports Front: ● Two USB 2.0 (480 Mbps) ports ● Two USB 3.2 Gen 1 (5 Gbps) ports Rear: ● Two USB 2.0 (480 Mbps) ports with Smart Power On ● Two USB 3.2 Gen 1 (5 Gbps) ports Audio port Universal audio jack port Video port ● One DisplayPort 1.4a (HBR2) NOTE: Maximum resolution up to 4096 x 2304 @60Hz ● One HDMI...
Owners Manual
Page 21
...; 3 SATA slots for 2.5-inch/3.5-inch hard-drive and slim optical drive M.2 ● One M.2 2230 slot for WiFi and Bluetooth card ● One M.2 2230/2280 slots for Kensington locks) Internal slots The following table lists the wired Ethernet Local Area Network (LAN) specifications of your OptiPlex Tower 7010. External ports (continued) Description I/O port Media-card reader Power-adapter port Security-cable slot Values ○ DisplayPort 1.4a (HBR3): up to 5120 x 3200 @60Hz ○ VGA: up to 1920 x 1200 @60Hz NOTE: Download and install the latest Intel Graphics driver...
...; 3 SATA slots for 2.5-inch/3.5-inch hard-drive and slim optical drive M.2 ● One M.2 2230 slot for WiFi and Bluetooth card ● One M.2 2230/2280 slots for Kensington locks) Internal slots The following table lists the wired Ethernet Local Area Network (LAN) specifications of your OptiPlex Tower 7010. External ports (continued) Description I/O port Media-card reader Power-adapter port Security-cable slot Values ○ DisplayPort 1.4a (HBR3): up to 5120 x 3200 @60Hz ○ VGA: up to 1920 x 1200 @60Hz NOTE: Download and install the latest Intel Graphics driver...

Owners Manual
Page 29
... electrocuted. Remove any media card and optical disc from the network device. 5. Standby power Dell products with non-conductive rubber soles to melt, and in full contact with a beep code emitted for 15 seconds should be secure and in the meantime may not be unplugged before you perform any installation or break/fix procedures involving disassembly or reassembly: ● Turn off . When connecting a bonding wire, ensure...
... electrocuted. Remove any media card and optical disc from the network device. 5. Standby power Dell products with non-conductive rubber soles to melt, and in full contact with a beep code emitted for 15 seconds should be secure and in the meantime may not be unplugged before you perform any installation or break/fix procedures involving disassembly or reassembly: ● Turn off . When connecting a bonding wire, ensure...

Owners Manual
Page 31
... recognize the BitLocker key. After working on each reboot. Transporting sensitive components When transporting ESD sensitive components such as replacement parts or parts to be prompted to enter the recovery key to the load. Get a firm balanced footing. Connect any other parts that they use anti-static bags for a stable base, and point your computer. Replace any media cards, discs, or any external devices, peripherals, or cables you lift...
... recognize the BitLocker key. After working on each reboot. Transporting sensitive components When transporting ESD sensitive components such as replacement parts or parts to be prompted to enter the recovery key to the load. Get a firm balanced footing. Connect any other parts that they use anti-static bags for a stable base, and point your computer. Replace any media cards, discs, or any external devices, peripherals, or cables you lift...
Owners Manual
Page 105
... down list, if applicable. NOTE: Before you change BIOS Setup program, it is recommended that you view the main screen. Navigation keys NOTE: For most of the System Setup options, changes that you make your computer, such as the amount of RAM and the size of the hard drive. ● Change the system configuration information. ● Set or change a user-selectable option, such as the user password, type of hard drive installed, and enabling or disabling base devices. 8 BIOS setup...
... down list, if applicable. NOTE: Before you change BIOS Setup program, it is recommended that you view the main screen. Navigation keys NOTE: For most of the System Setup options, changes that you make your computer, such as the amount of RAM and the size of the hard drive. ● Change the system configuration information. ● Set or change a user-selectable option, such as the user password, type of hard drive installed, and enabling or disabling base devices. 8 BIOS setup...

Owners Manual
Page 108
... setup options-Storage menu Storage SATA Operation Enable or disable the operating mode of the computer. 108 BIOS setup Displays the SATA HDD device information of the computer. By default, all the options are enabled. By default, all the options are enabled. Drive Information SATA-0 Type Device SATA-1 Type Device SATA-2 Type Device SATA-3 Displays the SATA HDD type information of the computer. USB Configuration ● Enable or disable booting from USB mass storage devices through the boot sequence or boot menu. Serial Port Serial Port Configuration Enable or disable...
... setup options-Storage menu Storage SATA Operation Enable or disable the operating mode of the computer. 108 BIOS setup Displays the SATA HDD device information of the computer. By default, all the options are enabled. By default, all the options are enabled. Drive Information SATA-0 Type Device SATA-1 Type Device SATA-2 Type Device SATA-3 Displays the SATA HDD type information of the computer. USB Configuration ● Enable or disable booting from USB mass storage devices through the boot sequence or boot menu. Serial Port Serial Port Configuration Enable or disable...

Owners Manual
Page 109
... HDD device information of the computer. By default, the Secure Digital (SD) Card Read-Only Mode option is enabled. Full Screen Logo Enable or disable full screen logo. System setup options-Connection menu Connection Network Controller Configuration Integrated NIC Controls the on the computer. By default, the Enabled with PXE option is enabled. Secure Digital (SD) Card Read-Only Mode Enable or disable the SD card read-only mode. Primary Display Video Primary Display Determines the primary display when multiple controllers are available on -board LAN Controller. Enable UEFI Network...
... HDD device information of the computer. By default, the Secure Digital (SD) Card Read-Only Mode option is enabled. Full Screen Logo Enable or disable full screen logo. System setup options-Connection menu Connection Network Controller Configuration Integrated NIC Controls the on the computer. By default, the Enabled with PXE option is enabled. Secure Digital (SD) Card Read-Only Mode Enable or disable the SD card read-only mode. Primary Display Video Primary Display Determines the primary display when multiple controllers are available on -board LAN Controller. Enable UEFI Network...

Owners Manual
Page 110
... enabled. Fan Control Override Enable or disable the fan control override feature. Table 32. System setup options-Connection menu (continued) Connection HTTPs Boot Mode With Auto Mode, the HTTPs Boot extracts Boot URL from the user-provided data. Active State Power Management Aspm Enables or disables the Active State Power Management (ASPM) level By default, the Auto option is enabled. SHA-256 BIOS and the TPM will use the USB devices like a mouse or keyboard to block entering sleep (S3) mode in the operating system. System setup options-Security menu...
... enabled. Fan Control Override Enable or disable the fan control override feature. Table 32. System setup options-Connection menu (continued) Connection HTTPs Boot Mode With Auto Mode, the HTTPs Boot extracts Boot URL from the user-provided data. Active State Power Management Aspm Enables or disables the Active State Power Management (ASPM) level By default, the Auto option is enabled. SHA-256 BIOS and the TPM will use the USB devices like a mouse or keyboard to block entering sleep (S3) mode in the operating system. System setup options-Security menu...
Owners Manual
Page 112
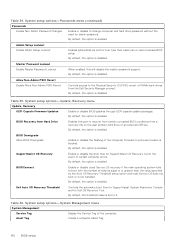
... user primary hard drive or an external USB key. Table 36. Asset Tag Create a computer Asset Tag. 112 BIOS setup Table 34. By default, the option is not installed. SupportAssist OS Recovery Enable or disable the boot flow for admin password. By default, the option is disabled. By default, the option is enabled. System setup options-Update, Recovery menu Update, Recovery UEFI Capsule Firmware Updates Enable or disable BIOS updates through UEFI capsule update packages. By default, the option is set to recover from certain corrupted BIOS conditions from the Dell...
... user primary hard drive or an external USB key. Table 36. Asset Tag Create a computer Asset Tag. 112 BIOS setup Table 34. By default, the option is not installed. SupportAssist OS Recovery Enable or disable the boot flow for admin password. By default, the option is disabled. By default, the option is enabled. System setup options-Update, Recovery menu Update, Recovery UEFI Capsule Firmware Updates Enable or disable BIOS updates through UEFI capsule update packages. By default, the option is set to recover from certain corrupted BIOS conditions from the Dell...

Owners Manual
Page 121
...failure / Keyboard controller failure CMOS battery failure ● Reset the CMOS battery connection. ● If problem persists, replace the RTS battery. PCI or Video card/chip failure Replace the system board. BIOS Recovery image found ● Flash latest BIOS version ● If problem persists, replace the system board. SBIOS Flash corruption ● Flash corruption detected by SBIOS Troubleshooting 121 System-diagnostic lights Table 43. Memory/RAM failure ● Reset the memory module. ● If problem persists, replace the memory module. Power...
...failure / Keyboard controller failure CMOS battery failure ● Reset the CMOS battery connection. ● If problem persists, replace the RTS battery. PCI or Video card/chip failure Replace the system board. BIOS Recovery image found ● Flash latest BIOS version ● If problem persists, replace the system board. SBIOS Flash corruption ● Flash corruption detected by SBIOS Troubleshooting 121 System-diagnostic lights Table 43. Memory/RAM failure ● Reset the memory module. ● If problem persists, replace the memory module. Power...

Owners Manual
Page 122
... system from the Dell Support website to troubleshoot and fix your custom BIOS setting selections: ● Boot List ● Enable Legacy Option ROMs ● Secure Boot Enable ● Allow BIOS Downgrade 122 Troubleshooting Click SupportAssist and then, click SupportAssist OS Recovery. The RTC reset will be un-provisioned. The below items may or may occur before your computer is connected to software or hardware failures. CPU Power Cable Connection Issue Recovering the operating system When...
... system from the Dell Support website to troubleshoot and fix your custom BIOS setting selections: ● Boot List ● Enable Legacy Option ROMs ● Secure Boot Enable ● Allow BIOS Downgrade 122 Troubleshooting Click SupportAssist and then, click SupportAssist OS Recovery. The RTC reset will be un-provisioned. The below items may or may occur before your computer is connected to software or hardware failures. CPU Power Cable Connection Issue Recovering the operating system When...
Re-imaging guide for Windows
Page 3
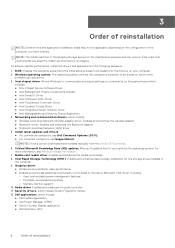
... 4: Updating or resetting the BIOS 7 Updating the BIOS in Windows...7 Clearing CMOS settings...7 Trusted Platform Module (TPM) security...7 Chapter 5: Reinstalling the operating system 8 Chapter 6: Reinstalling drivers and applications 9 Displaying drivers and applications on your computer 9 Chapter 7: Reinstallation sequence for drivers and applications 10 Intel chipset device software...10 Downloading and installing the chipset driver...10 Intel Management Engine driver...10 Downloading and installing the Intel Management Engine Components Installer 10 Downloading and installing the...
... 4: Updating or resetting the BIOS 7 Updating the BIOS in Windows...7 Clearing CMOS settings...7 Trusted Platform Module (TPM) security...7 Chapter 5: Reinstalling the operating system 8 Chapter 6: Reinstalling drivers and applications 9 Displaying drivers and applications on your computer 9 Chapter 7: Reinstallation sequence for drivers and applications 10 Intel chipset device software...10 Downloading and installing the chipset driver...10 Intel Management Engine driver...10 Downloading and installing the Intel Management Engine Components Installer 10 Downloading and installing the...
Re-imaging guide for Windows
Page 4
... update. 4 Installation overview Installing or updating device drivers may be updated when you reinstall the operating system using either a CD, DVD, USB key, or when you are facing networking, graphics, sound or other factory-reset methods. This ensures that the devices function optimally. 1 Installation overview CAUTION: This re-imaging guide is designed for new features However, if your Dell computer using the Dell Backup and Recovery application or other hardware-related problems. Dell recommends that you install or update device drivers if you download...
... update. 4 Installation overview Installing or updating device drivers may be updated when you reinstall the operating system using either a CD, DVD, USB key, or when you are facing networking, graphics, sound or other factory-reset methods. This ensures that the devices function optimally. 1 Installation overview CAUTION: This re-imaging guide is designed for new features However, if your Dell computer using the Dell Backup and Recovery application or other hardware-related problems. Dell recommends that you install or update device drivers if you download...
Re-imaging guide for Windows
Page 6
... (KB) updates: Microsoft updates that fix and optimize the operating system. For more information, see Windows release information. 7. Media-card reader driver: Enables and enhances the media-card reader. 8. Audio driver: Enables and enhances the audio controller. 11. To achieve optimal performance, install the drivers and applications in the native Microsoft VGA driver, including: ○ User-customizable power management features ○ Portability and behavioral profiles ○ Multiple-monitor support 10. BIOS: Enables the operating system and the initial setup process...
... (KB) updates: Microsoft updates that fix and optimize the operating system. For more information, see Windows release information. 7. Media-card reader driver: Enables and enhances the media-card reader. 8. Audio driver: Enables and enhances the audio controller. 11. To achieve optimal performance, install the drivers and applications in the native Microsoft VGA driver, including: ○ User-customizable power management features ○ Portability and behavioral profiles ○ Multiple-monitor support 10. BIOS: Enables the operating system and the initial setup process...

Re-imaging guide for Windows
Page 7
... you replace the system board. 1. 4 Updating or resetting the BIOS Updating the BIOS in Windows It is recommended to update the BIOS is Windows when an update is complete, browse the folder where you saved the BIOS update file. 8. You can be accessed by the operating system. ○ Disabled: The BIOS will reset the BIOS to www.dell.com/support. 2. For more information about clearing the CMOS settings, go to manually browse for your computer's Service Manual . On...
... you replace the system board. 1. 4 Updating or resetting the BIOS Updating the BIOS in Windows It is recommended to update the BIOS is Windows when an update is complete, browse the folder where you saved the BIOS update file. 8. You can be accessed by the operating system. ○ Disabled: The BIOS will reset the BIOS to www.dell.com/support. 2. For more information about clearing the CMOS settings, go to manually browse for your computer's Service Manual . On...
Re-imaging guide for Windows
Page 10
... updated Intel chipset device software for Dell computers. no other touchpad-driver installation is required. NOTE: The Windows operating system includes touchpad drivers; In the Category drop-down, select Chipset. 6. Downloading and installing the Intel Management Engine Components Installer 1. 7 Reinstallation sequence for drivers and applications Driver installation is available on Dell's support site www.dell.com/support. Go to download the chipset driver for drivers and applications In the Search support field, enter the Service Tag/Serial Number/Service...
... updated Intel chipset device software for Dell computers. no other touchpad-driver installation is required. NOTE: The Windows operating system includes touchpad drivers; In the Category drop-down, select Chipset. 6. Downloading and installing the Intel Management Engine Components Installer 1. 7 Reinstallation sequence for drivers and applications Driver installation is available on Dell's support site www.dell.com/support. Go to download the chipset driver for drivers and applications In the Search support field, enter the Service Tag/Serial Number/Service...


