Owners Manual
Page 3
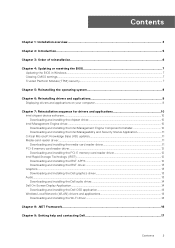
... 3: Specifications of OptiPlex Micro Plus 7010 12 Dimensions and weight...12 Processor...12 Chipset...15 Operating system...16 Memory...16 Memory matrix...16 External ports...17 Internal slots...17 Ethernet...18 Wireless module...18 Audio...18 Storage...19 Power adapter...19 GPU-Integrated...20 Video port resolution (GPU-Integrated)...20 External display support (GPU-Integrated)...20 Hardware security...21 Environmental...21 Regulatory compliance...22 Operating and storage environment...22 Chapter 4: Working inside your computer 23 Safety instructions...23...
... 3: Specifications of OptiPlex Micro Plus 7010 12 Dimensions and weight...12 Processor...12 Chipset...15 Operating system...16 Memory...16 Memory matrix...16 External ports...17 Internal slots...17 Ethernet...18 Wireless module...18 Audio...18 Storage...19 Power adapter...19 GPU-Integrated...20 Video port resolution (GPU-Integrated)...20 External display support (GPU-Integrated)...20 Hardware security...21 Environmental...21 Regulatory compliance...22 Operating and storage environment...22 Chapter 4: Working inside your computer 23 Safety instructions...23...

Owners Manual
Page 5
... BIOS using the USB drive in Windows 91 Updating the BIOS from the F12 One-Time boot menu 91 System and setup password...92 Assigning a system setup password...92 Deleting or changing an existing system setup password 93 Clearing BIOS (System Setup) and System passwords 93 Chapter 9: Troubleshooting...94 Dell SupportAssist Pre-boot System Performance Check diagnostics 94 Running the SupportAssist Pre-Boot System Performance Check 94 Power-Supply Unit Built-in Self-Test ...94 System-diagnostic lights...95 Recovering the operating...
... BIOS using the USB drive in Windows 91 Updating the BIOS from the F12 One-Time boot menu 91 System and setup password...92 Assigning a system setup password...92 Deleting or changing an existing system setup password 93 Clearing BIOS (System Setup) and System passwords 93 Chapter 9: Troubleshooting...94 Dell SupportAssist Pre-boot System Performance Check diagnostics 94 Running the SupportAssist Pre-Boot System Performance Check 94 Power-Supply Unit Built-in Self-Test ...94 System-diagnostic lights...95 Recovering the operating...

Owners Manual
Page 6
Power button with PowerShare 6. USB 3.2 Gen 2 port with diagnostic LED 2. Universal audio jack 5. Front 1 Views of OptiPlex Micro Plus 7010 Hard-disk activity light 3. USB 3.2 Gen 2x2 Type-C port 6 Views of OptiPlex Micro Plus 7010 1. Re-tasking line out/line in audio port 4.
Power button with PowerShare 6. USB 3.2 Gen 2 port with diagnostic LED 2. Universal audio jack 5. Front 1 Views of OptiPlex Micro Plus 7010 Hard-disk activity light 3. USB 3.2 Gen 2x2 Type-C port 6 Views of OptiPlex Micro Plus 7010 1. Re-tasking line out/line in audio port 4.
Owners Manual
Page 17
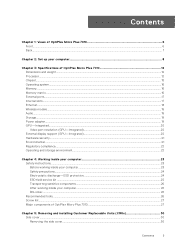
... optional video port (HDMI 2.1/Displayport 1.4a (HBR3)/VGA/PS2/serial/USB Type-C with DisplayPort Alt mode) (Rear) ● Three DisplayPort 1.4a (HBR2) (Rear) Media-card reader Not supported Power-adapter port One DC-in the Knowledge Base Resource at www.dell.com/support. Table 8. Table 9. Table 10. Specifications of M.2 cards, search in port with 7.40 mm barrel Security-cable slot ● One Kensington lock slot ● One padlock ring Internal slots The following table lists the external ports of your OptiPlex Micro Plus 7010. Memory matrix...
... optional video port (HDMI 2.1/Displayport 1.4a (HBR3)/VGA/PS2/serial/USB Type-C with DisplayPort Alt mode) (Rear) ● Three DisplayPort 1.4a (HBR2) (Rear) Media-card reader Not supported Power-adapter port One DC-in the Knowledge Base Resource at www.dell.com/support. Table 8. Table 9. Table 10. Specifications of M.2 cards, search in port with 7.40 mm barrel Security-cable slot ● One Kensington lock slot ● One padlock ring Internal slots The following table lists the external ports of your OptiPlex Micro Plus 7010. Memory matrix...

Owners Manual
Page 24
... nonfunctional memory. ● Intermittent - When connecting a bonding wire, ensure that you remove all attached network devices and peripherals, such as watches, bracelets, or rings prior to avoid electrostatic discharge (ESD) damage. ● After removing any disassembly instructions. Disconnect all jewelry such as keyboard, mouse, and monitor from your computer and then unplug the cable from the system. ● Use an ESD field service kit when working inside...
... nonfunctional memory. ● Intermittent - When connecting a bonding wire, ensure that you remove all attached network devices and peripherals, such as watches, bracelets, or rings prior to avoid electrostatic discharge (ESD) damage. ● After removing any disassembly instructions. Disconnect all jewelry such as keyboard, mouse, and monitor from your computer and then unplug the cable from the system. ● Use an ESD field service kit when working inside...

Owners Manual
Page 26
... the recovery key is not suspended before updating the BIOS, the next time you removed before working inside your computer About this document may severely damage your computer Do not add the weight of the load. 3. Connect your toes out. 2. Connect any other parts that you reboot the system it is critical to keep sensitive parts separate from all times when servicing Dell products. Turn on...
... the recovery key is not suspended before updating the BIOS, the next time you removed before working inside your computer About this document may severely damage your computer Do not add the weight of the load. 3. Connect your toes out. 2. Connect any other parts that you reboot the system it is critical to keep sensitive parts separate from all times when servicing Dell products. Turn on...
Owners Manual
Page 80
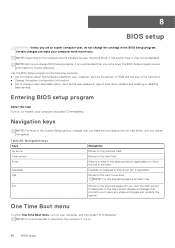
... change the settings in the field. Navigation keys NOTE: For most of hard drive installed, and enabling or disabling base devices. Selects a value in the selected field (if applicable) or follow the link in the BIOS Setup program. NOTE: Depending on the computer and its installed devices, the items listed in the main screen displays a message that prompts you change a user-selectable option, such as the user password, type of the System Setup options, changes...
... change the settings in the field. Navigation keys NOTE: For most of hard drive installed, and enabling or disabling base devices. Selects a value in the selected field (if applicable) or follow the link in the BIOS Setup program. NOTE: Depending on the computer and its installed devices, the items listed in the main screen displays a message that prompts you change a user-selectable option, such as the user password, type of the System Setup options, changes...

Owners Manual
Page 81
... service code of the computer. Displays whether the processor is used for the memory. The one-time boot menu displays the devices that is used . Displays whether the Signed Firmware Update is enabled on your computer and its installed devices, the items that are : ● Removable Drive (if available) ● STXXXX Drive (if available) NOTE: XXX denotes the SATA drive number. ● Optical Drive (if available) ● SATA Hard Drive (if available) ● Diagnostics The boot sequence screen also displays the option to access...
... service code of the computer. Displays whether the processor is used for the memory. The one-time boot menu displays the devices that is used . Displays whether the Signed Firmware Update is enabled on your computer and its installed devices, the items that are : ● Removable Drive (if available) ● STXXXX Drive (if available) NOTE: XXX denotes the SATA drive number. ● Optical Drive (if available) ● SATA Hard Drive (if available) ● Diagnostics The boot sequence screen also displays the option to access...

Owners Manual
Page 83
... SATA hard drive controller. BIOS setup 83 System setup options-Integrated Devices menu (continued) Integrated Devices Memory Mapped I/O above 4 Gig Allows 64-bit capable PCI devices to be decoded in above 4 GB address space, freeing up memory resources under 4 GB. By default, the Disabled option is enabled. Storage Interface Port Enablement Enable or disable the onboard drives. Displays the SATA HDD device information of the computer. Displays the SATA HDD type information of the computer. Serial Port Serial Port Configuration Enable or disable the serial port...
... SATA hard drive controller. BIOS setup 83 System setup options-Integrated Devices menu (continued) Integrated Devices Memory Mapped I/O above 4 Gig Allows 64-bit capable PCI devices to be decoded in above 4 GB address space, freeing up memory resources under 4 GB. By default, the Disabled option is enabled. Storage Interface Port Enablement Enable or disable the onboard drives. Displays the SATA HDD device information of the computer. Displays the SATA HDD type information of the computer. Serial Port Serial Port Configuration Enable or disable the serial port...

Owners Manual
Page 84
... is enabled. Wireless Device Enable WLAN Enable or disable the internal WLAN device By default, the option enabled. Enable UEFI Network Stack Enable or disable UEFI Network Stack and controls the on the computer. By default, the Auto Mode option is enabled. Device Displays the SATA HDD device information of the computer. Device Displays the M.2 PCIe SSD-0 device information of the computer. Table 31. Full Screen Logo Enable or disable full screen logo. By default, the HTTPs Boot option is enabled. 84 BIOS setup System setup options-Storage menu (continued) Storage Type...
... is enabled. Wireless Device Enable WLAN Enable or disable the internal WLAN device By default, the option enabled. Enable UEFI Network Stack Enable or disable UEFI Network Stack and controls the on the computer. By default, the Auto Mode option is enabled. Device Displays the SATA HDD device information of the computer. Device Displays the M.2 PCIe SSD-0 device information of the computer. Table 31. Full Screen Logo Enable or disable full screen logo. By default, the HTTPs Boot option is enabled. 84 BIOS setup System setup options-Storage menu (continued) Storage Type...

Owners Manual
Page 85
... Power Management (ASPM) level By default, the Auto option is enabled. Intel Speed Shift Technology Enable or disable the Intel speed shift technology support. By default, the Intel Speed Shift Technology option is enabled. Table 34. By default, the Key Storage Enable option is enabled. SHA-256 BIOS and the TPM will use the USB devices like a mouse or keyboard to the operating system. PPI ByPass for clear Commands option is disabled. By default, the Disabled option is enabled. By default, the option is enabled. By default...
... Power Management (ASPM) level By default, the Auto option is enabled. Intel Speed Shift Technology Enable or disable the Intel speed shift technology support. By default, the Intel Speed Shift Technology option is enabled. Table 34. By default, the Key Storage Enable option is enabled. SHA-256 BIOS and the TPM will use the USB devices like a mouse or keyboard to the operating system. PPI ByPass for clear Commands option is disabled. By default, the Disabled option is enabled. By default, the option is enabled. By default...
Owners Manual
Page 87
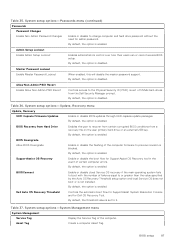
... enabled. BIOS Recovery from a recovery file on the user primary hard drive or an external USB key. By default, the threshold value is set to or greater than the value specified by the Auto OS Recovery Threshold setup option and local Service OS does not boot or is enabled. System setup options-Update, Recovery menu Update, Recovery UEFI Capsule Firmware Updates Enable or disable BIOS updates through UEFI capsule update packages. By default, the option is not installed. BIOSConnect Enable or disable cloud Service OS recovery if the main operating...
... enabled. BIOS Recovery from a recovery file on the user primary hard drive or an external USB key. By default, the threshold value is set to or greater than the value specified by the Auto OS Recovery Threshold setup option and local Service OS does not boot or is enabled. System setup options-Update, Recovery menu Update, Recovery UEFI Capsule Firmware Updates Enable or disable BIOS updates through UEFI capsule update packages. By default, the option is not installed. BIOSConnect Enable or disable cloud Service OS recovery if the main operating...

Owners Manual
Page 95
... problem persists, replace the memory module. failure / Keyboard controller failure CMOS battery failure ● Reset the CMOS battery connection. ● If problem persists, replace the RTS battery. Power rail failure ● EC ran into power sequencing failure. ● If problem persists, replace the system board. Diagnostic LED behavior Blinking pattern Amber 1 White 2 2 1 2 2 2 3 2 4 2 5 2 6 3 1 3 2 3 3 3 4 3 5 3 6 Problem description Suggested resolution Unrecoverable SPI Flash Failure CPU failure ● Run the Dell Support Assist/Dell...
... problem persists, replace the memory module. failure / Keyboard controller failure CMOS battery failure ● Reset the CMOS battery connection. ● If problem persists, replace the RTS battery. Power rail failure ● EC ran into power sequencing failure. ● If problem persists, replace the system board. Diagnostic LED behavior Blinking pattern Amber 1 White 2 2 1 2 2 2 3 2 4 2 5 2 6 3 1 3 2 3 3 3 4 3 5 3 6 Problem description Suggested resolution Unrecoverable SPI Flash Failure CPU failure ● Run the Dell Support Assist/Dell...

Owners Manual
Page 96
Diagnostic LED behavior (continued) Blinking pattern Amber White 3 7 4 2 Problem description Suggested resolution ● If problem persists, replace the system board. CPU Power Cable Connection Issue Recovering the operating system When your computer is unable to boot to diagnose and troubleshoot issues that is connected to the vPro server. You can also download it from No POST/No Boot/No Power situations. Press and hold the power button for 25 seconds. The system...
Diagnostic LED behavior (continued) Blinking pattern Amber White 3 7 4 2 Problem description Suggested resolution ● If problem persists, replace the system board. CPU Power Cable Connection Issue Recovering the operating system When your computer is unable to boot to diagnose and troubleshoot issues that is connected to the vPro server. You can also download it from No POST/No Boot/No Power situations. Press and hold the power button for 25 seconds. The system...
Re-imaging guide for Windows
Page 3
... 4: Updating or resetting the BIOS 7 Updating the BIOS in Windows...7 Clearing CMOS settings...7 Trusted Platform Module (TPM) security...7 Chapter 5: Reinstalling the operating system 8 Chapter 6: Reinstalling drivers and applications 9 Displaying drivers and applications on your computer 9 Chapter 7: Reinstallation sequence for drivers and applications 10 Intel chipset device software...10 Downloading and installing the chipset driver...10 Intel Management Engine driver...10 Downloading and installing the Intel Management Engine Components Installer 10 Downloading and installing the...
... 4: Updating or resetting the BIOS 7 Updating the BIOS in Windows...7 Clearing CMOS settings...7 Trusted Platform Module (TPM) security...7 Chapter 5: Reinstalling the operating system 8 Chapter 6: Reinstalling drivers and applications 9 Displaying drivers and applications on your computer 9 Chapter 7: Reinstallation sequence for drivers and applications 10 Intel chipset device software...10 Downloading and installing the chipset driver...10 Intel Management Engine driver...10 Downloading and installing the Intel Management Engine Components Installer 10 Downloading and installing the...
Re-imaging guide for Windows
Page 4
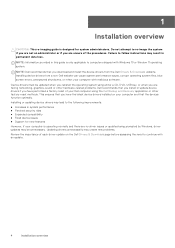
... operating system using either a CD, DVD, USB key, or when you are not an administrator or if you download and install the device drivers from a non-Dell website can cause system performance issues, corrupt operating system files, blue screen errors, unexpected shutdowns, or infect your computer with Windows 10 or Window 11 operating system. Updating drivers unnecessarily may create new problems. Review the importance of the procedures. 1 Installation overview CAUTION: This re-imaging guide...
... operating system using either a CD, DVD, USB key, or when you are not an administrator or if you download and install the device drivers from a non-Dell website can cause system performance issues, corrupt operating system files, blue screen errors, unexpected shutdowns, or infect your computer with Windows 10 or Window 11 operating system. Updating drivers unnecessarily may create new problems. Review the importance of the procedures. 1 Installation overview CAUTION: This re-imaging guide...
Re-imaging guide for Windows
Page 6
... audio controller. 11. Install latest updates and drivers: ● For commercial computers, use Dell Command Updates (DCU). ● For consumer computers, use SupportAssist. BIOS: Enables the operating system and the initial setup process to communicate and adjust settings on components on your computer. 2. NOTE: Drivers can operate on which other software can be loaded into the memory on the system board which include: ● Dell Update application ● Dell Power Manager (DPM) ● Dell On-Screen Display...
... audio controller. 11. Install latest updates and drivers: ● For commercial computers, use Dell Command Updates (DCU). ● For consumer computers, use SupportAssist. BIOS: Enables the operating system and the initial setup process to communicate and adjust settings on components on your computer. 2. NOTE: Drivers can operate on which other software can be loaded into the memory on the system board which include: ● Dell Update application ● Dell Power Manager (DPM) ● Dell On-Screen Display...

Re-imaging guide for Windows
Page 7
... operating system. ○ Disabled: The BIOS will reset the BIOS to factory settings. Updating or resetting the BIOS 7 Trusted Platform Module (TPM) security TPM must be enabled in the BIOS setup program for your computer's Service Manual . Press F2 when the Dell logo is displayed on -screen instructions. Turn on your computer being unable to boot, a BIOS reset is complete, browse the folder where you saved the BIOS update file. 8. After the download is necessary. Clearing CMOS settings If flashing...
... operating system. ○ Disabled: The BIOS will reset the BIOS to factory settings. Updating or resetting the BIOS 7 Trusted Platform Module (TPM) security TPM must be enabled in the BIOS setup program for your computer's Service Manual . Press F2 when the Dell logo is displayed on -screen instructions. Turn on your computer being unable to boot, a BIOS reset is complete, browse the folder where you saved the BIOS update file. 8. After the download is necessary. Clearing CMOS settings If flashing...
Re-imaging guide for Windows
Page 10
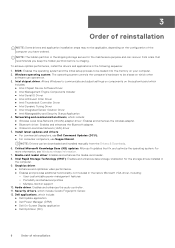
... the instructions on your computer. 7. Turn on the screen. no other touchpad-driver installation is required. NOTE: The Windows operating system includes touchpad drivers; Downloading and installing the chipset driver 1. In the Search support field, enter the Service Tag/Serial Number/Service Request/Model/Keyword of your computer to the folder where you are encountering issues with a specific device. Install the drivers in the following sequence. 7 Reinstallation sequence for drivers and applications Driver installation is...
... the instructions on your computer. 7. Turn on the screen. no other touchpad-driver installation is required. NOTE: The Windows operating system includes touchpad drivers; Downloading and installing the chipset driver 1. In the Search support field, enter the Service Tag/Serial Number/Service Request/Model/Keyword of your computer to the folder where you are encountering issues with a specific device. Install the drivers in the following sequence. 7 Reinstallation sequence for drivers and applications Driver installation is...
Re-imaging guide for Windows
Page 13
... the instructions on your computer. 2. Click Download to the folder where you saved the IRST APPX file. 8. Install the HD audio driver available for your computer. 4. In the Category drop-down , select Serial ATA. 6. Turn on the screen. After the download is complete, go to manually browse for download from www.dell.com/support. Downloading and installing the Dell graphics driver 1. In the Search support field, enter the Service Tag/Serial Number/Service Request/Model...
... the instructions on your computer. 2. Click Download to the folder where you saved the IRST APPX file. 8. Install the HD audio driver available for your computer. 4. In the Category drop-down , select Serial ATA. 6. Turn on the screen. After the download is complete, go to manually browse for download from www.dell.com/support. Downloading and installing the Dell graphics driver 1. In the Search support field, enter the Service Tag/Serial Number/Service Request/Model...


