
Owners Manual
Page 3
... 2: Set up your computer 8 Chapter 3: Specifications of OptiPlex Micro 7010 12 Dimensions and weight...12 Processor...12 Chipset...14 Operating system...15 Memory...15 Memory matrix...15 External ports...16 Internal slots...16 Ethernet...17 Wireless module...17 Audio...17 Storage...18 Power adapter...18 GPU-Integrated...19 Video port resolution (GPU-Integrated)...19 External display support (GPU-Integrated)...20 Hardware security...20 Environmental...20 Regulatory compliance...21 Operating and storage environment...21 Chapter 4: Working inside your...
... 2: Set up your computer 8 Chapter 3: Specifications of OptiPlex Micro 7010 12 Dimensions and weight...12 Processor...12 Chipset...14 Operating system...15 Memory...15 Memory matrix...15 External ports...16 Internal slots...16 Ethernet...17 Wireless module...17 Audio...17 Storage...18 Power adapter...18 GPU-Integrated...19 Video port resolution (GPU-Integrated)...19 External display support (GPU-Integrated)...20 Hardware security...20 Environmental...20 Regulatory compliance...21 Operating and storage environment...21 Chapter 4: Working inside your...
Owners Manual
Page 5
... BIOS using the USB drive in Windows 91 Updating the BIOS from the F12 One-Time boot menu 91 System and setup password...92 Assigning a system setup password...92 Deleting or changing an existing system setup password 93 Clearing BIOS (System Setup) and System passwords 93 Chapter 9: Troubleshooting...94 Dell SupportAssist Pre-boot System Performance Check diagnostics 94 Running the SupportAssist Pre-Boot System Performance Check 94 Power-Supply Unit Built-in Self-Test ...94 System-diagnostic lights...95 Recovering the operating...
... BIOS using the USB drive in Windows 91 Updating the BIOS from the F12 One-Time boot menu 91 System and setup password...92 Assigning a system setup password...92 Deleting or changing an existing system setup password 93 Clearing BIOS (System Setup) and System passwords 93 Chapter 9: Troubleshooting...94 Dell SupportAssist Pre-boot System Performance Check diagnostics 94 Running the SupportAssist Pre-Boot System Performance Check 94 Power-Supply Unit Built-in Self-Test ...94 System-diagnostic lights...95 Recovering the operating...

Owners Manual
Page 22
... is not covered by the Dell technical assistance team. Steps 1. 4 Working inside your computer Safety instructions Use the following safety guidelines to protect your computer from potential damage and to ensure your computer depending on the configuration you ordered. After you must disengage before connecting your computer and certain components may differ from the media-card reader. See the safety instructions that shipped...
... is not covered by the Dell technical assistance team. Steps 1. 4 Working inside your computer Safety instructions Use the following safety guidelines to protect your computer from potential damage and to ensure your computer depending on the configuration you ordered. After you must disengage before connecting your computer and certain components may differ from the media-card reader. See the safety instructions that shipped...

Owners Manual
Page 23
Remove any disassembly instructions. Safety precautions The safety precautions chapter details the primary steps to be taken before performing any media card and optical disc from the system. ● Use an ESD field service kit when working inside your computer 23 Observe the following safety precautions before you open the case. The internal power enables the system to be remotely turned on (wake on an anti-static mat. ● Wear...
Remove any disassembly instructions. Safety precautions The safety precautions chapter details the primary steps to be taken before performing any media card and optical disc from the system. ● Use an ESD field service kit when working inside your computer 23 Observe the following safety precautions before you open the case. The internal power enables the system to be remotely turned on (wake on an anti-static mat. ● Wear...

Owners Manual
Page 25
.... 4. Replace any media cards, discs, or any external devices, peripherals, or cables you lift, offsetting the force of your body to the load. Turn on your computer. 4. For more information about this subject, see Knowledge Article: updating the BIOS on your back. 5. Tighten stomach muscles. Lift with BitLocker enabled. Do not add the weight of the load. 3. Connect your computer and all insulator parts...
.... 4. Replace any media cards, discs, or any external devices, peripherals, or cables you lift, offsetting the force of your body to the load. Turn on your computer. 4. For more information about this subject, see Knowledge Article: updating the BIOS on your back. 5. Tighten stomach muscles. Lift with BitLocker enabled. Do not add the weight of the load. 3. Connect your computer and all insulator parts...
Owners Manual
Page 80
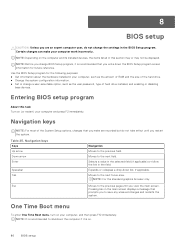
... your computer, such as the user password, type of hard drive installed, and enabling or disabling base devices. Table 25. One Time Boot menu To enter One Time Boot menu, turn on . 80 BIOS setup Expands or collapses a drop-down the BIOS Setup program screen information for the following purposes: ● Get information about the hardware installed in this task Turn on the computer and its installed devices, the items listed in your computer, and then...
... your computer, such as the user password, type of hard drive installed, and enabling or disabling base devices. Table 25. One Time Boot menu To enter One Time Boot menu, turn on . 80 BIOS setup Expands or collapses a drop-down the BIOS Setup program screen information for the following purposes: ● Get information about the hardware installed in this task Turn on the computer and its installed devices, the items listed in your computer, and then...

Owners Manual
Page 81
.... Displays the memory speed. Displays the DIMM 1 memory size. Displays whether the Signed Firmware Update is enabled on your computer and its installed devices, the items that are : ● Removable Drive (if available) ● STXXXX Drive (if available) NOTE: XXX denotes the SATA drive number. ● Optical Drive (if available) ● SATA Hard Drive (if available) ● Diagnostics The boot sequence screen also displays the option to access the System Setup screen. Displays the maximum processor clock speed. Displays the express service code of the computer. Displays...
.... Displays the memory speed. Displays the DIMM 1 memory size. Displays whether the Signed Firmware Update is enabled on your computer and its installed devices, the items that are : ● Removable Drive (if available) ● STXXXX Drive (if available) NOTE: XXX denotes the SATA drive number. ● Optical Drive (if available) ● SATA Hard Drive (if available) ● Diagnostics The boot sequence screen also displays the option to access the System Setup screen. Displays the maximum processor clock speed. Displays the express service code of the computer. Displays...

Owners Manual
Page 83
... setup options-Storage menu Storage SATA Operation Enable or disable the operating mode of the computer. Serial Port Serial Port Configuration Enable or disable the serial port address. By default, all the options are enabled. Front USB Configuration Rear USB Configuration Dust Filter Maintenance Enable or disable the individual front USB ports. Enable or disable the dust filter maintenance. By default, the Enable SMART Reporting option is enabled. Drive Information SATA-0 Type Device SATA-1 Type Device SATA-2 Displays the SATA HDD type information of the integrated SATA hard...
... setup options-Storage menu Storage SATA Operation Enable or disable the operating mode of the computer. Serial Port Serial Port Configuration Enable or disable the serial port address. By default, all the options are enabled. Front USB Configuration Rear USB Configuration Dust Filter Maintenance Enable or disable the individual front USB ports. Enable or disable the dust filter maintenance. By default, the Enable SMART Reporting option is enabled. Drive Information SATA-0 Type Device SATA-1 Type Device SATA-2 Displays the SATA HDD type information of the integrated SATA hard...

Owners Manual
Page 84
...-board LAN controller. Table 31. By default, the Enabled with PXE option is enabled. Bluetooth Enable or disable the internal Bluetooth device By default, the option enabled. By default, the HTTPs Boot option is enabled. SATA-3 Type Displays the SATA HDD type information of the computer. System setup options-Display menu Display Multi-Display Enable Multi-Display Enable or disable the Enable Multi-Display buttons on the computer By default, the Auto option is enabled. Full Screen Logo Enable or disable full screen logo. With Manual Mode, the HTTPs Boot reads Boot...
...-board LAN controller. Table 31. By default, the Enabled with PXE option is enabled. Bluetooth Enable or disable the internal Bluetooth device By default, the option enabled. By default, the HTTPs Boot option is enabled. SATA-3 Type Displays the SATA HDD type information of the computer. System setup options-Display menu Display Multi-Display Enable Multi-Display Enable or disable the Enable Multi-Display buttons on the computer By default, the Auto option is enabled. Full Screen Logo Enable or disable full screen logo. With Manual Mode, the HTTPs Boot reads Boot...

Owners Manual
Page 85
... default, the Block Sleep option is disabled. By default, the option is disabled. Table 33. SHA-256 BIOS and the TPM will use the USB devices like a mouse or keyboard to block entering sleep (S3) mode in the operating system. By default, the option is enabled. BIOS setup 85 Intel Speed Shift Technology Enable or disable the Intel speed shift technology support. By default, the TPM 2.0 Security On option is disabled. By default, the Power Off option is enabled. By default, the Key Storage Enable option is enabled. Clear Enables to clear...
... default, the Block Sleep option is disabled. By default, the option is disabled. Table 33. SHA-256 BIOS and the TPM will use the USB devices like a mouse or keyboard to block entering sleep (S3) mode in the operating system. By default, the option is enabled. BIOS setup 85 Intel Speed Shift Technology Enable or disable the Intel speed shift technology support. By default, the TPM 2.0 Security On option is disabled. By default, the Power Off option is enabled. By default, the Key Storage Enable option is enabled. Clear Enables to clear...
Owners Manual
Page 87
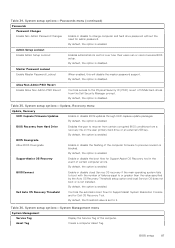
... hard-drives from a recovery file on the user primary hard drive or an external USB key. By default, the option is blocked. Master Password Lockout Enable Master Password Lockout When enabled, this will disable the master password support. Admin Setup Lockout Enable Admin Setup Lockout Enables administrators control over how their users can or cannot access BIOS setup. By default, the option is not installed. BIOSConnect Enable or disable cloud Service OS recovery if the main operating system fails to boot with the number of the computer firmware...
... hard-drives from a recovery file on the user primary hard drive or an external USB key. By default, the option is blocked. Master Password Lockout Enable Master Password Lockout When enabled, this will disable the master password support. Admin Setup Lockout Enable Admin Setup Lockout Enables administrators control over how their users can or cannot access BIOS setup. By default, the option is not installed. BIOSConnect Enable or disable cloud Service OS recovery if the main operating system fails to boot with the number of the computer firmware...

Owners Manual
Page 95
... of your OptiPlex Micro 7010. System-diagnostic lights Blinking pattern Amber White 1 1 Problem description TPM detection failure Suggested resolution Replace the system board. 1 2 Unrecoverable SPI Flash Replace the system board. power rail failure) 3 1 CMOS battery failure ● Reset the main battery connection. ● If problem persists, replace the main battery. 3 2 PCI or Video card/chip failure Replace the system board. Table 43. Troubleshooting 95 System-diagnostic lights This section lists the system-diagnostic lights of Replace the system...
... of your OptiPlex Micro 7010. System-diagnostic lights Blinking pattern Amber White 1 1 Problem description TPM detection failure Suggested resolution Replace the system board. 1 2 Unrecoverable SPI Flash Replace the system board. power rail failure) 3 1 CMOS battery failure ● Reset the main battery connection. ● If problem persists, replace the main battery. 3 2 PCI or Video card/chip failure Replace the system board. Table 43. Troubleshooting 95 System-diagnostic lights This section lists the system-diagnostic lights of Replace the system...

Owners Manual
Page 96
... launched model Dell Latitude and Precision systems from USB", and the instructions are drained. ● Run "BIOS recovery from No POST/No Boot/No Power situations. For more information about the Dell SupportAssist OS Recovery, see Dell SupportAssist OS Recovery User's Guide at www.dell.com/serviceabilitytools. Replace the system board. You can also download it from the Dell Support website to ensure all Dell computers installed with Windows operating system. Table 43. If problem persists, replace...
... launched model Dell Latitude and Precision systems from USB", and the instructions are drained. ● Run "BIOS recovery from No POST/No Boot/No Power situations. For more information about the Dell SupportAssist OS Recovery, see Dell SupportAssist OS Recovery User's Guide at www.dell.com/serviceabilitytools. Replace the system board. You can also download it from the Dell Support website to ensure all Dell computers installed with Windows operating system. Table 43. If problem persists, replace...
Re-imaging guide for Windows
Page 3
... 4: Updating or resetting the BIOS 7 Updating the BIOS in Windows...7 Clearing CMOS settings...7 Trusted Platform Module (TPM) security...7 Chapter 5: Reinstalling the operating system 8 Chapter 6: Reinstalling drivers and applications 9 Displaying drivers and applications on your computer 9 Chapter 7: Reinstallation sequence for drivers and applications 10 Intel chipset device software...10 Downloading and installing the chipset driver...10 Intel Management Engine driver...10 Downloading and installing the Intel Management Engine Components Installer 10 Downloading and installing the...
... 4: Updating or resetting the BIOS 7 Updating the BIOS in Windows...7 Clearing CMOS settings...7 Trusted Platform Module (TPM) security...7 Chapter 5: Reinstalling the operating system 8 Chapter 6: Reinstalling drivers and applications 9 Displaying drivers and applications on your computer 9 Chapter 7: Reinstallation sequence for drivers and applications 10 Intel chipset device software...10 Downloading and installing the chipset driver...10 Intel Management Engine driver...10 Downloading and installing the Intel Management Engine Components Installer 10 Downloading and installing the...
Re-imaging guide for Windows
Page 4
... instructions may create new problems. Review the importance of your computer and that you have performed a factory reset of each driver update on your Dell computer using either a CD, DVD, USB key, or when you are facing networking, graphics, sound or other factory-reset methods. Do not attempt to re-image the system if you are not an administrator or if you are unsure of the procedures. Installing device drivers from the Dell Drivers & Downloads...
... instructions may create new problems. Review the importance of your computer and that you have performed a factory reset of each driver update on your Dell computer using either a CD, DVD, USB key, or when you are facing networking, graphics, sound or other factory-reset methods. Do not attempt to re-image the system if you are not an administrator or if you are unsure of the procedures. Installing device drivers from the Dell Drivers & Downloads...
Re-imaging guide for Windows
Page 6
...-monitor support 10. Intel chipset driver: Allows Windows to be loaded into the memory on the system board which include: ● Dell Update application ● Dell Power Manager (DPM) ● Dell On-Screen Display application ● Dell Optimizer (DO) 6 Order of the computer you keep the hidden partition before re-imaging. Graphics driver: ● Enhances and optimizes video performance. ● Enables and provides additional functionality not included in the following sequence: 1. Media-card reader driver: Enables...
...-monitor support 10. Intel chipset driver: Allows Windows to be loaded into the memory on the system board which include: ● Dell Update application ● Dell Power Manager (DPM) ● Dell On-Screen Display application ● Dell Optimizer (DO) 6 Order of the computer you keep the hidden partition before re-imaging. Graphics driver: ● Enhances and optimizes video performance. ● Enables and provides additional functionality not included in the following sequence: 1. Media-card reader driver: Enables...
Re-imaging guide for Windows
Page 7
... download is complete, browse the folder where you replace the system board. 1. For more information, see your computer's Service Manual . Trusted Platform Module (TPM) security TPM must be enabled in the BIOS setup program for it cannot be accessed by the operating system. ○ Disabled: The BIOS will reset the BIOS to www.dell.com/support and see knowledge base article 000124211 at www.dell.com/support. Turn on -screen instructions...
... download is complete, browse the folder where you replace the system board. 1. For more information, see your computer's Service Manual . Trusted Platform Module (TPM) security TPM must be enabled in the BIOS setup program for it cannot be accessed by the operating system. ○ Disabled: The BIOS will reset the BIOS to www.dell.com/support and see knowledge base article 000124211 at www.dell.com/support. Turn on -screen instructions...
Re-imaging guide for Windows
Page 10
... Dell computer. Intel chipset device software The Windows operating system may have the Service Tag/Serial Number/Service Request/Model/Keyword, use the SupportAssist feature to the folder where you are encountering issues with a specific device. NOTE: If you do not have to www.dell.com/support. 3. 7 Reinstallation sequence for Dell computers. Downloading and installing the chipset driver 1. Downloading and installing the Intel Management Engine Components Installer 1. NOTE: The Windows operating system includes the webcam drivers; Turn...
... Dell computer. Intel chipset device software The Windows operating system may have the Service Tag/Serial Number/Service Request/Model/Keyword, use the SupportAssist feature to the folder where you are encountering issues with a specific device. NOTE: If you do not have to www.dell.com/support. 3. 7 Reinstallation sequence for Dell computers. Downloading and installing the chipset driver 1. Downloading and installing the Intel Management Engine Components Installer 1. NOTE: The Windows operating system includes the webcam drivers; Turn...
Re-imaging guide for Windows
Page 11
... installed when Windows Updates are enabled and can also click Browse all the latest available KB updates on the screen. For more information, see Windows release information: ● Windows 10 - release information Media-card reader driver The Windows operating system does not include the media-card reader driver. In the Search support field, enter the Service Tag/Serial Number/Service Request/Model/Keyword of your computer. 2. 2. Go to www.dell.com/support. 3. Turn on the screen. Click Drivers & downloads > Find drivers. 5. Click Drivers & downloads...
... installed when Windows Updates are enabled and can also click Browse all the latest available KB updates on the screen. For more information, see Windows release information: ● Windows 10 - release information Media-card reader driver The Windows operating system does not include the media-card reader driver. In the Search support field, enter the Service Tag/Serial Number/Service Request/Model/Keyword of your computer. 2. 2. Go to www.dell.com/support. 3. Turn on the screen. Click Drivers & downloads > Find drivers. 5. Click Drivers & downloads...
Re-imaging guide for Windows
Page 13
... driver for download from www.dell.com/support. Double-click the driver file icon and follow the instructions on your computer, and then click Search. In the Search support field, enter the Service Tag/Serial Number/Service Request/Model/Keyword of your computer. 2. In the Category drop-down, select Serial ATA. 6. Go to www.dell.com/support. 3. Click Drivers & downloads > Find drivers. 5. Graphics The Windows operating system includes the VGA-graphics driver only. Downloading and installing the Dell graphics driver 1. Turn...
... driver for download from www.dell.com/support. Double-click the driver file icon and follow the instructions on your computer, and then click Search. In the Search support field, enter the Service Tag/Serial Number/Service Request/Model/Keyword of your computer. 2. In the Category drop-down, select Serial ATA. 6. Go to www.dell.com/support. 3. Click Drivers & downloads > Find drivers. 5. Graphics The Windows operating system includes the VGA-graphics driver only. Downloading and installing the Dell graphics driver 1. Turn...


