User Guide
Page 12
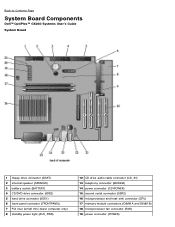
Back to Contents Page System Board Components Dell™ OptiPlex™ GX260 Systems User's Guide System Board 1 floppy drive connector (DSKT) 2 internal speaker (SPEAKER) 3 battery socket (BATTERY) 4 CD/DVD drive connector (IDE2) 5 hard drive connector (IDE1) 6 front-panel connector (FRONTPANEL) 7 PCI riser (small mini-tower computer only) 8 standby power light (AUX_PWR) 12 CD drive audio...
Back to Contents Page System Board Components Dell™ OptiPlex™ GX260 Systems User's Guide System Board 1 floppy drive connector (DSKT) 2 internal speaker (SPEAKER) 3 battery socket (BATTERY) 4 CD/DVD drive connector (IDE2) 5 hard drive connector (IDE1) 6 front-panel connector (FRONTPANEL) 7 PCI riser (small mini-tower computer only) 8 standby power light (AUX_PWR) 12 CD drive audio...
User Guide
Page 121
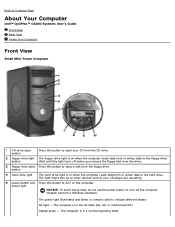
... the floppy drive. The computer is in a normal operating state Back to Contents Page About Your Computer Dell™ OptiPlex™ GX260 Systems User's Guide Front View Back View Inside Your Computer Front View Small Mini-Tower Computer 1 CD-drive eject button Press this button to eject your CD player are operating. 5 power button...
... the floppy drive. The computer is in a normal operating state Back to Contents Page About Your Computer Dell™ OptiPlex™ GX260 Systems User's Guide Front View Back View Inside Your Computer Front View Small Mini-Tower Computer 1 CD-drive eject button Press this button to eject your CD player are operating. 5 power button...

User Guide
Page 126
Back to Contents Page Adding and Removing Small Mini-Tower Computer Parts Dell™ OptiPlex™ GX260 Systems User's Guide Opening the Computer Cover AGP and DVI Adapter Cards Battery Drives Memory Microprocessor PCI Cards and Serial Port Adapters Telephony Applications Programming Interface (TAPI) Closing the Computer Cover Back to Contents Page
Back to Contents Page Adding and Removing Small Mini-Tower Computer Parts Dell™ OptiPlex™ GX260 Systems User's Guide Opening the Computer Cover AGP and DVI Adapter Cards Battery Drives Memory Microprocessor PCI Cards and Serial Port Adapters Telephony Applications Programming Interface (TAPI) Closing the Computer Cover Back to Contents Page
Service Manual
Page 2
...certain procedures (such as explained in "Precautionary Measures." You have performed the steps in the Dell™ OptiPlex™ GX260 small form-factor, small desktop, and small mini-tower computers. Turn off the computer and unplugging the power cord before touching anything inside your ...computer. Back to Contents Page Before You Begin Dell™ OptiPlex™ GX260 Service Manual Getting Started Recommended Tools Precautionary...
...certain procedures (such as explained in "Precautionary Measures." You have performed the steps in the Dell™ OptiPlex™ GX260 small form-factor, small desktop, and small mini-tower computers. Turn off the computer and unplugging the power cord before touching anything inside your ...computer. Back to Contents Page Before You Begin Dell™ OptiPlex™ GX260 Service Manual Getting Started Recommended Tools Precautionary...
Service Manual
Page 13
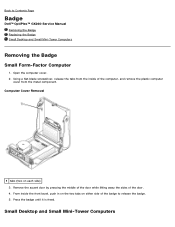
... pressing the middle of the door while lifting away the sides of the badge to Contents Page Badge Dell™ OptiPlex™ GX260 Service Manual Removing the Badge Replacing the Badge Small Desktop and Small Mini-Tower Computers Removing the Badge Small Form-Factor Computer 1. Computer Cover Removal 1 tabs (two on either side of...
... pressing the middle of the door while lifting away the sides of the badge to Contents Page Badge Dell™ OptiPlex™ GX260 Service Manual Removing the Badge Replacing the Badge Small Desktop and Small Mini-Tower Computers Removing the Badge Small Form-Factor Computer 1. Computer Cover Removal 1 tabs (two on either side of...
Service Manual
Page 28
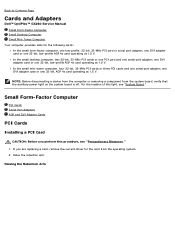
In the small mini-tower computer, four 32-bit, 33-MHz PCI cards or three PCI cards and one serial port adapter; NOTE: Before disconnecting a device from the computer or ...-MHz PCI cards or one PCI card and one serial port adapter; Back to Contents Page Cards and Adapters Dell™ OptiPlex™ GX260 Service Manual Small Form-Factor Computer Small Desktop Computer Small Mini-Tower Computer Your computer provides slots for the card from the system board, verify that the auxiliary power light...
In the small mini-tower computer, four 32-bit, 33-MHz PCI cards or three PCI cards and one serial port adapter; NOTE: Before disconnecting a device from the computer or ...-MHz PCI cards or one PCI card and one serial port adapter; Back to Contents Page Cards and Adapters Dell™ OptiPlex™ GX260 Service Manual Small Form-Factor Computer Small Desktop Computer Small Mini-Tower Computer Your computer provides slots for the card from the system board, verify that the auxiliary power light...
Service Manual
Page 35
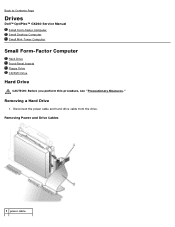
Disconnect the power cable and hard-drive cable from the drive. Removing Power and Drive Cables 1 power cable Back to Contents Page Drives Dell™ OptiPlex™ GX260 Service Manual Small Form-Factor Computer Small Desktop Computer Small Mini-Tower Computer Small Form-Factor Computer Hard Drive Front-Panel Inserts Floppy Drive CD/DVD Drive Hard Drive CAUTION: Before you perform this procedure, see "Precautionary Measures." Removing a Hard Drive 1.
Disconnect the power cable and hard-drive cable from the drive. Removing Power and Drive Cables 1 power cable Back to Contents Page Drives Dell™ OptiPlex™ GX260 Service Manual Small Form-Factor Computer Small Desktop Computer Small Mini-Tower Computer Small Form-Factor Computer Hard Drive Front-Panel Inserts Floppy Drive CD/DVD Drive Hard Drive CAUTION: Before you perform this procedure, see "Precautionary Measures." Removing a Hard Drive 1.
Service Manual
Page 63
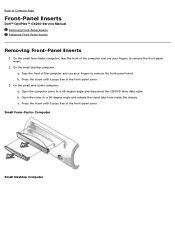
... your fingers to remove the front-panel insert. Face the front of the computer and use your fingers to Contents Page Front-Panel Inserts Dell™ OptiPlex™ GX260 Service Manual Removing Front-Panel Inserts Replacing Front-Panel Inserts Removing Front-Panel Inserts 1. Open the computer cover to a 90-degree angle and release... the cover to a 45-degree angle and disconnect the CD/DVD drive data cable. Back to remove the front-panel insert. 2. On the small mini-tower computer: a. On the small desktop computer: a.
... your fingers to remove the front-panel insert. Face the front of the computer and use your fingers to Contents Page Front-Panel Inserts Dell™ OptiPlex™ GX260 Service Manual Removing Front-Panel Inserts Replacing Front-Panel Inserts Removing Front-Panel Inserts 1. Open the computer cover to a 90-degree angle and release... the cover to a 45-degree angle and disconnect the CD/DVD drive data cable. Back to remove the front-panel insert. 2. On the small mini-tower computer: a. On the small desktop computer: a.

Service Manual
Page 72
... then slightly twist it as you lift it is attached to Contents Page Microprocessor Dell™ OptiPlex™ GX260 Service Manual Removing and Installing the Heat-Sink Assembly and Microprocessor Small Form-Factor and Small Desktop Computers Small Mini-Tower Computer Small Form-Factor and Small Desktop Computers 1. Disconnect the 12-volt power cable...
... then slightly twist it as you lift it is attached to Contents Page Microprocessor Dell™ OptiPlex™ GX260 Service Manual Removing and Installing the Heat-Sink Assembly and Microprocessor Small Form-Factor and Small Desktop Computers Small Mini-Tower Computer Small Form-Factor and Small Desktop Computers 1. Disconnect the 12-volt power cable...

Service Manual
Page 95
.... Raising the Retention Arm and Installing a Card 1 card 2 edge connector 3 card connector 4 retention arm 5 lever 6 filler bracket Back to Contents Page Small Mini-Tower Computer Dell™ OptiPlex™ GX260 Service Manual PCI Cards Serial Port Adapters AGP and DVI Adapter Cards NOTE: Before disconnecting a device from the computer or removing a component from the...
.... Raising the Retention Arm and Installing a Card 1 card 2 edge connector 3 card connector 4 retention arm 5 lever 6 filler bracket Back to Contents Page Small Mini-Tower Computer Dell™ OptiPlex™ GX260 Service Manual PCI Cards Serial Port Adapters AGP and DVI Adapter Cards NOTE: Before disconnecting a device from the computer or removing a component from the...


