
Quick Reference Guide
Page 3
...Tower Computer - Back-Panel Connectors . . 24 Small Form Factor Computer - Front View . . . . 26 Small Form Factor Computer - Back-Panel Connectors 19 Desktop Computer - Back-Panel Connectors 30 Removing the Computer Cover 32 Before You Begin 32 Mini Tower Computer 34... Desktop Computer 36 Small Form Factor Computer 38 Inside Your Computer 39 Mini Tower Computer 39 Desktop Computer 43 Small Form Factor Computer 47 Contents 3 Back View . . . . 29 Small Form Factor ...
...Tower Computer - Back-Panel Connectors . . 24 Small Form Factor Computer - Front View . . . . 26 Small Form Factor Computer - Back-Panel Connectors 19 Desktop Computer - Back-Panel Connectors 30 Removing the Computer Cover 32 Before You Begin 32 Mini Tower Computer 34... Desktop Computer 36 Small Form Factor Computer 38 Inside Your Computer 39 Mini Tower Computer 39 Desktop Computer 43 Small Form Factor Computer 47 Contents 3 Back View . . . . 29 Small Form Factor ...
Quick Reference Guide
Page 5
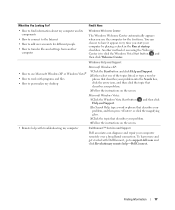
... changes to your computer or advanced technicalreference material for my computer • My computer documentation • My device documentation • Desktop System Software (DSS) NOTE: The Drivers and Utilities media may be optional and may not ship with your computer. Quick Reference ... may not be available in certain countries. Documentation and drivers are already installed on page 51), or to run the Dell Diagnostics (see "Dell Diagnostics" on your documentation. NOTE: Drivers and documentation updates can use the Drivers and Utilities media to reinstall drivers (see...
... changes to your computer or advanced technicalreference material for my computer • My computer documentation • My device documentation • Desktop System Software (DSS) NOTE: The Drivers and Utilities media may be optional and may not ship with your computer. Quick Reference ... may not be available in certain countries. Documentation and drivers are already installed on page 51), or to run the Dell Diagnostics (see "Dell Diagnostics" on your documentation. NOTE: Drivers and documentation updates can use the Drivers and Utilities media to reinstall drivers (see...
Quick Reference Guide
Page 9
... - DSS provides critical region or business segment, and enter updates for To download Desktop System Software: your computer, you reinstall the operating system for your operating system and your selections. Find It Here • Solutions - Upgrade information for Dell™ 3.5-inch USB floppy drives, processors, optical drives, and USB devices. If you...
... - DSS provides critical region or business segment, and enter updates for To download Desktop System Software: your computer, you reinstall the operating system for your operating system and your selections. Find It Here • Solutions - Upgrade information for Dell™ 3.5-inch USB floppy drives, processors, optical drives, and USB devices. If you...
Quick Reference Guide
Page 10
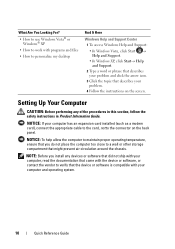
... compartment that describes your computer has an expansion card installed (such as a modem card), connect the appropriate cable to the card, not to personalize my desktop Find It Here Windows Help and Support Center 1 To access Windows Help and Support: • In Windows Vista, click Start → Help and Support. •...
... compartment that describes your computer has an expansion card installed (such as a modem card), connect the appropriate cable to the card, not to personalize my desktop Find It Here Windows Help and Support Center 1 To access Windows Help and Support: • In Windows Vista, click Start → Help and Support. •...
Quick Reference Guide
Page 21
... for devices that typically remain connected, such as joysticks or cameras, or for bootable USB devices see "System Setup Program" in your online User's Guide. Desktop Computer - The default designations are COM1 for serial connector 1 and COM2 for more information, see "System Setup Program" in your online User's Guide for instructions...
... for devices that typically remain connected, such as joysticks or cameras, or for bootable USB devices see "System Setup Program" in your online User's Guide. Desktop Computer - The default designations are COM1 for serial connector 1 and COM2 for more information, see "System Setup Program" in your online User's Guide for instructions...
Quick Reference Guide
Page 23
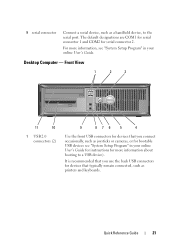
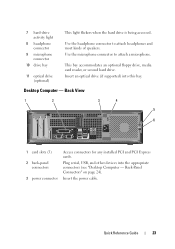
Insert an optical drive (if supported) into the appropriate connectors (see "Desktop Computer - Back View 1 2 3 4 5 6 1 card slots (3) 2 back-panel connectors 3 power connector Access connectors for any installed PCI and PCI Express cards. Insert the power ...cable. Back-Panel Connectors" on page 24). Use the microphone connector to attach headphones and most kinds of speakers. Desktop Computer - This bay accommodates an optional floppy drive, media card reader, or second hard drive. Plug serial, USB, and other devices into this bay...
Insert an optical drive (if supported) into the appropriate connectors (see "Desktop Computer - Back View 1 2 3 4 5 6 1 card slots (3) 2 back-panel connectors 3 power connector Access connectors for any installed PCI and PCI Express cards. Insert the power ...cable. Back-Panel Connectors" on page 24). Use the microphone connector to attach headphones and most kinds of speakers. Desktop Computer - This bay accommodates an optional floppy drive, media card reader, or second hard drive. Plug serial, USB, and other devices into this bay...

Quick Reference Guide
Page 24
... Connectors 1 2 34 5 9 8 24 Quick Reference Guide 7 6 4 voltage selection switch 5 padlock ring 6 cover release latch NOTE: Your computer may or may equipped with a manual voltageselection switch. Desktop Computer - Your computer may not have a voltage selection switch. NOTICE: In Japan, the voltage selection switch must be set the switch for the voltage that...
... Connectors 1 2 34 5 9 8 24 Quick Reference Guide 7 6 4 voltage selection switch 5 padlock ring 6 cover release latch NOTE: Your computer may or may equipped with a manual voltageselection switch. Desktop Computer - Your computer may not have a voltage selection switch. NOTICE: In Japan, the voltage selection switch must be set the switch for the voltage that...
Quick Reference Guide
Page 33
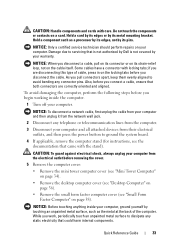
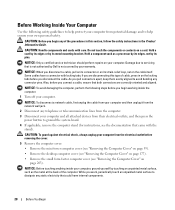
... its pins. CAUTION: Handle components and cards with the stand). Also, before you connect a cable, ensure that is not authorized by Dell is not covered by touching an unpainted metal surface, such as a processor by its edges, not by its metal mounting bracket. NOTICE:...Remove the computer cover: • Remove the mini tower computer cover (see "Mini Tower Computer" on page 34). • Remove the desktop computer cover (see "Desktop Computer" on page 36). • Remove the small form factor computer cover (see the documentation that could harm internal components. Hold a...
... its pins. CAUTION: Handle components and cards with the stand). Also, before you connect a cable, ensure that is not authorized by Dell is not covered by touching an unpainted metal surface, such as a processor by its edges, not by its metal mounting bracket. NOTICE:...Remove the computer cover: • Remove the mini tower computer cover (see "Mini Tower Computer" on page 34). • Remove the desktop computer cover (see "Desktop Computer" on page 36). • Remove the small form factor computer cover (see the documentation that could harm internal components. Hold a...
Quick Reference Guide
Page 36
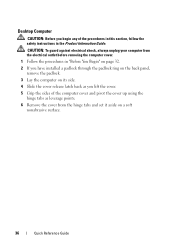
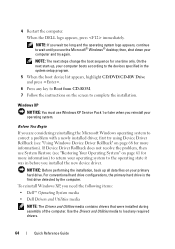
Desktop Computer CAUTION: Before you lift the cover. 5 Grip the sides of the procedures in this section, follow the safety instructions in "Before You Begin" on ...
Desktop Computer CAUTION: Before you lift the cover. 5 Grip the sides of the procedures in this section, follow the safety instructions in "Before You Begin" on ...
Quick Reference Guide
Page 43
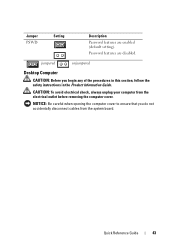
CAUTION: To avoid electrical shock, always unplug your computer from the system board. Jumper PSWD Setting Description Password features are disabled. NOTICE: Be careful when opening the computer cover to ensure that you begin any of the procedures in this section, follow the safety instructions in the Product Information Guide. Quick Reference Guide 43 jumpered unjumpered Desktop Computer CAUTION: Before you do not accidentally disconnect cables from the electrical outlet before removing the computer cover. Password features are enabled (default setting).
CAUTION: To avoid electrical shock, always unplug your computer from the system board. Jumper PSWD Setting Description Password features are disabled. NOTICE: Be careful when opening the computer cover to ensure that you begin any of the procedures in this section, follow the safety instructions in the Product Information Guide. Quick Reference Guide 43 jumpered unjumpered Desktop Computer CAUTION: Before you do not accidentally disconnect cables from the electrical outlet before removing the computer cover. Password features are enabled (default setting).
Quick Reference Guide
Page 52
...and Utilities media menu. 7 Type 2 to wait until you see a message stating that appears. 6 Type 1 to start the Dell Diagnostics. 8 Select Run the 32 Bit Dell Diagnostics from your Drivers and Utilities media (optional). Then shut down your computer and try again. On the next start-up, the...When the boot device list appears, highlight Boot to Utility Partition and press . 4 When the Dell Diagnostics Main Menu appears, select the test you want to wait until you see the Microsoft Windows desktop. If you wait too long and the operating system logo appears, continue to run . If ...
...and Utilities media menu. 7 Type 2 to wait until you see a message stating that appears. 6 Type 1 to start the Dell Diagnostics. 8 Select Run the 32 Bit Dell Diagnostics from your Drivers and Utilities media (optional). Then shut down your computer and try again. On the next start-up, the...When the boot device list appears, highlight Boot to Utility Partition and press . 4 When the Dell Diagnostics Main Menu appears, select the test you want to wait until you see the Microsoft Windows desktop. If you wait too long and the operating system logo appears, continue to run . If ...
Quick Reference Guide
Page 64
... You Begin If you are considering reinstalling the Microsoft Windows operating system to wait until you see the Microsoft® Windows® desktop; NOTICE: Before performing the installation, back up , your operating system. NOTE: If you reinstall your computer boots according to the... devices specified in before you need the following items: • Dell™ Operating System media • Dell Drivers and Utilities media NOTE: The Drivers and Utilities media contains drivers that were installed during assembly of the computer...
... You Begin If you are considering reinstalling the Microsoft Windows operating system to wait until you see the Microsoft® Windows® desktop; NOTICE: Before performing the installation, back up , your operating system. NOTE: If you reinstall your computer boots according to the... devices specified in before you need the following items: • Dell™ Operating System media • Dell Drivers and Utilities media NOTE: The Drivers and Utilities media contains drivers that were installed during assembly of the computer...
Quick Reference Guide
Page 65
... the device drivers, virus protection program, and other software. Click Exit if Install Windows XP message appears. 3 Restart the computer. 4 Press immediately after the DELL™ logo appears. To reinstall Windows XP, perform all the steps in the following sections in the order in which they are listed. After you... reinstall the operating system, you see the Windows desktop, and then shut down the computer and try again. 5 Press the arrow keys to select CD-ROM, and press . 6 When the Press any open ...
... the device drivers, virus protection program, and other software. Click Exit if Install Windows XP message appears. 3 Restart the computer. 4 Press immediately after the DELL™ logo appears. To reinstall Windows XP, perform all the steps in the following sections in the order in which they are listed. After you... reinstall the operating system, you see the Windows desktop, and then shut down the computer and try again. 5 Press the arrow keys to select CD-ROM, and press . 6 When the Press any open ...

User's Guide
Page 4
... 97 Front View 97 Back View 98 Back-Panel Connectors 99 Inside Your Computer 101 System Board Components 102 Desktop Computer (Model # DCNE) Specifications 105 I/O Panel 111 Removing the I/O Panel 111 Replacing the I/O Panel 112 Drives 113 General Installation Guidelines 113 Optical Drive 115 Floppy ...
... 97 Front View 97 Back View 98 Back-Panel Connectors 99 Inside Your Computer 101 System Board Components 102 Desktop Computer (Model # DCNE) Specifications 105 I/O Panel 111 Removing the I/O Panel 111 Replacing the I/O Panel 112 Drives 113 General Installation Guidelines 113 Optical Drive 115 Floppy ...
User's Guide
Page 6
6 Advanced Features 249 LegacySelect Technology Control 249 Manageability 249 Alert Standard Format 249 Dell OpenManage™ IT Assistant 250 Dell OpenManage Client Instrumentation 250 Security 250 Chassis Intrusion Detection 250 Option Settings 251 Padlock Ring and Security Cable Slot ...Setup 257 System Setup Options 258 Booting to a USB Device 264 Memory Key 264 Floppy Drive 264 Jumper Settings 265 Mini Tower, Desktop, and Small Form Factor Computers 265 Clearing Forgotten Passwords 265 Clearing CMOS Settings 266 HyperTransport™ and Dual-Core Technology 267 Power ...
6 Advanced Features 249 LegacySelect Technology Control 249 Manageability 249 Alert Standard Format 249 Dell OpenManage™ IT Assistant 250 Dell OpenManage Client Instrumentation 250 Security 250 Chassis Intrusion Detection 250 Option Settings 251 Padlock Ring and Security Cable Slot ...Setup 257 System Setup Options 258 Booting to a USB Device 264 Memory Key 264 Floppy Drive 264 Jumper Settings 265 Mini Tower, Desktop, and Small Form Factor Computers 265 Clearing Forgotten Passwords 265 Clearing CMOS Settings 266 HyperTransport™ and Dual-Core Technology 267 Power ...
User's Guide
Page 7
...Enabling Cool 'n' Quiet™ Technology 275 7 Chassis Intrusion Switch 277 Removing the Chassis Intrusion Switch 277 Mini Tower Computer 278 Desktop Computer 279 Small Form Factor Computer 280 Replacing the Chassis Intrusion Switch 280 Resetting the Chassis Intrusion Detector 280 8 Battery 283 ... the Battery 283 9 Replacing the System Board 287 Removing the System Board: Mini Tower, Desktop, and Small Form Factor Computers 287 Replacing the System Board: Mini Tower, Desktop, and Small Form Factor Computers 290 10 Memory 291 DDR2 Memory Overview 291 Addressing Memory With...
...Enabling Cool 'n' Quiet™ Technology 275 7 Chassis Intrusion Switch 277 Removing the Chassis Intrusion Switch 277 Mini Tower Computer 278 Desktop Computer 279 Small Form Factor Computer 280 Replacing the Chassis Intrusion Switch 280 Resetting the Chassis Intrusion Detector 280 8 Battery 283 ... the Battery 283 9 Replacing the System Board 287 Removing the System Board: Mini Tower, Desktop, and Small Form Factor Computers 287 Replacing the System Board: Mini Tower, Desktop, and Small Form Factor Computers 290 10 Memory 291 DDR2 Memory Overview 291 Addressing Memory With...
User's Guide
Page 13
... already installed on page 327). NOTE: Drivers and documentation updates can use the Drivers and Utilities media to reinstall drivers (see "Dell Diagnostics" on your computer. Readme files may be optional and may not ship with your computer or advanced technicalreference material for my ...computer • My device documentation • Desktop System Software (DSS) Find It Here Drivers and Utilities Media NOTE: The Drivers and Utilities media may be included on your media...
... already installed on page 327). NOTE: Drivers and documentation updates can use the Drivers and Utilities media to reinstall drivers (see "Dell Diagnostics" on your computer. Readme files may be optional and may not ship with your computer or advanced technicalreference material for my ...computer • My device documentation • Desktop System Software (DSS) Find It Here Drivers and Utilities Media NOTE: The Drivers and Utilities media may be included on your media...
User's Guide
Page 16
...model and click Confirm, or enter a service tag and click Go. 4 Click System Utilities. 5 Click Desktop System Software under Dell - Frequently asked questions Dell Support Website - Access Dell Support 3 from technicians, online courses, and frequently asked questions, hot topics, and general health of software ...hard drive, and the operating system • Customer Care - To download Desktop System Software: 1 Go to your computer, you should also reinstall the DSS utility. NOTE: The support.dell.com user interface may not be available for your region or business segment to...
...model and click Confirm, or enter a service tag and click Go. 4 Click System Utilities. 5 Click Desktop System Software under Dell - Frequently asked questions Dell Support Website - Access Dell Support 3 from technicians, online courses, and frequently asked questions, hot topics, and general health of software ...hard drive, and the operating system • Customer Care - To download Desktop System Software: 1 Go to your computer, you should also reinstall the DSS utility. NOTE: The support.dell.com user interface may not be available for your region or business segment to...
User's Guide
Page 17
...8226; How to use Microsoft Windows XP or Windows Vista® • How to work with programs and files • How to personalize my desktop 1 Click the Start button and click Help and Support. 2 Either select one of accessing the Welcome Center is to have it appear every time...its components • How to connect to the Internet • How to add user accounts for different people • How to support.dell.com and click Revolutionary remote help with DellConnect, go to transfer files and settings from another computer Windows Welcome Center The Windows Welcome Center automatically...
...8226; How to use Microsoft Windows XP or Windows Vista® • How to work with programs and files • How to personalize my desktop 1 Click the Start button and click Help and Support. 2 Either select one of accessing the Welcome Center is to have it appear every time...its components • How to connect to the Internet • How to add user accounts for different people • How to support.dell.com and click Revolutionary remote help with DellConnect, go to transfer files and settings from another computer Windows Welcome Center The Windows Welcome Center automatically...
User's Guide
Page 20
...its edges, not by your computer and all attached devices from the network wall jack. 2 Disconnect any static electricity that is not authorized by Dell is not covered by its pins. Hold a component such as a processor by its edges or by touching an unpainted metal surface, such ... 5 Remove the computer cover: • Remove the mini tower computer cover (see "Removing the Computer Cover" on page 39). • Remove the desktop computer cover (see "Removing the Computer Cover" on page 177). • Remove the small form factor computer cover (see the documentation that both connectors ...
...its edges, not by your computer and all attached devices from the network wall jack. 2 Disconnect any static electricity that is not authorized by Dell is not covered by its pins. Hold a component such as a processor by its edges or by touching an unpainted metal surface, such ... 5 Remove the computer cover: • Remove the mini tower computer cover (see "Removing the Computer Cover" on page 39). • Remove the desktop computer cover (see "Removing the Computer Cover" on page 177). • Remove the small form factor computer cover (see the documentation that both connectors ...


