
Quick Reference Guide
Page 15
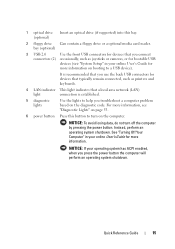
... losing data, do not turn on the diagnostic code. bay (optional) 3 USB 2.0 Use the front USB connectors for bootable USB devices (see "Diagnostic Lights" on booting to turn off the computer by pressing the power button. It is recommended that you use the back USB connectors for devices that typically remain...
... losing data, do not turn on the diagnostic code. bay (optional) 3 USB 2.0 Use the front USB connectors for bootable USB devices (see "Diagnostic Lights" on booting to turn off the computer by pressing the power button. It is recommended that you use the back USB connectors for devices that typically remain...
Quick Reference Guide
Page 21
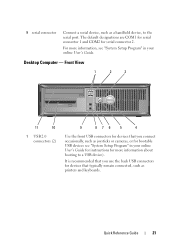
For more information about booting to the serial port. Desktop Computer - The default designations are COM1 for serial connector 1 and COM2 for more information, see "System Setup Program" in your ...
For more information about booting to the serial port. Desktop Computer - The default designations are COM1 for serial connector 1 and COM2 for more information, see "System Setup Program" in your ...
Quick Reference Guide
Page 27
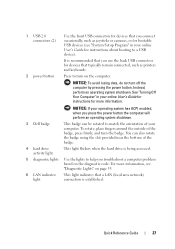
... is being accessed. 5 diagnostic lights Use the lights to help you press the power button the computer will perform an operating system shutdown. 3 Dell badge This badge can be rotated to match the orientation of the badge, press firmly, and turn off the computer by pressing the power button... a LAN (local area network) connection is established. For more information. It is recommended that you use the back USB connectors for instructions about booting to turn on the computer. Instead, perform an operating system shutdown. NOTICE: To avoid losing data, do not turn the badge.
... is being accessed. 5 diagnostic lights Use the lights to help you press the power button the computer will perform an operating system shutdown. 3 Dell badge This badge can be rotated to match the orientation of the badge, press firmly, and turn off the computer by pressing the power button... a LAN (local area network) connection is established. For more information. It is recommended that you use the back USB connectors for instructions about booting to turn on the computer. Instead, perform an operating system shutdown. NOTICE: To avoid losing data, do not turn the badge.
Quick Reference Guide
Page 52
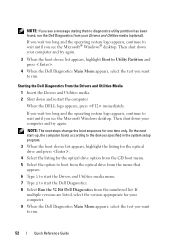
... . 4 Select the listing for the optical drive option from the CD boot menu. 5 Select the option to boot from the optical drive from the menu that no diagnostics utility partition has been found, run the Dell Diagnostics from the numbered list. Then shut down your computer. 9 When... the operating system logo appears, continue to start the Dell Diagnostics. 8 Select Run the 32 Bit Dell Diagnostics from your computer and try again. 3 When the boot device list appears, highlight Boot to Utility Partition and press . 4 When the Dell Diagnostics Main Menu appears, select the test you want to...
... . 4 Select the listing for the optical drive option from the CD boot menu. 5 Select the option to boot from the optical drive from the menu that no diagnostics utility partition has been found, run the Dell Diagnostics from the numbered list. Then shut down your computer. 9 When... the operating system logo appears, continue to start the Dell Diagnostics. 8 Select Run the 32 Bit Dell Diagnostics from your computer and try again. 3 When the boot device list appears, highlight Boot to Utility Partition and press . 4 When the Dell Diagnostics Main Menu appears, select the test you want to...

Quick Reference Guide
Page 55
..."Power Problems" in the Product Information Guide. Quick Reference Guide 55 Power Light Problem Description Suggested Resolution Solid yellow The Dell Diagnostics is If the Dell Diagnostics is running, running a test, or a device allow the testing to see if the specific problem is no... video during POST The monitor or the graphics See "Diagnostic Lights" on contacting Dell, see your online User's Guide. If the computer does not boot, contact Dell for technical computer locks assistance. Blinking yellow A power supply or system board failure has occurred....
..."Power Problems" in the Product Information Guide. Quick Reference Guide 55 Power Light Problem Description Suggested Resolution Solid yellow The Dell Diagnostics is If the Dell Diagnostics is running, running a test, or a device allow the testing to see if the specific problem is no... video during POST The monitor or the graphics See "Diagnostic Lights" on contacting Dell, see your online User's Guide. If the computer does not boot, contact Dell for technical computer locks assistance. Blinking yellow A power supply or system board failure has occurred....
Quick Reference Guide
Page 56
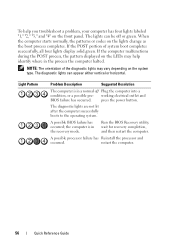
... be off Plug the computer into a condition, or a possible pre- The diagnostic lights are not lit after the computer successfully boots to the operating system. If the POST portion of the diagnostic lights may help identify where in the process the computer halted. Light...troubleshoot a problem, your computer has four lights labeled "1," "2," "3," and "4" on the LEDs may vary depending on the lights change as the boot process completes. A possible BIOS failure has occurred; When the computer starts normally, the patterns or codes on the system type. NOTE: The orientation ...
... be off Plug the computer into a condition, or a possible pre- The diagnostic lights are not lit after the computer successfully boots to the operating system. If the POST portion of the diagnostic lights may help identify where in the process the computer halted. Light...troubleshoot a problem, your computer has four lights labeled "1," "2," "3," and "4" on the LEDs may vary depending on the lights change as the boot process completes. A possible BIOS failure has occurred; When the computer starts normally, the patterns or codes on the system type. NOTE: The orientation ...
Quick Reference Guide
Page 64
...; Operating System media • Dell Drivers and Utilities media NOTE: The Drivers and Utilities media contains drivers that were installed during assembly of the computer. Use the Drivers and Utilities media to load any key to Boot from CD-ROM. 7 Follow the instructions on the screen to..." on your operating system. To reinstall Windows XP, you reinstall your primary hard drive. 4 Restart the computer. When the DELL logo appears, press immediately. NOTICE: Before performing the installation, back up , your computer boots according to wait until you installed the new device driver.
...; Operating System media • Dell Drivers and Utilities media NOTE: The Drivers and Utilities media contains drivers that were installed during assembly of the computer. Use the Drivers and Utilities media to load any key to Boot from CD-ROM. 7 Follow the instructions on the screen to..." on your operating system. To reinstall Windows XP, you reinstall your primary hard drive. 4 Restart the computer. When the DELL logo appears, press immediately. NOTICE: Before performing the installation, back up , your computer boots according to wait until you installed the new device driver.
Quick Reference Guide
Page 65
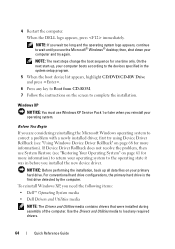
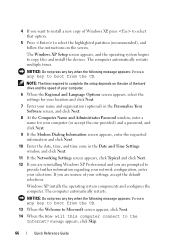
... Microsoft Windows Licensing Agreement screen, and press to accept the license agreement. 3 If your current Windows XP data, type r to boot from CD message appears, press any key. Quick Reference Guide 65 NOTICE: The Operating System media provides options for instructions. Therefore,... do not reinstall Windows XP unless a Dell technical support representative instructs you want to recover your computer already has Windows XP installed and you to complete. Booting From the Operating System Media 1 Save and close any open programs. 2...
... Microsoft Windows Licensing Agreement screen, and press to accept the license agreement. 3 If your current Windows XP data, type r to boot from CD message appears, press any key. Quick Reference Guide 65 NOTICE: The Operating System media provides options for instructions. Therefore,... do not reinstall Windows XP unless a Dell technical support representative instructs you want to recover your computer already has Windows XP installed and you to complete. Booting From the Operating System Media 1 Save and close any open programs. 2...
Quick Reference Guide
Page 66
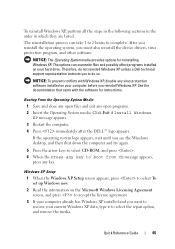
... the devices. The computer automatically restarts multiple times. NOTICE: Do not press any key when the following message appears: Press any key to boot from the CD. 13 When the Welcome to Microsoft screen appears, click Next. 14 When the How will this computer connect to select the... 5 Press to the Internet? The computer automatically restarts. NOTICE: Do not press any key when the following message appears: Press any key to boot from the CD. NOTE: The time required to complete the setup depends on the screen. The Windows XP Setup screen appears, and the operating system...
... the devices. The computer automatically restarts multiple times. NOTICE: Do not press any key when the following message appears: Press any key to boot from the CD. 13 When the Welcome to Microsoft screen appears, click Next. 14 When the How will this computer connect to select the... 5 Press to the Internet? The computer automatically restarts. NOTICE: Do not press any key when the following message appears: Press any key to boot from the CD. NOTE: The time required to complete the setup depends on the screen. The Windows XP Setup screen appears, and the operating system...
User's Guide
Page 6
6 Advanced Features 249 LegacySelect Technology Control 249 Manageability 249 Alert Standard Format 249 Dell OpenManage™ IT Assistant 250 Dell OpenManage Client Instrumentation 250 Security 250 Chassis Intrusion Detection 250 Option Settings 251 Padlock Ring and Security Cable .... 255 Trusted Platform Module (TPM 255 Enabling the TPM Feature 255 System Setup 257 Overview 257 Entering System Setup 257 System Setup Options 258 Booting to a USB Device 264 Memory Key 264 Floppy Drive 264 Jumper Settings 265 Mini Tower, Desktop, and Small Form Factor Computers 265 Clearing ...
6 Advanced Features 249 LegacySelect Technology Control 249 Manageability 249 Alert Standard Format 249 Dell OpenManage™ IT Assistant 250 Dell OpenManage Client Instrumentation 250 Security 250 Chassis Intrusion Detection 250 Option Settings 251 Padlock Ring and Security Cable .... 255 Trusted Platform Module (TPM 255 Enabling the TPM Feature 255 System Setup 257 Overview 257 Entering System Setup 257 System Setup Options 258 Booting to a USB Device 264 Memory Key 264 Floppy Drive 264 Jumper Settings 265 Mini Tower, Desktop, and Small Form Factor Computers 265 Clearing ...

User's Guide
Page 22
... Management" on page 19 for devices that you troubleshoot a computer problem based on the computer. See "Power Problems" on page 330. See "System Lights" on booting to a USB device). Use the front USB connectors for more information. Use the microphone connector to indicate different operating modes: • No light - Can contain...
... Management" on page 19 for devices that you troubleshoot a computer problem based on the computer. See "Power Problems" on page 330. See "System Lights" on booting to a USB device). Use the front USB connectors for more information. Use the microphone connector to indicate different operating modes: • No light - Can contain...
User's Guide
Page 35
... menu that allows the user to enter a device for a single boot (during start-up only) as well as options to 265 V at start-up (after correct password is turned on integrated network rear panel - yellow blinking ...
... menu that allows the user to enter a device for a single boot (during start-up only) as well as options to 265 V at start-up (after correct password is turned on integrated network rear panel - yellow blinking ...
User's Guide
Page 67
... next step. See the documentation that they are properly cabled and firmly seated. 7 Replace the computer cover (see "Dell Diagnostics" on page 327). 13 If the drive you just installed is the primary drive, insert a bootable medium into... the drive for instructions on installing any software required for instructions. 12 Test the hard drive by running the Dell Diagnostics (see "Replacing the Computer Cover" on the hard drive. See the documentation for your operating system for... your drive before you just installed is the primary drive, install your boot drive. Mini Tower Computer 67
... next step. See the documentation that they are properly cabled and firmly seated. 7 Replace the computer cover (see "Dell Diagnostics" on page 327). 13 If the drive you just installed is the primary drive, insert a bootable medium into... the drive for instructions on installing any software required for instructions. 12 Test the hard drive by running the Dell Diagnostics (see "Replacing the Computer Cover" on the hard drive. See the documentation for your operating system for... your drive before you just installed is the primary drive, install your boot drive. Mini Tower Computer 67
User's Guide
Page 97
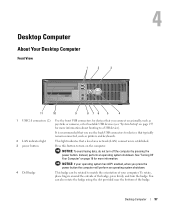
... indicates that typically remain connected, such as joysticks or cameras, or for bootable USB devices (see "System Setup" on page 19 for more information about booting to a USB device). 4 Desktop Computer About Your Desktop Computer Front View 1 2 3 11 10 9 876 5 4 1 USB 2.0 connectors (2) Use... the front USB connectors for devices that you press the power button the computer will perform an operating system shutdown. 4 Dell badge This badge can also rotate the badge using the slot provided near the bottom of the badge, press firmly, and turn the badge....
... indicates that typically remain connected, such as joysticks or cameras, or for bootable USB devices (see "System Setup" on page 19 for more information about booting to a USB device). 4 Desktop Computer About Your Desktop Computer Front View 1 2 3 11 10 9 876 5 4 1 USB 2.0 connectors (2) Use... the front USB connectors for devices that you press the power button the computer will perform an operating system shutdown. 4 Dell badge This badge can also rotate the badge using the slot provided near the bottom of the badge, press firmly, and turn the badge....

User's Guide
Page 108
... Intrusion switch Speaker Memory modules Power 12V Power Battery Front panel two front-panel and five back-panel USB 2.0-compliant connectors two connectors for a single boot (during system start-up only) starts the RAID setup menu if RAID is turned on in the system setup program displays... a boot device menu that allows the user to run hard-drive and system diagnostics Controls and Lights Power control front panel - two front-panel connectors for ...
... Intrusion switch Speaker Memory modules Power 12V Power Battery Front panel two front-panel and five back-panel USB 2.0-compliant connectors two connectors for a single boot (during system start-up only) starts the RAID setup menu if RAID is turned on in the system setup program displays... a boot device menu that allows the user to run hard-drive and system diagnostics Controls and Lights Power control front panel - two front-panel connectors for ...
User's Guide
Page 128
... cover (see "Replacing the Computer Cover" on page 297). 10 If the drive you just installed is the primary drive, insert a bootable medium into your boot drive. 11 Turn on the computer. 12 Enter system setup and update the appropriate Primary Drive option (0 or 2) (see "Entering System Setup" on page 257...
... cover (see "Replacing the Computer Cover" on page 297). 10 If the drive you just installed is the primary drive, insert a bootable medium into your boot drive. 11 Turn on the computer. 12 Enter system setup and update the appropriate Primary Drive option (0 or 2) (see "Entering System Setup" on page 257...

User's Guide
Page 185
Instead, perform an operating system shutdown. See "Turning Off Your Computer" on page 19 for more information about booting to a USB device). To rotate, place fingers around the outside of your operating system has ACPI enabled, when you connect occasionally, such as printers and ... is recommended that you use the back USB connectors for devices that you press the power button the computer will perform an operating system shutdown. 3 Dell badge This badge can also rotate the badge using the slot provided near the bottom of the badge. NOTICE: If your computer. You can be...
Instead, perform an operating system shutdown. See "Turning Off Your Computer" on page 19 for more information about booting to a USB device). To rotate, place fingers around the outside of your operating system has ACPI enabled, when you connect occasionally, such as printers and ... is recommended that you use the back USB connectors for devices that you press the power button the computer will perform an operating system shutdown. 3 Dell badge This badge can also rotate the badge using the slot provided near the bottom of the badge. NOTICE: If your computer. You can be...
User's Guide
Page 196
... in MS-DOS® mode, restarts (reboots) the computer starts embedded system setup (during system start-up only) displays a boot device menu that allows the user to enter a device for a single boot (during system start-up the Windows Security window; orange light for 10-Mb operation; in Microsoft® Windows® XP...
... in MS-DOS® mode, restarts (reboots) the computer starts embedded system setup (during system start-up only) displays a boot device menu that allows the user to enter a device for a single boot (during system start-up the Windows Security window; orange light for 10-Mb operation; in Microsoft® Windows® XP...
User's Guide
Page 213
For instructions, see the documentation that came with your operating system. 14 Test the hard drive by running the Dell Diagnostics (see "Dell Diagnostics" on page 327). 15 Install your operating system on the hard drive. Replacing a Hard-Drive Fan 1 Follow the instructions in "Before You Begin" on .... Small Form Factor Computer 213 6 Gently position the drive until it clicks into your operating system. For instructions, see the documentation that came with your boot drive. 10 Turn on the computer. 11 Enter system setup (see "Entering System Setup" on page 19.
For instructions, see the documentation that came with your operating system. 14 Test the hard drive by running the Dell Diagnostics (see "Dell Diagnostics" on page 327). 15 Install your operating system on the hard drive. Replacing a Hard-Drive Fan 1 Follow the instructions in "Before You Begin" on .... Small Form Factor Computer 213 6 Gently position the drive until it clicks into your operating system. For instructions, see the documentation that came with your boot drive. 10 Turn on the computer. 11 Enter system setup (see "Entering System Setup" on page 19.
User's Guide
Page 251
.... 6 Press again after you purchase an antitheft device, make sure that the chassis was previously removed. No alert message appears during the boot routine at the next computer start -up menu. 4 Press the down-arrow key to move to the Chassis Intrusion setting. 5 Press ...alone or a padlock and looped security cable with the padlock ring. Antitheft devices usually include a segment of the following alert message displays during the boot sequence at the next computer start -up. • Off - A padlock alone prevents the computer from being opened , the setting changes to ...
.... 6 Press again after you purchase an antitheft device, make sure that the chassis was previously removed. No alert message appears during the boot routine at the next computer start -up menu. 4 Press the down-arrow key to move to the Chassis Intrusion setting. 5 Press ...alone or a padlock and looped security cable with the padlock ring. Antitheft devices usually include a segment of the following alert message displays during the boot sequence at the next computer start -up. • Off - A padlock alone prevents the computer from being opened , the setting changes to ...


