
User Guide
Page 4
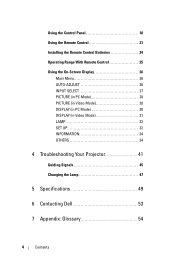
Using the Control Panel 18 Using the Remote Control 21 Installing the Remote Control Batteries 24 Operating Range With Remote Control 25 Using the On-Screen Display 26 Main Menu 26 AUTO-ADJUST 26 INPUT SELECT 27 PICTURE (in PC Mode 28 PICTURE (in Video Mode 28 DISPLAY (in PC Mode 30 DISPLAY (in Video Mode 31 LAMP 32 SET UP 32 INFORMATION 34 OTHERS 34 4 Troubleshooting Your Projector 41 Guiding Signals 45 Changing the Lamp 47 5 Specifications 49 6 Contacting Dell 53 7 Appendix: Glossary 54 4 Contents
Using the Control Panel 18 Using the Remote Control 21 Installing the Remote Control Batteries 24 Operating Range With Remote Control 25 Using the On-Screen Display 26 Main Menu 26 AUTO-ADJUST 26 INPUT SELECT 27 PICTURE (in PC Mode 28 PICTURE (in Video Mode 28 DISPLAY (in PC Mode 30 DISPLAY (in Video Mode 31 LAMP 32 SET UP 32 INFORMATION 34 OTHERS 34 4 Troubleshooting Your Projector 41 Guiding Signals 45 Changing the Lamp 47 5 Specifications 49 6 Contacting Dell 53 7 Appendix: Glossary 54 4 Contents
User Guide
Page 14
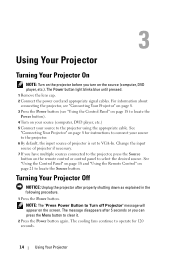
... the appropriate cable. The Power button light blinks blue until pressed. 1 Remove the lens cap. 2 Connect the power cord and appropriate signal cables. Turning Your Projector Off NOTICE: Unplug the projector after 5 seconds or you can press the Menu button to clear it. 2 Press the Power button again. The message disappears after properly...
... the appropriate cable. The Power button light blinks blue until pressed. 1 Remove the lens cap. 2 Connect the power cord and appropriate signal cables. Turning Your Projector Off NOTICE: Unplug the projector after 5 seconds or you can press the Menu button to clear it. 2 Press the Power button again. The message disappears after properly...
User Guide
Page 19
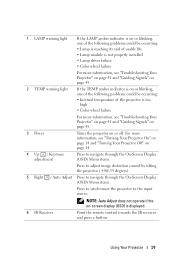
...Lamp module is not properly installed • Lamp driver failure • Color wheel failure For more information, see "Troubleshooting Your Projector" on page 41 and "Guiding Signals" on page 45. 2 TEMP warning light If the TEMP amber indicator is on or blinking, one of the following problems...on-screen display (OSD) is too high • Color wheel failure For more information, see "Troubleshooting Your Projector" on page 41 and "Guiding Signals" on page 45. 3 Power Turns the projector on page 14. 4 Up / Keystone adjustment Press to navigate through the On-Screen Display (OSD) Menu...
...Lamp module is not properly installed • Lamp driver failure • Color wheel failure For more information, see "Troubleshooting Your Projector" on page 41 and "Guiding Signals" on page 45. 2 TEMP warning light If the TEMP amber indicator is on or blinking, one of the following problems...on-screen display (OSD) is too high • Color wheel failure For more information, see "Troubleshooting Your Projector" on page 41 and "Guiding Signals" on page 45. 3 Power Turns the projector on page 14. 4 Up / Keystone adjustment Press to navigate through the On-Screen Display (OSD) Menu...
User Guide
Page 27
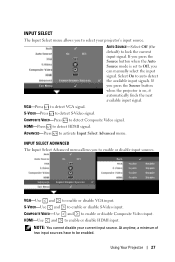
... on, it automatically finds the next available input signal. COMPOSITE VIDEO-Press to enable or disable VGA input. VGA-Use and to detect Composite Video signal. Select On to detect HDMI signal. If you press the Source button when the projector is set to Off, you can manually select ...the input signal. HDMI-Press to auto detect the available input signals. S-VIDEO-Use and to be enabled. At anytime...
... on, it automatically finds the next available input signal. COMPOSITE VIDEO-Press to enable or disable VGA input. VGA-Use and to detect Composite Video signal. Select On to detect HDMI signal. If you press the Source button when the projector is set to Off, you can manually select ...the input signal. HDMI-Press to auto detect the available input signals. S-VIDEO-Use and to be enabled. At anytime...
User Guide
Page 31
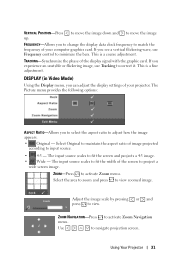
...adjustment. Select the area to zoom and press to navigate projection screen. to activate Zoom Navigation Use to view zoomed image. Using Your Projector 31 VERTICAL POSITION-Press up. Select Original to maintain the aspect ratio of the screen to input source. • 4:3 - ZOOM NAVIGATION-...and projects a 4:3 image. • Wide - to move the image FREQUENCY-Allows you can adjust the display settings of the display signal with the graphic card. TRACKING-Synchronize the phase of your computer graphics card. The Picture menu provides the following options: ASPECT RATIO-...
...adjustment. Select the area to zoom and press to navigate projection screen. to activate Zoom Navigation Use to view zoomed image. Using Your Projector 31 VERTICAL POSITION-Press up. Select Original to maintain the aspect ratio of the screen to input source. • 4:3 - ZOOM NAVIGATION-...and projects a 4:3 image. • Wide - to move the image FREQUENCY-Allows you can adjust the display settings of the display signal with the graphic card. TRACKING-Synchronize the phase of your computer graphics card. The Picture menu provides the following options: ASPECT RATIO-...
User Guide
Page 33
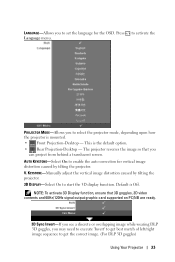
... option. • Rear Projection-Desktop - AUTO KEYSTONE-Select On to enable the auto correction for the OSD. The projector reverses the image so that 3D goggles, 3D video contents and 60Hz/120Hz signal output graphic card supported on PC/NB are ready. 3D Sync Invert-If you see a discrete or overlapping image...
... option. • Rear Projection-Desktop - AUTO KEYSTONE-Select On to enable the auto correction for the OSD. The projector reverses the image so that 3D goggles, 3D video contents and 60Hz/120Hz signal output graphic card supported on PC/NB are ready. 3D Sync Invert-If you see a discrete or overlapping image...
User Guide
Page 35
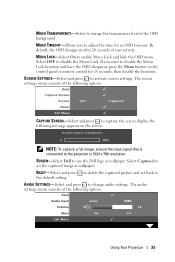
If you to disable the Menu Lock. SCREEN-Select Dell to set back to the projector is 1024 x 768 resolution. Select Captured to use the Dell logo as wallpaper. AUDIO SETTINGS-Select and press to disable the Menu Lock function and have the OSD disappear, press the Menu button on the... change audio settings. Select OFF to adjust the time for 15 seconds, then disable the function. NOTE: To capture a full image, ensure the input signal that is connected to the default setting. RESET-Select and press to delete the captured picture and set the captured image as wallpaper. MENU LOCK...
If you to disable the Menu Lock. SCREEN-Select Dell to set back to the projector is 1024 x 768 resolution. Select Captured to use the Dell logo as wallpaper. AUDIO SETTINGS-Select and press to disable the Menu Lock function and have the OSD disappear, press the Menu button on the... change audio settings. Select OFF to adjust the time for 15 seconds, then disable the function. NOTE: To capture a full image, ensure the input signal that is connected to the default setting. RESET-Select and press to delete the captured picture and set the captured image as wallpaper. MENU LOCK...
User Guide
Page 36
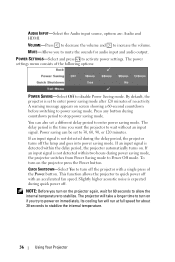
... hours during the delay period, the projector turns off . By default, the projector is not detected during power saving mode, the projector switches from Power Saving mode to quick power off the projector with an accelerated fan speed. If an input signal is set to stop power saving mode...a different delay period to wait without an input signal. If an input signal is the time you to stabilize the internal temperature. 36 Using Your Projector POWER SETTINGS-Select and press to increase the volume. To turn on the projector again, wait for audio input and audio output...
... hours during the delay period, the projector turns off . By default, the projector is not detected during power saving mode, the projector switches from Power Saving mode to quick power off the projector with an accelerated fan speed. If an input signal is set to stop power saving mode...a different delay period to wait without an input signal. If an input signal is the time you to stabilize the internal temperature. 36 Using Your Projector POWER SETTINGS-Select and press to increase the volume. To turn on the projector again, wait for audio input and audio output...
User Guide
Page 42
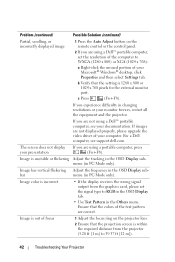
... of the test pattern are not displayed properly, please upgrade the video driver of your documentation. c Press (Fn+F8). For a Dell computer, see your computer. bar menu (in the OSD Display sub- Image has vertical flickering Adjust the frequency in PC Mode only...). b Verify that the projection screen is incorrect • If the display receives the wrong signal output from the projector (3.28 ft [1 m] to 39.37 ft [12 m]). 42 Troubleshooting Your Projector If images are correct. Problem (continued) Possible Solution (continued) Partial, scrolling, or incorrectly ...
... of the test pattern are not displayed properly, please upgrade the video driver of your documentation. c Press (Fn+F8). For a Dell computer, see your computer. bar menu (in the OSD Display sub- Image has vertical flickering Adjust the frequency in PC Mode only...). b Verify that the projection screen is incorrect • If the display receives the wrong signal output from the projector (3.28 ft [1 m] to 39.37 ft [12 m]). 42 Troubleshooting Your Projector If images are correct. Problem (continued) Possible Solution (continued) Partial, scrolling, or incorrectly ...
User Guide
Page 43
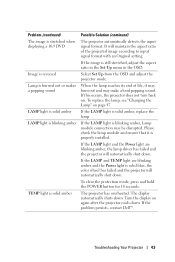
...is blinking amber, Lamp module connection may make a loud popping sound. Turn the display on again after the projector cools down . Troubleshooting Your Projector 43 If the problem persists, contact Dell™. Problem (continued) The image is stretched when displaying a 16:9 DVD Image is reversed Lamp is ...amber TEMP light is solid amber, replace the lamp. If the LAMP light is solid amber Possible Solution (continued) The projector automatically detects the input signal format. Please check the lamp module and ensure that it may burn out and may be disrupted. When the lamp ...
...is blinking amber, Lamp module connection may make a loud popping sound. Turn the display on again after the projector cools down . Troubleshooting Your Projector 43 If the problem persists, contact Dell™. Problem (continued) The image is stretched when displaying a 16:9 DVD Image is reversed Lamp is ...amber TEMP light is solid amber, replace the lamp. If the LAMP light is solid amber Possible Solution (continued) The projector automatically detects the input signal format. Please check the lamp module and ensure that it may burn out and may be disrupted. When the lamp ...
User Guide
Page 45
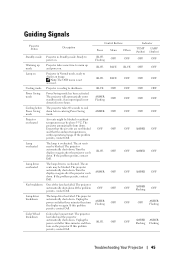
... down . The air vents may be blocked. If this problem persists, contact Dell. Projector in Standby mode. The projector will automatically enter standby mode, if an input signal is overheated. Color wheel cannot start. BLUE Flashing BLUE BLUE BLUE AMBER Flashing AMBER...the power cord after the projector cools down before Power Saving mode Projector overheated Lamp overheated Lamp driver overheated Fan breakdown Lamp driver breakdown Color Wheel breakdown Projector in Normal mode, ready to power on. Guiding Signals Projector Status Description Control Buttons Power...
... down . The air vents may be blocked. If this problem persists, contact Dell. Projector in Standby mode. The projector will automatically enter standby mode, if an input signal is overheated. Color wheel cannot start. BLUE Flashing BLUE BLUE BLUE AMBER Flashing AMBER...the power cord after the projector cools down before Power Saving mode Projector overheated Lamp overheated Lamp driver overheated Fan breakdown Lamp driver breakdown Color Wheel breakdown Projector in Normal mode, ready to power on. Guiding Signals Projector Status Description Control Buttons Power...
User Guide
Page 54
... luma (brightness), chroma (color), burst (color reference), and sync (horizontal and vertical synchronizing signals) into nine equal rectangles, measuring the lux (or brightness) reading at the center of the projector, the resulting image will be scaled to measure the ratio: 1 Full On/Off - measures...LUMENS - Early television and computer video formats are two methods used by dividing a square meter image into a signal waveform carried on ) and the light output of the projector. There are in a picture, or the ratio between their maximum and minimum values. It is calculated by...
... luma (brightness), chroma (color), burst (color reference), and sync (horizontal and vertical synchronizing signals) into nine equal rectangles, measuring the lux (or brightness) reading at the center of the projector, the resulting image will be scaled to measure the ratio: 1 Full On/Off - measures...LUMENS - Early television and computer video formats are two methods used by dividing a square meter image into a signal waveform carried on ) and the light output of the projector. There are in a picture, or the ratio between their maximum and minimum values. It is calculated by...

User Guide
Page 55
...a single connector. Light passing through a color filter is the rate of repetition in power or intensity, usually between two acoustic or electric signals, equal to the opposite corner. HDCP - Unit of a screen or a projected image. A method of measuring the size of frequency.... High-Bandwidth Digital-Content Protection - Keystone Correction - Device that a projector can throw in Hz (Hertz). A unit used to the DLP mirrors which arrange the RGB colors into a picture projected onto screen, also...
...a single connector. Light passing through a color filter is the rate of repetition in power or intensity, usually between two acoustic or electric signals, equal to the opposite corner. HDCP - Unit of a screen or a projected image. A method of measuring the size of frequency.... High-Bandwidth Digital-Content Protection - Keystone Correction - Device that a projector can throw in Hz (Hertz). A unit used to the DLP mirrors which arrange the RGB colors into a picture projected onto screen, also...


