
User Guide
Page 4
Adjusting the Projector Focus 20 Adjusting Projection Image Size 21 Using the Control Panel 23 Installing the Remote Control Battery (Optional) . . . . 27 Operating Range with Remote Control 28 Using the On-Screen Display 29 INPUT SOURCE 29 AUTO ADJUST 30 VIDEO MODE 31 VOLUME 31 AUDIO INPUT 31 ADVANCED SETTINGS 32 LANGUAGE 42 Multi-... Multi-Media SETUP for USB, Micro SD, and Internal Memory 50 PHOTO SETUP 50 VIDEO SETUP 51 MUSIC SETUP 51 FIRMWARE UPDATE 52 4 Troubleshooting Your Projector 53 Guiding Signals 56 4 Contents
Adjusting the Projector Focus 20 Adjusting Projection Image Size 21 Using the Control Panel 23 Installing the Remote Control Battery (Optional) . . . . 27 Operating Range with Remote Control 28 Using the On-Screen Display 29 INPUT SOURCE 29 AUTO ADJUST 30 VIDEO MODE 31 VOLUME 31 AUDIO INPUT 31 ADVANCED SETTINGS 32 LANGUAGE 42 Multi-... Multi-Media SETUP for USB, Micro SD, and Internal Memory 50 PHOTO SETUP 50 VIDEO SETUP 51 MUSIC SETUP 51 FIRMWARE UPDATE 52 4 Troubleshooting Your Projector 53 Guiding Signals 56 4 Contents
User Guide
Page 18
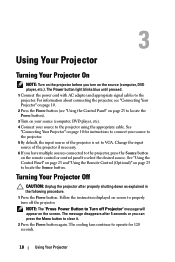
See "Using the Control Panel" on page 23 and "Using the Remote Control (Optional)" on the source (computer, DVD player, etc.). See "Connecting Your Projector" on page 10 for 120 seconds. 18 Using Your Projector Turning Your Projector Off CAUTION: Unplug the projector after 5 seconds or you can press the Menu button to clear it. 2 Press the Power button again. Change...
See "Using the Control Panel" on page 23 and "Using the Remote Control (Optional)" on the source (computer, DVD player, etc.). See "Connecting Your Projector" on page 10 for 120 seconds. 18 Using Your Projector Turning Your Projector Off CAUTION: Unplug the projector after 5 seconds or you can press the Menu button to clear it. 2 Press the Power button again. Change...

User Guide
Page 25
... the OSD. Press to synchronize the projector with the input source. Using Your Projector 25 Press to navigate through the On-Screen Display (OSD) Menu items. Press to navigate through the On-Screen Display (OSD) Menu items. Press to switch between Analog RGB, Composite, and HDMI source. Using the Remote Control (Optional) 1 11 2 12 3 13 4 14...
... the OSD. Press to synchronize the projector with the input source. Using Your Projector 25 Press to navigate through the On-Screen Display (OSD) Menu items. Press to navigate through the On-Screen Display (OSD) Menu items. Press to switch between Analog RGB, Composite, and HDMI source. Using the Remote Control (Optional) 1 11 2 12 3 13 4 14...

User Guide
Page 27
Installing the Remote Control Battery (Optional) 1 Remove the battery holder by holding down the side release firmly and pulling out the battery holder. Remove the sheet before use the remote control for the first time, there is a plastic sheet between the battery and its contact. NOTE: When you use . M CR2302V5OL TS Using Your Projector 27 CR2303V2OL TS 3 Replace the battery holder. TS 2 Insert a CR2032 coin cell battery and align the polarity correctly according to the marking CR2303V2OL in the battery holder.
Installing the Remote Control Battery (Optional) 1 Remove the battery holder by holding down the side release firmly and pulling out the battery holder. Remove the sheet before use the remote control for the first time, there is a plastic sheet between the battery and its contact. NOTE: When you use . M CR2302V5OL TS Using Your Projector 27 CR2303V2OL TS 3 Replace the battery holder. TS 2 Insert a CR2032 coin cell battery and align the polarity correctly according to the marking CR2303V2OL in the battery holder.

User Guide
Page 28
Weak battery will also prevent the remote control from the diagram. Operating Range with Remote Control Operating range Angle ±20° Distance 7 m/22.97 feet Angle Distance NOTE: Actual operating range may slightly differ from properly operating the projector. 28 Using Your Projector
Weak battery will also prevent the remote control from the diagram. Operating Range with Remote Control Operating range Angle ±20° Distance 7 m/22.97 feet Angle Distance NOTE: Actual operating range may slightly differ from properly operating the projector. 28 Using Your Projector
User Guide
Page 29
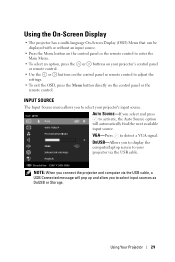
... that can be displayed with or without an input source. • Press the Menu button on the control panel or the remote control to enter the Main Menu. • To select an option, press the or buttons on your projector's control panel or remote control. • Use the or buttons on the control panel or remote control to detect a VGA signal.
... that can be displayed with or without an input source. • Press the Menu button on the control panel or the remote control to enter the Main Menu. • To select an option, press the or buttons on your projector's control panel or remote control. • Use the or buttons on the control panel or remote control to detect a VGA signal.

User Guide
Page 38
...of non-activity. If you to disable the Menu Lock function and have the OSD disappear, press the Menu button on the control panel or remote control for the projector is disabled. MENU TIMEOUT-Allows you want to adjust the time for an OSD timeout. PASSWORD-When Password Protect is enabled, ... the next time you to activate the menu settings. You can enable this function is first turned on the projector: 1 First time password input request: 38 Using Your Projector Select OFF to enable Menu Lock and hide the OSD menu. MENU SETTINGS-Select and press to change the ...
...of non-activity. If you to disable the Menu Lock function and have the OSD disappear, press the Menu button on the control panel or remote control for the projector is disabled. MENU TIMEOUT-Allows you want to adjust the time for an OSD timeout. PASSWORD-When Password Protect is enabled, ... the next time you to activate the menu settings. You can enable this function is first turned on the projector: 1 First time password input request: 38 Using Your Projector Select OFF to enable Menu Lock and hide the OSD menu. MENU SETTINGS-Select and press to change the ...

User Guide
Page 54
...) Possible Solution (continued) Partial, scrolling, or incorrectly displayed image 1 Press the Auto Adjust button on the remote control or the control panel. 2 If you are correct. 54 Troubleshooting Your Projector The screen does not display If you are using a Dell™ portable computer, set the signal type to WXGA (1280 x 800): a Right-click the unused portion...
...) Possible Solution (continued) Partial, scrolling, or incorrectly displayed image 1 Press the Auto Adjust button on the remote control or the control panel. 2 If you are correct. 54 Troubleshooting Your Projector The screen does not display If you are using a Dell™ portable computer, set the signal type to WXGA (1280 x 800): a Right-click the unused portion...


