User's Guide
Page 9
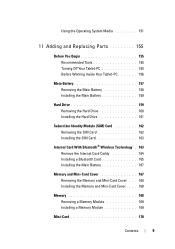
... Media 151 11 Adding and Replacing Parts 155 Before You Begin 155 Recommended Tools 155 Turning Off Your Tablet-PC 155 Before Working Inside Your Tablet-PC 156 Main Battery 157 Removing the Main Battery 158 Installing the Main Battery 159 Hard Drive 159 Removing the Hard Drive 160 Installing the Hard Drive 161 Subscriber Identity Module...
... Media 151 11 Adding and Replacing Parts 155 Before You Begin 155 Recommended Tools 155 Turning Off Your Tablet-PC 155 Before Working Inside Your Tablet-PC 156 Main Battery 157 Removing the Main Battery 158 Installing the Main Battery 159 Hard Drive 159 Removing the Hard Drive 160 Installing the Hard Drive 161 Subscriber Identity Module...
User's Guide
Page 157
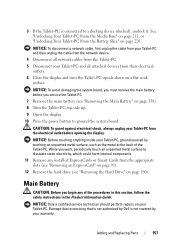
...the cable from the network device. 4 Disconnect all attached devices from the appropriate slots (see "Removing an ExpressCard" on page 91). 12 Remove the hard drive (see "Removing the Main Battery" on page 220. Main Battery CAUTION: Before you service the Tablet-PC. 7 Remove the main battery (see "Removing ... display and turn the Tablet-PC upside-down on page 160). Damage due to servicing that is not authorized by Dell is connected to ground the system board. Adding and Replacing Parts 157 3 If the Tablet-PC is not covered by touching an unpainted metal surface, such as the metal...
...the cable from the network device. 4 Disconnect all attached devices from the appropriate slots (see "Removing an ExpressCard" on page 91). 12 Remove the hard drive (see "Removing the Main Battery" on page 220. Main Battery CAUTION: Before you service the Tablet-PC. 7 Remove the main battery (see "Removing ... display and turn the Tablet-PC upside-down on page 160). Damage due to servicing that is not authorized by Dell is connected to ground the system board. Adding and Replacing Parts 157 3 If the Tablet-PC is not covered by touching an unpainted metal surface, such as the metal...
User's Guide
Page 159
...release latches (2) 3 battery bay 2 battery Installing the Main Battery 1 Align the main battery with the sides of the hard drive. Hard Drive CAUTION: If you feel a click, ensuring that the battery is hot, do not touch the metal housing of the battery... bay. 2 Slide the main battery into the battery bay until you remove the hard drive from the Tablet-PC when the drive is firmly and properly seated. 3 Turn the Tablet-PC top-side up on a flat work surface ...CAUTION: Before working inside your Tablet-PC by pressing the power button. Adding and Replacing Parts 159
...release latches (2) 3 battery bay 2 battery Installing the Main Battery 1 Align the main battery with the sides of the hard drive. Hard Drive CAUTION: If you feel a click, ensuring that the battery is hot, do not touch the metal housing of the battery... bay. 2 Slide the main battery into the battery bay until you remove the hard drive from the Tablet-PC when the drive is firmly and properly seated. 3 Turn the Tablet-PC top-side up on a flat work surface ...CAUTION: Before working inside your Tablet-PC by pressing the power button. Adding and Replacing Parts 159
User's Guide
Page 160
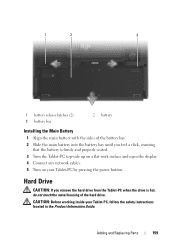
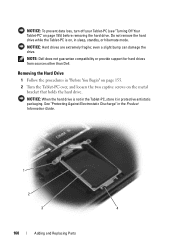
... hibernate mode. NOTICE: Hard drives are extremely fragile; Removing the Hard Drive 1 Follow the procedures in the Product Information Guide. 1 2 3 4 160 Adding and Replacing Parts even a slight bump can damage the drive. See "Protecting Against ...Electrostatic Discharge" in "Before You Begin" on page 155. 2 Turn the Tablet-PC over, and loosen the two captive screws on page 155) before removing the hard drive. NOTE: Dell does not guarantee compatibility or provide support for hard drives...
... hibernate mode. NOTICE: Hard drives are extremely fragile; Removing the Hard Drive 1 Follow the procedures in the Product Information Guide. 1 2 3 4 160 Adding and Replacing Parts even a slight bump can damage the drive. See "Protecting Against ...Electrostatic Discharge" in "Before You Begin" on page 155. 2 Turn the Tablet-PC over, and loosen the two captive screws on page 155) before removing the hard drive. NOTE: Dell does not guarantee compatibility or provide support for hard drives...
User's Guide
Page 161
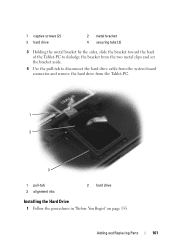
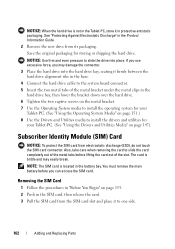
Adding and Replacing Parts 161 1 captive screws (2) 3 hard drive 2 metal bracket 4 securing tabs (2) 3 Holding the metal bracket by the sides, slide the bracket toward the back of the Tablet-PC to dislodge the bracket from the two metal clips and set the bracket aside. 4 Use the pull-tab to disconnect the hard drive cable from the system board connector and remove the hard drive from the Tablet-PC. 1 2 3 1 pull-tab 3 alignment ribs 2 hard drive Installing the Hard Drive 1 Follow the procedures in "Before You Begin" on page 155.
Adding and Replacing Parts 161 1 captive screws (2) 3 hard drive 2 metal bracket 4 securing tabs (2) 3 Holding the metal bracket by the sides, slide the bracket toward the back of the Tablet-PC to dislodge the bracket from the two metal clips and set the bracket aside. 4 Use the pull-tab to disconnect the hard drive cable from the system board connector and remove the hard drive from the Tablet-PC. 1 2 3 1 pull-tab 3 alignment ribs 2 hard drive Installing the Hard Drive 1 Follow the procedures in "Before You Begin" on page 155.
User's Guide
Page 162
... must remove the main battery before lifting the card out of the metal bracket under the metal clips in the hard drive bay, then lower the bracket down over the hard drive. 6 Tighten the two captive screws on the metal bracket. 7 Use the Operating System media to install the ...to one side. 162 Adding and Replacing Parts The card is brittle and may damage the connector. 3 Place the hard drive into place. NOTICE: When the hard drive is not in the Tablet-PC, store it firmly between the hard drive alignment ribs in the base. 4 Connect the hard drive cable to the system board connector....
... must remove the main battery before lifting the card out of the metal bracket under the metal clips in the hard drive bay, then lower the bracket down over the hard drive. 6 Tighten the two captive screws on the metal bracket. 7 Use the Operating System media to install the ...to one side. 162 Adding and Replacing Parts The card is brittle and may damage the connector. 3 Place the hard drive into place. NOTICE: When the hard drive is not in the Tablet-PC, store it firmly between the hard drive alignment ribs in the base. 4 Connect the hard drive cable to the system board connector....

User's Guide
Page 187
Adding and Replacing Parts 187 2 Remove the hard drive (see "Removing the Hard Drive" on page 160). 3 Remove the hinge cover (see "Removing the Hinge Cover" on page 174). 4 Remove the display assembly (see "Removing the Display Assembly" on page 179). 5 Remove the keyboard (see "Removing the Keyboard" on page 176). 6 Remove any installed Mini-Cards (see "Removing a Mini-Card" on page 171). 7 Disconnect the touch pad cable. 8 Turn the Tablet-PC upside down and remove the eleven M2.5 x 5-mm screws. 9 From the top side of the Tablet-PC, remove the four M2.5 x 5-mm screws labeled with a "P".
Adding and Replacing Parts 187 2 Remove the hard drive (see "Removing the Hard Drive" on page 160). 3 Remove the hinge cover (see "Removing the Hinge Cover" on page 174). 4 Remove the display assembly (see "Removing the Display Assembly" on page 179). 5 Remove the keyboard (see "Removing the Keyboard" on page 176). 6 Remove any installed Mini-Cards (see "Removing a Mini-Card" on page 171). 7 Disconnect the touch pad cable. 8 Turn the Tablet-PC upside down and remove the eleven M2.5 x 5-mm screws. 9 From the top side of the Tablet-PC, remove the four M2.5 x 5-mm screws labeled with a "P".

User's Guide
Page 189
... screws. 3 Turn the Tablet-PC top-side up and tighten the five M2.5 x 5-mm screws labeled with your Product Information Guide. Adding and Replacing Parts 189 1 palm rest 3 touch pad cable-locking arm 2 base 4 touch pad cable Installing the Palm Rest 1 Place the palm rest on...following procedures, follow the safety instructions in your fingers in "Before You Begin" on page 155. 2 Remove the hinge cover (see "Installing the Hard Drive" on page 161). NOTICE: To avoid electrostatic discharge, ground yourself by using a wrist grounding strap or by pressing with a "P". 4 Connect ...
... screws. 3 Turn the Tablet-PC top-side up and tighten the five M2.5 x 5-mm screws labeled with your Product Information Guide. Adding and Replacing Parts 189 1 palm rest 3 touch pad cable-locking arm 2 base 4 touch pad cable Installing the Palm Rest 1 Place the palm rest on...following procedures, follow the safety instructions in your fingers in "Before You Begin" on page 155. 2 Remove the hinge cover (see "Installing the Hard Drive" on page 161). NOTICE: To avoid electrostatic discharge, ground yourself by using a wrist grounding strap or by pressing with a "P". 4 Connect ...


