
User Manual
Page 5
... ion 5 System Information Chipset Processor Intel Mobile Express Series 6 chipset Intel Core i5/i7 series (2nd generation) Video Video type Data bus UMA Discrete Video controller UMA Discrete • integrated on system board • discrete integrated video • PCI-E x16 Gen1 • PCI-E x16 Gen2 Intel Graphics NVIDIA N12P with your computer. Specifications NOTE...
... ion 5 System Information Chipset Processor Intel Mobile Express Series 6 chipset Intel Core i5/i7 series (2nd generation) Video Video type Data bus UMA Discrete Video controller UMA Discrete • integrated on system board • discrete integrated video • PCI-E x16 Gen1 • PCI-E x16 Gen2 Intel Graphics NVIDIA N12P with your computer. Specifications NOTE...

User Manual
Page 6
...;C to 65 °C (-40 °F to 149 °F) 3 V CR2032 lithium coin cell 65 W and 90 W NOTE: 65 W adapter is available only for computers with integrated video card. 100 VAC to 240 VAC 1.50 A/1.60 A/1.70 A 50 Hz to 60 Hz 65 W and 90 W 3.34 A and 4.62 A (continuous) 19.5 +/- 1.0 VDC
...;C to 65 °C (-40 °F to 149 °F) 3 V CR2032 lithium coin cell 65 W and 90 W NOTE: 65 W adapter is available only for computers with integrated video card. 100 VAC to 240 VAC 1.50 A/1.60 A/1.70 A 50 Hz to 60 Hz 65 W and 90 W 3.34 A and 4.62 A (continuous) 19.5 +/- 1.0 VDC

Owners Manual
Page 80
Remove the video cable holder. 80 Remove the screws from the video cable holder. 23. 22.
Remove the video cable holder. 80 Remove the screws from the video cable holder. 23. 22.

Owners Manual
Page 81
24. Remove the screw that secures the system board to the computer. 26. Disconnect the video camera and LED cables from the system board. 81 Flip and remove the screws from the system board. 25.
24. Remove the screw that secures the system board to the computer. 26. Disconnect the video camera and LED cables from the system board. 81 Flip and remove the screws from the system board. 25.
Owners Manual
Page 84
Route and connect the video camera and LED cables to the system board. 8. Install the Modem Card. 11. Install the Keyboard Trim. 13. Install the Heat Sink and Processor. 15. Install the WLAN Card. 18. Install the ATG Port Cover (only for E6420 ATG systems). 27. Connect the Smart ...Cover. 23. Connect the system board to the computer. 5. Installing the System Board 1. Install the ATG Handle (only for E6420 ATG systems). 26. Place the video cable holder and tighten the screws securing the video cable holder to the system board. 4. Install the Battery. 25. Install the SD Card. 24....
Route and connect the video camera and LED cables to the system board. 8. Install the Modem Card. 11. Install the Keyboard Trim. 13. Install the Heat Sink and Processor. 15. Install the WLAN Card. 18. Install the ATG Port Cover (only for E6420 ATG systems). 27. Connect the Smart ...Cover. 23. Connect the system board to the computer. 5. Installing the System Board 1. Install the ATG Handle (only for E6420 ATG systems). 26. Place the video cable holder and tighten the screws securing the video cable holder to the system board. 4. Install the Battery. 25. Install the SD Card. 24....

Owners Manual
Page 90
Unthread the video and wireless antenna cables. 25. 24. Unthread the modem cable. 90
Unthread the video and wireless antenna cables. 25. 24. Unthread the modem cable. 90
Owners Manual
Page 93
...Install the Hard Drive. 19. Install the ExpressCard. 22. Install the Base Cover. 24. Install the ExpressCard Cage 9. Install the ATG Handle (only for E6420 ATG systems). 27. Install the Palmrest Assembly. 10. Install the Modem Card. 11. Install the Bluetooth Card. 14. Install the Heat... video and wireless antenna cables. 7. Install the WWAN Card. 17. Install the SD Card. 25. Place the modem cable holder. 3. Install the Battery. 26. Follow the procedures in After Working Inside Your Computer. 93 Route the modem cable. 6. Install the ATG Port Cover (only for E6420 ATG...
...Install the Hard Drive. 19. Install the ExpressCard. 22. Install the Base Cover. 24. Install the ExpressCard Cage 9. Install the ATG Handle (only for E6420 ATG systems). 27. Install the Palmrest Assembly. 10. Install the Modem Card. 11. Install the Bluetooth Card. 14. Install the Heat... video and wireless antenna cables. 7. Install the WWAN Card. 17. Install the SD Card. 25. Place the modem cable holder. 3. Install the Battery. 26. Follow the procedures in After Working Inside Your Computer. 93 Route the modem cable. 6. Install the ATG Port Cover (only for E6420 ATG...

Owners Manual
Page 104
24. Unthread the antennas, video, and camera connectors. 25. Lift up the whole bottom base while threading the cable down via the bottom base. 104
24. Unthread the antennas, video, and camera connectors. 25. Lift up the whole bottom base while threading the cable down via the bottom base. 104
Owners Manual
Page 106
.... 22. Install the System Board. 5. Install the Base Cover. 20. Install the Heat Sink and Processor. 12. Install the Memory. 17. Install the ATG Port Cover (only for E6420 ATG systems). 24. Install the ExpressCard Cage 6. Installing the Display Assembly 1. Route the antennas, video, and camera connectors. 3. Install the Hard Drive. 16. Install the...
.... 22. Install the System Board. 5. Install the Base Cover. 20. Install the Heat Sink and Processor. 12. Install the Memory. 17. Install the ATG Port Cover (only for E6420 ATG systems). 24. Install the ExpressCard Cage 6. Installing the Display Assembly 1. Route the antennas, video, and camera connectors. 3. Install the Hard Drive. 16. Install the...
Owners Manual
Page 122
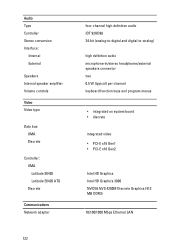
Audio Type Controller Stereo conversion Interface: Internal External Speakers Internal speaker amplifier Volume controls Video Video type Data bus: UMA Discrete Controller: UMA Latitude E6420 Latitude E6420 ATG Discrete Communications Network adapter four-channel high definition audio IDT 92HD90 24-bit (analog-to-digital and digital-to-analog) high definition audio microphone-in/...
Audio Type Controller Stereo conversion Interface: Internal External Speakers Internal speaker amplifier Volume controls Video Video type Data bus: UMA Discrete Controller: UMA Latitude E6420 Latitude E6420 ATG Discrete Communications Network adapter four-channel high definition audio IDT 92HD90 24-bit (analog-to-digital and digital-to-analog) high definition audio microphone-in/...
Owners Manual
Page 123
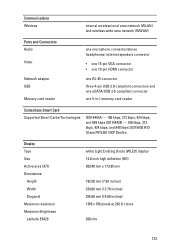
Communications Wireless internal wireless local area network (WLAN) and wireless wide area network (WWAN) Ports and Connectors Audio Video Network adapter USB Memory card reader one microphone connector/stereo headphones/ external speakers connector • one 15-pin VGA connector •... 424 kbps, and 848 kbps ISO15693 HID iClass FIPS201 NXP Desfire Display Type Size Active area (X/Y) Dimensions: Height Width Diagonal Maximum resolution Maximum Brightness Latitude E6420 white Light Emitting Diode (WLED) display 14.0 inch high definition (HD) 309.40 mm x 173.95 mm 192.50 mm (7.58 inches)...
Communications Wireless internal wireless local area network (WLAN) and wireless wide area network (WWAN) Ports and Connectors Audio Video Network adapter USB Memory card reader one microphone connector/stereo headphones/ external speakers connector • one 15-pin VGA connector •... 424 kbps, and 848 kbps ISO15693 HID iClass FIPS201 NXP Desfire Display Type Size Active area (X/Y) Dimensions: Height Width Diagonal Maximum resolution Maximum Brightness Latitude E6420 white Light Emitting Diode (WLED) display 14.0 inch high definition (HD) 309.40 mm x 173.95 mm 192.50 mm (7.58 inches)...

Owners Manual
Page 126
AC Adapter NOTE: 65 W AC adapter is available only for computers with 4-cell battery) Latitude E6420 ATG 26.90 mm to 32.40 mm (1.06 inches to 1.27 inches) 352.00 mm (13.86 inches) 241.00 mm (9.49 inches) 2.07 kg (4.... °F) 104 °F) NonOperating -40 °C to 70 °C (-40 °F -40 °C to 70 °C (-40 °F to 158 °F) to 158 °F) Physical Latitude E6420 Height Width Depth Weight (with integrated video card.
AC Adapter NOTE: 65 W AC adapter is available only for computers with 4-cell battery) Latitude E6420 ATG 26.90 mm to 32.40 mm (1.06 inches to 1.27 inches) 352.00 mm (13.86 inches) 241.00 mm (9.49 inches) 2.07 kg (4.... °F) 104 °F) NonOperating -40 °C to 70 °C (-40 °F -40 °C to 70 °C (-40 °F to 158 °F) to 158 °F) Physical Latitude E6420 Height Width Depth Weight (with integrated video card.
Owners Manual
Page 133
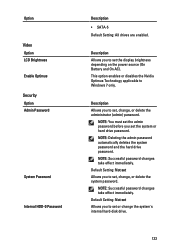
... or change the system's internal hard-disk drive. 133 Default Setting: Not set Allows you to set , change , or delete the administrator (admin) password. Option Video Option LCD Brightness Enable Optimus Security Option Admin Password System Password Internal HDD-0 Password Description • SATA-5 Default Setting: All drives are enabled. NOTE: You...
... or change the system's internal hard-disk drive. 133 Default Setting: Not set Allows you to set , change , or delete the administrator (admin) password. Option Video Option LCD Brightness Enable Optimus Security Option Admin Password System Password Internal HDD-0 Password Description • SATA-5 Default Setting: All drives are enabled. NOTE: You...
Owners Manual
Page 141
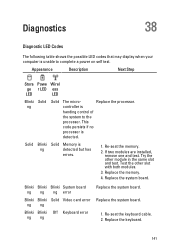
... ess LED LED Blinki ng Solid Solid The micro- Replace the system board. Blinki Blinki Blinki System board ng ng ng error Blinki Blinki Solid Video card error ng ng Blinki Blinki Off Keyboard error ng ng Replace the system board. Re-seat the keyboard cable. 2. controller is detected. Re-seat...
... ess LED LED Blinki ng Solid Solid The micro- Replace the system board. Blinki Blinki Blinki System board ng ng ng error Blinki Blinki Solid Video card error ng ng Blinki Blinki Off Keyboard error ng ng Replace the system board. Re-seat the keyboard cable. 2. controller is detected. Re-seat...
Owners Manual
Page 142
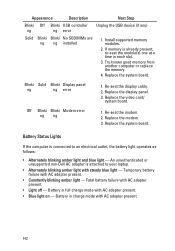
... Replace the system board. Replace the modem. 3. Re-seat the modem. 2. An unauthenticated or unsupported non-Dell AC adapter is already present, re-seat the module(s) one at a time in each slot. 3. Replace the video card/ system board. Re-seat the display cable. 2. Appearance Description Next Step Blinki Off Blinki USB controller...
... Replace the system board. Replace the modem. 3. Re-seat the modem. 2. An unauthenticated or unsupported non-Dell AC adapter is already present, re-seat the module(s) one at a time in each slot. 3. Replace the video card/ system board. Re-seat the display cable. 2. Appearance Description Next Step Blinki Off Blinki USB controller...


