
User Manual
Page 2
... environment, such as a closed briefcase, while it is normal and does not indicate a problem with the fan or the computer. Installing the Handle Assembly 1. ExpressCard slot 14. touchpad buttons (2) 18. device status lights Figure 2. modem connector 4. 13. fingerprint reader 15. contactless smart card... buttons (3) 20. trackstick 21. Back view 1. security cable slot 3. USB 2.0 connector 8. audio connector 10. Do not store your Dell computer in the air vents. Restricting the airflow can damage the computer or cause a fire. The computer turns on the fan when the...
... environment, such as a closed briefcase, while it is normal and does not indicate a problem with the fan or the computer. Installing the Handle Assembly 1. ExpressCard slot 14. touchpad buttons (2) 18. device status lights Figure 2. modem connector 4. 13. fingerprint reader 15. contactless smart card... buttons (3) 20. trackstick 21. Back view 1. security cable slot 3. USB 2.0 connector 8. audio connector 10. Do not store your Dell computer in the air vents. Restricting the airflow can damage the computer or cause a fire. The computer turns on the fan when the...

User Manual
Page 3
...connector, not the cable itself, and pull firmly but gently to avoid damaging the cable. Use the screws to tighten and secure the handle assembly to avoid damaging the cable. WARNING: The AC adapter works with your computer. Quick Setup WARNING: Before you follow the angle ...the safety information that you begin any of the connector on the AC adapter to the computer. Place the handle assembly into the slots. For additional best practices information, see www.dell.com/regulatory_compliance. NOTE: Some devices may cause fire or equipment damage. CAUTION: When you did not order...
...connector, not the cable itself, and pull firmly but gently to avoid damaging the cable. Use the screws to tighten and secure the handle assembly to avoid damaging the cable. WARNING: The AC adapter works with your computer. Quick Setup WARNING: Before you follow the angle ...the safety information that you begin any of the connector on the AC adapter to the computer. Place the handle assembly into the slots. For additional best practices information, see www.dell.com/regulatory_compliance. NOTE: Some devices may cause fire or equipment damage. CAUTION: When you did not order...

Owners Manual
Page 3
... Your Computer 9 Recommended Tools...10 Turning Off Your Computer 11 After Working Inside Your Computer 11 2 ATG Handle 13 Removing The ATG Handle 13 Installing The ATG Handle 14 3 ATG Port Cover 15 Removing the ATG Port Cover 15 Installing The ATG Port Cover 16 4 Modem Connector Plug 17 Removing the Modem Connector Plug 17 Installing the Modem Connector...
... Your Computer 9 Recommended Tools...10 Turning Off Your Computer 11 After Working Inside Your Computer 11 2 ATG Handle 13 Removing The ATG Handle 13 Installing The ATG Handle 14 3 ATG Port Cover 15 Removing the ATG Port Cover 15 Installing The ATG Port Cover 16 4 Modem Connector Plug 17 Removing the Modem Connector Plug 17 Installing the Modem Connector...

Owners Manual
Page 9
...purchased separately--installed by its metal mounting bracket. if you disconnect a cable, pull on its connector or on its pins. CAUTION: Handle components and cards with locking tabs; CAUTION: When you are correctly oriented and aligned. 9 Also, before you pull connectors apart, ...keep them evenly aligned to servicing that is not authorized by Dell is not covered by a certified service technician. Read and follow the safety instructions that both connectors are disconnecting this document assumes ...
...purchased separately--installed by its metal mounting bracket. if you disconnect a cable, pull on its connector or on its pins. CAUTION: Handle components and cards with locking tabs; CAUTION: When you are correctly oriented and aligned. 9 Also, before you pull connectors apart, ...keep them evenly aligned to servicing that is not authorized by Dell is not covered by a certified service technician. Read and follow the safety instructions that both connectors are disconnecting this document assumes ...

Owners Manual
Page 13
Remove the screws that secure the ATG handle to the computer. 3. Follow the procedures in Before Working On Your Computer. 2. Remove the ATG handle out of the computer. 13 ATG Handle 2 Removing The ATG Handle 1.
Remove the screws that secure the ATG handle to the computer. 3. Follow the procedures in Before Working On Your Computer. 2. Remove the ATG handle out of the computer. 13 ATG Handle 2 Removing The ATG Handle 1.

Owners Manual
Page 14
Follow the procedures in After working inside your computer. 14 Installing The ATG Handle 1. Place the ATG handle and tighten the screws that secure it to the computer. 2.
Follow the procedures in After working inside your computer. 14 Installing The ATG Handle 1. Place the ATG handle and tighten the screws that secure it to the computer. 2.
Owners Manual
Page 27
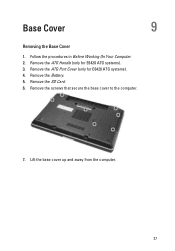
Base Cover 9 Removing the Base Cover 1. Remove the ATG Handle (only for E6420 ATG systems). 4. Remove the Battery. 5. Remove the screws that secure the base cover to the computer. 7. Lift the base cover up and away from the computer. 27 Remove the ATG Port Cover (only for E6420 ATG systems). 3. Remove the SD Card. 6. Follow the procedures in Before Working On Your Computer. 2.
Base Cover 9 Removing the Base Cover 1. Remove the ATG Handle (only for E6420 ATG systems). 4. Remove the Battery. 5. Remove the screws that secure the base cover to the computer. 7. Lift the base cover up and away from the computer. 27 Remove the ATG Port Cover (only for E6420 ATG systems). 3. Remove the SD Card. 6. Follow the procedures in Before Working On Your Computer. 2.

Owners Manual
Page 28
Place the base cover to the computer. 3. Tighten the screws that secure the base cover to align the screw holes correctly with the computer. 2. Install the Battery. 5. Follow the procedures in After Working Inside Your Computer. 28 Install the Secure Digital (SD) Card. 4. Install the ATG Handle (only for E6420 ATG systems). 6. Installing the Base Cover 1. Install the ATG Port Cover (only for E6420 ATG systems). 7.
Place the base cover to the computer. 3. Tighten the screws that secure the base cover to align the screw holes correctly with the computer. 2. Install the Battery. 5. Follow the procedures in After Working Inside Your Computer. 28 Install the Secure Digital (SD) Card. 4. Install the ATG Handle (only for E6420 ATG systems). 6. Installing the Base Cover 1. Install the ATG Port Cover (only for E6420 ATG systems). 7.
Owners Manual
Page 35
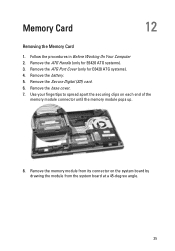
Remove the base cover. 7. Remove the ATG Port Cover (only for E6420 ATG systems). 3. Use your fingertips to spread apart the securing clips on the system board by drawing the module from the system board at a 45-degree angle. 35 Follow the procedures in Before Working On Your Computer 2. Remove the memory module from its connector on each end of the memory module connector until the memory module pops up. 8. Remove the Secure Digital (SD) card. 6. Memory Card 12 Removing the Memory Card 1. Remove the battery. 5. Remove the ATG Handle (only for E6420 ATG systems). 4.
Remove the base cover. 7. Remove the ATG Port Cover (only for E6420 ATG systems). 3. Use your fingertips to spread apart the securing clips on the system board by drawing the module from the system board at a 45-degree angle. 35 Follow the procedures in Before Working On Your Computer 2. Remove the memory module from its connector on each end of the memory module connector until the memory module pops up. 8. Remove the Secure Digital (SD) card. 6. Memory Card 12 Removing the Memory Card 1. Remove the battery. 5. Remove the ATG Handle (only for E6420 ATG systems). 4.

Owners Manual
Page 36
Install the Battery. 6. Install the ATG Port Cover (only for E6420 ATG systems). 8. Install the Base Cover. 4. Install the ATG Handle (only for E6420 ATG systems). 7. Install the Secure Digital (SD) card. 5. Follow the procedures in After Working Inside Your Computer. 36 Press the clips to secure the memory module to the system board. 3. Installing the Memory Card 1. Push the memory module into the memory slot. 2.
Install the Battery. 6. Install the ATG Port Cover (only for E6420 ATG systems). 8. Install the Base Cover. 4. Install the ATG Handle (only for E6420 ATG systems). 7. Install the Secure Digital (SD) card. 5. Follow the procedures in After Working Inside Your Computer. 36 Press the clips to secure the memory module to the system board. 3. Installing the Memory Card 1. Push the memory module into the memory slot. 2.

Owners Manual
Page 37
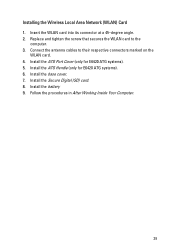
Wireless Local Area Network (WLAN) Card 13 Removing the Wireless Local Area Network (WLAN) Card 1. Remove the ATG Handle (only for E6420 ATG systems). 4. Remove the Secure Digital (SD) card. 6. Remove the screw that secures the WLAN card to the computer. 37 Remove the base cover. 7. Disconnect the antenna cables from the WLAN card. 8. Remove the battery. 5. Follow the procedures in Before Working On Your Computer. 2. Remove the ATG Port Cover (only for E6420 ATG systems). 3.
Wireless Local Area Network (WLAN) Card 13 Removing the Wireless Local Area Network (WLAN) Card 1. Remove the ATG Handle (only for E6420 ATG systems). 4. Remove the Secure Digital (SD) card. 6. Remove the screw that secures the WLAN card to the computer. 37 Remove the base cover. 7. Disconnect the antenna cables from the WLAN card. 8. Remove the battery. 5. Follow the procedures in Before Working On Your Computer. 2. Remove the ATG Port Cover (only for E6420 ATG systems). 3.
Owners Manual
Page 39
Replace and tighten the screw that secures the WLAN card to their respective connectors marked on the WLAN card. 4. Install the Secure Digital (SD) card. 8. Connect the antenna cables to the computer. 3. Install the ATG Handle (only for E6420 ATG systems). 5. Insert the WLAN card into its connector at a 45-degree angle. 2. Install the base cover. 7. Installing the Wireless Local Area Network (WLAN) Card 1. Follow the procedures in After Working Inside Your Computer. 39 Install the battery 9. Install the ATG Port Cover (only for E6420 ATG systems). 6.
Replace and tighten the screw that secures the WLAN card to their respective connectors marked on the WLAN card. 4. Install the Secure Digital (SD) card. 8. Connect the antenna cables to the computer. 3. Install the ATG Handle (only for E6420 ATG systems). 5. Insert the WLAN card into its connector at a 45-degree angle. 2. Install the base cover. 7. Installing the Wireless Local Area Network (WLAN) Card 1. Follow the procedures in After Working Inside Your Computer. 39 Install the battery 9. Install the ATG Port Cover (only for E6420 ATG systems). 6.
Owners Manual
Page 41
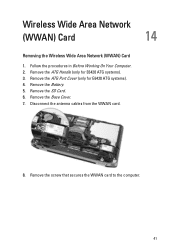
Follow the procedures in Before Working On Your Computer. 2. Disconnect the antenna cables from the WWAN card. 8. Remove the screw that secures the WWAN card to the computer. 41 Remove the Battery. 5. Remove the ATG Handle (only for E6420 ATG systems). 4. Remove the Base Cover. 7. Remove the ATG Port Cover (only for E6420 ATG systems). 3. Wireless Wide Area Network (WWAN) Card 14 Removing the Wireless Wide Area Network (WWAN) Card 1. Remove the SD Card. 6.
Follow the procedures in Before Working On Your Computer. 2. Disconnect the antenna cables from the WWAN card. 8. Remove the screw that secures the WWAN card to the computer. 41 Remove the Battery. 5. Remove the ATG Handle (only for E6420 ATG systems). 4. Remove the Base Cover. 7. Remove the ATG Port Cover (only for E6420 ATG systems). 3. Wireless Wide Area Network (WWAN) Card 14 Removing the Wireless Wide Area Network (WWAN) Card 1. Remove the SD Card. 6.

Owners Manual
Page 43
Replace and tighten the screw that secures the WWAN card to their respective connectors marked on the WWAN card. 4. Install the Base Cover. 5. Install the ATG Port Cover (only for E6420 ATG systems). 9. Install the ATG Handle (only for E6420 ATG systems). 8. Follow the procedures in After Working Inside Your Computer. 43 Install the Secure Digital (SD) Card. 6. Install the Battery. 7. Insert the WWAN card into its connector at a 45-degree angle. 2. Connect the antenna cables to the computer. 3. Installing the Wireless Wide Area Network (WWAN) Card 1.
Replace and tighten the screw that secures the WWAN card to their respective connectors marked on the WWAN card. 4. Install the Base Cover. 5. Install the ATG Port Cover (only for E6420 ATG systems). 9. Install the ATG Handle (only for E6420 ATG systems). 8. Follow the procedures in After Working Inside Your Computer. 43 Install the Secure Digital (SD) Card. 6. Install the Battery. 7. Insert the WWAN card into its connector at a 45-degree angle. 2. Connect the antenna cables to the computer. 3. Installing the Wireless Wide Area Network (WWAN) Card 1.

Owners Manual
Page 45
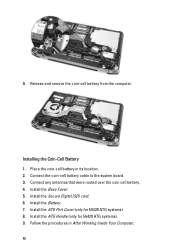
Remove the Battery. 5. Remove the Base Cover. 7. Remove the ATG Handle (only for E6420 ATG systems). 4. Disconnect any antennas routed over the coin cell battery. 8. Disconnect the coin-cell battery cable from the system board. 45 Remove the SD Card. 6. Follow the procedures in Before Working on Your Computer. 2. Coin-Cell Battery 15 Removing the Coin-Cell Battery 1. Remove the ATG Port Cover (only for E6420 ATG systems). 3.
Remove the Battery. 5. Remove the Base Cover. 7. Remove the ATG Handle (only for E6420 ATG systems). 4. Disconnect any antennas routed over the coin cell battery. 8. Disconnect the coin-cell battery cable from the system board. 45 Remove the SD Card. 6. Follow the procedures in Before Working on Your Computer. 2. Coin-Cell Battery 15 Removing the Coin-Cell Battery 1. Remove the ATG Port Cover (only for E6420 ATG systems). 3.
Owners Manual
Page 46
Release and remove the coin-cell battery from the computer. Install the ATG Port Cover (only for E6420 ATG systems). 9. Install the Secure Digital (SD) card. 6. Install the ATG Handle (only for E6420 ATG systems). 8. Install the Base Cover. 5. Place the coin-cell battery in After Working Inside Your Computer. 46 Install the Battery. 7. Follow the procedures in its location. 2. Connect the coin-cell battery cable to the system board. 3. Connect any antennas that were routed over the coin cell battery. 4. 9. Installing the Coin-Cell Battery 1.
Release and remove the coin-cell battery from the computer. Install the ATG Port Cover (only for E6420 ATG systems). 9. Install the Secure Digital (SD) card. 6. Install the ATG Handle (only for E6420 ATG systems). 8. Install the Base Cover. 5. Place the coin-cell battery in After Working Inside Your Computer. 46 Install the Battery. 7. Follow the procedures in its location. 2. Connect the coin-cell battery cable to the system board. 3. Connect any antennas that were routed over the coin cell battery. 4. 9. Installing the Coin-Cell Battery 1.

Owners Manual
Page 47
Disconnect the heat sink assembly cable. 8. Remove the ATG Handle (only for E6420 ATG systems). 4. Remove the SD Card. 6. Heat Sink 16 Removing The Heat Sink 1. Remove the Battery. 5. Remove the ATG Port Cover (only for E6420 ATG systems). 3. Loosen the screws securing the heat sink. 47 Follow the procedures in Before Working On Your Computer. 2. Remove the Base Cover. 7.
Disconnect the heat sink assembly cable. 8. Remove the ATG Handle (only for E6420 ATG systems). 4. Remove the SD Card. 6. Heat Sink 16 Removing The Heat Sink 1. Remove the Battery. 5. Remove the ATG Port Cover (only for E6420 ATG systems). 3. Loosen the screws securing the heat sink. 47 Follow the procedures in Before Working On Your Computer. 2. Remove the Base Cover. 7.
Owners Manual
Page 49
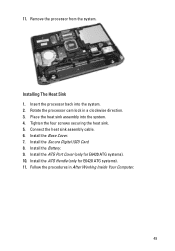
... processor back into the system. 4. Install the ATG Handle (only for E6420 ATG systems). 10. Rotate the processor cam lock in After Working Inside Your Computer. 49 Tighten the four screws securing the heat sink. 5. Install the Secure Digital (SD) Card. 8. Install the ATG Port Cover (only for E6420 ATG systems). 11. Follow the procedures in a clockwise...
... processor back into the system. 4. Install the ATG Handle (only for E6420 ATG systems). 10. Rotate the processor cam lock in After Working Inside Your Computer. 49 Tighten the four screws securing the heat sink. 5. Install the Secure Digital (SD) Card. 8. Install the ATG Port Cover (only for E6420 ATG systems). 11. Follow the procedures in a clockwise...

Owners Manual
Page 51
Remove the ATG Handle (only for E6420 ATG systems). 4. Remove the Secure Digital Card. 6. Remove the Hard Drive. 8. Bluetooth Card 17 Removing the Bluetooth Card 1. Remove the Battery. 5. Remove the screw that secures the bluetooth card to the computer 9. Follow the procedures in Before Working On Your Computer. 2. Remove the bluetooth card from the holder. 51 Remove the ATG Port Cover (only for E6420 ATG systems). 3. Remove the Base Cover. 7.
Remove the ATG Handle (only for E6420 ATG systems). 4. Remove the Secure Digital Card. 6. Remove the Hard Drive. 8. Bluetooth Card 17 Removing the Bluetooth Card 1. Remove the Battery. 5. Remove the screw that secures the bluetooth card to the computer 9. Follow the procedures in Before Working On Your Computer. 2. Remove the bluetooth card from the holder. 51 Remove the ATG Port Cover (only for E6420 ATG systems). 3. Remove the Base Cover. 7.

Owners Manual
Page 53
Install the SD Card. 6. Install the ATG Port Cover (only for E6420 ATG systems). 9. Follow the procedures in After Working Inside Your Computer. 53 Connect the bluetooth cable to the computer. 3. Install the Battery. 7. Install the Hard Drive. 4. Install the Base Cover. 5. Replace and tighten the screw to secure the bluetooth card to the bluetooth card. 2. Install the ATG Handle (only for E6420 ATG systems). 8. Installing the Bluetooth Card 1.
Install the SD Card. 6. Install the ATG Port Cover (only for E6420 ATG systems). 9. Follow the procedures in After Working Inside Your Computer. 53 Connect the bluetooth cable to the computer. 3. Install the Battery. 7. Install the Hard Drive. 4. Install the Base Cover. 5. Replace and tighten the screw to secure the bluetooth card to the bluetooth card. 2. Install the ATG Handle (only for E6420 ATG systems). 8. Installing the Bluetooth Card 1.

