E-Family Re-Image Guide
Page 5
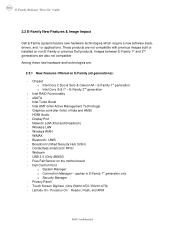
E-Family Reimage "How-To" Guide 2.2 E-Family New Features & Image Impact Dell E-Family systems feature new hardware technologies which require a new software stack, drivers, and / or applications. Chipset o Intel Core...Bluetooth / UWB - Privacy Panel - Touch Screen Digitizer (Only E6400 ATG / E6410 ATG) - Intel RAID Functionality - Intel Turbo Boost - E-Family 1st generation o Intel Core i5 & i7 - Display Port - USB 3.0 (Only M6500) - Wireless LAN - Broadcom Unified Security Hub (USH) - Latitude On / Precision On - Dell Control Point o System Manager o Connection ...
E-Family Reimage "How-To" Guide 2.2 E-Family New Features & Image Impact Dell E-Family systems feature new hardware technologies which require a new software stack, drivers, and / or applications. Chipset o Intel Core...Bluetooth / UWB - Privacy Panel - Touch Screen Digitizer (Only E6400 ATG / E6410 ATG) - Intel RAID Functionality - Intel Turbo Boost - E-Family 1st generation o Intel Core i5 & i7 - Display Port - USB 3.0 (Only M6500) - Wireless LAN - Broadcom Unified Security Hub (USH) - Latitude On / Precision On - Dell Control Point o System Manager o Connection ...
E-Family Re-Image Guide
Page 8
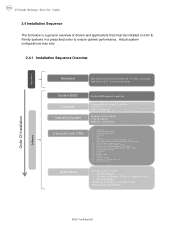
...Turbo Boost (only on Dell EFamily systems in a prescribed... (WWAN) 13. DCP • System Manager • Connection Manager - Intel Chipset 2. Dell Control Point Security Driver Pack. 10. Wireless Personal Area Network Adapter (UWB / WPAN) 12... - E-Family 1st generation only • Security Manager Latitude On & Precision On Reader & Flash Backup & Recovery Manager Dell Confidential E-Family Reimage "How-To" Guide 2.4 Installation Sequence.... Control Vault Firmware Applications Dell Control Point - Integrated Wired Network Controller & Intel PROSet Utility / Application 9. Touch...
...Turbo Boost (only on Dell EFamily systems in a prescribed... (WWAN) 13. DCP • System Manager • Connection Manager - Intel Chipset 2. Dell Control Point Security Driver Pack. 10. Wireless Personal Area Network Adapter (UWB / WPAN) 12... - E-Family 1st generation only • Security Manager Latitude On & Precision On Reader & Flash Backup & Recovery Manager Dell Confidential E-Family Reimage "How-To" Guide 2.4 Installation Sequence.... Control Vault Firmware Applications Dell Control Point - Integrated Wired Network Controller & Intel PROSet Utility / Application 9. Touch...
E-Family Re-Image Guide
Page 10
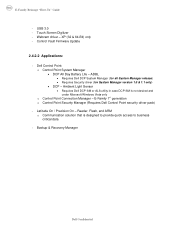
... (32 & 64-Bit) only - E-Family 1st generation o Control Point Security Manager (Requires Dell Control Point security driver pack) - E-Family Reimage "How-To" Guide - ADBL • Requires Dell DCP System Manager (for all System Manager release) • Requires Security driver (for System Manager... version 1.0 & 1.1 only) • DCP - Dell Control Point: o Control Point System Manager • DCP All Day Battery Life - Control Vault Firmware Update 2.4.2.2 Applications: - Touch Screen Digitizer - Latitude On / Precision On - Reader, Flash, and ARM o Communication...
... (32 & 64-Bit) only - E-Family 1st generation o Control Point Security Manager (Requires Dell Control Point security driver pack) - E-Family Reimage "How-To" Guide - ADBL • Requires Dell DCP System Manager (for all System Manager release) • Requires Security driver (for System Manager... version 1.0 & 1.1 only) • DCP - Dell Control Point: o Control Point System Manager • DCP All Day Battery Life - Control Vault Firmware Update 2.4.2.2 Applications: - Touch Screen Digitizer - Latitude On / Precision On - Reader, Flash, and ARM o Communication...
E-Family Re-Image Guide
Page 23
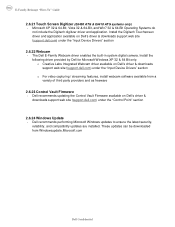
... 32 & 64 Bit only: o Creative Labs Integrated Webcam driver available on Dell's driver & downloads support web site (support.dell.com) under the "Control Point" section 2.6.24 Windows Update - E-Family Reimage "How-To" Guide 2.6.21 Touch Screen Digitizer (E6400 ATG & E6410 ATG systems only) - The Dell E-Family Webcam driver enables the built-in system digital camera. Microsoft XP...
... 32 & 64 Bit only: o Creative Labs Integrated Webcam driver available on Dell's driver & downloads support web site (support.dell.com) under the "Control Point" section 2.6.24 Windows Update - E-Family Reimage "How-To" Guide 2.6.21 Touch Screen Digitizer (E6400 ATG & E6410 ATG systems only) - The Dell E-Family Webcam driver enables the built-in system digital camera. Microsoft XP...
E-Family Re-Image Guide
Page 28
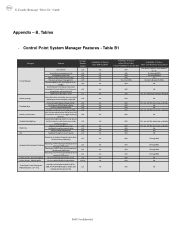
... user profiles v1.0 View battery manufacturer info. Keyboard backlighting options (to be able to set to enable/disable Privacy screen Privacy Screen - v1.0 (ADBL) Dell Enhanced Performance Plans (User Selectable Thermal Tables for sRGB, Pro Photo RGB/Kodak or Adobe color v1.3 RGB LED Displays...certain panels only) Availablity of Feature when only Windows OS installed? Yes Yes Yes Yes Yes Yes Availablity of Feature when Dell provides drivers/middleware, but with No screen pop-up display Yes N/A Yes, but No DCP N/A N/A N/A N/A Yes (Intel LOM) Availabilty of Feature when...
... user profiles v1.0 View battery manufacturer info. Keyboard backlighting options (to be able to set to enable/disable Privacy screen Privacy Screen - v1.0 (ADBL) Dell Enhanced Performance Plans (User Selectable Thermal Tables for sRGB, Pro Photo RGB/Kodak or Adobe color v1.3 RGB LED Displays...certain panels only) Availablity of Feature when only Windows OS installed? Yes Yes Yes Yes Yes Yes Availablity of Feature when Dell provides drivers/middleware, but with No screen pop-up display Yes N/A Yes, but No DCP N/A N/A N/A N/A Yes (Intel LOM) Availabilty of Feature when...
Replacing the System Board
Page 2
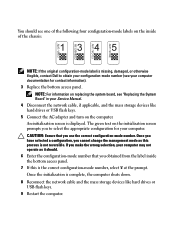
The green text on the initialization screen prompts you cannot change the management mode as it should see one of the chassis: NOTE: If the original configuration-mode label is missing, damaged, or otherwise illegible, contact Dell to select the appropriate configuration for contact information)....you have selected a configuration, you to obtain your configuration-mode number (see "Replacing the System Board" in your computer. An initialization screen is complete, the computer shuts down. 8 Reconnect the network cable and the mass storage devices like hard drives or USB flash keys....
The green text on the initialization screen prompts you cannot change the management mode as it should see one of the chassis: NOTE: If the original configuration-mode label is missing, damaged, or otherwise illegible, contact Dell to select the appropriate configuration for contact information)....you have selected a configuration, you to obtain your configuration-mode number (see "Replacing the System Board" in your computer. An initialization screen is complete, the computer shuts down. 8 Reconnect the network cable and the mass storage devices like hard drives or USB flash keys....
Setup and Quick Reference Guide
Page 16
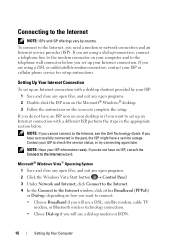
... any open files, and exit any open programs. 2 Double-click the ISP icon on the Microsoft® Windows® desktop. 3 Follow the instructions on the screen to the Internet, see the Dell Technology Guide. To connect to the Internet, you cannot connect to complete the setup.
... any open files, and exit any open programs. 2 Double-click the ISP icon on the Microsoft® Windows® desktop. 3 Follow the instructions on the screen to the Internet, see the Dell Technology Guide. To connect to the Internet, you cannot connect to complete the setup.

Setup and Quick Reference Guide
Page 17
Setting Up Your Computer 17 Otherwise, follow the instructions on the screen by your ISP to complete the setup. NOTE: If you do not know which type of Internet service providers... from a list of connection to select, click Help me choose or contact your ISP. 5 Follow the instructions on the screen and use the setup information provided by the Windows Easy Transfer wizard. If you have already obtained setup information from your ISP.... • If you selected Set up my connection manually in progress. 4 Follow the instructions provided on the screen to complete the setup.
Setting Up Your Computer 17 Otherwise, follow the instructions on the screen by your ISP to complete the setup. NOTE: If you do not know which type of Internet service providers... from a list of connection to select, click Help me choose or contact your ISP. 5 Follow the instructions on the screen and use the setup information provided by the Windows Easy Transfer wizard. If you have already obtained setup information from your ISP.... • If you selected Set up my connection manually in progress. 4 Follow the instructions provided on the screen to complete the setup.

Setup and Quick Reference Guide
Page 18
...8594; All Programs→ Accessories→ System Tools→ Files and Settings Transfer Wizard. 2 When the Files and Settings Transfer Wizard welcome screen appears, click Next. 3 On the Which computer is optional and may not be included with certain computers. For transferring information to a new... new computer by directly connecting a serial cable to the input/output (I will use the wizard from a source computer to Microsoft Windows XP screen, click Perform additional tasks. 3 Under What do ?, click Transfer files and settings→ Next. 18 Setting Up Your Computer NOTE: You ...
...8594; All Programs→ Accessories→ System Tools→ Files and Settings Transfer Wizard. 2 When the Files and Settings Transfer Wizard welcome screen appears, click Next. 3 On the Which computer is optional and may not be included with certain computers. For transferring information to a new... new computer by directly connecting a serial cable to the input/output (I will use the wizard from a source computer to Microsoft Windows XP screen, click Perform additional tasks. 3 Under What do ?, click Transfer files and settings→ Next. 18 Setting Up Your Computer NOTE: You ...
Setup and Quick Reference Guide
Page 19
...new computer. 4 On the Which computer is this ? To transfer data to the new computer: 1 On the Now go to your old computer screen on the new computer, click Next. 2 On the Where are the files and settings? Running the Files and Settings Transfer Wizard Without the Operating ...Next. 5 Insert the removable media, such as a writable CD, and click OK. To create a wizard disk, use your settings and files and click Next. screen, click I want to create a Wizard Disk in the following steps: 1 Open the Files and Settings Transfer Wizard: click Start→ All Programs→ Accessories&#...
...new computer. 4 On the Which computer is this ? To transfer data to the new computer: 1 On the Now go to your old computer screen on the new computer, click Next. 2 On the Where are the files and settings? Running the Files and Settings Transfer Wizard Without the Operating ...Next. 5 Insert the removable media, such as a writable CD, and click OK. To create a wizard disk, use your settings and files and click Next. screen, click I want to create a Wizard Disk in the following steps: 1 Open the Files and Settings Transfer Wizard: click Start→ All Programs→ Accessories&#...
Setup and Quick Reference Guide
Page 20
... Computer→ Next. 5 On the Select a transfer method screen, click the transfer method you want to transfer? screen, select the items you prefer. 6 On the What do not click Next. 7 Go to the Dell™ Knowledge Base document may not be available in certain countries. 20 Setting Up ...Open field on the appropriate removable media) and click OK. 3 On the Files and Settings Transfer Wizard welcome screen, click Next. 4 On the Which computer is this procedure, search support.dell.com for document #154781 (What Are The Different Methods To Transfer Files From My Old Computer To My New...
... Computer→ Next. 5 On the Select a transfer method screen, click the transfer method you want to transfer? screen, select the items you prefer. 6 On the What do not click Next. 7 Go to the Dell™ Knowledge Base document may not be available in certain countries. 20 Setting Up ...Open field on the appropriate removable media) and click OK. 3 On the Files and Settings Transfer Wizard welcome screen, click Next. 4 On the Which computer is this procedure, search support.dell.com for document #154781 (What Are The Different Methods To Transfer Files From My Old Computer To My New...
Setup and Quick Reference Guide
Page 41
... From the Dell Drivers and Utilities Media 1 Insert the Drivers and Utilities media. 2 Shut down your computer and try again. Select Diagnostics from the diagnostics utility partition on your hard drive, and follow the instructions on the screen. On the next start-up, the computer ... appears and press . 5 Type 1 to start menu and press . When the DELL logo appears, press immediately. Starting the Dell Diagnostics From Your Hard Drive NOTE: If your computer cannot display a screen image, see "Contacting Dell" on page 65. 1 Ensure that the computer is connected to an electrical outlet...
... From the Dell Drivers and Utilities Media 1 Insert the Drivers and Utilities media. 2 Shut down your computer and try again. Select Diagnostics from the diagnostics utility partition on your hard drive, and follow the instructions on the screen. On the next start-up, the computer ... appears and press . 5 Type 1 to start menu and press . When the DELL logo appears, press immediately. Starting the Dell Diagnostics From Your Hard Drive NOTE: If your computer cannot display a screen image, see "Contacting Dell" on page 65. 1 Ensure that the computer is connected to an electrical outlet...

Setup and Quick Reference Guide
Page 42
...). • If a device does not work, ensure that the device is properly connected. • If an error message appears on the screen, write down the exact message. Troubleshooting Tips Follow these tips when troubleshooting your computer: • If you want to run, and follow the ...cable and front panel cable are turned on. • Ensure that the electrical outlet is working by testing it with your computer. 7 When the Dell Diagnostics Main Menu appears, select the test that you added or removed a part before the problem started, review the installation procedures and ensure that the...
...). • If a device does not work, ensure that the device is properly connected. • If an error message appears on the screen, write down the exact message. Troubleshooting Tips Follow these tips when troubleshooting your computer: • If you want to run, and follow the ...cable and front panel cable are turned on. • Ensure that the electrical outlet is working by testing it with your computer. 7 When the Dell Diagnostics Main Menu appears, select the test that you added or removed a part before the problem started, review the installation procedures and ensure that the...

Setup and Quick Reference Guide
Page 45
... Panel→ Programs→ Use an older program with this version of Windows. 2 In the welcome screen, click Next. 3 Follow the instructions on the screen. Windows XP: The Program Compatibility Wizard configures a program so that it runs in an environment similar to...environments. 1 Click Start→ All Programs→ Accessories→ Program Compatibility Wizard→ Next. 2 Follow the instructions on the screen. Troubleshooting 45 If necessary, uninstall and then reinstall the program. A program stops responding END THE PROGRAM - 1 Press simultaneously to access...
... Panel→ Programs→ Use an older program with this version of Windows. 2 In the welcome screen, click Next. 3 Follow the instructions on the screen. Windows XP: The Program Compatibility Wizard configures a program so that it runs in an environment similar to...environments. 1 Click Start→ All Programs→ Accessories→ Program Compatibility Wizard→ Next. 2 Follow the instructions on the screen. Troubleshooting 45 If necessary, uninstall and then reinstall the program. A program stops responding END THE PROGRAM - 1 Press simultaneously to access...
Setup and Quick Reference Guide
Page 47
.... • View the Dell Support Utility settings. • Access the help file for the Dell Support Utility, and view Dell Support settings. Clicking the Dell Support Icon Click or right...Click Start→ All Programs→ Dell Support→ Dell Support Settings. 2 Ensure that the Show icon on the taskbar option is customized for the Dell Support Utility. • View frequently ... Dell Support Utility. • Turn off the Dell Support Utility. Double-Clicking the Dell Support Icon Double-click the icon to support.dell.com and download the software. For more about the Dell ...
.... • View the Dell Support Utility settings. • Access the help file for the Dell Support Utility, and view Dell Support settings. Clicking the Dell Support Icon Click or right...Click Start→ All Programs→ Dell Support→ Dell Support Settings. 2 Ensure that the Show icon on the taskbar option is customized for the Dell Support Utility. • View frequently ... Dell Support Utility. • Turn off the Dell Support Utility. Double-Clicking the Dell Support Icon Double-click the icon to support.dell.com and download the software. For more about the Dell ...
Setup and Quick Reference Guide
Page 51
... in your computer. For drivers information, see the Windows desktop, reinsert the Drivers and Utilities media. 5 At the Welcome Dell System Owner screen, click Next. Manually Reinstalling Drivers After extracting the driver files to your administrator to reinstall and follow the prompts on the... screen. If you installed additional hardware, the drivers for hardware that are not displayed, exit the Drivers and Utilities program. A ...
... in your computer. For drivers information, see the Windows desktop, reinsert the Drivers and Utilities media. 5 At the Welcome Dell System Owner screen, click Next. Manually Reinstalling Drivers After extracting the driver files to your administrator to reinstall and follow the prompts on the... screen. If you installed additional hardware, the drivers for hardware that are not displayed, exit the Drivers and Utilities program. A ...

Setup and Quick Reference Guide
Page 53
...Restore NOTICE: Before you restore the computer to an earlier time or Create a restore point. 3 Click Next and follow the remaining prompts on -screen prompts. NOTICE: Make regular backups of your data files or recover them. Starting System Restore Windows Vista: 1 Click Start . 2 In the... Start Search box, type System Restore and press . otherwise, contact your Dell™ computer to continue the desired action. 3 Click Next and follow the remaining on the screen. NOTE: Set your administrator to the Windows Classic view. If you may undo the last system ...
...Restore NOTICE: Before you restore the computer to an earlier time or Create a restore point. 3 Click Next and follow the remaining prompts on -screen prompts. NOTICE: Make regular backups of your data files or recover them. Starting System Restore Windows Vista: 1 Click Start . 2 In the... Start Search box, type System Restore and press . otherwise, contact your Dell™ computer to continue the desired action. 3 Click Next and follow the remaining on the screen. NOTE: Set your administrator to the Windows Classic view. If you may undo the last system ...
Setup and Quick Reference Guide
Page 55
...options, log on page 50. NOTE: Depending upon your configuration, you want to the factory condition, then click Next. The Dell Factory Image Restore welcome screen appears. 6 Click Next. NOTICE: If you do not want to continue reformatting the hard drive and restoring the system software ...with Factory Image Restore, click Cancel. 7 Click the checkbox to confirm that you may take 5 or more minutes to select Dell Factory Tools, then Dell Factory Image Restore. The restore process begins and may need to complete. If Device Driver Rollback does not resolve the problem, use...
...options, log on page 50. NOTE: Depending upon your configuration, you want to the factory condition, then click Next. The Dell Factory Image Restore welcome screen appears. 6 Click Next. NOTICE: If you do not want to continue reformatting the hard drive and restoring the system software ...with Factory Image Restore, click Cancel. 7 Click the checkbox to confirm that you may take 5 or more minutes to select Dell Factory Tools, then Dell Factory Image Restore. The restore process begins and may need to complete. If Device Driver Rollback does not resolve the problem, use...
Setup and Quick Reference Guide
Page 56
...the boot sequence for one time only. See "Using Microsoft® Windows® System Restore" on your primary hard drive. Depending on the screen to complete the installation. 56 Reinstalling Software On the next start-up all data files on page 52. For conventional hard drive configurations, the...-ROM, and follow the instructions on the region from which you ordered your computer, or whether you requested the media, the Dell Drivers and Utilities media and Dell Operating System media may not ship with your computer. To reinstall Windows, you installed the new device driver.
...the boot sequence for one time only. See "Using Microsoft® Windows® System Restore" on your primary hard drive. Depending on the screen to complete the installation. 56 Reinstalling Software On the next start-up all data files on page 52. For conventional hard drive configurations, the...-ROM, and follow the instructions on the region from which you ordered your computer, or whether you requested the media, the Dell Drivers and Utilities media and Dell Operating System media may not ship with your computer. To reinstall Windows, you installed the new device driver.
Setup and Quick Reference Guide
Page 69
...customer service, 60 System Restore, 52 enabling, 54 T transferring information to a new computer, 17 troubleshooting, 31, 58 blue screen, 45 computer not responding, 44 Dell Diagnostics, 40 error messages, 33 memory, 43 power, 42 power light conditions, 42 power lights, 31 program crashes, 44 ...programs and Windows compatibility, 45 restore to previous state, 52 software, 44-46 tips, 42 W Windows License label, 58 Windows Vista Dell Factory Image Restore, 54-55 Device Driver Rollback, 50 Program Compatibility wizard, 45 reinstalling, 57 returning to a previous device driver version, 50...
...customer service, 60 System Restore, 52 enabling, 54 T transferring information to a new computer, 17 troubleshooting, 31, 58 blue screen, 45 computer not responding, 44 Dell Diagnostics, 40 error messages, 33 memory, 43 power, 42 power light conditions, 42 power lights, 31 program crashes, 44 ...programs and Windows compatibility, 45 restore to previous state, 52 software, 44-46 tips, 42 W Windows License label, 58 Windows Vista Dell Factory Image Restore, 54-55 Device Driver Rollback, 50 Program Compatibility wizard, 45 reinstalling, 57 returning to a previous device driver version, 50...

