
Quick Reference Guide
Page 25
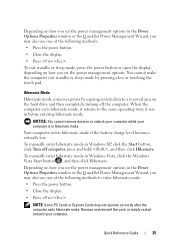
... the display, depending on how you set the power management options. Your computer enters hibernate mode if the battery charge level becomes critically low. To manually enter hibernate mode in Windows XP, click the Start button, click Turn off the computer. Quick Reference Guide 25 To... manually enter hibernate mode in Windows Vista, click the Windows Vista Start button , and then click Hibernate. NOTE: Some PC Cards or Express Cards may not ...
... the display, depending on how you set the power management options. Your computer enters hibernate mode if the battery charge level becomes critically low. To manually enter hibernate mode in Windows XP, click the Start button, click Turn off the computer. Quick Reference Guide 25 To... manually enter hibernate mode in Windows Vista, click the Windows Vista Start button , and then click Hibernate. NOTE: Some PC Cards or Express Cards may not ...

User's Guide
Page 44
...Properties Windows XP Click the Start button, point to enter hibernate mode: • Press the power button. • Close the display. • Press . To manually enter hibernate mode in Windows XP, click the Start button, click Turn off computer, press and hold , and then click Hibernate. Depending on hibernate mode... Wizard or Windows Power Options Properties to exit hibernate mode. The computer may not operate correctly after the computer exits hibernate mode. To manually enter hibernate mode in Windows Vista, click the Windows Vista Start button , and then click Hibernate.
...Properties Windows XP Click the Start button, point to enter hibernate mode: • Press the power button. • Close the display. • Press . To manually enter hibernate mode in Windows XP, click the Start button, click Turn off computer, press and hold , and then click Hibernate. Depending on hibernate mode... Wizard or Windows Power Options Properties to exit hibernate mode. The computer may not operate correctly after the computer exits hibernate mode. To manually enter hibernate mode in Windows Vista, click the Windows Vista Start button , and then click Hibernate.

User's Guide
Page 45
...: You must remove all external cables from the wall connector and computer, and remove any other computers with your computer. NOTE: With Dell™ ExpressCharge™, when the computer is turned off the computer, disconnect the AC adapter from the electrical outlet and the computer, disconnect... to an electrical outlet, the computer checks the battery charge and temperature. For information about resolving problems with a battery, see the Service Manual for as long as you like. Charging the Battery When you connect the computer to an electrical outlet or install a battery while the...
...: You must remove all external cables from the wall connector and computer, and remove any other computers with your computer. NOTE: With Dell™ ExpressCharge™, when the computer is turned off the computer, disconnect the AC adapter from the electrical outlet and the computer, disconnect... to an electrical outlet, the computer checks the battery charge and temperature. For information about resolving problems with a battery, see the Service Manual for as long as you like. Charging the Battery When you connect the computer to an electrical outlet or install a battery while the...
User's Guide
Page 101
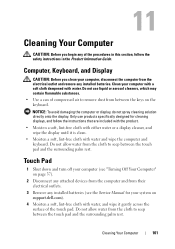
... clean your computer, disconnect the computer from the electrical outlet and remove any installed batteries. Clean your computer (see "Turning Off Your Computer" on support.dell.com). 4 Moisten a soft, lint-free cloth with water, and wipe it is clean. • Moisten a soft, lint-free cloth with water and wipe the ...with the product. • Moisten a soft, lint-free cloth with water. Computer, Keyboard, and Display CAUTION: Before you begin any installed batteries (see the Service Manual for cleaning displays, and follow the safety instructions in the Product Information Guide.
... clean your computer, disconnect the computer from the electrical outlet and remove any installed batteries. Clean your computer (see "Turning Off Your Computer" on support.dell.com). 4 Moisten a soft, lint-free cloth with water, and wipe it is clean. • Moisten a soft, lint-free cloth with water and wipe the ...with the product. • Moisten a soft, lint-free cloth with water. Computer, Keyboard, and Display CAUTION: Before you begin any installed batteries (see the Service Manual for cleaning displays, and follow the safety instructions in the Product Information Guide.
User's Guide
Page 108
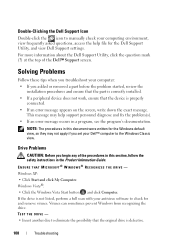
...: The procedures in this section, follow the safety instructions in the Product Information Guide. This message may not apply if you set your Dell™ computer to the Windows Classic view. Windows XP: • Click Start and click My Computer. TEST THE DRIVE - •... Support screen. Windows Vista®: • Click the Windows Vista Start button and click Computer. Double-Clicking the Dell Support Icon Double-click the icon to manually check your computing environment, view frequently asked questions, access the help support personnel diagnose and fix the problem(s). •...
...: The procedures in this section, follow the safety instructions in the Product Information Guide. This message may not apply if you set your Dell™ computer to the Windows Classic view. Windows XP: • Click Start and click My Computer. TEST THE DRIVE - •... Support screen. Windows Vista®: • Click the Windows Vista Start button and click Computer. Double-Clicking the Dell Support Icon Double-click the icon to manually check your computing environment, view frequently asked questions, access the help support personnel diagnose and fix the problem(s). •...
User's Guide
Page 115
... R K L I G H T S O N T H E B A C K O F T H E C O M P U T E R - If necessary, install additional memory (see the Service Manual for your system on support.dell.com). • Reseat the memory modules to see if that the network cable is successfully communicating with the memory (see the Service... Manual for your system on support.dell.com). • Ensure that your computer is firmly inserted into the network connector on page 103). C H E C K T H E N E...
... R K L I G H T S O N T H E B A C K O F T H E C O M P U T E R - If necessary, install additional memory (see the Service Manual for your system on support.dell.com). • Reseat the memory modules to see if that the network cable is successfully communicating with the memory (see the Service... Manual for your system on support.dell.com). • Ensure that your computer is firmly inserted into the network connector on page 103). C H E C K T H E N E...
User's Guide
Page 116
... that the electrical outlet is in the Microsoft® Windows® XP and Microsoft Windows Vista® Operating Systems" on support.dell.com). 116 Troubleshooting Power Problems CAUTION: Before you begin any power strips being used are plugged into an electrical outlet and are correct...but an internal power problem may be malfunctioning or incorrectly installed. • Remove and then reinstall all memory modules (see the Service Manual for your network settings are turned on properly. • Ensure that any of the procedures in this section, follow the safety instructions...
... that the electrical outlet is in the Microsoft® Windows® XP and Microsoft Windows Vista® Operating Systems" on support.dell.com). 116 Troubleshooting Power Problems CAUTION: Before you begin any power strips being used are plugged into an electrical outlet and are correct...but an internal power problem may be malfunctioning or incorrectly installed. • Remove and then reinstall all memory modules (see the Service Manual for your network settings are turned on properly. • Ensure that any of the procedures in this section, follow the safety instructions...
User's Guide
Page 117
... in this section, follow the safety instructions in the Product Information Guide. NOTE: If you begin any expansion cards, including graphics cards (see the Service Manual for your printer, contact the printer's manufacturer. TE S T T H E E L E C T R I V E R - For a parallel printer, ensure that the printer cables are : • Power, ...the Print to the same electrical outlet Printer Problems CAUTION: Before you need technical assistance for your system on support.dell.com). See the printer documentation for setup and troubleshooting information. E L I M I N A T E I O N -
... in this section, follow the safety instructions in the Product Information Guide. NOTE: If you begin any expansion cards, including graphics cards (see the Service Manual for your printer, contact the printer's manufacturer. TE S T T H E E L E C T R I V E R - For a parallel printer, ensure that the printer cables are : • Power, ...the Print to the same electrical outlet Printer Problems CAUTION: Before you need technical assistance for your system on support.dell.com). See the printer documentation for setup and troubleshooting information. E L I M I N A T E I O N -
User's Guide
Page 130
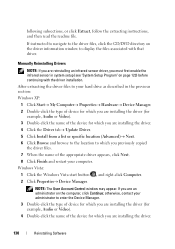
... driver appears, click Next. 8 Click Finish and restart your hard drive as described in system setup (see "System Setup Program" on the computer, click Continue; Manually Reinstalling Drivers NOTE: If you are reinstalling an infrared sensor driver, you must first enable the infrared sensor in the previous section: Windows XP: 1 Click...
... driver appears, click Next. 8 Click Finish and restart your hard drive as described in system setup (see "System Setup Program" on the computer, click Continue; Manually Reinstalling Drivers NOTE: If you are reinstalling an infrared sensor driver, you must first enable the infrared sensor in the previous section: Windows XP: 1 Click...

User's Guide
Page 134
... Restore Using PC Restore: 1 Turn on certain computers. NOTICE: If you received your operating system problem. NOTE: Do not manually shut down the computer. NOTE: Dell PC Restore by Symantec and Dell Factory Image Restore may not be available in time, let the computer finish starting, and then restart the computer again. Data...
... Restore Using PC Restore: 1 Turn on certain computers. NOTICE: If you received your operating system problem. NOTE: Do not manually shut down the computer. NOTE: Dell PC Restore by Symantec and Dell Factory Image Restore may not be available in time, let the computer finish starting, and then restart the computer again. Data...

User's Guide
Page 159
...radio or television reception, which can radiate radio frequency energy and, if not installed and used in accordance with the manufacturer's instruction manual, may not cause harmful interference. 2 This device must accept any interference received, including interference that changes or modifications not expressly ...approved by one or more of the FCC Rules. This equipment has been tested and found to Part 15 of Dell Inc. If this equipment. These limits are on , you are encouraged to try to provide reasonable protection against harmful interference in...
...radio or television reception, which can radiate radio frequency energy and, if not installed and used in accordance with the manufacturer's instruction manual, may not cause harmful interference. 2 This device must accept any interference received, including interference that changes or modifications not expressly ...approved by one or more of the FCC Rules. This equipment has been tested and found to Part 15 of Dell Inc. If this equipment. These limits are on , you are encouraged to try to provide reasonable protection against harmful interference in...
Service Manual
Page 1
... names may be used in the United States and/or other than its own. Trademarks used in this text: Dell, the DELL logo, Latitude, and Dell OpenManage are trademarks of Microsoft Corporation in this document to refer to either potential damage to hardware or loss of Intel...and trade names other countries. NOTICE: A NOTICE indicates either the entities claiming the marks and names or their products. Dell™ Latitude™ D530 Service Manual Before You Begin Internal Card With Bluetooth ® Wireless Technology Hard Drive Memory Module Modem Coin-Cell Battery Hinge Cover ...
... names may be used in the United States and/or other than its own. Trademarks used in this text: Dell, the DELL logo, Latitude, and Dell OpenManage are trademarks of Microsoft Corporation in this document to refer to either potential damage to hardware or loss of Intel...and trade names other countries. NOTICE: A NOTICE indicates either the entities claiming the marks and names or their products. Dell™ Latitude™ D530 Service Manual Before You Begin Internal Card With Bluetooth ® Wireless Technology Hard Drive Memory Module Modem Coin-Cell Battery Hinge Cover ...
Service Manual
Page 2
...turns off . Shut down . c. For the Microsoft Windows Vista® operating system: a. l You have performed the steps in the Dell™ Product Information Guide. Click the arrow in the lower-right corner of the procedures in reverse order. Do not touch the components or... noted, each procedure assumes that the computer and all open programs. b. Back to Contents Page Before You Begin Dell™ Latitude™ D530 Service Manual Recommended Tools Turning Off Your Computer Before Working Inside Your Computer This chapter provides procedures for about four seconds until ...
...turns off . Shut down . c. For the Microsoft Windows Vista® operating system: a. l You have performed the steps in the Dell™ Product Information Guide. Click the arrow in the lower-right corner of the procedures in reverse order. Do not touch the components or... noted, each procedure assumes that the computer and all open programs. b. Back to Contents Page Before You Begin Dell™ Latitude™ D530 Service Manual Recommended Tools Turning Off Your Computer Before Working Inside Your Computer This chapter provides procedures for about four seconds until ...
Service Manual
Page 4
After the download completes, double-click the BIOS utility file. 3. When the reboot message appears, click OK and wait for the computer to Contents Page Flashing the BIOS Dell™ Latitude™ D530 Service Manual 1. Back to restart. In the Dell BIOS Flash window, click Continue. 4. Download the BIOS utility from the Dell Support website at support.dell.com and save it to Contents Page Back to your desktop. 2.
After the download completes, double-click the BIOS utility file. 3. When the reboot message appears, click OK and wait for the computer to Contents Page Flashing the BIOS Dell™ Latitude™ D530 Service Manual 1. Back to restart. In the Dell BIOS Flash window, click Continue. 4. Download the BIOS utility from the Dell Support website at support.dell.com and save it to Contents Page Back to your desktop. 2.
Service Manual
Page 5
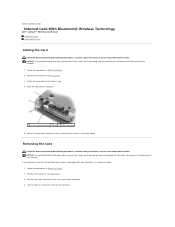
... connector out of the computer. 1. Pull the cable to the wireless card. 4. Back to Contents Page Internal Card With Bluetooth® Wireless Technology Dell™ Latitude™ D530 Service Manual Adding the Card Removing the Card Adding the Card CAUTION: Before performing the following procedures, read the safety instructions in your Product Information Guide...
... connector out of the computer. 1. Pull the cable to the wireless card. 4. Back to Contents Page Internal Card With Bluetooth® Wireless Technology Dell™ Latitude™ D530 Service Manual Adding the Card Removing the Card Adding the Card CAUTION: Before performing the following procedures, read the safety instructions in your Product Information Guide...
Service Manual
Page 7
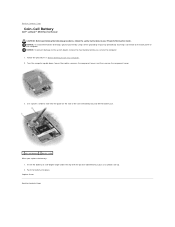
Back to Contents Page Coin-Cell Battery Dell™ Latitude™ D530 Service Manual CAUTION: Before performing the following procedures, follow the safety instructions in Before Working Inside Your Computer. 2. NOTICE: To prevent damage to the system board, remove ...
Back to Contents Page Coin-Cell Battery Dell™ Latitude™ D530 Service Manual CAUTION: Before performing the following procedures, follow the safety instructions in Before Working Inside Your Computer. 2. NOTICE: To prevent damage to the system board, remove ...
Service Manual
Page 8
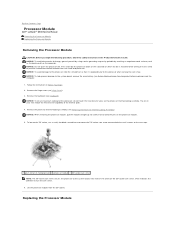
... capability of microprocessor 2 processor module 3 ZIF-socket cam screw NOTE: The ZIF-socket cam screw secures the processor to Contents Page Processor Module Dell™ Latitude™ D530 Service Manual Removing the Processor Module Replacing the Processor Module Removing the Processor Module CAUTION: Before you begin the following procedure, follow the safety instructions in...
... capability of microprocessor 2 processor module 3 ZIF-socket cam screw NOTE: The ZIF-socket cam screw secures the processor to Contents Page Processor Module Dell™ Latitude™ D530 Service Manual Removing the Processor Module Replacing the Processor Module Removing the Processor Module CAUTION: Before you begin the following procedure, follow the safety instructions in...
Service Manual
Page 10
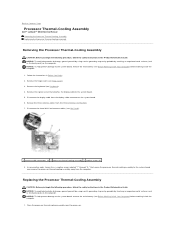
... connector on the system board. 6. Remove the captive screw that secure the processor thermal-cooling assembly to Contents Page Processor Thermal-Cooling Assembly Dell™ Latitude™ D530 Service Manual Removing the Processor Thermal-Cooling Assembly Replacing the Processor Thermal-Cooling Assembly Removing the Processor Thermal-Cooling Assembly CAUTION: Before you begin the following...
... connector on the system board. 6. Remove the captive screw that secure the processor thermal-cooling assembly to Contents Page Processor Thermal-Cooling Assembly Dell™ Latitude™ D530 Service Manual Removing the Processor Thermal-Cooling Assembly Replacing the Processor Thermal-Cooling Assembly Removing the Processor Thermal-Cooling Assembly CAUTION: Before you begin the following...
Service Manual
Page 12
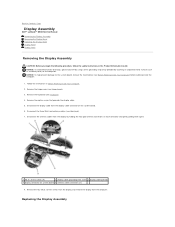
... main battery (see Before Working Inside Your Computer) before working inside the computer. 1. NOTICE: To help prevent damage to Contents Page Display Assembly Dell™ Latitude™ D530 Service Manual Removing the Display Assembly Removing the Display Bezel Replacing the Display Bezel Display Panel Display Latch Removing the Display Assembly CAUTION: Before you begin...
... main battery (see Before Working Inside Your Computer) before working inside the computer. 1. NOTICE: To help prevent damage to Contents Page Display Assembly Dell™ Latitude™ D530 Service Manual Removing the Display Assembly Removing the Display Bezel Replacing the Display Bezel Display Panel Display Latch Removing the Display Assembly CAUTION: Before you begin...
Service Manual
Page 17
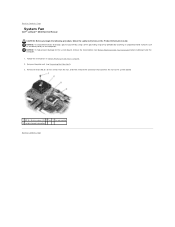
... to the system board 1 M2.5 x 5-mm screws (2) 2 fan 3 fan connector 4 system board connector Back to Contents Page Back to Contents Page System Fan Dell™ Latitude™ D530 Service Manual CAUTION: Before you begin the following procedure, follow the safety instructions in Before Working Inside Your Computer. 2. Remove the palm rest (see Before Working...
... to the system board 1 M2.5 x 5-mm screws (2) 2 fan 3 fan connector 4 system board connector Back to Contents Page Back to Contents Page System Fan Dell™ Latitude™ D530 Service Manual CAUTION: Before you begin the following procedure, follow the safety instructions in Before Working Inside Your Computer. 2. Remove the palm rest (see Before Working...


