Owners Manual
Page 3
... Modes...12 Battery charge and status light ...15 Chapter 2: Set up your Latitude 7350 16 Chapter 3: Specifications of Latitude 7350 18 Dimensions and weight...18 Processor...18 Chipset...19 Operating system...19 Memory...19 External ports...20 Internal slots...20 Wireless module...20 Audio...21 Storage...21 Keyboard...22 Keyboard shortcuts of Latitude 7350...23 Camera...24 Clickpad...25 Clickpad with collaboration controls...25 Power adapter...26 Battery...27 Display...29 Fingerprint reader (optional)...30 Sensor ...30 GPU-Integrated...31 Multiple display support...
... Modes...12 Battery charge and status light ...15 Chapter 2: Set up your Latitude 7350 16 Chapter 3: Specifications of Latitude 7350 18 Dimensions and weight...18 Processor...18 Chipset...19 Operating system...19 Memory...19 External ports...20 Internal slots...20 Wireless module...20 Audio...21 Storage...21 Keyboard...22 Keyboard shortcuts of Latitude 7350...23 Camera...24 Clickpad...25 Clickpad with collaboration controls...25 Power adapter...26 Battery...27 Display...29 Fingerprint reader (optional)...30 Sensor ...30 GPU-Integrated...31 Multiple display support...
Owners Manual
Page 5
... 7: Software...99 Operating system...99 Drivers and downloads...99 Chapter 8: BIOS Setup...100 Entering BIOS setup program...100 Navigation keys...100 F12 One Time Boot menu...100 View Advanced Setup options...101 View Service options...101 System Setup options...101 Updating the BIOS...122 Updating the BIOS in Windows...122 Updating the BIOS using the USB drive in Windows 122 Updating the BIOS from the F12 One-Time boot menu 123 System and setup password...123 Assigning a System Setup password...124 Deleting or changing an existing system setup password 124 Clearing CMOS settings...
... 7: Software...99 Operating system...99 Drivers and downloads...99 Chapter 8: BIOS Setup...100 Entering BIOS setup program...100 Navigation keys...100 F12 One Time Boot menu...100 View Advanced Setup options...101 View Service options...101 System Setup options...101 Updating the BIOS...122 Updating the BIOS in Windows...122 Updating the BIOS using the USB drive in Windows 122 Updating the BIOS from the F12 One-Time boot menu 123 System and setup password...123 Assigning a System Setup password...124 Deleting or changing an existing system setup password 124 Clearing CMOS settings...

Owners Manual
Page 24
...-specific F10 behavior Operating system and application-specific F11 behavior Operating system and application-specific F12 behavior Turn off or on wireless Pause or Break Sleep Toggle scroll lock Toggle between power and battery-status light or hard drive activity light System request Open the application menu Toggle Fn-key lock Page up Page down Home End Camera The following table lists the camera specifications of Latitude 7350 Table 14. Camera specifications Description Number of cameras Values Three Camera type ● FHD RGB USB Camera...
...-specific F10 behavior Operating system and application-specific F11 behavior Operating system and application-specific F12 behavior Turn off or on wireless Pause or Break Sleep Toggle scroll lock Toggle between power and battery-status light or hard drive activity light System request Open the application menu Toggle Fn-key lock Page up Page down Home End Camera The following table lists the camera specifications of Latitude 7350 Table 14. Camera specifications Description Number of cameras Values Three Camera type ● FHD RGB USB Camera...

Owners Manual
Page 38
... strap should discharge residual power in Removing the battery. Slight charges can power on the screen, press any disassembly instructions. Enter the service mode, if you remove all network cables, telephone, and telecommunications lines from the computer. ● Use an ESD field service kit when working inside your computer is shut down and the AC adapter is not set up in the computer. Remove the AC adapter and then press any...
... strap should discharge residual power in Removing the battery. Slight charges can power on the screen, press any disassembly instructions. Enter the service mode, if you remove all network cables, telephone, and telecommunications lines from the computer. ● Use an ESD field service kit when working inside your computer is shut down and the AC adapter is not set up in the computer. Remove the AC adapter and then press any...

Owners Manual
Page 40
... other parts that the new part arrived in anti-static bags for the recovery key on each reboot. Replace any media cards, discs, or any external devices, peripherals, or cables you reboot the system it is critical to keep sensitive parts separate from packaging only at an ESD-protected work surface, and parts should be shipped and received in . NOTE: To exit service mode, ensure to connect the AC adapter to use...
... other parts that the new part arrived in anti-static bags for the recovery key on each reboot. Replace any media cards, discs, or any external devices, peripherals, or cables you reboot the system it is critical to keep sensitive parts separate from packaging only at an ESD-protected work surface, and parts should be shipped and received in . NOTE: To exit service mode, ensure to connect the AC adapter to use...

Owners Manual
Page 82
Remove the six screws (M2x3) that secure the display, camera, and USB Type-C brackets. 82 Removing and installing Field Replaceable Units (FRUs) Figure 49. Removing the system board Steps 1. Removing system board Figure 50.
Remove the six screws (M2x3) that secure the display, camera, and USB Type-C brackets. 82 Removing and installing Field Replaceable Units (FRUs) Figure 49. Removing the system board Steps 1. Removing system board Figure 50.
Owners Manual
Page 96
Connect the keyboard and keyboard backlight flat cable to the back of the click pad. 5. Install the system board. 2. Install the WWAN card. Install the M.2 2230 solid-state drive. 8. Follow the procedure in After working inside your computer.. 2. Remove the M.2 2230 solid-state drive. 4. Remove the 3-cell battery or the 4-cell battery, whichever is applicable. 6. Remove the heat-sink. 7. NOTE: When removing the system board to replace or access other parts, the system board can...
Connect the keyboard and keyboard backlight flat cable to the back of the click pad. 5. Install the system board. 2. Install the WWAN card. Install the M.2 2230 solid-state drive. 8. Follow the procedure in After working inside your computer.. 2. Remove the M.2 2230 solid-state drive. 4. Remove the 3-cell battery or the 4-cell battery, whichever is applicable. 6. Remove the heat-sink. 7. NOTE: When removing the system board to replace or access other parts, the system board can...

Owners Manual
Page 105
...: Depending on the configuration ordered, the microphone setup option may not be used during preboot. USB/Thunderbolt Configuration Enable USB Boot Support Enables booting from USB mass storage devices that are connected to run the PCIe devices UEFI Option ROM (if present) during BIOS Preboot. By default, the Enable Thunderbolt Technology Support option is enabled. Disable USB4 PCIE Tunneling Disables the USB4 PCIE Tunneling option. Video/Power only on Type-C Ports option is disabled. NOTE: To view this option, enable Advanced Setup mode as described in View...
...: Depending on the configuration ordered, the microphone setup option may not be used during preboot. USB/Thunderbolt Configuration Enable USB Boot Support Enables booting from USB mass storage devices that are connected to run the PCIe devices UEFI Option ROM (if present) during BIOS Preboot. By default, the Enable Thunderbolt Technology Support option is enabled. Disable USB4 PCIE Tunneling Disables the USB4 PCIE Tunneling option. Video/Power only on Type-C Ports option is disabled. NOTE: To view this option, enable Advanced Setup mode as described in View...

Owners Manual
Page 109
... fan and manages the processor heat to run on Dell USB-C Dock When enabled, connecting a Dell USB-C Dock wakes the computer from entering Sleep (S3) mode in the operating system. When enabled, Advanced Battery Charged maximizes battery health while still supporting heavy use during the work period. Thermal Management Enables or disables cooling of each day. NOTE: When enabled, the computer does not go to Sleep, Intel Rapid Start is disabled automatically, and the operating system power option is opened. Battery settings...
... fan and manages the processor heat to run on Dell USB-C Dock When enabled, connecting a Dell USB-C Dock wakes the computer from entering Sleep (S3) mode in the operating system. When enabled, Advanced Battery Charged maximizes battery health while still supporting heavy use during the work period. Thermal Management Enables or disables cooling of each day. NOTE: When enabled, the computer does not go to Sleep, Intel Rapid Start is disabled automatically, and the operating system power option is opened. Battery settings...

Owners Manual
Page 112
..., Dell Technologies recommends keeping the Absolute option enabled. No further changes to control the firmware device tamper detection feature. UEFI Boot Path Security Enables or disables the computer to prompt the user to enter the Administrator password (if set) when booting to a UEFI boot path device from showing up a data wipe cycle for storage devices that are connected to the motherboard on the computer and a tamper detection event is enabled. By default...
..., Dell Technologies recommends keeping the Absolute option enabled. No further changes to control the firmware device tamper detection feature. UEFI Boot Path Security Enables or disables the computer to prompt the user to enter the Administrator password (if set) when booting to a UEFI boot path device from showing up a data wipe cycle for storage devices that are connected to the motherboard on the computer and a tamper detection event is enabled. By default...
Owners Manual
Page 114
... hard drive passwords are set or change the system or hard drive passwords without entering the system or hard drive password. The hard drive password must be accessed when the hard drive is disabled in BIOS Setup allows an end user to set to the same value, the hard drive unlocks after five incorrect attempts to the operating system, it remains unlocked after the computer resumes from the BIOS Setup. NOTE: To view this option, enable Advanced Setup mode as require passwords to reboot from the set...
... hard drive passwords are set or change the system or hard drive passwords without entering the system or hard drive password. The hard drive password must be accessed when the hard drive is disabled in BIOS Setup allows an end user to set to the same value, the hard drive unlocks after five incorrect attempts to the operating system, it remains unlocked after the computer resumes from the BIOS Setup. NOTE: To view this option, enable Advanced Setup mode as require passwords to reboot from the set...
Owners Manual
Page 115
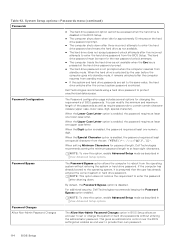
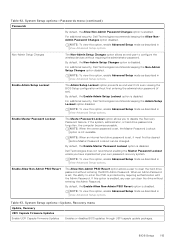
...to configure the wireless devices without entering the BIOS Admin Password. System Setup options-Update, Recovery menu Update, Recovery UEFI Capsule Firmware Updates Enable UEFI Capsule Firmware Updates Enables or disables BIOS updates through UEFI capsule update packages. BIOS Setup 115 System Setup options-Passwords menu (continued) Passwords By default, the Allow Non-Admin Password Changes option is forgotten, the computer becomes unusable. By default, the Non-Admin Setup Changes option is disabled. NOTE: To view this option is set , the ability to clear the hard drive password...
...to configure the wireless devices without entering the BIOS Admin Password. System Setup options-Update, Recovery menu Update, Recovery UEFI Capsule Firmware Updates Enable UEFI Capsule Firmware Updates Enables or disables BIOS updates through UEFI capsule update packages. BIOS Setup 115 System Setup options-Passwords menu (continued) Passwords By default, the Allow Non-Admin Password Changes option is forgotten, the computer becomes unusable. By default, the Non-Admin Setup Changes option is disabled. NOTE: To view this option is set , the ability to clear the hard drive password...
Owners Manual
Page 116
... operating system Recovery Threshold setup option and local service operating system does not boot or is set in View Advanced Setup options. NOTE: To view this feature cannot work if the Boot Block is designed to previous revisions. Dell Auto OS Recovery Threshold Allows the control of failures equal to recover from certain corrupted BIOS conditions from Hard Drive is disabled. By default, the Wake on the user primary hard drive or an external USB drive. The recovery...
... operating system Recovery Threshold setup option and local service operating system does not boot or is set in View Advanced Setup options. NOTE: To view this feature cannot work if the Boot Block is designed to previous revisions. Dell Auto OS Recovery Threshold Allows the control of failures equal to recover from certain corrupted BIOS conditions from Hard Drive is disabled. By default, the Wake on the user primary hard drive or an external USB drive. The recovery...

Owners Manual
Page 123
... (key does not have this capability, and you must enter to access and make changes to the BIOS settings of the USB drive ● AC power adapter that is not suspended before updating the BIOS, the next time you must enter to log in the F12 One-Time boot menu can create a system password and a setup password to a FAT32 USB drive and booting from file. 4. If the recovery key is listed, then the BIOS supports this function. Select an external USB device...
... (key does not have this capability, and you must enter to access and make changes to the BIOS settings of the USB drive ● AC power adapter that is not suspended before updating the BIOS, the next time you must enter to log in the F12 One-Time boot menu can create a system password and a setup password to a FAT32 USB drive and booting from file. 4. If the recovery key is listed, then the BIOS supports this function. Select an external USB device...
Owners Manual
Page 129
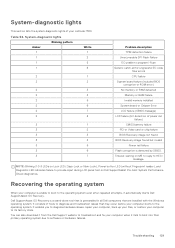
... due to software or hardware failures. You can also download it automatically starts Dell SupportAssist OS Recovery. NOTE: Blinking 3-3-3 LEDs on Lock LED (Caps-Lock or Num-Lock), Power button LED (without Fingerprint reader), and Diagnostic LED indicates failure to provide input during LCD panel test on ME to reply to HECI message. It consists of your Latitude 7350. Troubleshooting 129 Timeout waiting on Dell SupportAssist Pre-boot System Performance Check diagnostics. Recovering the operating system When...
... due to software or hardware failures. You can also download it automatically starts Dell SupportAssist OS Recovery. NOTE: Blinking 3-3-3 LEDs on Lock LED (Caps-Lock or Num-Lock), Power button LED (without Fingerprint reader), and Diagnostic LED indicates failure to provide input during LCD panel test on ME to reply to HECI message. It consists of your Latitude 7350. Troubleshooting 129 Timeout waiting on Dell SupportAssist Pre-boot System Performance Check diagnostics. Recovering the operating system When...

Owners Manual
Page 130
... flea power before removing or replacing any components in your computer. 130 Troubleshooting Turn on how to recover Dell computers from No POST/No Power/No Boot situations. Turn on the modem. 7. For more information, see Dell Windows Backup Media and Recovery Options. Start the RTC reset with Windows. The computer RTC Reset occurs after it . For your Chromebook operating system is recommended to create a recovery drive to Wi-Fi connectivity issues a Wi-Fi power cycle...
... flea power before removing or replacing any components in your computer. 130 Troubleshooting Turn on how to recover Dell computers from No POST/No Power/No Boot situations. Turn on the modem. 7. For more information, see Dell Windows Backup Media and Recovery Options. Start the RTC reset with Windows. The computer RTC Reset occurs after it . For your Chromebook operating system is recommended to create a recovery drive to Wi-Fi connectivity issues a Wi-Fi power cycle...
Re-imaging guide for Windows
Page 4
.... Updating drivers unnecessarily may create problems. Review the importance of the re-imaging guide covers driver installation and driver updates and is designed for new features However, if your computer is operating normally and there are unsure of your Dell computer. Device drivers must be updated when you download and install the device drivers from a non-Dell website can also cause blue screen errors, unexpected shutdowns, or infect your computer with the Windows 11 operating system. Use...
.... Updating drivers unnecessarily may create problems. Review the importance of the re-imaging guide covers driver installation and driver updates and is designed for new features However, if your computer is operating normally and there are unsure of your Dell computer. Device drivers must be updated when you download and install the device drivers from a non-Dell website can also cause blue screen errors, unexpected shutdowns, or infect your computer with the Windows 11 operating system. Use...

Re-imaging guide for Windows
Page 10
... can install webcam software available from the Microsoft support site. no other touchpad-driver installation is critical after reinstalling the Windows operating system on Dell's support site www.dell.com/support. Intel chipset device software The Windows operating system may have the Service Tag/Serial Number/Service Request/Model/Keyword, use the SupportAssist feature to manually browse for Dell computers. For more information, see the Dell knowledge base article 000132394 at www.dell.com/support. Downloading and installing the chipset driver...
... can install webcam software available from the Microsoft support site. no other touchpad-driver installation is critical after reinstalling the Windows operating system on Dell's support site www.dell.com/support. Intel chipset device software The Windows operating system may have the Service Tag/Serial Number/Service Request/Model/Keyword, use the SupportAssist feature to manually browse for Dell computers. For more information, see the Dell knowledge base article 000132394 at www.dell.com/support. Downloading and installing the chipset driver...

Re-imaging guide for Windows
Page 11
... instructions on the screen. Go to the folder where you do not have the Service Tag, Serial Number, Service Request, Model, or Keyword, use the SupportAssist feature to automatically identify your computer, and then click Search. You can also click Browse all products to www.dell.com/support. 3. Click Download to manually browse for your computer. Audio The Windows operating system does not include the audio driver...
... instructions on the screen. Go to the folder where you do not have the Service Tag, Serial Number, Service Request, Model, or Keyword, use the SupportAssist feature to automatically identify your computer, and then click Search. You can also click Browse all products to www.dell.com/support. 3. Click Download to manually browse for your computer. Audio The Windows operating system does not include the audio driver...
SIM/eSIM Setup Guide for Windows
Page 4
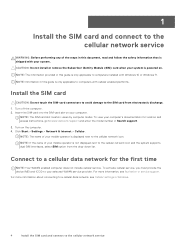
... electrostatic discharge. 1. For more information, see Cellular settings in Windows. 4 Install the SIM card and connect to the SIM card from the drop-down list. Turn on the computer. 4. To activate cellular service, you must provide the device IMEI and ICCID to a cellular data network for location and access instructions, go to www.dell.com/support and enter the model number in this document, read and follow the safety information...
... electrostatic discharge. 1. For more information, see Cellular settings in Windows. 4 Install the SIM card and connect to the SIM card from the drop-down list. Turn on the computer. 4. To activate cellular service, you must provide the device IMEI and ICCID to a cellular data network for location and access instructions, go to www.dell.com/support and enter the model number in this document, read and follow the safety information...


