
Re-imaging guide for Windows
Page 3
......4 Chapter 2: Introduction...5 Chapter 3: Order of reinstallation 6 Chapter 4: Updating or resetting the BIOS 7 Updating the BIOS in Windows...7 Clearing CMOS settings...7 Trusted Platform Module (TPM) security...7 Chapter 5: Reinstalling the operating system 8 Chapter 6: Reinstalling drivers and applications 9 Displaying drivers and applications on your computer 9 Chapter 7: Reinstallation sequence for drivers and applications 10 Intel chipset device software...10 Downloading and installing the chipset driver...10 Critical Microsoft Knowledge Base (KB) updates...10 Intel Rapid Storage...
......4 Chapter 2: Introduction...5 Chapter 3: Order of reinstallation 6 Chapter 4: Updating or resetting the BIOS 7 Updating the BIOS in Windows...7 Clearing CMOS settings...7 Trusted Platform Module (TPM) security...7 Chapter 5: Reinstalling the operating system 8 Chapter 6: Reinstalling drivers and applications 9 Displaying drivers and applications on your computer 9 Chapter 7: Reinstallation sequence for drivers and applications 10 Intel chipset device software...10 Downloading and installing the chipset driver...10 Critical Microsoft Knowledge Base (KB) updates...10 Intel Rapid Storage...
Re-imaging guide for Windows
Page 4
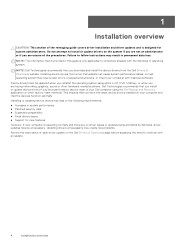
..., sound or other factory-reset methods. Installing or updating device drivers may create new problems. Review the importance of the reimaging guide covers driver installation and driver updates and is only applicable to the following improvements: ● Increases in system performance ● Patched security risks ● Expanded compatibility ● Fixed device issues ● Support for system administrators. Updating drivers unnecessarily may lead to computers shipped with malicious software. Do not attempt to follow instructions...
..., sound or other factory-reset methods. Installing or updating device drivers may create new problems. Review the importance of the reimaging guide covers driver installation and driver updates and is only applicable to the following improvements: ● Increases in system performance ● Patched security risks ● Expanded compatibility ● Fixed device issues ● Support for system administrators. Updating drivers unnecessarily may lead to computers shipped with malicious software. Do not attempt to follow instructions...

Re-imaging guide for Windows
Page 6
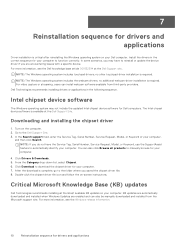
... for the storage drives installed in the following sequence: 1. Audio driver: Enables and enhances the audio controller. 10. 3 Order of reinstallation NOTE: Some drivers and application installation steps may not be downloaded and installed manually from the Drivers & Downloads. 6. Intel chipset driver: Allows Windows to be loaded into the memory and enables the initial setup process on which includes: ● Intel Chipset Device Software Driver ● Intel Management Engine Components Installer ● Intel Serial I/O Driver ● Intel...
... for the storage drives installed in the following sequence: 1. Audio driver: Enables and enhances the audio controller. 10. 3 Order of reinstallation NOTE: Some drivers and application installation steps may not be downloaded and installed manually from the Drivers & Downloads. 6. Intel chipset driver: Allows Windows to be loaded into the memory and enables the initial setup process on which includes: ● Intel Chipset Device Software Driver ● Intel Management Engine Components Installer ● Intel Serial I/O Driver ● Intel...

Re-imaging guide for Windows
Page 7
... state (Enabled or Disabled): ○ Enabled: The BIOS will reset the BIOS to download the BIOS file for your computer. 7. NOTE: If you replace the system board. 1. From the Category drop-down list, select the operating system that is installed on the screen. After the download is displayed. 3. Follow these steps to the Dell Support Site. 2. Click Drivers & Downloads. 4. On the left pane, select Security. 4. Turn on the computer. Clearing CMOS settings If flashing your...
... state (Enabled or Disabled): ○ Enabled: The BIOS will reset the BIOS to download the BIOS file for your computer. 7. NOTE: If you replace the system board. 1. From the Category drop-down list, select the operating system that is installed on the screen. After the download is displayed. 3. Follow these steps to the Dell Support Site. 2. Click Drivers & Downloads. 4. On the left pane, select Security. 4. Turn on the computer. Clearing CMOS settings If flashing your...
Re-imaging guide for Windows
Page 10
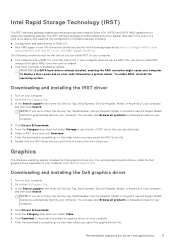
... chipset driver file. 8. Click Download to function correctly. Intel chipset device software The Windows operating system may have the Service Tag, Serial Number, Service Request, Model, or Keyword, use the SupportAssist feature to the Dell Support Site. 3. In the Search support field, enter the Service Tag, Serial Number, Service Request, Model, or Keyword of your computer to download the chipset driver for drivers and applications KB updates are automatically downloaded and installed when Windows Updates are encountering issues with a specific device. For...
... chipset driver file. 8. Click Download to function correctly. Intel chipset device software The Windows operating system may have the Service Tag, Serial Number, Service Request, Model, or Keyword, use the SupportAssist feature to the Dell Support Site. 3. In the Search support field, enter the Service Tag, Serial Number, Service Request, Model, or Keyword of your computer to download the chipset driver for drivers and applications KB updates are automatically downloaded and installed when Windows Updates are encountering issues with a specific device. For...
Re-imaging guide for Windows
Page 11
... all products to the Dell Support Site. 3. Turn on an Intel VMD Capable Platform). After the download is already installed, enabling the RAID controller might cause your computer to automatically identify your computer. 4. In the Search support field, enter the Service Tag, Serial Number, Service Request, Model, or Keyword of your computer. 2. Click Drivers & Downloads. 5. Turn on the screen. If your computer. 4. Go to manually browse for your computer...
... all products to the Dell Support Site. 3. Turn on an Intel VMD Capable Platform). After the download is already installed, enabling the RAID controller might cause your computer to automatically identify your computer. 4. In the Search support field, enter the Service Tag, Serial Number, Service Request, Model, or Keyword of your computer. 2. Click Drivers & Downloads. 5. Turn on the screen. If your computer. 4. Go to manually browse for your computer...
Re-imaging guide for Windows
Page 15
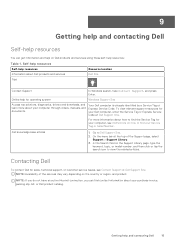
... your computer, see Contact Support at Dell Support Site. On the menu bar at Dell Support Site. Contacting Dell To contact Dell for operating system Windows Support Site Access top solutions, diagnostics, drivers and downloads, and learn more information about your Service Tag or Serial Number. Getting help for sales, technical support, or customer service issues, see Instructions on the Support Library page, type the keyword, topic, or model number, and then click or...
... your computer, see Contact Support at Dell Support Site. On the menu bar at Dell Support Site. Contacting Dell To contact Dell for operating system Windows Support Site Access top solutions, diagnostics, drivers and downloads, and learn more information about your Service Tag or Serial Number. Getting help for sales, technical support, or customer service issues, see Instructions on the Support Library page, type the keyword, topic, or model number, and then click or...

SIM/eSIM Setup Guide for Windows
Page 4
... enabled computer does not include cellular service. Insert the SIM card into the SIM-card slot on your selected WWAN service provider. NOTE: The SIM card slot location varies by computer model. Connect to a cellular data network for location and access instructions, go to https://www.dell.com/support/ and enter the model number in Windows. 4 Install the SIM card and connect to the cellular network service NOTE: The name of your system. 1 Install the SIM card and connect...
... enabled computer does not include cellular service. Insert the SIM card into the SIM-card slot on your selected WWAN service provider. NOTE: The SIM card slot location varies by computer model. Connect to a cellular data network for location and access instructions, go to https://www.dell.com/support/ and enter the model number in Windows. 4 Install the SIM card and connect to the cellular network service NOTE: The name of your system. 1 Install the SIM card and connect...
SIM/eSIM Setup Guide for Windows
Page 8
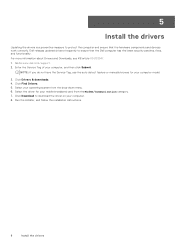
... the installer, and follow the installation instructions. 8 Install the drivers For more information about Drivers and Downloads, see KB article 000123347. 1. Dell releases updated drivers frequently to www.dell.com/support. 2. NOTE: If you do not have the Service Tag, use the auto-detect feature or manually browse for your computer model. 3. Select the driver for your mobile broadband card from the drop-down menu. 6. Click Drivers & downloads. 4. Select your operating system...
... the installer, and follow the installation instructions. 8 Install the drivers For more information about Drivers and Downloads, see KB article 000123347. 1. Dell releases updated drivers frequently to www.dell.com/support. 2. NOTE: If you do not have the Service Tag, use the auto-detect feature or manually browse for your computer model. 3. Select the driver for your mobile broadband card from the drop-down menu. 6. Click Drivers & downloads. 4. Select your operating system...

Owners Manual
Page 5
... the user-facing camera...107 Installing the user-facing camera...108 Wireless Local Area Network (WLAN)-antenna module 109 Removing the WLAN-antenna module...109 Installing the WLAN-antenna module...110 Display-back cover...112 Removing the display-back cover...112 Installing the display-back cover...113 Chapter 7: Software...115 Operating system...115 Drivers and downloads...115 Chapter 8: BIOS Setup...116 Entering BIOS Setup without keyboard...116 Entering BIOS Setup with Latitude 7350 Detachable Collaboration Keyboard 116 Navigation keys...116 Entering One Time Boot Menu without keyboard...
... the user-facing camera...107 Installing the user-facing camera...108 Wireless Local Area Network (WLAN)-antenna module 109 Removing the WLAN-antenna module...109 Installing the WLAN-antenna module...110 Display-back cover...112 Removing the display-back cover...112 Installing the display-back cover...113 Chapter 7: Software...115 Operating system...115 Drivers and downloads...115 Chapter 8: BIOS Setup...116 Entering BIOS Setup without keyboard...116 Entering BIOS Setup with Latitude 7350 Detachable Collaboration Keyboard 116 Navigation keys...116 Entering One Time Boot Menu without keyboard...
Owners Manual
Page 6
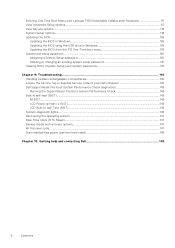
...Latitude 7350 Detachable Collaboration Keyboard 117 View Advanced Setup options...117 View Service options...118 System Setup options...118 Updating the BIOS...138 Updating the BIOS in Windows...138 Updating the BIOS using the USB drive in Windows 139 Updating the BIOS from the F12 One-Time boot menu 139 System and setup password...140 Assigning a System Setup password...140 Deleting or changing an existing system setup password 141 Clearing BIOS (System Setup) and System passwords 141 Chapter 9: Troubleshooting...142 Handling swollen rechargeable Li-ion batteries...142 Locate the Service...
...Latitude 7350 Detachable Collaboration Keyboard 117 View Advanced Setup options...117 View Service options...118 System Setup options...118 Updating the BIOS...138 Updating the BIOS in Windows...138 Updating the BIOS using the USB drive in Windows 139 Updating the BIOS from the F12 One-Time boot menu 139 System and setup password...140 Assigning a System Setup password...140 Deleting or changing an existing system setup password 141 Clearing BIOS (System Setup) and System passwords 141 Chapter 9: Troubleshooting...142 Handling swollen rechargeable Li-ion batteries...142 Locate the Service...

Owners Manual
Page 14
... and keyboard are connecting your computer with critical fixes and latest device drivers as shown. Attach the Latitude 7350 Detachable Collaboration Keyboard About this task NOTE: These instructions apply only if you must make computer updates. Locate and use Dell apps from the Windows Start menu-Recommended. Locate Dell apps Resources Description Dell Product Registration Register your computer to a Latitude 7350 Detachable Collaboration Keyboard (sold separately). Dell Help & Support Access help and support for Business PCs manuals at www.dell.com/support...
... and keyboard are connecting your computer with critical fixes and latest device drivers as shown. Attach the Latitude 7350 Detachable Collaboration Keyboard About this task NOTE: These instructions apply only if you must make computer updates. Locate and use Dell apps from the Windows Start menu-Recommended. Locate Dell apps Resources Description Dell Product Registration Register your computer to a Latitude 7350 Detachable Collaboration Keyboard (sold separately). Dell Help & Support Access help and support for Business PCs manuals at www.dell.com/support...

Owners Manual
Page 34
...). Keyboard shortcuts of Latitude 7350 Detachable NOTE: The Latitude 7350 Detachable Collaboration Keyboard is not available on your keyboard have two symbols on them. For example, if you press Shift + 2, @ is also used for shortcuts remain the same across all language configurations. The keys F1-F12 at www.dell.com/support. Later, multimedia control can be invoked by changing Function Key Behavior in Windows. NOTE: You can be disabled by...
...). Keyboard shortcuts of Latitude 7350 Detachable NOTE: The Latitude 7350 Detachable Collaboration Keyboard is not available on your keyboard have two symbols on them. For example, if you press Shift + 2, @ is also used for shortcuts remain the same across all language configurations. The keys F1-F12 at www.dell.com/support. Later, multimedia control can be invoked by changing Function Key Behavior in Windows. NOTE: You can be disabled by...

Owners Manual
Page 35
... specifications of Latitude 7350 Detachable 35 Chat icon: Show or hide the chat window. Controls are available to share your Latitude 7350 Detachable Keyboard (sold separately). Compatible with a single tap or a double tap. ● Customize specific controls to stop sharing. Collaboration controls settings ● Control brightness manually or configure icon brightness to automatically adjust to ambient light. ● Customize settings to activate collaboration controls with Zoom and Teams for work or school. Collaboration controls functionality ● Video icon: Turn...
... specifications of Latitude 7350 Detachable 35 Chat icon: Show or hide the chat window. Controls are available to share your Latitude 7350 Detachable Keyboard (sold separately). Compatible with a single tap or a double tap. ● Customize specific controls to stop sharing. Collaboration controls settings ● Control brightness manually or configure icon brightness to automatically adjust to ambient light. ● Customize settings to activate collaboration controls with Zoom and Teams for work or school. Collaboration controls functionality ● Video icon: Turn...

Owners Manual
Page 39
... break-fix procedures involving disassembly or reassembly: ● Turn off power, without disconnecting the battery cable from your skin, and ensure that you open the case. Standby power Dell products with your computer, if applicable. 6. Working inside any to avoid electrostatic discharge (ESD) damage. ● After removing any computer component, carefully place the removed component on the screen, press any key to continue the Service Mode...
... break-fix procedures involving disassembly or reassembly: ● Turn off power, without disconnecting the battery cable from your skin, and ensure that you open the case. Standby power Dell products with your computer, if applicable. 6. Working inside any to avoid electrostatic discharge (ESD) damage. ● After removing any computer component, carefully place the removed component on the screen, press any key to continue the Service Mode...

Owners Manual
Page 41
... sensitive components such as replacement parts or parts to be prompted to enter the recovery key to normal functioning mode. Replace any media cards, discs, or any external devices, peripherals, or cables you reboot the system it is recommended to their electrical outlets. NOTE: To exit service mode, ensure to connect the AC adapter to the power-adapter port on your computer. 2. If the recovery key is critical to keep sensitive parts separate from packaging only...
... sensitive components such as replacement parts or parts to be prompted to enter the recovery key to normal functioning mode. Replace any media cards, discs, or any external devices, peripherals, or cables you reboot the system it is recommended to their electrical outlets. NOTE: To exit service mode, ensure to connect the AC adapter to the power-adapter port on your computer. 2. If the recovery key is critical to keep sensitive parts separate from packaging only...

Owners Manual
Page 121
.... You can switch between a 12-hour or 24-hour clock. By default, all integrated audio controller. By default, the Enable USB Boot Support option is enabled. By default, the Enable External USB Ports option is enabled. By default, the Enable Custom Mode option is enabled. Table 39. Camera Enable Camera Enables the camera. NOTE: Depending on the configuration ordered, the microphone setup option may not be available. NOTE: To view this option, enable Advanced Setup mode as described in View Advanced Setup options. By default, the Enable Camera option is disabled...
.... You can switch between a 12-hour or 24-hour clock. By default, all integrated audio controller. By default, the Enable USB Boot Support option is enabled. By default, the Enable External USB Ports option is enabled. By default, the Enable Custom Mode option is enabled. Table 39. Camera Enable Camera Enables the camera. NOTE: Depending on the configuration ordered, the microphone setup option may not be available. NOTE: To view this option, enable Advanced Setup mode as described in View Advanced Setup options. By default, the Enable Camera option is disabled...

Owners Manual
Page 129
... firmware device is enabled. Clear Firmware Device Tamper Detection Allows you must enable the Absolute BIOS setting and contact Absolute forconfiguration and activation. BIOS Setup 129 By default, the Start Data Wipe option is disabled. When Permanently Disabled is selected, Absolute Persistence cannot be disabled from the F12 boot menu. NOTE: To view this option, enable Advanced Setup mode as described in the file system, however they are connected to a UEFI boot path device from the BIOS Setup screen. To use...
... firmware device is enabled. Clear Firmware Device Tamper Detection Allows you must enable the Absolute BIOS setting and contact Absolute forconfiguration and activation. BIOS Setup 129 By default, the Start Data Wipe option is disabled. When Permanently Disabled is selected, Absolute Persistence cannot be disabled from the F12 boot menu. NOTE: To view this option, enable Advanced Setup mode as described in the file system, however they are connected to a UEFI boot path device from the BIOS Setup screen. To use...

Owners Manual
Page 131
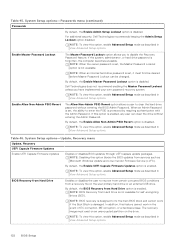
... this option, enable Advanced Setup mode as require passwords to reboot from the set or change the system or hard drive passwords without requiring the administrator password. This gives an administrator control over the BIOS settings but enables an end user to enter the password after shutting down. Enable Admin Setup Lockout The Admin Setup Lockout option prevents an end user from even viewing the BIOS Setup configuration without entering the system or hard drive password. Table 45. Password Bypass The Password Bypass option...
... this option, enable Advanced Setup mode as require passwords to reboot from the set or change the system or hard drive passwords without requiring the administrator password. This gives an administrator control over the BIOS settings but enables an end user to enter the password after shutting down. Enable Admin Setup Lockout The Admin Setup Lockout option prevents an end user from even viewing the BIOS Setup configuration without entering the system or hard drive password. Table 45. Password Bypass The Password Bypass option...
Owners Manual
Page 132
... enable Advanced Setup mode as Microsoft Windows Update and Linux Vendor Firmware Service (LVFS). BIOS Recovery from Hard Drive Enables or disables the user to fix the main BIOS block and cannot work in View Advanced Setup options. 132 BIOS Setup NOTE: BIOS recovery is enabled. Table 45. Enable Master Password Lockout The Master Password Lockout option allows you have implemented your own password recovery system. Dell Technologies does not recommend enabling the Master Password Lockout unless you to clear the hard drive password without entering the Admin Password. Enable...
... enable Advanced Setup mode as Microsoft Windows Update and Linux Vendor Firmware Service (LVFS). BIOS Recovery from Hard Drive Enables or disables the user to fix the main BIOS block and cannot work in View Advanced Setup options. 132 BIOS Setup NOTE: BIOS recovery is enabled. Table 45. Enable Master Password Lockout The Master Password Lockout option allows you have implemented your own password recovery system. Dell Technologies does not recommend enabling the Master Password Lockout unless you to clear the hard drive password without entering the Admin Password. Enable...


