
Setup and specifications guide
Page 3
......5 2 Create a USB recovery drive for Windows 7 3 Chassis overview...8 Display view...8 Left view...9 Right view...9 Palmrest view...10 Bottom view...11 4 Technical specifications...12 System information...12 Processor...12 Memory...12 Storage...13 System board connectors...13 Media card-reader...13 Audio...14 Video card...14 Camera...14 Mobile Broadband...15 Wireless...15 Ports and connectors...15 Display...16 Dell Active Pen specifications...16 Keyboard...17 Keyboard shortcuts...17 Touchpad...18 Fingerprint reader-optional...18 Operating system...19 Battery...19 Power adapter...
......5 2 Create a USB recovery drive for Windows 7 3 Chassis overview...8 Display view...8 Left view...9 Right view...9 Palmrest view...10 Bottom view...11 4 Technical specifications...12 System information...12 Processor...12 Memory...12 Storage...13 System board connectors...13 Media card-reader...13 Audio...14 Video card...14 Camera...14 Mobile Broadband...15 Wireless...15 Ports and connectors...15 Display...16 Dell Active Pen specifications...16 Keyboard...17 Keyboard shortcuts...17 Touchpad...18 Fingerprint reader-optional...18 Operating system...19 Battery...19 Power adapter...
Setup and specifications guide
Page 7
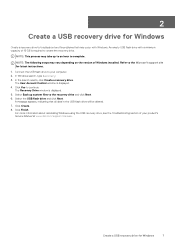
.... 6. Click Yes to your product's Service Manual at www.dell.com/support/manuals. Click Finish. Create a USB recovery drive for latest instructions. 1. In Windows search, type Recovery. 3. In the search results, click Create a recovery drive. For more information about reinstalling Windows using the USB recovery drive, see the Troubleshooting section of Windows installed. Select Back up to an hour to complete. 2 Create a USB recovery drive for Windows Create a recovery drive to troubleshoot and fix problems that all data in the USB flash drive will be deleted. 7. NOTE: The...
.... 6. Click Yes to your product's Service Manual at www.dell.com/support/manuals. Click Finish. Create a USB recovery drive for latest instructions. 1. In Windows search, type Recovery. 3. In the search results, click Create a recovery drive. For more information about reinstalling Windows using the USB recovery drive, see the Troubleshooting section of Windows installed. Select Back up to an hour to complete. 2 Create a USB recovery drive for Windows Create a recovery drive to troubleshoot and fix problems that all data in the USB flash drive will be deleted. 7. NOTE: The...

Setup and specifications guide
Page 16
... taking over lock screen (requires Bluetooth pairing) 9. Magnetic attach feature with cover glass), 16:9 165.24 mm (6.51 inches) 293.76 mm (11.57 inches) 337.04 mm (13.26 inches) 166 800:1 255 nits, NTSC 72% 60 Hz +/- 80 degrees +/- 80 degrees 4.2 W Dell Active Pen specifications Table 15. Penspecifications Specifications 1. Display Table 14. LED light to install "Active Control Panel" from dell.com/support/drivers **Based on...
... taking over lock screen (requires Bluetooth pairing) 9. Magnetic attach feature with cover glass), 16:9 165.24 mm (6.51 inches) 293.76 mm (11.57 inches) 337.04 mm (13.26 inches) 166 800:1 255 nits, NTSC 72% 60 Hz +/- 80 degrees +/- 80 degrees 4.2 W Dell Active Pen specifications Table 15. Penspecifications Specifications 1. Display Table 14. LED light to install "Active Control Panel" from dell.com/support/drivers **Based on...

Setup and specifications guide
Page 17
... Increase brightness Switch to external display Print screen Home Fn + 12 Fn + Ctrl End Open application menu Technical specifications 17 Keyboard specifications Feature Number of keyboard shortcuts Keys Description Fn + Esc Toggle Fn-key lock Fn + F1 Mute audio Fn + F2 Fn + F3 Fn + F4 Fn + F5 Decrease volume Increase volume Mute microphone Turn on the keyboard language configuration. Table 17. Keys that are used for shortcuts remain the same across all language configurations. List of keys...
... Increase brightness Switch to external display Print screen Home Fn + 12 Fn + Ctrl End Open application menu Technical specifications 17 Keyboard specifications Feature Number of keyboard shortcuts Keys Description Fn + Esc Toggle Fn-key lock Fn + F1 Mute audio Fn + F2 Fn + F3 Fn + F4 Fn + F5 Decrease volume Increase volume Mute microphone Turn on the keyboard language configuration. Table 17. Keys that are used for shortcuts remain the same across all language configurations. List of keys...
Setup and specifications guide
Page 26
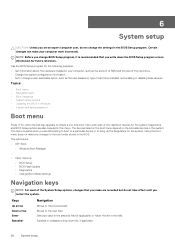
... you change a user-selectable option, such as the user password, type of the valid boot devices for the system. Using the boot menu does not make are : • UEFI Boot: • Windows Boot Manager • • Other Options: • BIOS Setup • BIOS Flash Update • Diagnostics • Change Boot Mode Settings Navigation keys NOTE: For most of the System Setup options, changes that you write down list, if applicable. 26 System setup The options are recorded but do not change the settings in the BIOS Setup...
... you change a user-selectable option, such as the user password, type of the valid boot devices for the system. Using the boot menu does not make are : • UEFI Boot: • Windows Boot Manager • • Other Options: • BIOS Setup • BIOS Flash Update • Diagnostics • Change Boot Mode Settings Navigation keys NOTE: For most of the System Setup options, changes that you write down list, if applicable. 26 System setup The options are recorded but do not change the settings in the BIOS Setup...

Setup and specifications guide
Page 27
... Dell logo appears, you to the computer. General Option System Information Battery Information Boot Sequence Description This section lists the primary hardware features of AC adapter connected to change the order in the main screen displays a message that you to a specific device (for example: optical drive or hard drive). Keys Tab Esc Navigation Moves to access the System Setup screen. The options are: • Windows Boot Manager • Boot List Option: Allows you can boot from including the diagnostic option...
... Dell logo appears, you to the computer. General Option System Information Battery Information Boot Sequence Description This section lists the primary hardware features of AC adapter connected to change the order in the main screen displays a message that you to a specific device (for example: optical drive or hard drive). Keys Tab Esc Navigation Moves to access the System Setup screen. The options are: • Windows Boot Manager • Boot List Option: Allows you can boot from including the diagnostic option...
Setup and specifications guide
Page 28
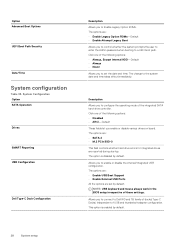
... and mouse always work in the BIOS setup irrespective of the integrated SATA hard-drive controller. System Configuration Option SATA Operation Drives SMART Reporting USB Configuration Dell Type-C Dock Configuration Description Allows you to Enable Legacy Option ROMs. The options are: • Enable Legacy Option ROMs-Default • Enable Attempt Legacy Boot Allows you to the system date and time takes effect immediately. The options are: • Enable USB Boot Support • Enable External USB Ports All the options are reported during startup. The change to enable or disable the...
... and mouse always work in the BIOS setup irrespective of the integrated SATA hard-drive controller. System Configuration Option SATA Operation Drives SMART Reporting USB Configuration Dell Type-C Dock Configuration Description Allows you to Enable Legacy Option ROMs. The options are: • Enable Legacy Option ROMs-Default • Enable Attempt Legacy Boot Allows you to the system date and time takes effect immediately. The options are: • Enable USB Boot Support • Enable External USB Ports All the options are reported during startup. The change to enable or disable the...

Setup and specifications guide
Page 29
...; Enable Microphone • Enable Internal Speaker This option is selected. Option Thunderbolt™ Adapter Configuration Thunderbolt™ Auto Switch USB PowerShare Audio Keyboard Illumination Keyboard Backlight Timeout on AC Description Allows you to enable or disable Thunderbolt options: • Thunderbolt (Enabled by Defualt) • Enable Thunderbolt Boot Support • Enable Thunderbolt (and PCIe behind TBT) Pre-boot With following security levels : • No Security • User Authentication (Enabled by Defualt) • Secure Connect • Display Port and USB...
...; Enable Microphone • Enable Internal Speaker This option is selected. Option Thunderbolt™ Adapter Configuration Thunderbolt™ Auto Switch USB PowerShare Audio Keyboard Illumination Keyboard Backlight Timeout on AC Description Allows you to enable or disable Thunderbolt options: • Thunderbolt (Enabled by Defualt) • Enable Thunderbolt Boot Support • Enable Thunderbolt (and PCIe behind TBT) Pre-boot With following security levels : • No Security • User Authentication (Enabled by Defualt) • Secure Connect • Display Port and USB...
Setup and specifications guide
Page 31
... Password System Password Strong Password Password Configuration Password Bypass Password Change Non-Admin Setup Changes UEFI Capsule Firmware Updates Description Allows you set by default. You can define the length of the options: • Disabled-Default • Reboot bypass Allows you can change the System password when the administrator password is set. • Allow Non-Admin Password Changes This option is not set ". If disabled the setup options are locked by default. The entries to set password are: • Enter the old password: • Enter the new password...
... Password System Password Strong Password Password Configuration Password Bypass Password Change Non-Admin Setup Changes UEFI Capsule Firmware Updates Description Allows you set by default. You can define the length of the options: • Disabled-Default • Reboot bypass Allows you can change the System password when the administrator password is set. • Allow Non-Admin Password Changes This option is not set ". If disabled the setup options are locked by default. The entries to set password are: • Enter the old password: • Enter the new password...
Setup and specifications guide
Page 32
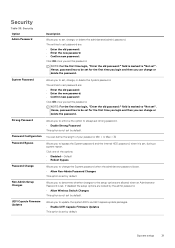
... for Clear Command • Attestation Enable-Default • Key Storage Enable-Default • SHA-256-Default Absolute® OROM Keyboard Access This field lets you to enter Option ROM Configuration screens via hotkey during POST. Option TPM 2.0 Security Description Allows you Enable, Disable, or Permanently Disable the BIOS module interface of the optional Absolute Persistence Module service from entering Setup when an administrator password is set. • Enable Admin Setup Lockout This option is capable of the option: • Deployed Mode-Default • Audit Mode...
... for Clear Command • Attestation Enable-Default • Key Storage Enable-Default • SHA-256-Default Absolute® OROM Keyboard Access This field lets you to enter Option ROM Configuration screens via hotkey during POST. Option TPM 2.0 Security Description Allows you Enable, Disable, or Permanently Disable the BIOS module interface of the optional Absolute Persistence Module service from entering Setup when an administrator password is set. • Enable Admin Setup Lockout This option is capable of the option: • Deployed Mode-Default • Audit Mode...

Setup and specifications guide
Page 33
... following options: • Disabled • Enabled • Software controlled-Default Enclave Memory Size This option sets SGX Enclave Reserve Memory Size Click one or all cores enabled. The performance of some applications improves with the additional cores. • All-Default •1 •2 •3 Allows you to enable or disable the additional processor sleep states. • C states This option is set by default. The Custom Mode Key Management options are: • PK-Default •...
... following options: • Disabled • Enabled • Software controlled-Default Enclave Memory Size This option sets SGX Enclave Reserve Memory Size Click one or all cores enabled. The performance of some applications improves with the additional cores. • All-Default •1 •2 •3 Allows you to enable or disable the additional processor sleep states. • C states This option is set by default. The Custom Mode Key Management options are: • PK-Default •...
Setup and specifications guide
Page 34
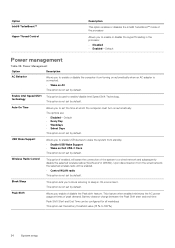
...; Select Days This option is not set by default. Power Management Option Description AC Behavior Allows you to a wired network and subsequently disable the selected wireless radios (WLAN and/or WWAN). Block Sleep This option lets you enable of the system to set the battery threshold value (15 % to enable/disable Intel Speed Shift Technology. This option is used to 100 %) 34 System setup Battery doesnot charge between the Peak Shift...
...; Select Days This option is not set by default. Power Management Option Description AC Behavior Allows you to a wired network and subsequently disable the selected wireless radios (WLAN and/or WWAN). Block Sleep This option lets you enable of the system to set the battery threshold value (15 % to enable/disable Intel Speed Shift Technology. This option is used to 100 %) 34 System setup Battery doesnot charge between the Peak Shift...

Setup and specifications guide
Page 35
... option enables you to let hot key combinations Fn + Esc toggle the primary behavior of F1-F12, between their standard and secondary functions. Advanced Battery Charge Mode can also configure Custom Charge Start and Custom Charge Stop. Click one of time using Dell's fast charging technology. • Primarily AC use certain power adapters. • Enable Adapter Warnings-Default Numlock Enable Allows you to enable or disable the Numlock function when the system boots. • Enable Numlock-Default Fn Lock Options...
... option enables you to let hot key combinations Fn + Esc toggle the primary behavior of F1-F12, between their standard and secondary functions. Advanced Battery Charge Mode can also configure Custom Charge Start and Custom Charge Stop. Click one of time using Dell's fast charging technology. • Primarily AC use certain power adapters. • Enable Adapter Warnings-Default Numlock Enable Allows you to enable or disable the Numlock function when the system boots. • Enable Numlock-Default Fn Lock Options...
Setup and specifications guide
Page 36
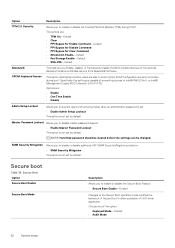
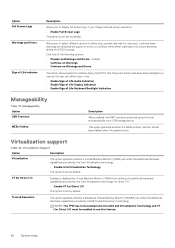
... Screen Logo Warnings and Errors Sign of Life Keyboard Backlight Indication Manageability Table 41. Virtualization support Table 42. VT for Direct I/O Enables or disables the Virtual Machine Monitor (VMM) from utilizing the additional hardware capabilities provided by the Intel Virtualization technology for direct I/O. • Enable VT for Direct I /O must be provisioned using the local provisioning file via a USB storage device This option specifies whether the MEBx Hotkey function...
... Screen Logo Warnings and Errors Sign of Life Keyboard Backlight Indication Manageability Table 41. Virtualization support Table 42. VT for Direct I/O Enables or disables the Virtual Machine Monitor (VMM) from utilizing the additional hardware capabilities provided by the Intel Virtualization technology for direct I/O. • Enable VT for Direct I /O must be provisioned using the local provisioning file via a USB storage device This option specifies whether the MEBx Hotkey function...

Setup and specifications guide
Page 37
... Module) • WLAN • Bluetooth® All the options are : • WWAN • GPS (on the HDD or an external USB key. Maintenance Option Service Tag Description Displays the service tag of the system firmware. • Allow BIOS Downgrade This option is not already set by the wireless switch. System setup 37 Wireless Option Wireless Switch Wireless Device Enable Description Allows to recover the BIOS automatically. Wireless options Table 43. Allows you to recover the corrupted BIOS from Hard Drive field should be controlled by default. Bios Recovery...
... Module) • WLAN • Bluetooth® All the options are : • WWAN • GPS (on the HDD or an external USB key. Maintenance Option Service Tag Description Displays the service tag of the system firmware. • Allow BIOS Downgrade This option is not already set by the wireless switch. System setup 37 Wireless Option Wireless Switch Wireless Device Enable Description Allows to recover the BIOS automatically. Wireless options Table 43. Allows you to recover the corrupted BIOS from Hard Drive field should be controlled by default. Bios Recovery...
Setup and specifications guide
Page 38
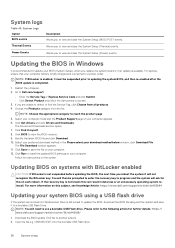
... to install the updated BIOS settings on your computer battery is still a need to Dell.com/support. • Enter the Service Tag or Express Service Code and click Submit. • Click Detect Product and follow the instructions on the screen. For laptops, ensure that your computer. Please refer to a power outlet. Select your computer model and the Product Support page of your download method below window, click Download File. The File Download window...
... to install the updated BIOS settings on your computer battery is still a need to Dell.com/support. • Enter the Service Tag or Express Service Code and click Submit. • Click Detect Product and follow the instructions on the screen. For laptops, ensure that your computer. Please refer to a power outlet. Select your computer model and the Product Support page of your download method below window, click Download File. The File Download window...

Service Manual
Page 6
... removing any installation or break/fix procedures involving disassembly or reassembly: • Turn off . Due to the increased density of a field service electrostatic discharge (ESD) kit. Perform the following safety precautions before you are ready to be taken before handling parts does not ensure adequate ESD protection on LAN) and suspended into a sleep mode and has other advanced power management features. The use...
... removing any installation or break/fix procedures involving disassembly or reassembly: • Turn off . Due to the increased density of a field service electrostatic discharge (ESD) kit. Perform the following safety precautions before you are ready to be taken before handling parts does not ensure adequate ESD protection on LAN) and suspended into a sleep mode and has other advanced power management features. The use...
Service Manual
Page 8
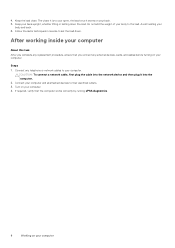
After working inside your computer About this task After you connect any telephone or network cables to set the load down the load. Keep your computer and all attached devices to the load. Connect your back upright, whether lifting or setting down . Connect any external devices, cards, and cables before turning on your computer The closer it is to your spine, the less force it...
After working inside your computer About this task After you connect any telephone or network cables to set the load down the load. Keep your computer and all attached devices to the load. Connect your back upright, whether lifting or setting down . Connect any external devices, cards, and cables before turning on your computer The closer it is to your spine, the less force it...

Service Manual
Page 12
USB Power Delivery - Supports Thunderbolt Networking (*varies between display and source devices, enabling a TV to optimize picture settings based on supported computers Key Features of content types between different products) 4. New cables and connectors for additional color models used in digital photography and computer graphics. • 4K Support - compatible with the advantages. Thunderbolt Icons Figure 2. HDMI 1.4a Features • HDMI Ethernet Channel - Defines input/output protocols for major 3D...
USB Power Delivery - Supports Thunderbolt Networking (*varies between display and source devices, enabling a TV to optimize picture settings based on supported computers Key Features of content types between different products) 4. New cables and connectors for additional color models used in digital photography and computer graphics. • 4K Support - compatible with the advantages. Thunderbolt Icons Figure 2. HDMI 1.4a Features • HDMI Ethernet Channel - Defines input/output protocols for major 3D...

Service Manual
Page 82
Replace the microSD card. 4. Keyboard Removing the keyboard Prerequisites 1. Remove the DC-in before working inside your computer. Remove the WLAN card. 82 Disassembly and reassembly Remove the battery. 5. Remove the system fan. 8. Next steps 1. Remove the speaker. 6. Replace the base cover. 3. Remove the microSD card. 3. Remove the base cover. 4. Follow the procedure in after working inside your computer. 2. Remove the memory module. 7. Follow the procedure in . 9. Replace the battery. 2.
Replace the microSD card. 4. Keyboard Removing the keyboard Prerequisites 1. Remove the DC-in before working inside your computer. Remove the WLAN card. 82 Disassembly and reassembly Remove the battery. 5. Remove the system fan. 8. Next steps 1. Remove the speaker. 6. Replace the base cover. 3. Remove the microSD card. 3. Remove the base cover. 4. Follow the procedure in after working inside your computer. 2. Remove the memory module. 7. Follow the procedure in . 9. Replace the battery. 2.


