
Handling swollen Lithium-ion batteries
Page 1
... damage to the device enclosure or internal components leading to Dell in an approved shipping container (provided by a Dell authorized service technician. Swollen batteries should not be used and should be trademarks of any type to pry on or against the battery. ● If a battery gets stuck in the electronics industry due to comply with your computer. Document Number: A05 Rev...
... damage to the device enclosure or internal components leading to Dell in an approved shipping container (provided by a Dell authorized service technician. Swollen batteries should not be used and should be trademarks of any type to pry on or against the battery. ● If a battery gets stuck in the electronics industry due to comply with your computer. Document Number: A05 Rev...

Owners Manual
Page 5
... Boot screen options...57 Intel Software Guard Extensions screen options...57 Performance screen options...58 Power management screen options...58 POST behavior screen options...59 Virtualization support screen options...60 Wireless screen options...60 Maintenance screen options...60 System logs screen options...60 SupportAssist system resolution...61 Updating the BIOS in Windows ...61 System and setup password...61 Assigning a system setup password...62 Deleting or changing an existing system setup password 62 7 Software...63 Operating system configurations...63 Downloading drivers...63...
... Boot screen options...57 Intel Software Guard Extensions screen options...57 Performance screen options...58 Power management screen options...58 POST behavior screen options...59 Virtualization support screen options...60 Wireless screen options...60 Maintenance screen options...60 System logs screen options...60 SupportAssist system resolution...61 Updating the BIOS in Windows ...61 System and setup password...61 Assigning a system setup password...62 Deleting or changing an existing system setup password 62 7 Software...63 Operating system configurations...63 Downloading drivers...63...
Owners Manual
Page 6
... on LAN) and suspended into a sleep mode and has other advanced power management features. The internal power enables the system to the damage. Bonding Bonding is a method for lower power requirements and increased density, ESD protection is a memory DIMM that has received a static shock and immediately generates a "No POST/No Video" symptom with your skin, and ensure that you remove all network cables, telephone...
... on LAN) and suspended into a sleep mode and has other advanced power management features. The internal power enables the system to the damage. Bonding Bonding is a method for lower power requirements and increased density, ESD protection is a memory DIMM that has received a static shock and immediately generates a "No POST/No Video" symptom with your skin, and ensure that you remove all network cables, telephone...
Owners Manual
Page 7
... packaging that all times when servicing Dell products. Once deployed properly, service parts can be free of the bag is recommended that the new part arrived in anti-static bags for safe transport. ESDsensitive items are typically installed in static-safe packaging. The physical connection of a wrist strap are insulators and often highly charged. • Working Environment - Use only Field Service kits with a wrist strap...
... packaging that all times when servicing Dell products. Once deployed properly, service parts can be free of the bag is recommended that the new part arrived in anti-static bags for safe transport. ESDsensitive items are typically installed in static-safe packaging. The physical connection of a wrist strap are insulators and often highly charged. • Working Environment - Use only Field Service kits with a wrist strap...
Owners Manual
Page 8
.... 2. Turn on your computer. 8 Working on your computer 1. Always obtain additional resources or use batteries designed for other Dell computers. 1. Before working inside your back. 5. Remove any external devices, cards, and cables before performing Step # 8. Connect any external devices, such as a port replicator or media base, and replace any telephone or network cables to your spine, the less force it exerts on your back upright, whether lifting or setting down...
.... 2. Turn on your computer. 8 Working on your computer 1. Always obtain additional resources or use batteries designed for other Dell computers. 1. Before working inside your back. 5. Remove any external devices, cards, and cables before performing Step # 8. Connect any external devices, such as a port replicator or media base, and replace any telephone or network cables to your spine, the less force it exerts on your back upright, whether lifting or setting down...
Owners Manual
Page 18
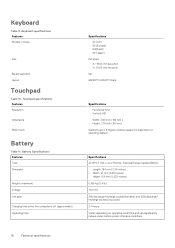
Keyboard specifications Features Number of keys Size Backlit keyboard Layout Touchpad Table 10. Battery Specifications Features Type Dimension Weight (maximum) Voltage Life span Charging time when the computer is dependent on operating conditions and can significantly reduce under certain power-intensive conditions 18 Technical specifications Touchpad specifications Features Resolution Dimensions Multi-touch Battery Table 11. Specifications 42 WHr,3 Cell, Li-ion/Polymer, ExpressCharge Capable Battery • Length: 184 mm (7.24...
Keyboard specifications Features Number of keys Size Backlit keyboard Layout Touchpad Table 10. Battery Specifications Features Type Dimension Weight (maximum) Voltage Life span Charging time when the computer is dependent on operating conditions and can significantly reduce under certain power-intensive conditions 18 Technical specifications Touchpad specifications Features Resolution Dimensions Multi-touch Battery Table 11. Specifications 42 WHr,3 Cell, Li-ion/Polymer, ExpressCharge Capable Battery • Length: 184 mm (7.24...
Owners Manual
Page 26
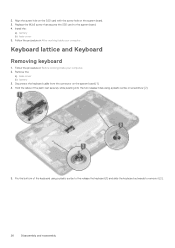
Install the: a) battery b) base cover 5. Keyboard lattice and Keyboard Removing keyboard 1. Disconnect the keyboard cable from the connector on the system board. 3. Remove the: a) base cover b) battery 3. Follow the procedure in Before working inside your computer. Hold the sides of the keyboard using a plastic scribe or screwdriver [2]. 5. 2. Pry the bottom of the palm rest securely while pushing into the two release holes using a plastic scribe to the release...
Install the: a) battery b) base cover 5. Keyboard lattice and Keyboard Removing keyboard 1. Disconnect the keyboard cable from the connector on the system board. 3. Remove the: a) base cover b) battery 3. Follow the procedure in Before working inside your computer. Hold the sides of the keyboard using a plastic scribe or screwdriver [2]. 5. 2. Pry the bottom of the palm rest securely while pushing into the two release holes using a plastic scribe to the release...
Owners Manual
Page 42
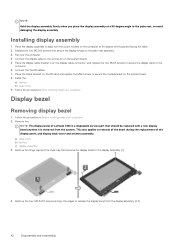
... system board. 8. Connect the WLAN cables. 7. a) base cover b) battery c) display assembly 3. Place the display cable bracket over the computer. 4. Remove the: NOTE: The display bezel of the display panel, and display back-cover and antenna assembly. Connect the display cable to the palm-rest assembly. 3. This also applies to removal of the bezel during the replacement of Latitude 3190 is removed from the display assembly [2,3]. 42 Disassembly and reassembly Follow the procedure in Before working...
... system board. 8. Connect the WLAN cables. 7. a) base cover b) battery c) display assembly 3. Place the display cable bracket over the computer. 4. Remove the: NOTE: The display bezel of the display panel, and display back-cover and antenna assembly. Connect the display cable to the palm-rest assembly. 3. This also applies to removal of the bezel during the replacement of Latitude 3190 is removed from the display assembly [2,3]. 42 Disassembly and reassembly Follow the procedure in Before working...
Owners Manual
Page 45
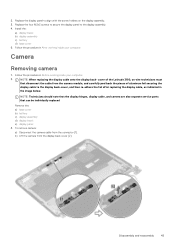
... the display back cover [2]. b) Lift the camera from the connector [1]. NOTE: Technicians should note that the display hinges, display cable, and camera are also separate service parts that can be individually replaced Remove the: a) base cover b) battery c) display assembly d) display bezel e) display panel 3. Replace the display panel to align with the screw holders on -site technicians must first disconnect the cable from the camera module, and carefully peel back the pieces of the Latitude 3190...
... the display back cover [2]. b) Lift the camera from the connector [1]. NOTE: Technicians should note that the display hinges, display cable, and camera are also separate service parts that can be individually replaced Remove the: a) base cover b) battery c) display assembly d) display bezel e) display panel 3. Replace the display panel to align with the screw holders on -site technicians must first disconnect the cable from the camera module, and carefully peel back the pieces of the Latitude 3190...
Owners Manual
Page 50
... accommodate power-hungry devices • New power management features • Full-duplex data transfers and support for new transfer types • Backward USB 2.0 compatibility • New connectors and cable The topics below cover some portable systems. NOTE: The DDR4 memory is imbedded in 1996. Speed Currently, there are Super-Speed, Hi-Speed and FullSpeed. They are 3 speed modes defined by trying known good memory modules in...
... accommodate power-hungry devices • New power management features • Full-duplex data transfers and support for new transfer types • Backward USB 2.0 compatibility • New connectors and cable The topics below cover some portable systems. NOTE: The DDR4 memory is imbedded in 1996. Speed Currently, there are Super-Speed, Hi-Speed and FullSpeed. They are 3 speed modes defined by trying known good memory modules in...
Owners Manual
Page 52
... HDMI transfers uncompressed digital audio and video for phones and other portable devices, supporting video resolutions up to optimize picture settings based on a single cable. The primary advantage is an industry-supported, uncompressed, all-digital audio/video interface. NOTE: The HDMI 1.4 will rival the Digital Cinema systems used in A/V systems • HDMI supports communication between display and source devices, enabling a TV to 1080p • Automotive Connection System - HDMI 1.4 Features • HDMI...
... HDMI transfers uncompressed digital audio and video for phones and other portable devices, supporting video resolutions up to optimize picture settings based on a single cable. The primary advantage is an industry-supported, uncompressed, all-digital audio/video interface. NOTE: The HDMI 1.4 will rival the Digital Cinema systems used in A/V systems • HDMI supports communication between display and source devices, enabling a TV to 1080p • Automotive Connection System - HDMI 1.4 Features • HDMI...
Owners Manual
Page 53
... Setup-defined boot device order and boot directly to access the System Setup screen. During the Power-on the computer and its installed devices, the items listed in Windows • System and setup password Boot Sequence Boot sequence enables you can : • Access System Setup by pressing F2 key • Bring up the one -time boot menu displays the devices that you make are : • Removable Drive (if available) • STXXXX Drive NOTE: XXXX denotes the SATA drive number. • Optical Drive...
... Setup-defined boot device order and boot directly to access the System Setup screen. During the Power-on the computer and its installed devices, the items listed in Windows • System and setup password Boot Sequence Boot sequence enables you can : • Access System Setup by pressing F2 key • Bring up the one -time boot menu displays the devices that you make are : • Removable Drive (if available) • STXXXX Drive NOTE: XXXX denotes the SATA drive number. • Optical Drive...
Owners Manual
Page 54
... Firmware update-enabled by default • Memory Information: Displays Memory Installed, Memory Available, Memory Speed, Memory Channels Mode, Memory Technology • Processor Information: Displays Processor Type, Core Count, Processor ID, Current Clock Speed, Minimum Clock Speed, Maximum Clock Speed, Processor L2 Cache, HT Capable, and 64-Bit Technology • Device Information: Primary hard drive, SATA, Passthrough MAC address, Video Controller, Video BIOS Version, Video Memory, Panel Type, Native Resolution, Audio Controller, Wi-Fi Device, Bluetooth Device Battery Information Boot...
... Firmware update-enabled by default • Memory Information: Displays Memory Installed, Memory Available, Memory Speed, Memory Channels Mode, Memory Technology • Processor Information: Displays Processor Type, Core Count, Processor ID, Current Clock Speed, Minimum Clock Speed, Maximum Clock Speed, Processor L2 Cache, HT Capable, and 64-Bit Technology • Device Information: Primary hard drive, SATA, Passthrough MAC address, Video Controller, Video BIOS Version, Video Memory, Panel Type, Native Resolution, Audio Controller, Wi-Fi Device, Bluetooth Device Battery Information Boot...
Owners Manual
Page 55
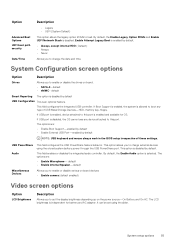
... disable various on board devices: • Enable camera (default enabled) Video screen options Option LCD Brightness Description Allows you to set using the stored system battery power through the USB PowerShare port. Option Advanced Boot Options UEFI boot path security Date/Time Description • Legacy • UEFI (System Default) This option allows the legacy option ROMs to this port is enabled and available for battery and AC adapter. If USB port is disabled, the OS cannot see any type of these settings. This option allows you to charge external devices using...
... disable various on board devices: • Enable camera (default enabled) Video screen options Option LCD Brightness Description Allows you to set using the stored system battery power through the USB PowerShare port. Option Advanced Boot Options UEFI boot path security Date/Time Description • Legacy • UEFI (System Default) This option allows the legacy option ROMs to this port is enabled and available for battery and AC adapter. If USB port is disabled, the OS cannot see any type of these settings. This option allows you to charge external devices using...
Owners Manual
Page 56
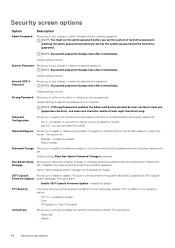
...: Successful password changes take effect immediately. Default setting: Not set Strong Password Allows you to activate or disable the optional Computrace software The options are: • Deactivate • Disable 56 System setup options Option "Allow Wireless Switch Changes" is selected. The options are: • Enable UEFI Capsule Firmware Update-enabled by default PTT Security This option lets you control whether the Platform Trust Technology feature (PTT) is visible on the operating system. • PTT On-enabled by default • Clear...
...: Successful password changes take effect immediately. Default setting: Not set Strong Password Allows you to activate or disable the optional Computrace software The options are: • Deactivate • Disable 56 System setup options Option "Allow Wireless Switch Changes" is selected. The options are: • Enable UEFI Capsule Firmware Update-enabled by default PTT Security This option lets you control whether the Platform Trust Technology feature (PTT) is visible on the operating system. • PTT On-enabled by default • Clear...
Owners Manual
Page 59
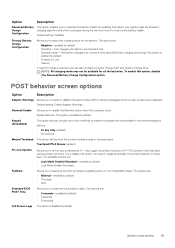
...; Lock Mode Disable/Standard-enabled by default • Lock Mode Enable/Secondary Fastboot Allows you to speed up the boot process by bypassing some of these keys. Option Description Advanced Battery Charge Configuration This option enables you choose one of two methods to enable the keypad that is embedded in the internal keyboard; By enabling this option, your battery at a standard rate. • ExpressCharge-The battery charges over a shorter time using Dell's fast charging technology This option is enabled...
...; Lock Mode Disable/Standard-enabled by default • Lock Mode Enable/Secondary Fastboot Allows you to speed up the boot process by bypassing some of these keys. Option Description Advanced Battery Charge Configuration This option enables you choose one of two methods to enable the keypad that is embedded in the internal keyboard; By enabling this option, your battery at a standard rate. • ExpressCharge-The battery charges over a shorter time using Dell's fast charging technology This option is enabled...
Owners Manual
Page 60
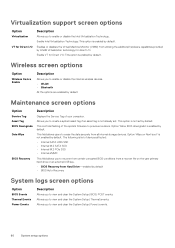
Virtualization support screen options Option Virtualization VT for direct I/O. Enables or disables the Virtual Machine Monitor (VMM) from Hard Drive-enabled by default. Allows you to create a system asset tag if an asset tag is enabled by default. Option 'Wipe on the user primary hard drive or an external USB key. • BIOS Recovery from utilizing the additional hardware capabilities provided by default. Enable Intel Virtualization Technology: This option is not already set by Intel® Virtualization technology for Direct...
Virtualization support screen options Option Virtualization VT for direct I/O. Enables or disables the Virtual Machine Monitor (VMM) from Hard Drive-enabled by default. Allows you to create a system asset tag if an asset tag is enabled by default. Option 'Wipe on the user primary hard drive or an external USB key. • BIOS Recovery from utilizing the additional hardware capabilities provided by default. Enable Intel Virtualization Technology: This option is not already set by Intel® Virtualization technology for Direct...
Owners Manual
Page 61
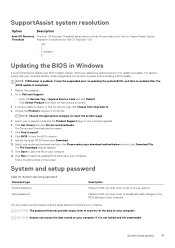
... the BIOS settings of your computer appears. 6. Select your preferred download method in Windows It is recommended to update your BIOS (System Setup), when you must be suspended prior to install the updated BIOS settings on your computer. Follow the instructions on screen. 3. System and setup password Password type System password Setup password Description Password that your computer battery is enabled, it must enter to access and make changes to Dell.com/support. • Enter the Service Tag or Express Service Code and...
... the BIOS settings of your computer appears. 6. Select your preferred download method in Windows It is recommended to update your BIOS (System Setup), when you must be suspended prior to install the updated BIOS settings on your computer. Follow the instructions on screen. 3. System and setup password Password type System password Setup password Description Password that your computer battery is enabled, it must enter to access and make changes to Dell.com/support. • Enter the Service Tag or Express Service Code and...
Owners Manual
Page 63
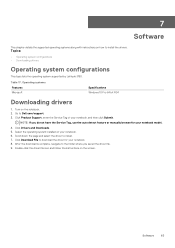
...Microsoft Specifications Windows 10 Pro 64 bit RS4 Downloading drivers 1. Turn on your notebook. 6. Go to install. 7. NOTE: If you saved the driver file. 9. Scroll down the page and select the driver to Dell.com/support. 3. After the download is complete, navigate to install the drivers. Software 63 Table 17. Topics: • Operating system configurations • Downloading drivers Operating system configurations This topic lists the operating system supported by Latitude 3190. Click Drivers and Downloads. 5. 7 Software This chapter details the supported operating...
...Microsoft Specifications Windows 10 Pro 64 bit RS4 Downloading drivers 1. Turn on your notebook. 6. Go to install. 7. NOTE: If you saved the driver file. 9. Scroll down the page and select the driver to Dell.com/support. 3. After the download is complete, navigate to install the drivers. Software 63 Table 17. Topics: • Operating system configurations • Downloading drivers Operating system configurations This topic lists the operating system supported by Latitude 3190. Click Drivers and Downloads. 5. 7 Software This chapter details the supported operating...

Owners Manual
Page 64
... options to provide extra information about the failed device(s) • View status messages that inform you if tests are unaffected by the BIOS internally. Power on the system make sure system is launched by the RTC reset: 64 Troubleshooting In the boot menu screen, use Up/Down arrow key to reset real time clock. Note the error code and contact Dell. Press and hold the power button for specific devices require user...
... options to provide extra information about the failed device(s) • View status messages that inform you if tests are unaffected by the BIOS internally. Power on the system make sure system is launched by the RTC reset: 64 Troubleshooting In the boot menu screen, use Up/Down arrow key to reset real time clock. Note the error code and contact Dell. Press and hold the power button for specific devices require user...


