
Dell Latitude 10 - ST2 Owner's Manual
Page 3
... the Stylus as a Mouse...8 Using the Stylus or Finger on Touch Keyboard 8 Touch Keyboard...8 Working with Files...8 Entering Text...9 Stylus Flicks...9 Pen and Touch Settings...10 Touch Usage...11 3 Removing and Installing Components 13 Recommended Tools...13 Internal and External View...13 Removing the Battery...14 Installing the Battery...15 Removing... Installing the SmartCard Reader ...21 Removing the Wireless Wide Area Network (WWAN) Card 21 Installing the Wireless Wide Area Network (WWAN) Card 22 Removing the Docking Board...22
... the Stylus as a Mouse...8 Using the Stylus or Finger on Touch Keyboard 8 Touch Keyboard...8 Working with Files...8 Entering Text...9 Stylus Flicks...9 Pen and Touch Settings...10 Touch Usage...11 3 Removing and Installing Components 13 Recommended Tools...13 Internal and External View...13 Removing the Battery...14 Installing the Battery...15 Removing... Installing the SmartCard Reader ...21 Removing the Wireless Wide Area Network (WWAN) Card 21 Installing the Wireless Wide Area Network (WWAN) Card 22 Removing the Docking Board...22
Dell Latitude 10 - ST2 Owner's Manual
Page 4
Installing the Docking Board...23 Removing the System Board...23 Installing the System Board...24 Removing the Rear Camera...25 Installing the Rear Camera...25 Removing the Coin-... 35 Running the ePSA Diagnostic Utility...35 Beep Codes...36 LED Error Codes...37 Troubleshooting the Wacom Digitizer...38 Troubleshooting Steps...38 6 Specifications...39 7 Contacting Dell...43
Installing the Docking Board...23 Removing the System Board...23 Installing the System Board...24 Removing the Rear Camera...25 Installing the Rear Camera...25 Removing the Coin-... 35 Running the ePSA Diagnostic Utility...35 Beep Codes...36 LED Error Codes...37 Troubleshooting the Wacom Digitizer...38 Troubleshooting Steps...38 6 Specifications...39 7 Contacting Dell...43
Dell Latitude 10 - ST2 Owner's Manual
Page 5
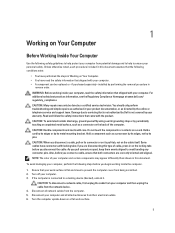
...Turn the computer upside-down on the cable itself. For additional safety best practices information, see the Regulatory Compliance Homepage at www.dell.com/ regulatory_compliance CAUTION: Many repairs may appear differently than shown in this document assumes that shipped with your computer. • ...each procedure included in this document. if you begin working inside the computer. 1. If the computer is flat and clean to a docking device (docked), undock it. Also, before you are correctly oriented and aligned. Some cables have performed the steps in reverse order. 1 Working ...
...Turn the computer upside-down on the cable itself. For additional safety best practices information, see the Regulatory Compliance Homepage at www.dell.com/ regulatory_compliance CAUTION: Many repairs may appear differently than shown in this document assumes that shipped with your computer. • ...each procedure included in this document. if you begin working inside the computer. 1. If the computer is flat and clean to a docking device (docked), undock it. Also, before you are correctly oriented and aligned. Some cables have performed the steps in reverse order. 1 Working ...

Dell Latitude 10 - ST2 Owner's Manual
Page 14
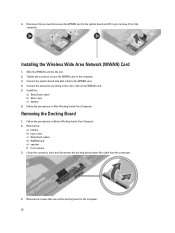
Figure 2. docking board 2. system board 5. coin-cell battery 3. front camera 6. Follow the procedures in an outward direction and remove it from the computer. 14 Slide the battery release latch to the unlock position. SmartCard reader/WWAN card (WWAN card is located below the SmartCard reader Removing the Battery 1. speaker 4. rear camera 7. Internal View 1. Lift up the battery in Before Working Inside Your Computer. 2.
Figure 2. docking board 2. system board 5. coin-cell battery 3. front camera 6. Follow the procedures in an outward direction and remove it from the computer. 14 Slide the battery release latch to the unlock position. SmartCard reader/WWAN card (WWAN card is located below the SmartCard reader Removing the Battery 1. speaker 4. rear camera 7. Internal View 1. Lift up the battery in Before Working Inside Your Computer. 2.
Dell Latitude 10 - ST2 Owner's Manual
Page 22
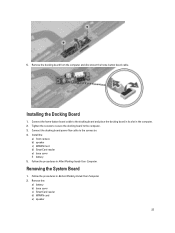
... computer. Tighten the screws to secure the WWAN card to the WWAN card. 4. Connect the system board side data cable to the computer. 3. Removing the Docking Board 1. Follow the procedures in After Working Inside Your Computer. Lift up to the computer. 22 4. Remove the: a) battery b) base cover c) SmartCard reader d) WWAN Card...
... computer. Tighten the screws to secure the WWAN card to the WWAN card. 4. Connect the system board side data cable to the computer. 3. Removing the Docking Board 1. Follow the procedures in After Working Inside Your Computer. Lift up to the computer. 22 4. Remove the: a) battery b) base cover c) SmartCard reader d) WWAN Card...
Dell Latitude 10 - ST2 Owner's Manual
Page 23
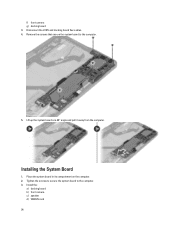
...and disconnect the home-button board cable. Follow the procedures in Before Working Inside Your Computer. 2. Tighten the screws to secure the docking board to the connector. 4. Follow the procedures in After Working Inside Your Computer. Install the: a) front camera b) speaker c) WWAN... d) SmartCard reader e) base cover f) battery 5. Removing the System Board 1. Connect the docking board power flex cable to the computer. 3. Connect the home-button board cable to the docking board and place the docking board in its slot in the computer. 2. 5. Remove the: a) battery b) base...
...and disconnect the home-button board cable. Follow the procedures in Before Working Inside Your Computer. 2. Tighten the screws to secure the docking board to the connector. 4. Follow the procedures in After Working Inside Your Computer. Install the: a) front camera b) speaker c) WWAN... d) SmartCard reader e) base cover f) battery 5. Removing the System Board 1. Connect the docking board power flex cable to the computer. 3. Connect the home-button board cable to the docking board and place the docking board in its slot in the computer. 2. 5. Remove the: a) battery b) base...
Dell Latitude 10 - ST2 Owner's Manual
Page 24
Installing the System Board 1. Tighten the screws to secure the system board to the computer. 5. Disconnect the LVDS and docking board flex cables. 4. Install the: a) docking board b) front camera c) speaker d) WWAN card 24 Lift up the system board at a 45° angle and pull it away from the computer. f) front camera g) docking board 3. Remove the screws that secure the system board to the computer. 3. Place the system board in its compartment on the computer. 2.
Installing the System Board 1. Tighten the screws to secure the system board to the computer. 5. Disconnect the LVDS and docking board flex cables. 4. Install the: a) docking board b) front camera c) speaker d) WWAN card 24 Lift up the system board at a 45° angle and pull it away from the computer. f) front camera g) docking board 3. Remove the screws that secure the system board to the computer. 3. Place the system board in its compartment on the computer. 2.
Dell Latitude 10 - ST2 Owner's Manual
Page 29
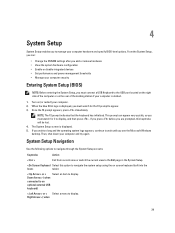
When the blue DELL logo is displayed, you must connect a USB Keyboard to the USB port located on the ... or switch the current view to display. If you press before you see the Microsoft Windows desktop. The System Setup screen is docked. 1. tablet. < Up Arrow > or < Select an item to the Exit page in the System Setup. From the System... watch for the F2 prompt to wait until you are prompted, this keystroke will be lost. 4. Turn on the rear of the docking station if your computer. 2. Right Arrow > ( when 29 This prompt can : • Change the NVRAM settings after you add...
When the blue DELL logo is displayed, you must connect a USB Keyboard to the USB port located on the ... or switch the current view to display. If you press before you see the Microsoft Windows desktop. The System Setup screen is docked. 1. tablet. < Up Arrow > or < Select an item to the Exit page in the System Setup. From the System... watch for the F2 prompt to wait until you are prompted, this keystroke will be lost. 4. Turn on the rear of the docking station if your computer. 2. Right Arrow > ( when 29 This prompt can : • Change the NVRAM settings after you add...
Dell Latitude 10 - ST2 Owner's Manual
Page 40
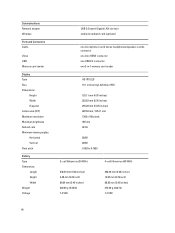
... Maximum brightness Refresh rate Minimum viewing angles: Horizontal Vertical Pixel pitch Battery Type Dimensions Length Height Width Weight Voltage USB 2.0 based Gigabit LAN via dock mobile broadband card (optional) one microphone-in and stereo headphones/speakers combo connector one mini HDMI connector one USB 2.0 connector one 3-in-1 memory... card reader HD IPS LED 10.1 inches high definition (HD) 125.11 mm (4.93 inches) 222.52 mm (8.76 inches) 255.28 mm (10.05 inches) 222.52 mm / 125.11 mm 1366 x 768 pixels 450 nits 60 Hz...
... Maximum brightness Refresh rate Minimum viewing angles: Horizontal Vertical Pixel pitch Battery Type Dimensions Length Height Width Weight Voltage USB 2.0 based Gigabit LAN via dock mobile broadband card (optional) one microphone-in and stereo headphones/speakers combo connector one mini HDMI connector one USB 2.0 connector one 3-in-1 memory... card reader HD IPS LED 10.1 inches high definition (HD) 125.11 mm (4.93 inches) 222.52 mm (8.76 inches) 255.28 mm (10.05 inches) 222.52 mm / 125.11 mm 1366 x 768 pixels 450 nits 60 Hz...

Setting up Your Docking Station
Page 2
... Simpan Tablet pada Dok Align the tablet with the docking station connector and press down until it snaps into place. Dicetak di Malaysia. © 2012 Dell Inc. 2012 - 10 CATATAN: Port USB dan audio tablet dinonaktifkan setelah sistem dimasukkan dalam dok. 2 Connect the AC adapter ...Sambungkan adaptor AC Connect the AC adapter to the AC adapter connector on the docking station and to the electrical outlet. ...
... Simpan Tablet pada Dok Align the tablet with the docking station connector and press down until it snaps into place. Dicetak di Malaysia. © 2012 Dell Inc. 2012 - 10 CATATAN: Port USB dan audio tablet dinonaktifkan setelah sistem dimasukkan dalam dok. 2 Connect the AC adapter ...Sambungkan adaptor AC Connect the AC adapter to the AC adapter connector on the docking station and to the electrical outlet. ...
Setup and Features Information Tech Sheet
Page 1
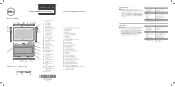
... inches) 685 grams (1.51 lb) Environmental Operating Temperature 0 °C to 35 °C (32 °F to view information about your tablet. Latitude 10 - Untuk informasi lebih lanjut tentang konfigurasi tablet Anda, kunjungi Layar Mulai→ Bantuan dan Dukungan dan pilih opsi untuk melihat informasi tentang tablet Anda. ... 14 start button 15 rear camera 16 camera flash 17 swappable battery 18 speakers 19 battery latch 20 battery status LED 21 dock/power connector 22 micro USB/power connector 23 finger print reader (optional) 24 security lock slot 25 volume decrease button 26 ...
... inches) 685 grams (1.51 lb) Environmental Operating Temperature 0 °C to 35 °C (32 °F to view information about your tablet. Latitude 10 - Untuk informasi lebih lanjut tentang konfigurasi tablet Anda, kunjungi Layar Mulai→ Bantuan dan Dukungan dan pilih opsi untuk melihat informasi tentang tablet Anda. ... 14 start button 15 rear camera 16 camera flash 17 swappable battery 18 speakers 19 battery latch 20 battery status LED 21 dock/power connector 22 micro USB/power connector 23 finger print reader (optional) 24 security lock slot 25 volume decrease button 26 ...