
Dell Latitude 10 - ST2 Owner's Manual
Page 3
... the Stylus as a Mouse...8 Using the Stylus or Finger on Touch Keyboard 8 Touch Keyboard...8 Working with Files...8 Entering Text...9 Stylus Flicks...9 Pen and Touch Settings...10 Touch Usage...11 3 Removing and Installing Components 13 Recommended Tools...13 Internal and External View...13 Removing the Battery...14 Installing the Battery...15 Removing... Installing the SmartCard Reader ...21 Removing the Wireless Wide Area Network (WWAN) Card 21 Installing the Wireless Wide Area Network (WWAN) Card 22 Removing the Docking Board...22
... the Stylus as a Mouse...8 Using the Stylus or Finger on Touch Keyboard 8 Touch Keyboard...8 Working with Files...8 Entering Text...9 Stylus Flicks...9 Pen and Touch Settings...10 Touch Usage...11 3 Removing and Installing Components 13 Recommended Tools...13 Internal and External View...13 Removing the Battery...14 Installing the Battery...15 Removing... Installing the SmartCard Reader ...21 Removing the Wireless Wide Area Network (WWAN) Card 21 Installing the Wireless Wide Area Network (WWAN) Card 22 Removing the Docking Board...22
Dell Latitude 10 - ST2 Owner's Manual
Page 4
Installing the Docking Board...23 Removing the System Board...23 Installing the System Board...24 Removing the Rear Camera...25 Installing the Rear Camera...25 Removing the Coin-... 35 Running the ePSA Diagnostic Utility...35 Beep Codes...36 LED Error Codes...37 Troubleshooting the Wacom Digitizer...38 Troubleshooting Steps...38 6 Specifications...39 7 Contacting Dell...43
Installing the Docking Board...23 Removing the System Board...23 Installing the System Board...24 Removing the Rear Camera...25 Installing the Rear Camera...25 Removing the Coin-... 35 Running the ePSA Diagnostic Utility...35 Beep Codes...36 LED Error Codes...37 Troubleshooting the Wacom Digitizer...38 Troubleshooting Steps...38 6 Specifications...39 7 Contacting Dell...43
Dell Latitude 10 - ST2 Owner's Manual
Page 5
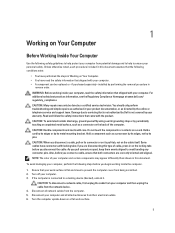
...assumes that both connectors are disconnecting this document. For additional safety best practices information, see the Regulatory Compliance Homepage at www.dell.com/ regulatory_compliance CAUTION: Many repairs may appear differently than shown in on the locking tabs before you are correctly oriented and... its metal mounting bracket. Hold a component such as a connector on a flat work surface is not covered by Dell is flat and clean to a docking device (docked), undock it. Some cables have read the safety information that came with care. if you connect a cable, ensure...
...assumes that both connectors are disconnecting this document. For additional safety best practices information, see the Regulatory Compliance Homepage at www.dell.com/ regulatory_compliance CAUTION: Many repairs may appear differently than shown in on the locking tabs before you are correctly oriented and... its metal mounting bracket. Hold a component such as a connector on a flat work surface is not covered by Dell is flat and clean to a docking device (docked), undock it. Some cables have read the safety information that came with care. if you connect a cable, ensure...

Dell Latitude 10 - ST2 Owner's Manual
Page 14
speaker 4. Slide the battery release latch to the unlock position. docking board 2. front camera 6. rear camera 7. Follow the procedures in an outward direction and remove it from the computer. 14 SmartCard reader/WWAN card (WWAN card is located below the SmartCard reader Removing the Battery 1. Lift up the battery in Before Working Inside Your Computer. 2. coin-cell battery 3. Figure 2. system board 5. Internal View 1.
speaker 4. Slide the battery release latch to the unlock position. docking board 2. front camera 6. rear camera 7. Follow the procedures in an outward direction and remove it from the computer. 14 SmartCard reader/WWAN card (WWAN card is located below the SmartCard reader Removing the Battery 1. Lift up the battery in Before Working Inside Your Computer. 2. coin-cell battery 3. Figure 2. system board 5. Internal View 1.
Dell Latitude 10 - ST2 Owner's Manual
Page 22
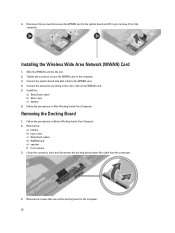
... 1. Remove the screws that secure the WWAN card to remove it up the connector latch and disconnect the docking board power flex cable from the computer. Follow the procedures in Before Working Inside Your Computer. 2. 4. Install the : a) SmartCard reader b) base cover c) battery 6. Lift up ... computer. 22 Follow the procedures in After Working Inside Your Computer. Installing the Wireless Wide Area Network (WWAN) Card 1. Disconnect the screws that secure the docking board to the color code on the WWAN card. 5.
... 1. Remove the screws that secure the WWAN card to remove it up the connector latch and disconnect the docking board power flex cable from the computer. Follow the procedures in Before Working Inside Your Computer. 2. 4. Install the : a) SmartCard reader b) base cover c) battery 6. Lift up ... computer. 22 Follow the procedures in After Working Inside Your Computer. Installing the Wireless Wide Area Network (WWAN) Card 1. Disconnect the screws that secure the docking board to the color code on the WWAN card. 5.
Dell Latitude 10 - ST2 Owner's Manual
Page 23
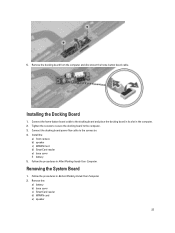
5. Connect the home-button board cable to the connector. 4. Remove the docking board from the computer and disconnect the home-button board cable. Connect the docking board power flex cable to the docking board and place the docking board in its slot in the computer. 2. Removing the System Board 1. Follow the procedures in Before ...Remove the: a) battery b) base cover c) SmartCard reader d) WWAN card e) speaker 23 Install the: a) front camera b) speaker c) WWAN Card d) SmartCard reader e) base cover f) battery 5. Installing the Docking Board 1. Tighten the screws to secure the...
5. Connect the home-button board cable to the connector. 4. Remove the docking board from the computer and disconnect the home-button board cable. Connect the docking board power flex cable to the docking board and place the docking board in its slot in the computer. 2. Removing the System Board 1. Follow the procedures in Before ...Remove the: a) battery b) base cover c) SmartCard reader d) WWAN card e) speaker 23 Install the: a) front camera b) speaker c) WWAN Card d) SmartCard reader e) base cover f) battery 5. Installing the Docking Board 1. Tighten the screws to secure the...
Dell Latitude 10 - ST2 Owner's Manual
Page 24
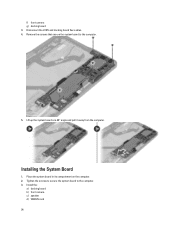
Disconnect the LVDS and docking board flex cables. 4. Install the: a) docking board b) front camera c) speaker d) WWAN card 24 Tighten the screws to secure the system board to the computer. 5. Installing the System Board 1. Lift up the system board at a 45° angle and pull it away from the computer. Place the system board in its compartment on the computer. 2. f) front camera g) docking board 3. Remove the screws that secure the system board to the computer. 3.
Disconnect the LVDS and docking board flex cables. 4. Install the: a) docking board b) front camera c) speaker d) WWAN card 24 Tighten the screws to secure the system board to the computer. 5. Installing the System Board 1. Lift up the system board at a 45° angle and pull it away from the computer. Place the system board in its compartment on the computer. 2. f) front camera g) docking board 3. Remove the screws that secure the system board to the computer. 3.
Dell Latitude 10 - ST2 Owner's Manual
Page 29
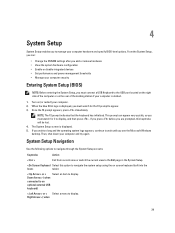
... the System Setup, you can appear very quickly, so you must connect a USB Keyboard to the USB port located on the right side of the docking station if your computer. 2. Down Arrow > ( when connected to an optional external USB keyboard) < Left Arrow > or < Select a menu to the ...Arrow > or < Select an item to display, and then press . 4 System Setup System Setup enables you see the Microsoft Windows desktop. When the blue DELL logo is displayed. 5. If you wait too long and the operating system logo appears, continue to wait until you to appear. 3. If you press before...
... the System Setup, you can appear very quickly, so you must connect a USB Keyboard to the USB port located on the right side of the docking station if your computer. 2. Down Arrow > ( when connected to an optional external USB keyboard) < Left Arrow > or < Select a menu to the ...Arrow > or < Select an item to display, and then press . 4 System Setup System Setup enables you see the Microsoft Windows desktop. When the blue DELL logo is displayed. 5. If you wait too long and the operating system logo appears, continue to wait until you to appear. 3. If you press before...
Dell Latitude 10 - ST2 Owner's Manual
Page 40
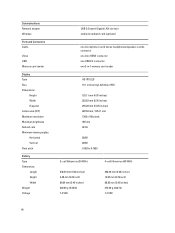
... Maximum brightness Refresh rate Minimum viewing angles: Horizontal Vertical Pixel pitch Battery Type Dimensions Length Height Width Weight Voltage USB 2.0 based Gigabit LAN via dock mobile broadband card (optional) one microphone-in and stereo headphones/speakers combo connector one mini HDMI connector one USB 2.0 connector one 3-in-1 memory... card reader HD IPS LED 10.1 inches high definition (HD) 125.11 mm (4.93 inches) 222.52 mm (8.76 inches) 255.28 mm (10.05 inches) 222.52 mm / 125.11 mm 1366 x 768 pixels 450 nits 60 Hz...
... Maximum brightness Refresh rate Minimum viewing angles: Horizontal Vertical Pixel pitch Battery Type Dimensions Length Height Width Weight Voltage USB 2.0 based Gigabit LAN via dock mobile broadband card (optional) one microphone-in and stereo headphones/speakers combo connector one mini HDMI connector one USB 2.0 connector one 3-in-1 memory... card reader HD IPS LED 10.1 inches high definition (HD) 125.11 mm (4.93 inches) 222.52 mm (8.76 inches) 255.28 mm (10.05 inches) 222.52 mm / 125.11 mm 1366 x 768 pixels 450 nits 60 Hz...
How To Guide
Page 5
... - Choose drivers and downloads These products are : 2.2.1 Features Offered on other Latitude, Mobile Precision or previous Dell products. Physical switch to lock up /down buttons - Optional Docking with flash) - New BIOS architecture - TPM - Graphics controller (Intel) with Stylus support - Dell Latitude 10 - ST2 Reimage "How-To" Guide 2.2 Latitude 10 - ST2 - Touch Screen Digitizer & multi-Fingers touch with display auto-rotation.
... - Choose drivers and downloads These products are : 2.2.1 Features Offered on other Latitude, Mobile Precision or previous Dell products. Physical switch to lock up /down buttons - Optional Docking with flash) - New BIOS architecture - TPM - Graphics controller (Intel) with Stylus support - Dell Latitude 10 - ST2 Reimage "How-To" Guide 2.2 Latitude 10 - ST2 - Touch Screen Digitizer & multi-Fingers touch with display auto-rotation.

How To Guide
Page 7
... Network Adapter (UWB / WPAN) - Mobile Broadband Wireless Wide Area Network Adapter (WWAN) - On Latitude 10 - ST2, it is posted on Dock/Dongle - BIOS - Enables and enhances the audio controller - Optional Wired Network Controller on Dell's driver & downloads support web site (support.dell.com) under the "BIOS" section. Enables and enhances the Wireless LAN network adapter 3. Enables...
... Network Adapter (UWB / WPAN) - Mobile Broadband Wireless Wide Area Network Adapter (WWAN) - On Latitude 10 - ST2, it is posted on Dock/Dongle - BIOS - Enables and enhances the audio controller - Optional Wired Network Controller on Dell's driver & downloads support web site (support.dell.com) under the "BIOS" section. Enables and enhances the Wireless LAN network adapter 3. Enables...

How To Guide
Page 8
... driver applicable to the WLAN devices installed in Dell Latitude 10 - ST2 Reimage "How-To" Guide TPM SUPPORT: Disabled (Default): The BIOS will not turn the TPM during POST. The TPM will turn on Dock/Dongle - These are available on Dell's driver & downloads support web site (support.dell.com) under the "Communication" section 2.7.3 Wired Network...
... driver applicable to the WLAN devices installed in Dell Latitude 10 - ST2 Reimage "How-To" Guide TPM SUPPORT: Disabled (Default): The BIOS will not turn the TPM during POST. The TPM will turn on Dock/Dongle - These are available on Dell's driver & downloads support web site (support.dell.com) under the "Communication" section 2.7.3 Wired Network...