
AMD Service Manual
Page 13
... system board. 1 hard-drive cable 2 status light board connector cable connector 7. drive cable and the status light board cable from the connector on the computer base. Remove the battery (see Removing the Module Cover). 4. Remove the keyboard (see Removing the Battery) before ...Dell™ Inspiron™ M301Z/N301Z Service Manual Removing the Coin-Cell Battery Replacing the Coin-Cell Battery WARNING: Before working inside the computer. CAUTION: To help prevent damage to disconnect the hard- Lift the connector latches and pull the pull-tabs to the system board, remove...
... system board. 1 hard-drive cable 2 status light board connector cable connector 7. drive cable and the status light board cable from the connector on the computer base. Remove the battery (see Removing the Module Cover). 4. Remove the keyboard (see Removing the Battery) before ...Dell™ Inspiron™ M301Z/N301Z Service Manual Removing the Coin-Cell Battery Replacing the Coin-Cell Battery WARNING: Before working inside the computer. CAUTION: To help prevent damage to disconnect the hard- Lift the connector latches and pull the pull-tabs to the system board, remove...
AMD Service Manual
Page 27
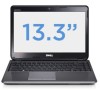
...). 4. Lift the connector latch and pull the pull-tab to disconnect the hard-drive cable from a source other than Dell, you remove the hard drive from sources other than Dell. Back to Contents Page Hard Drive Assembly Dell™ Inspiron™ M301Z/N301Z Service Manual Removing the Hard Drive Assembly Replacing the Hard Drive Assembly WARNING: Before working inside your computer, read the safety information that shipped...
...). 4. Lift the connector latch and pull the pull-tab to disconnect the hard-drive cable from a source other than Dell, you remove the hard drive from sources other than Dell. Back to Contents Page Hard Drive Assembly Dell™ Inspiron™ M301Z/N301Z Service Manual Removing the Hard Drive Assembly Replacing the Hard Drive Assembly WARNING: Before working inside your computer, read the safety information that shipped...

AMD Service Manual
Page 28
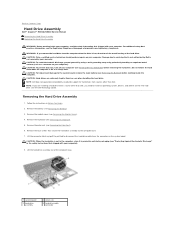
.... Remove the new hard drive from the hard drive. 1 screws (4) 3 hard-drive bracket 2 interposer 4 hard drive Replacing the Hard Drive Assembly 1. See "Restoring Your Operating System" in the hard-drive bracket. 5. For more information, see the Dell Technology Guide. Pull the interposer to the hard drive. 10. Remove the four screws that secure the hard-drive assembly to Contents Page Replace the four screws the hard-drive bracket to secure the hard-drive...
.... Remove the new hard drive from the hard drive. 1 screws (4) 3 hard-drive bracket 2 interposer 4 hard drive Replacing the Hard Drive Assembly 1. See "Restoring Your Operating System" in the hard-drive bracket. 5. For more information, see the Dell Technology Guide. Pull the interposer to the hard drive. 10. Remove the four screws that secure the hard-drive assembly to Contents Page Replace the four screws the hard-drive bracket to secure the hard-drive...
AMD Service Manual
Page 46
... the pull-tabs to Contents Page Speaker Dell™ Inspiron™ M301Z/N301Z Service Manual Removing the Speaker Replacing the Speaker WARNING: Before working inside your computer, read the safety information that is not authorized by your computer. Remove the battery (see Removing the Keyboard). 5. Back to disconnect the hard- For additional safety best practices information, see...
... the pull-tabs to Contents Page Speaker Dell™ Inspiron™ M301Z/N301Z Service Manual Removing the Speaker Replacing the Speaker WARNING: Before working inside your computer, read the safety information that is not authorized by your computer. Remove the battery (see Removing the Keyboard). 5. Back to disconnect the hard- For additional safety best practices information, see...

AMD Service Manual
Page 47
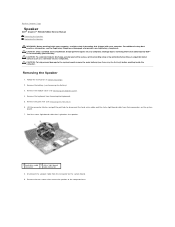
Note the routing of the status light board cable over the speaker. 7. Follow the instructions in the computer base. 3. Slide the hard-drive cable and the status light board cable into their connectors on the connector latches to the computer base. 4. Press down on the system ...2 screws (2) 10. Replacing the Speaker 1. Replace the module cover (see Replacing the Palm Rest). 8. Press the adhesive side of the speaker cable and remove the speaker from the computer base. Replace the battery (see Replacing the Keyboard). 9. Replace the keyboard (see Replacing the Battery).
Note the routing of the status light board cable over the speaker. 7. Follow the instructions in the computer base. 3. Slide the hard-drive cable and the status light board cable into their connectors on the connector latches to the computer base. 4. Press down on the system ...2 screws (2) 10. Replacing the Speaker 1. Replace the module cover (see Replacing the Palm Rest). 8. Press the adhesive side of the speaker cable and remove the speaker from the computer base. Replace the battery (see Replacing the Keyboard). 9. Replace the keyboard (see Replacing the Battery).

AMD Service Manual
Page 48
...Remove the memory module(s) (see Removing the Middle Cover). 13. Remove the keyboard (see Removing the Bluetooth Card). 10. Remove the Bluetooth® card (see Removing the Keyboard). 6. Follow the instructions in "Removing the Hard Drive Assembly". 8. Remove the screw that secures the left hinge-bracket. Remove...in Before You Begin. 2. Remove the processor fan (see Removing the Palm Rest). 7. Remove the battery (see Removing the Module Cover). 4. Back to Contents Page System Board Dell™ Inspiron™ M301Z/N301Z Service Manual Removing the System Board Replacing the ...
...Remove the memory module(s) (see Removing the Middle Cover). 13. Remove the keyboard (see Removing the Bluetooth Card). 10. Remove the Bluetooth® card (see Removing the Keyboard). 6. Follow the instructions in "Removing the Hard Drive Assembly". 8. Remove the screw that secures the left hinge-bracket. Remove...in Before You Begin. 2. Remove the processor fan (see Removing the Palm Rest). 7. Remove the battery (see Removing the Module Cover). 4. Back to Contents Page System Board Dell™ Inspiron™ M301Z/N301Z Service Manual Removing the System Board Replacing the ...

AMD Service Manual
Page 49
Lift the left hinge-bracket off the computer base. 1 left hinge-bracket 2 screw 15. Remove the four screws that secure the system board to the computer base. 14. Disconnect the coin-cell battery cable, speaker cable, status light board cable, and the AC adapter connector cable from their respective connectors on the system board. 1 AC adapter cable connector 2 coin-cell battery cable connector 3 status light board cable 4 hard-drive cable connector connector 5 speaker cable connector 16.
Lift the left hinge-bracket off the computer base. 1 left hinge-bracket 2 screw 15. Remove the four screws that secure the system board to the computer base. 14. Disconnect the coin-cell battery cable, speaker cable, status light board cable, and the AC adapter connector cable from their respective connectors on the system board. 1 AC adapter cable connector 2 coin-cell battery cable connector 3 status light board cable 4 hard-drive cable connector connector 5 speaker cable connector 16.

AMD Service Manual
Page 50
... (see Replacing the Processor Fan). 14. Follow the instructions in Replacing the Hard Drive Assembly. 13. Replace the screw that no stray screws remain inside the computer. Replace the processor fan (see Removing the Mini-Card(s)). 20. Replace the Bluetooth card (see Replacing the Keyboard... instructions from step 6 to step 8 in Before You Begin. 2. Replace the memory module(s) (see Removing the Processor Heat Sink Assembly). Failure to the computer. 21. Remove the processor heat sink assembly (see Replacing the Memory Module(s)). 19. Replace the middle cover (see Replacing...
... (see Replacing the Processor Fan). 14. Follow the instructions in Replacing the Hard Drive Assembly. 13. Replace the screw that no stray screws remain inside the computer. Replace the processor fan (see Removing the Mini-Card(s)). 20. Replace the Bluetooth card (see Replacing the Keyboard... instructions from step 6 to step 8 in Before You Begin. 2. Replace the memory module(s) (see Removing the Processor Heat Sink Assembly). Failure to the computer. 21. Remove the processor heat sink assembly (see Replacing the Memory Module(s)). 19. Replace the middle cover (see Replacing...

AMD Setup Guide
Page 62
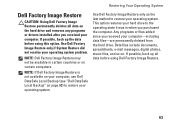
... state it is not available on your computer, use Dell Factory Image Restore (see "Dell Factory Image Restore" on page 63) to restore your operating system. 60 You can use Dell DataSafe Local Backup to restore your hard drive to preserve the data files on your data files before... using the Dell DataSafe Local Backup. Disconnect all regions. NOTE: If Dell DataSafe Local Backup is recommended that you backup your computer, it was in all the devices (USB drive, printer, etc.) connected to the computer and remove ...
... state it is not available on your computer, use Dell Factory Image Restore (see "Dell Factory Image Restore" on page 63) to restore your operating system. 60 You can use Dell DataSafe Local Backup to restore your hard drive to preserve the data files on your data files before... using the Dell DataSafe Local Backup. Disconnect all regions. NOTE: If Dell DataSafe Local Backup is recommended that you backup your computer, it was in all the devices (USB drive, printer, etc.) connected to the computer and remove ...
AMD Setup Guide
Page 65
... Restore may not be available in when you purchased the computer. Use Dell Factory Image Restore only as the last method to the operating state it was in certain countries or on the hard drive and removes any programs or drivers installed after you received your computer. Any programs... or files added since you received your computer-including data files-are permanently deleted from the hard drive. If possible, back up the data before ...
... Restore may not be available in when you purchased the computer. Use Dell Factory Image Restore only as the last method to the operating state it was in certain countries or on the hard drive and removes any programs or drivers installed after you received your computer. Any programs... or files added since you received your computer-including data files-are permanently deleted from the hard drive. If possible, back up the data before ...
AMD Setup Guide
Page 71
... the reason for any of your return. Include any accessories that you return the product to Dell, make sure to back up any data on the hard drive(s) and on any other storage device in the product. Remove any and all items being returned (power cables, software, guides, and so on) if ...the return is not responsible for the return. 3. Include a copy of the box. or damaged or lost or corrupted data; Call Dell to obtain a...
... the reason for any of your return. Include any accessories that you return the product to Dell, make sure to back up any data on the hard drive(s) and on any other storage device in the product. Remove any and all items being returned (power cables, software, guides, and so on) if ...the return is not responsible for the return. 3. Include a copy of the box. or damaged or lost or corrupted data; Call Dell to obtain a...


