AMD Service Manual
Page 1
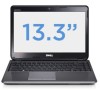
...States and/or other than its own. disclaims any manner whatsoever without notice. © 2010 Dell Inc. Trademarks used in this text: Dell, the DELL logo, and Inspiron are either the entities claiming the marks and names or their products. Microsoft, Windows, and the... refer to either trademarks or registered trademarks of your computer. Dell™ Inspiron™ M301Z/N301Z Service Manual Before You Begin Battery Module Cover Memory Module(s) Keyboard Palm Rest Power Button Board Hard Drive Assembly Processor Fan Internal Card With Bluetooth® Wireless Technology ...
...States and/or other than its own. disclaims any manner whatsoever without notice. © 2010 Dell Inc. Trademarks used in this text: Dell, the DELL logo, and Inspiron are either the entities claiming the marks and names or their products. Microsoft, Windows, and the... refer to either trademarks or registered trademarks of your computer. Dell™ Inspiron™ M301Z/N301Z Service Manual Before You Begin Battery Module Cover Memory Module(s) Keyboard Palm Rest Power Button Board Hard Drive Assembly Processor Fan Internal Card With Bluetooth® Wireless Technology ...

AMD Service Manual
Page 13
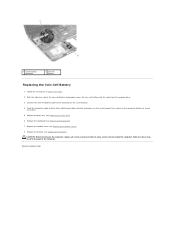
...the Module Cover). 4. Lift the connector latches and pull the pull-tabs to disconnect the hard- CAUTION: Only a certified service technician should perform repairs on the system board. 1 hard-drive cable 2 status light board connector cable connector 7. Removing the Coin-Cell Battery 1. Remove the...the Palm Rest). 6. Damage due to servicing that shipped with your computer. Back to Contents Page Coin-Cell Battery Dell™ Inspiron™ M301Z/N301Z Service Manual Removing the Coin-Cell Battery Replacing the Coin-Cell Battery WARNING: Before working inside your computer, read...
...the Module Cover). 4. Lift the connector latches and pull the pull-tabs to disconnect the hard- CAUTION: Only a certified service technician should perform repairs on the system board. 1 hard-drive cable 2 status light board connector cable connector 7. Removing the Coin-Cell Battery 1. Remove the...the Palm Rest). 6. Damage due to servicing that shipped with your computer. Back to Contents Page Coin-Cell Battery Dell™ Inspiron™ M301Z/N301Z Service Manual Removing the Coin-Cell Battery Replacing the Coin-Cell Battery WARNING: Before working inside your computer, read...
AMD Service Manual
Page 14
... (see Replacing the Keyboard). 7. 1 system board connector 2 coin-cell battery Replacing the Coin-Cell Battery 1. Replace the battery (see Replacing the Palm Rest). 6. Slide the hard-drive cable and the status light board cable into the socket on the system board. Replace the palm rest (see Replacing the Battery). Back to do...
... (see Replacing the Keyboard). 7. 1 system board connector 2 coin-cell battery Replacing the Coin-Cell Battery 1. Replace the battery (see Replacing the Palm Rest). 6. Slide the hard-drive cable and the status light board cable into the socket on the system board. Replace the palm rest (see Replacing the Battery). Back to do...
AMD Service Manual
Page 27
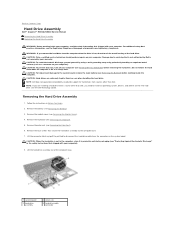
... the metal housing of the computer base. 1 system board 3 hard-drive assembly 2 screws (4) 4 hard-drive cable connector CAUTION: To prevent data loss, turn off your computer (see Removing the Battery). 3. Back to Contents Page Hard Drive Assembly Dell™ Inspiron™ M301Z/N301Z Service Manual Removing the Hard Drive Assembly Replacing the Hard Drive Assembly WARNING: Before working inside your computer, read the...
... the metal housing of the computer base. 1 system board 3 hard-drive assembly 2 screws (4) 4 hard-drive cable connector CAUTION: To prevent data loss, turn off your computer (see Removing the Battery). 3. Back to Contents Page Hard Drive Assembly Dell™ Inspiron™ M301Z/N301Z Service Manual Removing the Hard Drive Assembly Replacing the Hard Drive Assembly WARNING: Before working inside your computer, read the...

AMD Service Manual
Page 28
... for your computer, as needed . Remove the new hard drive from the hard drive. 1 screws (4) 3 hard-drive bracket 2 interposer 4 hard drive Replacing the Hard Drive Assembly 1. Replace the palm rest (see the Dell Technology Guide. Failure to the hard drive. 10. Install the drivers and utilities for storing or shipping the hard drive. 3. Pull the interposer to the hard drive. 6. Save the original packaging for your computer...
... for your computer, as needed . Remove the new hard drive from the hard drive. 1 screws (4) 3 hard-drive bracket 2 interposer 4 hard drive Replacing the Hard Drive Assembly 1. Replace the palm rest (see the Dell Technology Guide. Failure to the hard drive. 10. Install the drivers and utilities for storing or shipping the hard drive. 3. Pull the interposer to the hard drive. 6. Save the original packaging for your computer...
AMD Service Manual
Page 46
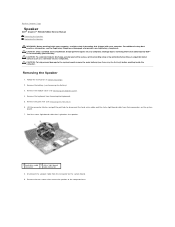
... by periodically touching an unpainted metal surface (such as a connector on the speaker. 1 hard-drive cable 2 status light board connector cable connector 8. Remove the two screws that is not authorized by Dell™ is glued on your computer). CAUTION: To avoid electrostatic discharge, ground yourself by.... Lift the connector latches and pull the pull-tabs to the computer base. Back to Contents Page Speaker Dell™ Inspiron™ M301Z/N301Z Service Manual Removing the Speaker Replacing the Speaker WARNING: Before working inside your computer, read the safety ...
... by periodically touching an unpainted metal surface (such as a connector on the speaker. 1 hard-drive cable 2 status light board connector cable connector 8. Remove the two screws that is not authorized by Dell™ is glued on your computer). CAUTION: To avoid electrostatic discharge, ground yourself by.... Lift the connector latches and pull the pull-tabs to the computer base. Back to Contents Page Speaker Dell™ Inspiron™ M301Z/N301Z Service Manual Removing the Speaker Replacing the Speaker WARNING: Before working inside your computer, read the safety ...

AMD Service Manual
Page 47
... to the connector on the connector latches to the computer base. 4. Replace the two screws that no stray screws remain inside the computer. Slide the hard-drive cable and the status light board cable into their connectors on the computer, replace all screws and ensure that secure the speaker to secure the...
... to the connector on the connector latches to the computer base. 4. Replace the two screws that no stray screws remain inside the computer. Slide the hard-drive cable and the status light board cable into their connectors on the computer, replace all screws and ensure that secure the speaker to secure the...

AMD Service Manual
Page 48
... the Middle Cover). 13. Remove the middle cover (see Removing the Keyboard). 6. Back to Contents Page System Board Dell™ Inspiron™ M301Z/N301Z Service Manual Removing the System Board Replacing the System Board Entering the Service Tag in the BIOS WARNING: Before working... system board, remove the main battery (see Removing the Battery) before working inside the computer. Follow the instructions in "Removing the Hard Drive Assembly". 8. Remove the Bluetooth® card (see Removing the Display Assembly). 12. Remove the display assembly (see Removing the Bluetooth...
... the Middle Cover). 13. Remove the middle cover (see Removing the Keyboard). 6. Back to Contents Page System Board Dell™ Inspiron™ M301Z/N301Z Service Manual Removing the System Board Replacing the System Board Entering the Service Tag in the BIOS WARNING: Before working... system board, remove the main battery (see Removing the Battery) before working inside the computer. Follow the instructions in "Removing the Hard Drive Assembly". 8. Remove the Bluetooth® card (see Removing the Display Assembly). 12. Remove the display assembly (see Removing the Bluetooth...

AMD Service Manual
Page 49
14. Disconnect the coin-cell battery cable, speaker cable, status light board cable, and the AC adapter connector cable from their respective connectors on the system board. 1 AC adapter cable connector 2 coin-cell battery cable connector 3 status light board cable 4 hard-drive cable connector connector 5 speaker cable connector 16. Lift the left hinge-bracket off the computer base. 1 left hinge-bracket 2 screw 15. Remove the four screws that secure the system board to the computer base.
14. Disconnect the coin-cell battery cable, speaker cable, status light board cable, and the AC adapter connector cable from their respective connectors on the system board. 1 AC adapter cable connector 2 coin-cell battery cable connector 3 status light board cable 4 hard-drive cable connector connector 5 speaker cable connector 16. Lift the left hinge-bracket off the computer base. 1 left hinge-bracket 2 screw 15. Remove the four screws that secure the system board to the computer base.

AMD Service Manual
Page 50
... the coin-cell battery cable, speaker cable, status light board cable, and the AC adapter connector cable to do so may result in Replacing the Hard Drive Assembly. 13. Replace the memory module(s) (see Replacing the Battery). Replace the module cover (see Replacing the Mini-Card(s)). 4. Turn the system board assembly over...
... the coin-cell battery cable, speaker cable, status light board cable, and the AC adapter connector cable to do so may result in Replacing the Hard Drive Assembly. 13. Replace the memory module(s) (see Replacing the Battery). Replace the module cover (see Replacing the Mini-Card(s)). 4. Turn the system board assembly over...

AMD Setup Guide
Page 25
... when no media card is installed in the media card slot. Connects to eSATA compatible storage devices (such as external hard drives or optical drives) or USB devices (such as a mouse, keyboard, printer, external drive, or MP3 player). 3 Audio out/Headphone connector - Connects to a microphone or inputs signal for use with a plastic blank installed... slots from other particles. Provides a fast and convenient way to view and share digital photos, music, videos, and documents stored on memory cards. Using Your Inspiron Laptop 1 7-in /Microphone connector -
... when no media card is installed in the media card slot. Connects to eSATA compatible storage devices (such as external hard drives or optical drives) or USB devices (such as a mouse, keyboard, printer, external drive, or MP3 player). 3 Audio out/Headphone connector - Connects to a microphone or inputs signal for use with a plastic blank installed... slots from other particles. Provides a fast and convenient way to view and share digital photos, music, videos, and documents stored on memory cards. Using Your Inspiron Laptop 1 7-in /Microphone connector -

AMD Setup Guide
Page 29
Turns on page 28. 2 Hard drive activity light - Indicates the battery charge status. Front View Features Using Your Inspiron Laptop 12 3 1 Power indicator light - For more information on the power indicator light, see "Status Lights and Indicators"on page 28. For more information on ... reads or writes data. Indicates the power states. NOTE: The battery is charging when the computer is blinking. 3 Battery status light - A solid white light indicates hard drive activity. CAUTION: To avoid loss of data, never turn off the computer while the...
Turns on page 28. 2 Hard drive activity light - Indicates the battery charge status. Front View Features Using Your Inspiron Laptop 12 3 1 Power indicator light - For more information on the power indicator light, see "Status Lights and Indicators"on page 28. For more information on ... reads or writes data. Indicates the power states. NOTE: The battery is charging when the computer is blinking. 3 Battery status light - A solid white light indicates hard drive activity. CAUTION: To avoid loss of data, never turn off the computer while the...
AMD Setup Guide
Page 39
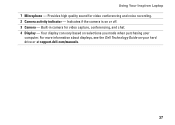
Using Your Inspiron Laptop 1 Microphone - Indicates if the camera is on selections you made when purchasing your hard drive or at support.dell.com/manuals. 37 Provides high quality sound for video capture, conferencing, and chat. 4 Display - Built-in camera for video conferencing and voice recording. 2 Camera activity indicator - Your display can vary based on or off. 3 Camera - For more information about displays, see the Dell Technology Guide on your computer.
Using Your Inspiron Laptop 1 Microphone - Indicates if the camera is on selections you made when purchasing your hard drive or at support.dell.com/manuals. 37 Provides high quality sound for video capture, conferencing, and chat. 4 Display - Built-in camera for video conferencing and voice recording. 2 Camera activity indicator - Your display can vary based on or off. 3 Camera - For more information about displays, see the Dell Technology Guide on your computer.
AMD Setup Guide
Page 42
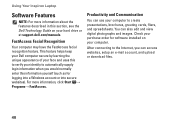
... computer. For more information about the features described in this information yourself (such as for software installed on your hard drive or at support.dell.com/manuals. FastAccess Facial Recognition Your computer may have the FastAccess facial recognition feature. You can use your computer...automatically supply login information when you can access websites, setup an e-mail account, and upload or download files. 40 Using Your Inspiron Laptop Software Features NOTE: For more information, click Start → Programs→ FastAccess. Check your purchase order for logging into ...
... computer. For more information about the features described in this information yourself (such as for software installed on your hard drive or at support.dell.com/manuals. FastAccess Facial Recognition Your computer may have the FastAccess facial recognition feature. You can use your computer...automatically supply login information when you can access websites, setup an e-mail account, and upload or download files. 40 Using Your Inspiron Laptop Software Features NOTE: For more information, click Start → Programs→ FastAccess. Check your purchase order for logging into ...
AMD Setup Guide
Page 50
... for troubleshooting information: --Ensure that the program is installed and configured properly. --Verify that your computer meets the minimum hardware requirements needed to check the hard drive or CDs. • Save and close any open files or programs and shut down your computer through the Start menu. • Check the software documentation...
... for troubleshooting information: --Ensure that the program is installed and configured properly. --Verify that your computer meets the minimum hardware requirements needed to check the hard drive or CDs. • Save and close any open files or programs and shut down your computer through the Start menu. • Check the software documentation...
AMD Setup Guide
Page 52
... register and download the software. 3. This software is not listed in all regions. System Messages If your hard drive or at My Dell Downloads. Go to downloadstore.dell.com/media. 2. Using Support Tools My Dell Downloads NOTE: My Dell Downloads may display a System Message that was running when the message appeared. Some of the software for...
... register and download the software. 3. This software is not listed in all regions. System Messages If your hard drive or at My Dell Downloads. Go to downloadstore.dell.com/media. 2. Using Support Tools My Dell Downloads NOTE: My Dell Downloads may display a System Message that was running when the message appeared. Some of the software for...
AMD Setup Guide
Page 54
...Disconnect the USB device. S.M.A.R.T error, possible hard drive failure. Contact Dell (see "Contacting Dell" on your device has two USB cables, connect both of range may or may not indicate a potential hard drive problem - A chip on page 73). 52 CAUTION - Hard Drive SELF MONITORING SYSTEM has reported that you back... needs more power for it to connect the USB device, or if your hard drive or at support.dell.com/manuals). A parameter out of them. No timer tick interrupt - Contact Dell (see "Contacting Dell" on the system board might be malfunctioning or there might be a system ...
...Disconnect the USB device. S.M.A.R.T error, possible hard drive failure. Contact Dell (see "Contacting Dell" on your device has two USB cables, connect both of range may or may not indicate a potential hard drive problem - A chip on page 73). 52 CAUTION - Hard Drive SELF MONITORING SYSTEM has reported that you back... needs more power for it to connect the USB device, or if your hard drive or at support.dell.com/manuals). A parameter out of them. No timer tick interrupt - Contact Dell (see "Contacting Dell" on the system board might be malfunctioning or there might be a system ...
AMD Setup Guide
Page 55
...but incorrectly configured, you contact Dell for technical assistance. Press during the operating system setup or is active. Start the Dell Diagnostics from your computer. In the search results, select the option that you experience a problem with your hard drive or from the Drivers and ...Utilities disc. 53 Using Support Tools Dell Diagnostics If you want to enter the System Setup (BIOS) utility. Hardware Troubleshooter If a device...
...but incorrectly configured, you contact Dell for technical assistance. Press during the operating system setup or is active. Start the Dell Diagnostics from your computer. In the search results, select the option that you experience a problem with your hard drive or from the Drivers and ...Utilities disc. 53 Using Support Tools Dell Diagnostics If you want to enter the System Setup (BIOS) utility. Hardware Troubleshooter If a device...
AMD Setup Guide
Page 56
... Diagnostics from the Drivers and Utilities disc. then, shut down your computer. b. Using Support Tools Starting Dell Diagnostics From Your Hard Drive The Dell Diagnostics is located on a hidden diagnostic utility partition on (or restart) your computer. 3. NOTE: If you see a message stating that is displayed: "No problems have ...
... Diagnostics from the Drivers and Utilities disc. then, shut down your computer. b. Using Support Tools Starting Dell Diagnostics From Your Hard Drive The Dell Diagnostics is located on a hidden diagnostic utility partition on (or restart) your computer. 3. NOTE: If you see a message stating that is displayed: "No problems have ...

AMD Setup Guide
Page 57
...not invoked: Press any key to the Choose An Option window. 7. The Service Tag helps you identify your computer is displayed: "Booting Dell Diagnostic Utility Partition. Using Support Tools 5. NOTE: The Service Tag for your computer when you want to restart the computer, click Exit.... test screen to return to continue." c. Press any key to start the Dell Diagnostics from the diagnostic utility partition on your screen. d. Write down the error code and problem description and contact Dell (see "Contacting Dell" on your hard drive and to go to the Choose An Option window. 4.
...not invoked: Press any key to the Choose An Option window. 7. The Service Tag helps you identify your computer is displayed: "Booting Dell Diagnostic Utility Partition. Using Support Tools 5. NOTE: The Service Tag for your computer when you want to restart the computer, click Exit.... test screen to return to continue." c. Press any key to start the Dell Diagnostics from the diagnostic utility partition on your screen. d. Write down the error code and problem description and contact Dell (see "Contacting Dell" on your hard drive and to go to the Choose An Option window. 4.


