
Service Manual
Page 1
... trade names may be used in trademarks and trade names other countries. A00 Dell Inc. All rights reserved. Microsoft, Windows, Windows Vista, and Windows Vista start button logo are trademarks of these materials in any proprietary interest in this text: Dell, the DELL logo, and Inspiron are either trademarks or registered trademarks of your computer. Reproduction of...
... trade names may be used in trademarks and trade names other countries. A00 Dell Inc. All rights reserved. Microsoft, Windows, Windows Vista, and Windows Vista start button logo are trademarks of these materials in any proprietary interest in this text: Dell, the DELL logo, and Inspiron are either trademarks or registered trademarks of your computer. Reproduction of...
Service Manual
Page 2
... click Shut Down. 3. WARNING: Before working inside your computer, read the safety information that shipped with your computer. Windows Vista®: Click the Start button Windows 7: , click the arrow , and then click Shut Down. CAUTION: Only a certified service technician is turned off ...following safety guidelines to help protect your computer from potential damage and to help to Contents Page Before You Begin Dell™ Inspiron™ 300/400 Service Manual Recommended Tools Turning Off Your Computer Safety Instructions This manual provides procedures for complete information...
... click Shut Down. 3. WARNING: Before working inside your computer, read the safety information that shipped with your computer. Windows Vista®: Click the Start button Windows 7: , click the arrow , and then click Shut Down. CAUTION: Only a certified service technician is turned off ...following safety guidelines to help protect your computer from potential damage and to help to Contents Page Before You Begin Dell™ Inspiron™ 300/400 Service Manual Recommended Tools Turning Off Your Computer Safety Instructions This manual provides procedures for complete information...
Service Manual
Page 27
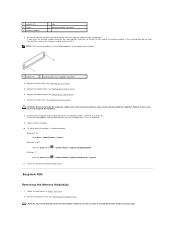
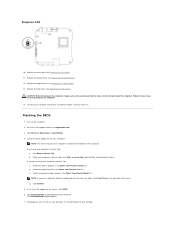
...memory size has changed, press to continue. 9. Click the Start button ® Control Panel® System and Security® System. 11. Inspiron 400 Removing the Memory Module(s) 1. Remove the bottom cover (see Replacing the Top Bracket). 7. If the securing clips do not snap into the... module securing clips. 1 cutouts (2) 3 notch 5 memory module 2 tab 4 memory-module connector 3. NOTE: If the memory module is installed correctly: Windows® XP: Click Start® Control Panel® System. Replace the top bracket (see Removing the Bottom Cover). To verify that the memory is ...
...memory size has changed, press to continue. 9. Click the Start button ® Control Panel® System and Security® System. 11. Inspiron 400 Removing the Memory Module(s) 1. Remove the bottom cover (see Replacing the Top Bracket). 7. If the securing clips do not snap into the... module securing clips. 1 cutouts (2) 3 notch 5 memory module 2 tab 4 memory-module connector 3. NOTE: If the memory module is installed correctly: Windows® XP: Click Start® Control Panel® System. Replace the top bracket (see Removing the Bottom Cover). To verify that the memory is ...
Service Manual
Page 28
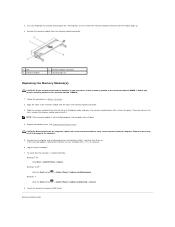
...memory-module connector. 3. Connect your fingertips to the computer. 5. To verify that no stray screws remain inside the computer. Windows Vista®: Click the Start button Windows 7: ® Control Panel® System and Maintenance. Slide the memory module firmly into the slot at a 45-degree ...pops up. 4. If you install a memory module in the connector labeled "DIMM 2." 1. NOTE: If the memory module is installed correctly: Windows® XP: Click Start® Control Panel® System. Use your computer and all screws and ensure that the memory is not installed ...
...memory-module connector. 3. Connect your fingertips to the computer. 5. To verify that no stray screws remain inside the computer. Windows Vista®: Click the Start button Windows 7: ® Control Panel® System and Maintenance. Slide the memory module firmly into the slot at a 45-degree ...pops up. 4. If you install a memory module in the connector labeled "DIMM 2." 1. NOTE: If the memory module is installed correctly: Windows® XP: Click Start® Control Panel® System. Use your computer and all screws and ensure that the memory is not installed ...
Service Manual
Page 41
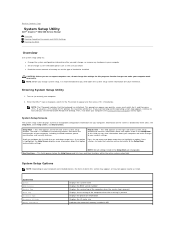
...can view information about your computer and make your computer l Set or change the settings for your computer (see the Microsoft® Windows® desktop. and down your computer. System Info System BIOS Version Service Tag Asset Tag Processor Type Processor L2 Cache Memory Installed... Displays the asset tag of the system setup window and contains information about that the keyboard has initialized. NOTE: Not all settings listed in MB Press the up - Back to Contents Page System Setup Utility Dell™ Inspiron™ 300/400 Service Manual Overview Clearing Forgotten...
...can view information about your computer and make your computer l Set or change the settings for your computer (see the Microsoft® Windows® desktop. and down your computer. System Info System BIOS Version Service Tag Asset Tag Processor Type Processor L2 Cache Memory Installed... Displays the asset tag of the system setup window and contains information about that the keyboard has initialized. NOTE: Not all settings listed in MB Press the up - Back to Contents Page System Setup Utility Dell™ Inspiron™ 300/400 Service Manual Overview Clearing Forgotten...
Service Manual
Page 43
...Then shut down your device is bootable, check the device documentation. On the Boot Device Menu choose the device you to run the Dell Diagnostics on the Drivers and Utilities media. Disabled (Hard Disk by default) Specifies the boot device priority sequence from the available hard... flash option to wait until you wait too long and the operating system logo appears, continue to the boot menu. If you see the Microsoft Windows desktop. The Boot Device Menu appears, listing all available boot devices. 4. Removable; Removable; Network; NOTE: To boot to a USB connector. ...
...Then shut down your device is bootable, check the device documentation. On the Boot Device Menu choose the device you to run the Dell Diagnostics on the Drivers and Utilities media. Disabled (Hard Disk by default) Specifies the boot device priority sequence from the available hard... flash option to wait until you wait too long and the operating system logo appears, continue to the boot menu. If you see the Microsoft Windows desktop. The Boot Device Menu appears, listing all available boot devices. 4. Removable; Removable; Network; NOTE: To boot to a USB connector. ...
Service Manual
Page 45
...on . Click Save to the computer. 14. The file downloads to electrical outlets, and turn them on your desktop. Inspiron 400 10. CAUTION: Before turning on the computer. 2. Flashing the BIOS 1. Locate the BIOS update file for your ... Service Tag for your computer and devices to your desktop. Enter your computer's Service Tag: a. Click Download Now to the Dell Support website at the bottom of the computer. Replace the top cover (see Replacing the Drive Bay). 11. b. c. ...Replace the optical drive (see Replacing the Top Bracket). 13. The File Download window appears. 7.
...on . Click Save to the computer. 14. The file downloads to electrical outlets, and turn them on your desktop. Inspiron 400 10. CAUTION: Before turning on the computer. 2. Flashing the BIOS 1. Locate the BIOS update file for your ... Service Tag for your computer and devices to your desktop. Enter your computer's Service Tag: a. Click Download Now to the Dell Support website at the bottom of the computer. Replace the top cover (see Replacing the Drive Bay). 11. b. c. ...Replace the optical drive (see Replacing the Top Bracket). 13. The File Download window appears. 7.

Service Manual
Page 46
Back to Contents Page Double-click the file icon on the desktop and follow the instructions on your desktop and is titled the same as the downloaded BIOS update file. 9. 8. The file icon appears on the screen. Click Close if the Download Complete window appears.
Back to Contents Page Double-click the file icon on the desktop and follow the instructions on your desktop and is titled the same as the downloaded BIOS update file. 9. 8. The file icon appears on the screen. Click Close if the Download Complete window appears.

Service Manual
Page 50
... than its own. is subject to change without the written permission of your computer. Microsoft, Windows, Windows Vista, and Windows Vista start button logo are trademarks of Microsoft Corporation in this document to refer to Contents Page Dell™ Inspiron™ 300/400 Service Manual NOTE: A NOTE indicates important information that helps you how to...
... than its own. is subject to change without the written permission of your computer. Microsoft, Windows, Windows Vista, and Windows Vista start button logo are trademarks of Microsoft Corporation in this document to refer to Contents Page Dell™ Inspiron™ 300/400 Service Manual NOTE: A NOTE indicates important information that helps you how to...

SETUP GUIDE
Page 4
...Microsoft, Windows, Windows Vista, and Windows Vista start button logo are either the entities claiming the marks and names or their products. August 2009 P/N H4MWD Rev. AMD and AMD Athlon are trademarks of Dell Inc.; Trademarks used in this text: Dell, the DELL logo, YOURS IS HERE, Inspiron, Dell On Call... States and/or other countries; Bluetooth is subject to avoid the problem. disclaims any manner whatsoever without notice. © 2009 Dell Inc. CAUTION: A CAUTION indicates either potential damage to hardware or loss of data and tells you make better use of your...
...Microsoft, Windows, Windows Vista, and Windows Vista start button logo are either the entities claiming the marks and names or their products. August 2009 P/N H4MWD Rev. AMD and AMD Athlon are trademarks of Dell Inc.; Trademarks used in this text: Dell, the DELL logo, YOURS IS HERE, Inspiron, Dell On Call... States and/or other countries; Bluetooth is subject to avoid the problem. disclaims any manner whatsoever without notice. © 2009 Dell Inc. CAUTION: A CAUTION indicates either potential damage to hardware or loss of data and tells you make better use of your...

SETUP GUIDE
Page 15
Setting Up Your Inspiron Desktop CAUTION: Do not interrupt the operating system's setup process. Set Up Ubuntu To set up an Internet connection. Set Up Microsoft Windows To set up Ubuntu® for the first time, follow the instructions on the Dell Support website at the time of your ...some time to reinstall the operating system. These steps are mandatory and may render your computer unusable and you selected at support.dell.com. The Windows setup screens will need to complete. Doing so may take you download and install the latest BIOS and drivers for more ...
Setting Up Your Inspiron Desktop CAUTION: Do not interrupt the operating system's setup process. Set Up Ubuntu To set up an Internet connection. Set Up Microsoft Windows To set up Ubuntu® for the first time, follow the instructions on the Dell Support website at the time of your ...some time to reinstall the operating system. These steps are mandatory and may render your computer unusable and you selected at support.dell.com. The Windows setup screens will need to complete. Doing so may take you download and install the latest BIOS and drivers for more ...

SETUP GUIDE
Page 17
...open programs. 2. Click Start → Control Panel→ Network and Sharing Center→ Connect to your wireless router. Setting Up Your Inspiron Desktop Windows Vista® 1. Save and close any open files, and exit any open programs. 2. Click Start → Connect To. 3. Before... you can use your wireless Internet connection, you need to connect to a network. 3. To set up your connection to a wireless router: Windows XP 1. Windows 7 1. Click Start→ Control Panel. 3. Setting Up a Wireless Connection NOTE: To set up your wireless router, see the documentation that...
...open programs. 2. Click Start → Control Panel→ Network and Sharing Center→ Connect to your wireless router. Setting Up Your Inspiron Desktop Windows Vista® 1. Save and close any open files, and exit any open programs. 2. Click Start → Connect To. 3. Before... you can use your wireless Internet connection, you need to connect to a network. 3. To set up your connection to a wireless router: Windows XP 1. Windows 7 1. Click Start→ Control Panel. 3. Setting Up a Wireless Connection NOTE: To set up your wireless router, see the documentation that...

SETUP GUIDE
Page 18
Contact your ISP information ready. Under Network and Internet Connections, select Setup or Change Your Internet Connection. The Internet Properties window appears. 16 4. In the next window, select the appropriate option: --If you have an ISP and want to select one . Otherwise, follow the instructions..., continue to the Internet but have successfully connected in your Internet connection: Windows XP 1. If you cannot connect to step 8. Click Connect to complete the setup. Setting Up Your Inspiron Desktop Setting Up Your Internet Connection ISPs and ISP offerings vary by country....
Contact your ISP information ready. Under Network and Internet Connections, select Setup or Change Your Internet Connection. The Internet Properties window appears. 16 4. In the next window, select the appropriate option: --If you have an ISP and want to select one . Otherwise, follow the instructions..., continue to the Internet but have successfully connected in your Internet connection: Windows XP 1. If you cannot connect to step 8. Click Connect to complete the setup. Setting Up Your Inspiron Desktop Setting Up Your Internet Connection ISPs and ISP offerings vary by country....

SETUP GUIDE
Page 19
...Windows 7 1. Click Start → Control Panel. 3. Windows Vista NOTE: The following instructions are applicable to the Windows default view, so they may not apply if you set your ISP. 4. Setting Up Your Inspiron... Desktop NOTE: If you do not know which type of connection to select, click Help me choose or contact your ISP. 8. Follow the instructions on the screen and use the setup information provided by your ISP to the Windows...Connect to the Internet window appears. Click Start → Control Panel. 3. The Connect to the Internet window appears. Select the ...
...Windows 7 1. Click Start → Control Panel. 3. Windows Vista NOTE: The following instructions are applicable to the Windows default view, so they may not apply if you set your ISP. 4. Setting Up Your Inspiron... Desktop NOTE: If you do not know which type of connection to select, click Help me choose or contact your ISP. 8. Follow the instructions on the screen and use the setup information provided by your ISP to the Windows...Connect to the Internet window appears. Click Start → Control Panel. 3. The Connect to the Internet window appears. Select the ...

SETUP GUIDE
Page 28
...Windows 7 1. Using Your Inspiron Desktop Customizing the Desktop You can customize your desktop to access the display properties window. 2. Right-click an open the Display Properties window and learn more about your customization options. Right-click an open the Change the visuals and sounds on your computer window... to change the appearance, resolution, wallpaper, screensaver, or other features of your customization options. 26 Windows Vista® 1. To customize the desktop: Windows® XP 1. Click Personalize, to open area of the desktop. 2. Click Properties, to open...
...Windows 7 1. Using Your Inspiron Desktop Customizing the Desktop You can customize your desktop to access the display properties window. 2. Right-click an open the Display Properties window and learn more about your customization options. Right-click an open the Change the visuals and sounds on your computer window... to change the appearance, resolution, wallpaper, screensaver, or other features of your customization options. 26 Windows Vista® 1. To customize the desktop: Windows® XP 1. Click Personalize, to open area of the desktop. 2. Click Properties, to open...

SETUP GUIDE
Page 29
... by adapting processor speed to your activity and by your computer over its lifetime. • Balanced (recommended) - Windows 7 • Power saver - The Microsoft® Windows® operating system installed on your computer. Using Your Inspiron Desktop Customizing Your Energy Settings You can use the power options in your operating system to configure the...
... by adapting processor speed to your activity and by your computer over its lifetime. • Balanced (recommended) - Windows 7 • Power saver - The Microsoft® Windows® operating system installed on your computer. Using Your Inspiron Desktop Customizing Your Energy Settings You can use the power options in your operating system to configure the...

SETUP GUIDE
Page 30
Using Your Inspiron Desktop Transferring Information to a New Computer Windows XP NOTE: The following steps are applicable for the Windows default view, so they may not apply if you set your Dell™ computer to the Windows Classic view. 1. Click Start → Control Panel→ ...; Control Panel. 2. If the User Account Control window appears, click Continue. 2. Windows Vista NOTE: The following steps are applicable for the Windows default view, so they may not apply if you set your Dell™ computer to the Windows Classic view. 1. Follow the instructions on the...
Using Your Inspiron Desktop Transferring Information to a New Computer Windows XP NOTE: The following steps are applicable for the Windows default view, so they may not apply if you set your Dell™ computer to the Windows Classic view. 1. Click Start → Control Panel→ ...; Control Panel. 2. If the User Account Control window appears, click Continue. 2. Windows Vista NOTE: The following steps are applicable for the Windows default view, so they may not apply if you set your Dell™ computer to the Windows Classic view. 1. Follow the instructions on the...

SETUP GUIDE
Page 31
Click Start→ All Programs→ Accessories→ System Tools→ Backup. 2. If the User Account Control window appears, click Continue. Follow the instructions on your computer. 3. Using Your Inspiron Desktop Backing Up Your Data It is recommended that you periodically back up files and folders on the Configure Backup wizard. 29 Click...
Click Start→ All Programs→ Accessories→ System Tools→ Backup. 2. If the User Account Control window appears, click Continue. Follow the instructions on your computer. 3. Using Your Inspiron Desktop Backing Up Your Data It is recommended that you periodically back up files and folders on the Configure Backup wizard. 29 Click...

SETUP GUIDE
Page 32
...Remove a Category or Icon 1. Right-click the Dock and click Advanced Setting.... 2. Choose the desired option to the Dock or a category. Using Your Inspiron Desktop Dell Dock The Dell Dock is a group of the icons Add a Category 1. Select an icon for the category in the Title field. 3. You can personalize the Dock by...icons that provides easy access to frequently-used applications, files, and folders. Right-click the category or icon on the screen. The Add/Edit Category window appears. 2. Follow the instructions on the Dock and click Delete shortcut or Delete category. 2.
...Remove a Category or Icon 1. Right-click the Dock and click Advanced Setting.... 2. Choose the desired option to the Dock or a category. Using Your Inspiron Desktop Dell Dock The Dell Dock is a group of the icons Add a Category 1. Select an icon for the category in the Title field. 3. You can personalize the Dock by...icons that provides easy access to frequently-used applications, files, and folders. Right-click the category or icon on the screen. The Add/Edit Category window appears. 2. Follow the instructions on the Dock and click Delete shortcut or Delete category. 2.

SETUP GUIDE
Page 38
... the computer turns off. Ensure that the AC adapter cable is designed for at least 8 to an earlier version of Microsoft® Windows® operating system environments. If a program stops responding - Click Applications. 3. If a program crashes repeatedly - Then restart your mouse..., press and hold the power button for an earlier Microsoft® Windows® operating system - Click End Task. If the computer stops responding or a solid blue screen appears - Windows XP 1. Run the Program Compatibility Wizard. Solving Problems Lockups and Software Problems...
... the computer turns off. Ensure that the AC adapter cable is designed for at least 8 to an earlier version of Microsoft® Windows® operating system environments. If a program stops responding - Click Applications. 3. If a program crashes repeatedly - Then restart your mouse..., press and hold the power button for an earlier Microsoft® Windows® operating system - Click End Task. If the computer stops responding or a solid blue screen appears - Windows XP 1. Run the Program Compatibility Wizard. Solving Problems Lockups and Software Problems...


