
Comprehensive Specifications
Page 2
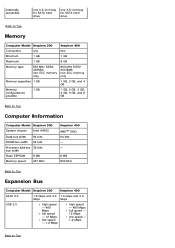
... for SATA hard drive one 3.5-inch bay for SATA hard drive Back to Top non-ECC memory only Memory capacities 1 GB 1 GB, 2 GB, and 4 GB Memory configurations possible 1 GB 1 GB, 2 GB, 3 GB, 4 GB, 6 GB, and 8 GB Back to Top Computer Information Computer Model Inspiron 300 System chipset...width 64 bits Processor address 32 bits bus width Flash EEPROM 8 MB Memory speed 667 MHz Inspiron 400 AMD® 780G 64 bits - - 8 MB 800 MHz Back to Top Expansion Bus Computer Model Inspiron 300 Inspiron 400 SATA 2.0 1.5 Gbps and 3.0 1.5 Gbps and 3.0 Gbps Gbps USB 2.0 high speed...
... for SATA hard drive one 3.5-inch bay for SATA hard drive Back to Top non-ECC memory only Memory capacities 1 GB 1 GB, 2 GB, and 4 GB Memory configurations possible 1 GB 1 GB, 2 GB, 3 GB, 4 GB, 6 GB, and 8 GB Back to Top Computer Information Computer Model Inspiron 300 System chipset...width 64 bits Processor address 32 bits bus width Flash EEPROM 8 MB Memory speed 667 MHz Inspiron 400 AMD® 780G 64 bits - - 8 MB 800 MHz Back to Top Expansion Bus Computer Model Inspiron 300 Inspiron 400 SATA 2.0 1.5 Gbps and 3.0 1.5 Gbps and 3.0 Gbps Gbps USB 2.0 high speed...
Comprehensive Specifications
Page 6
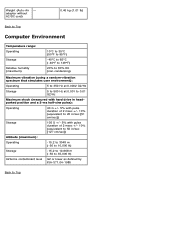
... simulates user environment): Operating 5 to 350 Hz at 0.0002 G2/Hz Storage 5 to 500 Hz at 0.001 to 0.01 G2/Hz Maximum shock (measured with hard drive in headparked position and a 2-ms half-sine pulse): Operating 40 G +/- 5% with pulse duration of 2 msec +/- 10% (equivalent to 20 in/sec [51 cm/sec]) Storage...
... simulates user environment): Operating 5 to 350 Hz at 0.0002 G2/Hz Storage 5 to 500 Hz at 0.001 to 0.01 G2/Hz Maximum shock (measured with hard drive in headparked position and a 2-ms half-sine pulse): Operating 40 G +/- 5% with pulse duration of 2 msec +/- 10% (equivalent to 20 in/sec [51 cm/sec]) Storage...
Service Manual
Page 1
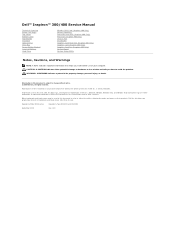
... button logo are trademarks of Dell Inc.; Dell™ Inspiron™ 300/400 Service Manual Technical Overview Before You Begin Top Cover Bottom Cover Top Bracket I/O Bezel Optical Drive Drive Bay Power-Button Bracket Coin-Cell Battery Hard Drive Wireless Mini-Card (Inspiron 400 Only) Memory Module(s) Processor Heat Sink (Inspiron 400 Only) Processor (Inspiron 400 Only) Chassis Fan I/O Bracket...
... button logo are trademarks of Dell Inc.; Dell™ Inspiron™ 300/400 Service Manual Technical Overview Before You Begin Top Cover Bottom Cover Top Bracket I/O Bezel Optical Drive Drive Bay Power-Button Bracket Coin-Cell Battery Hard Drive Wireless Mini-Card (Inspiron 400 Only) Memory Module(s) Processor Heat Sink (Inspiron 400 Only) Processor (Inspiron 400 Only) Chassis Fan I/O Bracket...
Service Manual
Page 16
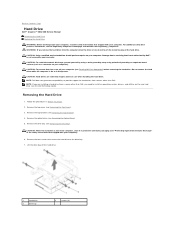
... loss, turn off the hard drive. 1 hard drive 3 drive bay 2 screws (4) Removing the Hard Drive 1. Follow the procedures in the safety instructions that shipped with your computer. Remove the drive bay (see Turning Off Your Computer) before removing the hard drive. Lift the drive bay off your computer (see Removing the Drive Bay). Back to Contents Page Hard Drive Dell™ Inspiron™ 300/400 Service...
... loss, turn off the hard drive. 1 hard drive 3 drive bay 2 screws (4) Removing the Hard Drive 1. Follow the procedures in the safety instructions that shipped with your computer. Remove the drive bay (see Turning Off Your Computer) before removing the hard drive. Lift the drive bay off your computer (see Removing the Drive Bay). Back to Contents Page Hard Drive Dell™ Inspiron™ 300/400 Service...
Service Manual
Page 17
... that no stray screws remain inside the computer. Replace the optical drive (see the Dell Technology Guide. Failure to do so may result in damage to Contents Page For more information, see Replacing the Optical Drive). 7. Save the original packaging for your computer, as needed ....holes on . 10. CAUTION: Before turning on the computer, replace all attached devices to the drive bay. 5. Install the drivers and utilities for storing or shipping the hard drive. 3. Replacing the Hard Drive 1. Follow the procedures in the Setup Guide. 11. Connect your computer, as needed . ...
... that no stray screws remain inside the computer. Replace the optical drive (see the Dell Technology Guide. Failure to do so may result in damage to Contents Page For more information, see Replacing the Optical Drive). 7. Save the original packaging for your computer, as needed ....holes on . 10. CAUTION: Before turning on the computer, replace all attached devices to the drive bay. 5. Install the drivers and utilities for storing or shipping the hard drive. 3. Replacing the Hard Drive 1. Follow the procedures in the Setup Guide. 11. Connect your computer, as needed . ...
Service Manual
Page 18
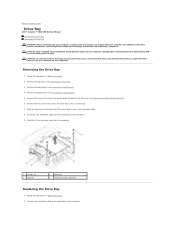
... bracket (see Removing the Top Cover). 3. Carefully lift the drive bay away from the connector on the hard drive. Remove the top cover (see Removing the Top Bracket). 4. Back to Contents Page Drive Bay Dell™ Inspiron™ 300/400 Service Manual Removing the Drive Bay Replacing the Drive Bay WARNING: Before working inside your computer, read the...
... bracket (see Removing the Top Cover). 3. Carefully lift the drive bay away from the connector on the hard drive. Remove the top cover (see Removing the Top Bracket). 4. Back to Contents Page Drive Bay Dell™ Inspiron™ 300/400 Service Manual Removing the Drive Bay Replacing the Drive Bay WARNING: Before working inside your computer, read the...
Service Manual
Page 41
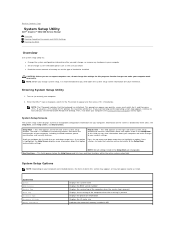
... keys to wait until you are changeable. As an option is recommended that option and available settings. Back to Contents Page System Setup Utility Dell™ Inspiron™ 300/400 Service Manual Overview Clearing Forgotten Passwords and CMOS Settings Flashing the BIOS Overview Use system setup utility to your current settings. ..., this section may appear, or may not appear exactly as the user password l Read the current amount of memory or set the type of hard drive installed CAUTION: Unless you see Turning Off Your Computer) and try again. Key Functions -
... keys to wait until you are changeable. As an option is recommended that option and available settings. Back to Contents Page System Setup Utility Dell™ Inspiron™ 300/400 Service Manual Overview Clearing Forgotten Passwords and CMOS Settings Flashing the BIOS Overview Use system setup utility to your current settings. ..., this section may appear, or may not appear exactly as the user password l Read the current amount of memory or set the type of hard drive installed CAUTION: Unless you see Turning Off Your Computer) and try again. Key Functions -
Service Manual
Page 43
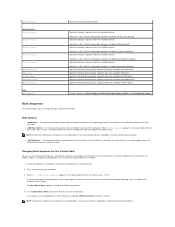
... Default Setting Boot Sequence This feature allows you to change the current boot sequence, for example, to boot from the CD/DVD drive to run the Dell Diagnostics on the Drivers and Utilities media. Removable; CD/DVD; Network; Insert the memory device into a USB port and restart ...your computer and try again. USB; Disabled (CD/DVD by default) Specifies the boot sequence from the primary hard drive. Removable; The computer attempts to boot from the available devices Hard Disk; When F2 = Setup, F12 Boot Options appears in the lower-right corner of diagnostic tests, the previous...
... Default Setting Boot Sequence This feature allows you to change the current boot sequence, for example, to boot from the CD/DVD drive to run the Dell Diagnostics on the Drivers and Utilities media. Removable; CD/DVD; Network; Insert the memory device into a USB port and restart ...your computer and try again. USB; Disabled (CD/DVD by default) Specifies the boot sequence from the primary hard drive. Removable; The computer attempts to boot from the available devices Hard Disk; When F2 = Setup, F12 Boot Options appears in the lower-right corner of diagnostic tests, the previous...
SETUP GUIDE
Page 25
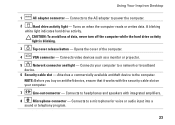
... slot on when the computer reads or writes data. A blinking white light indicates hard drive activity. Opens the cover of data, never turn off the computer while the hard drive activity light is blinking. 3 Top cover release button - CAUTION: To avoid loss...that it works with integrated amplifiers. 8 Microphone connector - Attaches a commercially available antitheft device to power the computer. 2 Hard drive activity light - Using Your Inspiron Desktop 1 AC adapter connector - Connects to a network or broadband device. 6 Security cable slot - Turns on your computer...
... slot on when the computer reads or writes data. A blinking white light indicates hard drive activity. Opens the cover of data, never turn off the computer while the hard drive activity light is blinking. 3 Top cover release button - CAUTION: To avoid loss...that it works with integrated amplifiers. 8 Microphone connector - Attaches a commercially available antitheft device to power the computer. 2 Hard drive activity light - Using Your Inspiron Desktop 1 AC adapter connector - Connects to a network or broadband device. 6 Security cable slot - Turns on your computer...

SETUP GUIDE
Page 27
...portable products such as digital cameras and cell phones. Your optical disc drive may support multiple disc media formats including CDs, DVDs, and Blu-ray Discs (if the option is selected at support.dell.com/manuals. Optional software applications enable you can be recorded to organize... edit and view digital photographs and images. Using Your Inspiron Desktop Software Features NOTE: For more information about the features described in this section, see the Dell Technology Guide available on your hard drive or on the Dell Support website at the time of purchase). You can ...
...portable products such as digital cameras and cell phones. Your optical disc drive may support multiple disc media formats including CDs, DVDs, and Blu-ray Discs (if the option is selected at support.dell.com/manuals. Optional software applications enable you can be recorded to organize... edit and view digital photographs and images. Using Your Inspiron Desktop Software Features NOTE: For more information about the features described in this section, see the Dell Technology Guide available on your hard drive or on the Dell Support website at the time of purchase). You can ...
SETUP GUIDE
Page 39
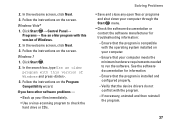
... instructions on the Program Compatibility wizard. Follow the instructions on your computer. --Ensure that your computer meets the minimum hardware requirements needed to check the hard drive or CDs. In the welcome screen, click Next. 3. In the welcome screen, click Next. 3. See the software documentation for troubleshooting information: --Ensure that the program...
... instructions on the Program Compatibility wizard. Follow the instructions on your computer. --Ensure that your computer meets the minimum hardware requirements needed to check the hard drive or CDs. In the welcome screen, click Next. 3. In the welcome screen, click Next. 3. See the software documentation for troubleshooting information: --Ensure that the program...
SETUP GUIDE
Page 42
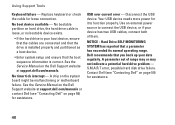
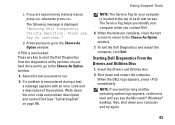
... 59) for assistance. 40 Disconnect the USB device. S.M.A.R.T error, possible hard disk drive failure. Using Support Tools Keyboard failure - NOTICE - Hard Drive SELF MONITORING SYSTEM has reported that you back up your data regularly. Contact Dell (see "Contacting Dell" on the Dell Support website at support.dell.com/manuals. USB over current error - Use an external power source...
... 59) for assistance. 40 Disconnect the USB device. S.M.A.R.T error, possible hard disk drive failure. Using Support Tools Keyboard failure - NOTICE - Hard Drive SELF MONITORING SYSTEM has reported that you back up your data regularly. Contact Dell (see "Contacting Dell" on the Dell Support website at support.dell.com/manuals. USB over current error - Use an external power source...

SETUP GUIDE
Page 43
... Troubleshooter If a device is either not detected during the operating system setup or is detected but incorrectly configured, you begin. Start the Dell Diagnostics from the Drivers and Utilities disc. 41 NOTE: The Drivers and Utilities disc is recommended that best describes the problem and follow ... steps. In the search results, select the option that you print these procedures before you contact Dell for technical assistance. It is optional and may not ship with your hard drive or from your computer, perform the checks in the system setup program and is active. Type ...
... Troubleshooter If a device is either not detected during the operating system setup or is detected but incorrectly configured, you begin. Start the Dell Diagnostics from the Drivers and Utilities disc. 41 NOTE: The Drivers and Utilities disc is recommended that best describes the problem and follow ... steps. In the search results, select the option that you print these procedures before you contact Dell for technical assistance. It is optional and may not ship with your hard drive or from your computer, perform the checks in the system setup program and is active. Type ...
SETUP GUIDE
Page 44
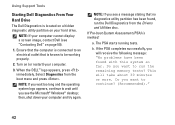
... see the Microsoft® Windows® desktop; then, shut down your hard drive. b. Do you want to continue? (Recommended)." 42 Do you want to run the Dell Diagnostics from the boot menu and press . When the DELL™ logo appears, press immediately. NOTE: If you will take about ...logo appears, continue to be working properly. 2. NOTE: If your computer. 3. Turn on page 59). 1. Using Support Tools Starting Dell Diagnostics From Your Hard Drive The Dell Diagnostics is located on a hidden diagnostic utility partition on your computer and try again.
... see the Microsoft® Windows® desktop; then, shut down your hard drive. b. Do you want to continue? (Recommended)." 42 Do you want to run the Dell Diagnostics from the boot menu and press . When the DELL™ logo appears, press immediately. NOTE: If you will take about ...logo appears, continue to be working properly. 2. NOTE: If your computer. 3. Turn on page 59). 1. Using Support Tools Starting Dell Diagnostics From Your Hard Drive The Dell Diagnostics is located on a hidden diagnostic utility partition on your computer and try again.
SETUP GUIDE
Page 45
... to run. 5. The Service Tag helps you identify your hard drive and to go to wait until you are complete, close the test screen to return to continue." Select the test you contact Dell. 6. Write down the error code and problem description and contact Dell (see the Microsoft® Windows® desktop; NOTE: The...
... to run. 5. The Service Tag helps you identify your hard drive and to go to wait until you are complete, close the test screen to return to continue." Select the test you contact Dell. 6. Write down the error code and problem description and contact Dell (see the Microsoft® Windows® desktop; NOTE: The...
SETUP GUIDE
Page 47
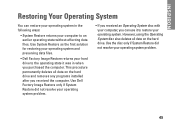
... data files. • Dell Factory Image Restore returns your hard drive to the operating state it was in the following ways: • System Restore returns your computer to restore your operating system. This procedure permanently deletes all data on the hard drive and removes any programs installed after you received the computer. INSPIRON Restoring Your Operating...
... data files. • Dell Factory Image Restore returns your hard drive to the operating state it was in the following ways: • System Restore returns your computer to restore your operating system. This procedure permanently deletes all data on the hard drive and removes any programs installed after you received the computer. INSPIRON Restoring Your Operating...

SETUP GUIDE
Page 50
...; Windows® desktop; NOTE: If you purchased the computer. When the Dell logo appears, press several times to the operating state it was in certain countries or on the hard drive and removes any programs or drivers installed after you received your computer. This ... received your computer-including data files-are permanently deleted from the hard drive. If possible, back up all data on certain computers. Performing Dell Factory Image Restore 1. Select Repair Your Computer. 3. Turn on . NOTE: Dell Factory Image Restore may not be available in when you wait...
...; Windows® desktop; NOTE: If you purchased the computer. When the Dell logo appears, press several times to the operating state it was in certain countries or on the hard drive and removes any programs or drivers installed after you received your computer. This ... received your computer-including data files-are permanently deleted from the hard drive. If possible, back up all data on certain computers. Performing Dell Factory Image Restore 1. Select Repair Your Computer. 3. Turn on . NOTE: Dell Factory Image Restore may not be available in when you wait...
SETUP GUIDE
Page 51
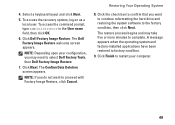
... may take five or more minutes to factory condition. 9. Click Finish to restart your configuration, you do not want to continue reformatting the hard drive and restoring the system software to proceed with Factory Image Restore, click Cancel. To access the recovery options, log on as a local user.... Restoring Your Operating System 8. NOTE: Depending upon your computer. 49 Select a keyboard layout and click Next. 5. Click Dell Factory Image Restore. A message appears when the operating system and factory-installed applications have been restored to complete. The...
... may take five or more minutes to factory condition. 9. Click Finish to restart your configuration, you do not want to continue reformatting the hard drive and restoring the system software to proceed with Factory Image Restore, click Cancel. To access the recovery options, log on as a local user.... Restoring Your Operating System 8. NOTE: Depending upon your computer. 49 Select a keyboard layout and click Next. 5. Click Dell Factory Image Restore. A message appears when the operating system and factory-installed applications have been restored to complete. The...

SETUP GUIDE
Page 52
...first try using Windows Device Driver Rollback. Click Properties→ Hardware→ Device Manager. 4. For conventional hard drive configurations, the primary hard drive is the first drive detected by the computer. 50 Restoring Your Operating System Operating System Reinstallation Before You Begin If you installed ...; Roll Back Driver. If Device Driver Rollback does not resolve the problem, then use System Restore to return your primary hard drive. Right-click My Computer. 3. To roll back the device driver: Windows XP 1. CAUTION: Before performing the installation, ...
...first try using Windows Device Driver Rollback. Click Properties→ Hardware→ Device Manager. 4. For conventional hard drive configurations, the primary hard drive is the first drive detected by the computer. 50 Restoring Your Operating System Operating System Reinstallation Before You Begin If you installed ...; Roll Back Driver. If Device Driver Rollback does not resolve the problem, then use System Restore to return your primary hard drive. Right-click My Computer. 3. To roll back the device driver: Windows XP 1. CAUTION: Before performing the installation, ...

SETUP GUIDE
Page 58
... product. You are not accepted. Remove any of the Diagnostics Checklist (see "Contacting Dell" on any product returned, and you . Pack the equipment to call for paying shipping expenses. Call Dell to back up any data on the hard drive and on page 59. 56 2. lost removable media that are responsible for your confidential...
... product. You are not accepted. Remove any of the Diagnostics Checklist (see "Contacting Dell" on any product returned, and you . Pack the equipment to call for paying shipping expenses. Call Dell to back up any data on the hard drive and on page 59. 56 2. lost removable media that are responsible for your confidential...


