Dell™ Technology Guide
Page 39
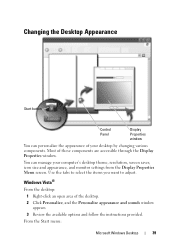
You can personalize the appearance of your computer's desktop theme, resolution, screen saver, icon size and appearance, and monitor settings from the Display Properties Menu screen. Windows Vista® From the desktop: 1 Right-click an open area of these components are accessible through the Display Properties window. Use the tabs to ...
You can personalize the appearance of your computer's desktop theme, resolution, screen saver, icon size and appearance, and monitor settings from the Display Properties Menu screen. Windows Vista® From the desktop: 1 Right-click an open area of these components are accessible through the Display Properties window. Use the tabs to ...
Dell™ Technology Guide
Page 51
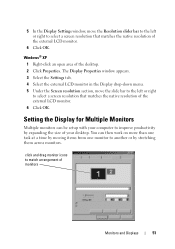
...to select a screen resolution that matches the native resolution of the external LCD monitor. 6 Click OK. Setting the Display for Multiple Monitors Multiple monitors can then work on more than one task at a time by moving items from one monitor to another or by expanding the size of your ...computer to select a screen resolution that matches the native resolution of the external LCD monitor. 6 Click OK. The Display Properties window appears. 3 Select the...
...to select a screen resolution that matches the native resolution of the external LCD monitor. 6 Click OK. Setting the Display for Multiple Monitors Multiple monitors can then work on more than one task at a time by moving items from one monitor to another or by expanding the size of your ...computer to select a screen resolution that matches the native resolution of the external LCD monitor. 6 Click OK. The Display Properties window appears. 3 Select the...

Dell™ Technology Guide
Page 91
...computer will not boot. 1 Launch Nvidia MediaShield. 2 Click to select the array you want to keep before continuing. The NVIDIA Delete Array Wizard screen appears. 4 Click Next. Converting From One RAID Configuration to Another RAID Configuration You can add hard drives to an existing array. Drives and Media... to RAID-Enabled Mode" on the volume. NOTICE: Additional hard drives to be no smaller than any remaining arrays along with the name and size of the drives in the current configuration. 1 Ensure that you have marked for deletion. 5 Click Finish to mirrored, for example - The ...
...computer will not boot. 1 Launch Nvidia MediaShield. 2 Click to select the array you want to keep before continuing. The NVIDIA Delete Array Wizard screen appears. 4 Click Next. Converting From One RAID Configuration to Another RAID Configuration You can add hard drives to an existing array. Drives and Media... to RAID-Enabled Mode" on the volume. NOTICE: Additional hard drives to be no smaller than any remaining arrays along with the name and size of the drives in the current configuration. 1 Ensure that you have marked for deletion. 5 Click Finish to mirrored, for example - The ...
Dell™ Technology Guide
Page 94
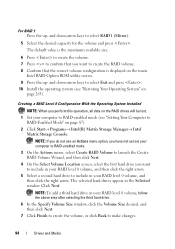
... be lost. 1 Set your RAID level 0 volume, follow the above step after selecting the third hard drive. 6 In the Specify Volume Size window, click the Volume Size desired, and then click Next. 7 Click Finish to create the volume, or click Back to include in your RAID level 0 volume, and... -arrow keys to create the RAID volume. 8 Confirm that you do not see "Restoring Your Operating System" on the main Intel RAID Option ROM utility screen. 9 Press the up - Creating a RAID Level 0 Configuration With the Operating System Installed NOTE: When you want to select RAID1 (Mirror). 5 Select the ...
... be lost. 1 Set your RAID level 0 volume, follow the above step after selecting the third hard drive. 6 In the Specify Volume Size window, click the Volume Size desired, and then click Next. 7 Click Finish to create the volume, or click Back to include in your RAID level 0 volume, and... -arrow keys to create the RAID volume. 8 Confirm that you do not see "Restoring Your Operating System" on the main Intel RAID Option ROM utility screen. 9 Press the up - Creating a RAID Level 0 Configuration With the Operating System Installed NOTE: When you want to select RAID1 (Mirror). 5 Select the ...

Dell™ Technology Guide
Page 95
...Create RAID Volume to launch the Create RAID Volume Wizard. 4 Click Next at the first screen. 5 Confirm the volume name, select RAID 1 as the RAID level, and then click Next to continue. 6 On... the Select Volume Location screen, click the first hard drive you want to use, and then click the right arrow. 7 Click... until two drives appear in the Selected window, and then click Next. 8 In the Specify Volume Size window, select the Volume Size desired and click Next. 9 Click Finish to create the volume, or click Back to make changes....
...Create RAID Volume to launch the Create RAID Volume Wizard. 4 Click Next at the first screen. 5 Confirm the volume name, select RAID 1 as the RAID level, and then click Next to continue. 6 On... the Select Volume Location screen, click the first hard drive you want to use, and then click the right arrow. 7 Click... until two drives appear in the Selected window, and then click Next. 8 In the Specify Volume Size window, select the Volume Size desired and click Next. 9 Click Finish to create the volume, or click Back to make changes....

Dell™ Technology Guide
Page 96
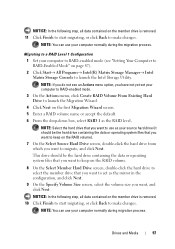
... Start→ All Programs→ Intel(R) Matrix Storage Manager→ Intel Matrix Storage Console. NOTE: You can use your stripe size. 8 On the Select Source Hard Drive screen, double-click the hard drive from the drop-down -arrow keys to migrate, and click Next. Your computer boots to span the... stripe array, and click Next. 10 On the Specify Volume Size screen, select the Volume Size you want , and click Next. 96 Drives and Media This drive should be the hard drive containing the data or operating system ...
... Start→ All Programs→ Intel(R) Matrix Storage Manager→ Intel Matrix Storage Console. NOTE: You can use your stripe size. 8 On the Select Source Hard Drive screen, double-click the hard drive from the drop-down -arrow keys to migrate, and click Next. Your computer boots to span the... stripe array, and click Next. 10 On the Specify Volume Size screen, select the Volume Size you want , and click Next. 96 Drives and Media This drive should be the hard drive containing the data or operating system ...
Dell™ Technology Guide
Page 97
... process. This drive should be the hard drive containing the data or operating system files that you want to keep on the first Migration Wizard screen. 5 Enter a RAID volume name or accept the default. 6 From the drop-down box, select RAID 1 as the RAID level. Drives and Media 97 NOTICE...to migrate, and click Next. NOTE: You can use as the mirror in the configuration, and click Next. 9 On the Specify Volume Size screen, select the volume size you have not yet set your computer to RAID-enabled mode (see an Actions menu option, you want to use your computer normally during...
... process. This drive should be the hard drive containing the data or operating system files that you want to keep on the first Migration Wizard screen. 5 Enter a RAID volume name or accept the default. 6 From the drop-down box, select RAID 1 as the RAID level. Drives and Media 97 NOTICE...to migrate, and click Next. NOTE: You can use as the mirror in the configuration, and click Next. 9 On the Specify Volume Size screen, select the volume size you have not yet set your computer to RAID-enabled mode (see an Actions menu option, you want to use your computer normally during...

Dell™ Technology Guide
Page 177
... key to have multiple instances of programs that are open . Increasing Computer Speed by using the Zoom feature. Zoom Adjust the size of everything on the screen by Limiting the Number of Open Internet Windows Tabs allow you re-visit a web page. It is not necessary to zoom... next to Enable Tabbed Browsing. 4 Click to zoom out. Accessing the Internet 177 Saving Space by clicking Settings. 3 Reduce the file size (the number of MBs in the same browsing window. The tab feature speeds computer processing by limiting the number of Internet Explorer running simultaneously...
... key to have multiple instances of programs that are open . Increasing Computer Speed by using the Zoom feature. Zoom Adjust the size of everything on the screen by Limiting the Number of Open Internet Windows Tabs allow you re-visit a web page. It is not necessary to zoom... next to Enable Tabbed Browsing. 4 Click to zoom out. Accessing the Internet 177 Saving Space by clicking Settings. 3 Reduce the file size (the number of MBs in the same browsing window. The tab feature speeds computer processing by limiting the number of Internet Explorer running simultaneously...
Dell™ Technology Guide
Page 241
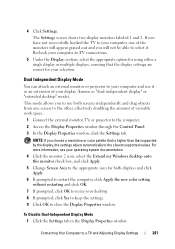
...operating system documentation. 4 Click the monitor 2 icon, select the Extend my Windows desktop onto this monitor check box, and click Apply. 5 Change Screen Area to the appropriate sizes for your desktop. 8 If prompted, click Yes to keep the settings. 9 Click OK to use it . NOTE: If you choose a ...resolution or color palette that is higher than that the display settings are correct for both screens independently and drag objects from one of...
...operating system documentation. 4 Click the monitor 2 icon, select the Extend my Windows desktop onto this monitor check box, and click Apply. 5 Change Screen Area to the appropriate sizes for your desktop. 8 If prompted, click Yes to keep the settings. 9 Click OK to use it . NOTE: If you choose a ...resolution or color palette that is higher than that the display settings are correct for both screens independently and drag objects from one of...
Setup Guide
Page 67
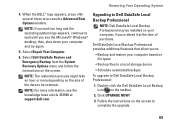
...8226; Backup files to a local storage device • Schedule automated backups To upgrade to be installed on the screen. NOTE: For more depending on the size of purchase. NOTE: The restoration process might take an hour or more information, see the Microsoft® Windows...® desktop; Double-click the Dell DataSafe Local Backup icon on the screen to access the Advanced Boot Options window. Follow the instructions on the taskbar. 2. Select Dell...
...8226; Backup files to a local storage device • Schedule automated backups To upgrade to be installed on the screen. NOTE: For more depending on the size of purchase. NOTE: The restoration process might take an hour or more information, see the Microsoft® Windows...® desktop; Double-click the Dell DataSafe Local Backup icon on the screen to access the Advanced Boot Options window. Follow the instructions on the taskbar. 2. Select Dell...


