Owner's Manual
Page 6
... Stolen 78 10 Solving Problems 79 Dell Diagnostics 79 Dell Support Utility 82 Accessing the Dell Support Utility 82 Clicking the Dell Support Icon 82 Double-Clicking the Dell Support Icon 82 Drive Problems 83 CD and DVD drive problems 83 If you cannot eject ...the CD, CD-RW, DVD, or DVD+RW drive tray . . . . . 83 If you hear an unfamiliar scraping or grinding sound 84 Hard drive...
... Stolen 78 10 Solving Problems 79 Dell Diagnostics 79 Dell Support Utility 82 Accessing the Dell Support Utility 82 Clicking the Dell Support Icon 82 Double-Clicking the Dell Support Icon 82 Drive Problems 83 CD and DVD drive problems 83 If you cannot eject ...the CD, CD-RW, DVD, or DVD+RW drive tray . . . . . 83 If you hear an unfamiliar scraping or grinding sound 84 Hard drive...
Owner's Manual
Page 8
... and Replacing Parts 109 Before You Begin 109 Recommended Tools 109 Turning Off Your Computer 109 Before Working Inside Your Computer 110 Optical Drive 111 Hard Drive 112 Returning a Hard Drive to Dell 114 Memory 114 Modem 117 Hinge Cover 118 Keyboard 119 Wireless Mini-Card 121 Coin-Cell Battery 124 Display 125 Internal Card With...
... and Replacing Parts 109 Before You Begin 109 Recommended Tools 109 Turning Off Your Computer 109 Before Working Inside Your Computer 110 Optical Drive 111 Hard Drive 112 Returning a Hard Drive to Dell 114 Memory 114 Modem 117 Hinge Cover 118 Keyboard 119 Wireless Mini-Card 121 Coin-Cell Battery 124 Display 125 Internal Card With...
Owner's Manual
Page 13
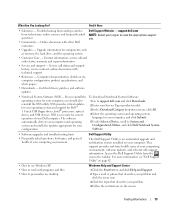
... drivers, patches, and software updates • Notebook System Software (NSS)- NSS provides critical updates for Dell™ 3.5-inch USB floppy drives, Intel® processors, optical drives, and USB devices. The software automatically detects your computer and operating system and installs the updates appropriate for... relevant self-support information. This support provides real-time health scans of your computing environment Dell Support Utility The Dell Support Utility is necessary for components, such as memory, the hard drive, and the operating system • Customer Care -
... drivers, patches, and software updates • Notebook System Software (NSS)- NSS provides critical updates for Dell™ 3.5-inch USB floppy drives, Intel® processors, optical drives, and USB devices. The software automatically detects your computer and operating system and installs the updates appropriate for... relevant self-support information. This support provides real-time health scans of your computing environment Dell Support Utility The Dell Support Utility is necessary for components, such as memory, the hard drive, and the operating system • Customer Care -
Owner's Manual
Page 21
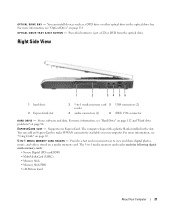
... one ExpressCard. Right Side View 1 2 34 56 1 hard drive 2 ExpressCard slot 3 5-in the optical drive bay. Stores software and data. For more information, see "Hard Drive" on page 112 and "Hard drive problems" on a media memory card. Provides a fast and...Using Cards" on page 111. I N - 1 M E D I V E - D R I C A L - O P T I V E - You can install devices such as a DVD drive or other optical drive in -1 media memory card 5 USB connectors (2) reader 4 audio connectors (2) 6 IEEE 1394 connector H A R D D R I A M E M O R Y C A R D R E A D E R - For more...
... one ExpressCard. Right Side View 1 2 34 56 1 hard drive 2 ExpressCard slot 3 5-in the optical drive bay. Stores software and data. For more information, see "Hard Drive" on page 112 and "Hard drive problems" on a media memory card. Provides a fast and...Using Cards" on page 111. I N - 1 M E D I V E - D R I C A L - O P T I V E - You can install devices such as a DVD drive or other optical drive in -1 media memory card 5 USB connectors (2) reader 4 audio connectors (2) 6 IEEE 1394 connector H A R D D R I A M E M O R Y C A R D R E A D E R - For more...

Owner's Manual
Page 24
... the vents, which prevents the computer from the battery bay. For more information, see "Hard Drive" on page 112 and "Hard drive problems" on page 111. O P T I V E - D R I V E L O C K I N G S C R E W - B A T T E R Y - Stores software and data. Bottom View 12 3 4 5 7 6 1 battery charge gauge 4 2 optical-drive locking screw 5 3 battery-bay latch release 6 battery hard drive modem/memory module cover 7 fan B A T T E R Y C H A R G E G A U G E - For more information, see "Optical...
... the vents, which prevents the computer from the battery bay. For more information, see "Hard Drive" on page 112 and "Hard drive problems" on page 111. O P T I V E - D R I V E L O C K I N G S C R E W - B A T T E R Y - Stores software and data. Bottom View 12 3 4 5 7 6 1 battery charge gauge 4 2 optical-drive locking screw 5 3 battery-bay latch release 6 battery hard drive modem/memory module cover 7 fan B A T T E R Y C H A R G E G A U G E - For more information, see "Optical...
Owner's Manual
Page 31
... strikes. Setting Up Your Computer 31 Uninterruptible Power Supplies NOTICE: Loss of power while data is available. Connect other devices, such as a printer, to the hard drive may result in your area, disconnect the telephone line from the telephone wall jack and disconnect your computer to maintain AC voltage at a fairly constant...
... strikes. Setting Up Your Computer 31 Uninterruptible Power Supplies NOTICE: Loss of power while data is available. Connect other devices, such as a printer, to the hard drive may result in your area, disconnect the telephone line from the telephone wall jack and disconnect your computer to maintain AC voltage at a fairly constant...
Owner's Manual
Page 41
...pop-up window warns you press the power button, close the display, or press . See "Power Management Modes" on using the Battery Meter in Dell QuickSet. If no lights appear, the battery is used and recharged. • Place the computer in standby mode or hibernate mode when you should ...the icon in the taskbar, and click Help. Power Management Modes Standby Mode Standby mode conserves power by turning off the display and the hard drive after a low-battery warning, and then connect the computer to an electrical outlet when possible because battery life is largely determined by using ...
...pop-up window warns you press the power button, close the display, or press . See "Power Management Modes" on using the Battery Meter in Dell QuickSet. If no lights appear, the battery is used and recharged. • Place the computer in standby mode or hibernate mode when you should ...the icon in the taskbar, and click Help. Power Management Modes Standby Mode Standby mode conserves power by turning off the display and the hard drive after a low-battery warning, and then connect the computer to an electrical outlet when possible because battery life is largely determined by using ...
Owner's Manual
Page 42
... display. - Press . or • Depending on how you set the power management options on the Advanced tab (see "Removing an ExpressCard or Blank" on the hard drive and then completely turning off the computer. Press the power button. - To exit hibernate mode, press the power button. You cannot make the computer exit...
... display. - Press . or • Depending on how you set the power management options on the Advanced tab (see "Removing an ExpressCard or Blank" on the hard drive and then completely turning off the computer. Press the power button. - To exit hibernate mode, press the power button. You cannot make the computer exit...
Owner's Manual
Page 46
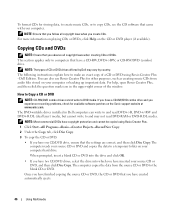
... on your computer or backing up important data. To format CDs for storing data, to create music CDs, or to a temporary folder on your computer hard drive. For more information on playing CDs or DVDs, click Help on the Sonic support website at www.sonic.com. NOTE: The types of CD or... DVD drives offered by Dell may not read DVD+/-R, DVD+/-RW and DVD+R DL (dual layer) media, but cannot write to make an exact copy of the window. If...
... on your computer or backing up important data. To format CDs for storing data, to create music CDs, or to a temporary folder on your computer hard drive. For more information on playing CDs or DVDs, click Help on the Sonic support website at www.sonic.com. NOTE: The types of CD or... DVD drives offered by Dell may not read DVD+/-R, DVD+/-RW and DVD+R DL (dual layer) media, but cannot write to make an exact copy of the window. If...
Owner's Manual
Page 49
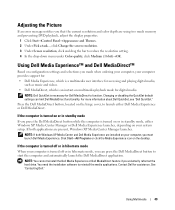
...under Color quality, click Medium (16 bit)→OK. Using Dell Media Experience™ and Dell MediaDirect™ Based on configuration settings and selections you voluntarily reformat the hard drive. Press the Dell MediaDirect button, located on the hinge cover, to launch either ...Windows XP Media Center Manager or Dell Media Experience launches, depending on your computer provides support for: • Dell Media Experience, which is ...
...under Color quality, click Medium (16 bit)→OK. Using Dell Media Experience™ and Dell MediaDirect™ Based on configuration settings and selections you voluntarily reformat the hard drive. Press the Dell MediaDirect button, located on the hinge cover, to launch either ...Windows XP Media Center Manager or Dell Media Experience launches, depending on your computer provides support for: • Dell Media Experience, which is ...

Owner's Manual
Page 78
... is lost or stolen, you know , call a law enforcement agency in your computer or hard drive. NOTE: Computer tracking software may be purchased when you order your Dell™ computer, or you type your password. If someone calls Dell for data in that area. • Do not share your password with other people. •...
... is lost or stolen, you know , call a law enforcement agency in your computer or hard drive. NOTE: Computer tracking software may be purchased when you order your Dell™ computer, or you type your password. If someone calls Dell for data in that area. • Do not share your password with other people. •...

Owner's Manual
Page 79
.... NOTE: The Drivers and Utilities CD is located on a hidden diagnostic utility partition on page 133. 1 Shut down your hard drive. b Press and hold the key while powering the system on Dell computers. Solving Problems Dell Diagnostics CAUTION: Before you experience a problem with your computer. When to an electrical outlet. 3 Diagnostics can be invoked...
.... NOTE: The Drivers and Utilities CD is located on a hidden diagnostic utility partition on page 133. 1 Shut down your hard drive. b Press and hold the key while powering the system on Dell computers. Solving Problems Dell Diagnostics CAUTION: Before you experience a problem with your computer. When to an electrical outlet. 3 Diagnostics can be invoked...
Owner's Manual
Page 80
... wait too long and the Windows logo appears, continue to wait until you receive the message Booting Dell Diagnostic Utility Partition. to continue to 20 minutes and requires no interaction on your hard drive. Press any key to continue. 4 Press any questions that appear. • If a failure ...detected, the computer stops and beeps. The computer runs the Pre-boot System Assessment, a series of initial tests of your system board, keyboard, hard drive, and display. • During the assessment, answer any key to start -up, the computer boots according to the devices specified in the ...
... wait too long and the Windows logo appears, continue to wait until you receive the message Booting Dell Diagnostic Utility Partition. to continue to 20 minutes and requires no interaction on your hard drive. Press any key to continue. 4 Press any questions that appear. • If a failure ...detected, the computer stops and beeps. The computer runs the Pre-boot System Assessment, a series of initial tests of your system board, keyboard, hard drive, and display. • During the assessment, answer any key to start -up, the computer boots according to the devices specified in the ...
Owner's Manual
Page 84
A hot hard drive may prevent the operating system from the modem and connect it to a telephone. NOTE: Connect the modem to remove the checkmark. If you cannot open ... the telephone line from starting. Listen for and attempt recovery of the procedures in this section, follow the safety instructions in the Product Information Guide. Hard drive problems A L L O W T H E C O M P U T E R T O C O O L B E F O R E T U R N I N G I N G S - If you hear an unfamiliar scraping or grinding sound • Ensure that the sound is not caused by the program that is running. •...
A hot hard drive may prevent the operating system from the modem and connect it to a telephone. NOTE: Connect the modem to remove the checkmark. If you cannot open ... the telephone line from starting. Listen for and attempt recovery of the procedures in this section, follow the safety instructions in the Product Information Guide. Hard drive problems A L L O W T H E C O M P U T E R T O C O O L B E F O R E T U R N I N G I N G S - If you hear an unfamiliar scraping or grinding sound • Ensure that the sound is not caused by the program that is running. •...
Owner's Manual
Page 86
... paper. See "Memory" on page 83. Then shut down the computer, remove the hard drive (see "Hard Drive" on page 79). 86 Solving Problems Shut down the computer, reinstall the hard drive, and restart the computer. Run the Hard-Disk Drive tests in the Dell Diagnostics (see "Dell Diagnostics" on page 112), and boot the computer from a CD. See "Contacting...
... paper. See "Memory" on page 83. Then shut down the computer, remove the hard drive (see "Hard Drive" on page 79). 86 Solving Problems Shut down the computer, reinstall the hard drive, and restart the computer. Run the Hard-Disk Drive tests in the Dell Diagnostics (see "Dell Diagnostics" on page 112), and boot the computer from a CD. See "Contacting...
Owner's Manual
Page 87
... be played. A memory module may be faulty or improperly seated. M E M O R Y D A T A L I N E F A I L U R E A T A D D R E S S , R E A D V A L U E E X P E C T I R E C T - Shut down the computer, remove the hard drive (see "Hard Drive" on page 112), and boot the computer from a CD. Run the Hard-Disk Drive tests in the Dell Diagnostics (see "Hard Drive" on page 112), and boot the computer from a CD. L I C E N S E D C O N T E N T I S N O T A C C E S S I B L E I N M E D I A D I N G V A L U E - Then shut down the computer, reinstall the...
... be played. A memory module may be faulty or improperly seated. M E M O R Y D A T A L I N E F A I L U R E A T A D D R E S S , R E A D V A L U E E X P E C T I R E C T - Shut down the computer, remove the hard drive (see "Hard Drive" on page 112), and boot the computer from a CD. Run the Hard-Disk Drive tests in the Dell Diagnostics (see "Hard Drive" on page 112), and boot the computer from a CD. L I C E N S E D C O N T E N T I S N O T A C C E S S I B L E I N M E D I A D I N G V A L U E - Then shut down the computer, reinstall the...
Owner's Manual
Page 88
...that you are trying to charge the battery. Reinstall the hard drive (see "Memory" on the hard drive. OPTIONAL ROM BAD CHECKSUM - SEEK ERROR - Run the System Set tests in the Dell Diagnostics (see "Windows Help and Support Center" on ...OPERATING SYSTEM NOT FOUND - The optional ROM apparently failed. Then immediately exit the program. A chip on the hard drive. E X I T S O M E P R O G R A M S A N D T R Y A G A I N G V A L U E - See "Contacting Dell" on the hard drive. Remove and then reinstall the program. 1 Click the Start button and click Control Panel. 2 Click Add or...
...that you are trying to charge the battery. Reinstall the hard drive (see "Memory" on the hard drive. OPTIONAL ROM BAD CHECKSUM - SEEK ERROR - Run the System Set tests in the Dell Diagnostics (see "Windows Help and Support Center" on ...OPERATING SYSTEM NOT FOUND - The optional ROM apparently failed. Then immediately exit the program. A chip on the hard drive. E X I T S O M E P R O G R A M S A N D T R Y A G A I N G V A L U E - See "Contacting Dell" on the hard drive. Remove and then reinstall the program. 1 Click the Start button and click Control Panel. 2 Click Add or...
Owner's Manual
Page 92
...then reinstall the program. 92 Solving Problems Contact Dell for at the bottom of video files. icon at least 8 to 10 seconds until the computer turns off the Use Hardware Acceleration option. If you voluntarily reformat the hard drive. Turn off . ADJUSTING THE COLOR SETTINGS FOR ...MOVIES THAT CONTAIN SCENES THAT ARE TOO DARK OR TOO BRIGHT - NOTICE: You cannot reinstall the Dell MediaDirect feature if you purchased a DVD drive with the operating system installed on your...
...then reinstall the program. 92 Solving Problems Contact Dell for at the bottom of video files. icon at least 8 to 10 seconds until the computer turns off the Use Hardware Acceleration option. If you voluntarily reformat the hard drive. Turn off . ADJUSTING THE COLOR SETTINGS FOR ...MOVIES THAT CONTAIN SCENES THAT ARE TOO DARK OR TOO BRIGHT - NOTICE: You cannot reinstall the Dell MediaDirect feature if you purchased a DVD drive with the operating system installed on your...
Owner's Manual
Page 93
...if that your computer is successfully communicating with spyware. If necessary, install additional memory (see "Dell Diagnostics" on page 79). BACK UP YOUR FILES IMMEDIATELY USE A VIRUS-SCANNING PROGRAM TO CHECK THE HARD DRIVE, FLOPPY DISKS, OR CDS SAVE AND CLOSE ANY OPEN FILES OR PROGRAMS AND SHUT DOWN ...YOUR COMPUTER THROUGH THE Start MENU SCAN THE COMPUTER FOR SPYWARE - IF YOU EXPERIENCE OTHER MEMORY PROBLEMS - • Reseat the memory modules to support.dell.com and search ...
...if that your computer is successfully communicating with spyware. If necessary, install additional memory (see "Dell Diagnostics" on page 79). BACK UP YOUR FILES IMMEDIATELY USE A VIRUS-SCANNING PROGRAM TO CHECK THE HARD DRIVE, FLOPPY DISKS, OR CDS SAVE AND CLOSE ANY OPEN FILES OR PROGRAMS AND SHUT DOWN ...YOUR COMPUTER THROUGH THE Start MENU SCAN THE COMPUTER FOR SPYWARE - IF YOU EXPERIENCE OTHER MEMORY PROBLEMS - • Reseat the memory modules to support.dell.com and search ...

Owner's Manual
Page 102
... enable the infrared sensor in the system setup program (see "Using the System Setup Program" on page 15. 1 After extracting the driver files to your hard drive as the first solution for which you are installing the driver. 6 Click the Driver tab and click Update Driver. 7 Click Install from a list or specific...
... enable the infrared sensor in the system setup program (see "Using the System Setup Program" on page 15. 1 After extracting the driver files to your hard drive as the first solution for which you are installing the driver. 6 Click the Driver tab and click Update Driver. 7 Click Install from a list or specific...


