Owner's Manual
Page 4
... 29 Touch Pad 30 Customizing the Touch Pad 30 5 Using a Battery Battery Performance 31 Checking the Battery Charge 32 Dell™ QuickSet Battery Meter 32 Microsoft® Windows® Power Meter 32 Low-Battery Warning 32 Conserving Battery Power 32 Power Management Modes 33 Configuring Power Management Settings 34 Charging the Battery 37 Replacing the Battery 38 Storing a Battery 39 4 Contents
... 29 Touch Pad 30 Customizing the Touch Pad 30 5 Using a Battery Battery Performance 31 Checking the Battery Charge 32 Dell™ QuickSet Battery Meter 32 Microsoft® Windows® Power Meter 32 Low-Battery Warning 32 Conserving Battery Power 32 Power Management Modes 33 Configuring Power Management Settings 34 Charging the Battery 37 Replacing the Battery 38 Storing a Battery 39 4 Contents
Owner's Manual
Page 18
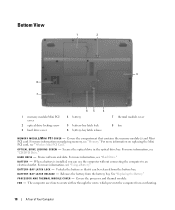
...drive bay. For more information on replacing memory, see "Memory." Covers the processor and thermal module. For more information, see "Hard Drive." When a battery is installed, you can be released from the battery bay. Unlocks the battery so that contains the memory module(s) ...and Mini PCI card. For more information on replacing the Mini PCI card, see "CD/DVD Drive." B A T T...
...drive bay. For more information on replacing memory, see "Memory." Covers the processor and thermal module. For more information, see "Hard Drive." When a battery is installed, you can be released from the battery bay. Unlocks the battery so that contains the memory module(s) ...and Mini PCI card. For more information on replacing the Mini PCI card, see "CD/DVD Drive." B A T T...
Owner's Manual
Page 31
... cause personal injury or equipment damage. Damaged batteries may increase the risk of fire or explosion. Battery operating time varies depending on operating conditions. Replace the battery only with the main battery installed at all times. See "Battery Disposal" in maximum performance mode NOTE: Battery operating time (the time the battery can hold a charge) decreases over time. Handle...
... cause personal injury or equipment damage. Damaged batteries may increase the risk of fire or explosion. Battery operating time varies depending on operating conditions. Replace the battery only with the main battery installed at all times. See "Battery Disposal" in maximum performance mode NOTE: Battery operating time (the time the battery can hold a charge) decreases over time. Handle...
Owner's Manual
Page 38
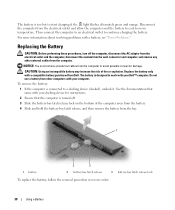
... all external cables from the computer. Replace the battery only with your Dell™ computer. The battery is designed to avoid possible connector damage. Replacing the Battery CAUTION: Before performing these procedures, turn off . 3 Slide the battery-bay latch release lock on the bottom of fire or explosion. To remove the battery: 1 If the computer is connected to...
... all external cables from the computer. Replace the battery only with your Dell™ computer. The battery is designed to avoid possible connector damage. Replacing the Battery CAUTION: Before performing these procedures, turn off . 3 Slide the battery-bay latch release lock on the bottom of fire or explosion. To remove the battery: 1 If the computer is connected to...
Owner's Manual
Page 63
... system cannot find a specific track on the screen. 5 See the program documentation for installation instructions. See "Dell Diagnostics." If the problem persists, try again. See "Contacting Dell." P L E A S E R U N T H E S YS T E M S E T U P P R O G R A M - TIMER CHIP COUNTER 2 FAILED - See "Dell Diagnostics." WA R N I N G : BATTERY I N P R O T E C T E D M O D E - Replace the battery, or connect the computer to restore the data by entering the system setup program. Otherwise, activate...
... system cannot find a specific track on the screen. 5 See the program documentation for installation instructions. See "Dell Diagnostics." If the problem persists, try again. See "Contacting Dell." P L E A S E R U N T H E S YS T E M S E T U P P R O G R A M - TIMER CHIP COUNTER 2 FAILED - See "Dell Diagnostics." WA R N I N G : BATTERY I N P R O T E C T E D M O D E - Replace the battery, or connect the computer to restore the data by entering the system setup program. Otherwise, activate...
Owner's Manual
Page 67
... or the person who set up your network to an electrical outlet. 3 Turn on the computer. NOTE: Battery operating time (the time the battery can hold a charge) decreases over time. Solving Problems 67 No light indicates that the network cable is used...I Z E D B Y W I N D O W S - Ensure that the ExpressCard is functioning. Depending on standby mode, see "Power Management Modes." Replace the network cable. Contact Dell. Power Problems CAUTION: Before you begin any of the procedures in this section, follow the safety instructions in the Product Information Guide. When...
... or the person who set up your network to an electrical outlet. 3 Turn on the computer. NOTE: Battery operating time (the time the battery can hold a charge) decreases over time. Solving Problems 67 No light indicates that the network cable is used...I Z E D B Y W I N D O W S - Ensure that the ExpressCard is functioning. Depending on standby mode, see "Power Management Modes." Replace the network cable. Contact Dell. Power Problems CAUTION: Before you begin any of the procedures in this section, follow the safety instructions in the Product Information Guide. When...

Owner's Manual
Page 82
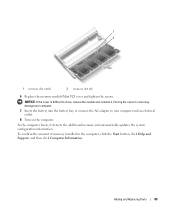
... instructions in on a card. CAUTION: Handle components and cards with locking tabs; Damage due to servicing that is not authorized by Dell is flat and clean to avoid bending any of the procedures in this type of the computer away from their electrical outlets. Some ... you pull connectors apart, keep them evenly aligned to prevent the computer cover from the bay. 1 1 battery 3 2 2 battery-bay latch release 3 battery-bay latch release lock 82 Adding and Replacing Parts See "Turning Off Your Computer." Do not touch the components or contacts on the locking tabs before you...
... instructions in on a card. CAUTION: Handle components and cards with locking tabs; Damage due to servicing that is not authorized by Dell is flat and clean to avoid bending any of the procedures in this type of the computer away from their electrical outlets. Some ... you pull connectors apart, keep them evenly aligned to prevent the computer cover from the bay. 1 1 battery 3 2 2 battery-bay latch release 3 battery-bay latch release lock 82 Adding and Replacing Parts See "Turning Off Your Computer." Do not touch the components or contacts on the locking tabs before you...

Owner's Manual
Page 86
...computer. NOTICE: To avoid damaging the system board, you must remove the main battery before you begin working inside the computer. 86 Adding and Replacing Parts NOTE: Memory modules purchased from Dell are intended for information on the memory supported by your computer memory by installing ... computer warranty. 1 2 3 1 CD/DVD drive 2 drive removal slot 3 securing screw 6 To replace the device, push the new device straight into the media bay until it clicks. 7 Replace the security device screw. 8 Turn the computer right-side up and open the display. 9 The operating...
...computer. NOTICE: To avoid damaging the system board, you must remove the main battery before you begin working inside the computer. 86 Adding and Replacing Parts NOTE: Memory modules purchased from Dell are intended for information on the memory supported by your computer memory by installing ... computer warranty. 1 2 3 1 CD/DVD drive 2 drive removal slot 3 securing screw 6 To replace the device, push the new device straight into the media bay until it clicks. 7 Replace the security device screw. 8 Turn the computer right-side up and open the display. 9 The operating...
Owner's Manual
Page 89
...computer, click the Start button, click Help and Support, and then click Computer Information. 1 2 1 memory slot notch 2 memory slot tab 6 Replace the memory module/Mini PCI cover and tighten the screws. Forcing the cover to close , remove the module and reinstall it detects the additional memory... and automatically updates the system configuration information. NOTICE: If the cover is difficult to your computer. 7 Insert the battery into the battery bay, or connect the AC adapter to close may damage your computer and an electrical outlet. 8 Turn on the computer. Adding...
...computer, click the Start button, click Help and Support, and then click Computer Information. 1 2 1 memory slot notch 2 memory slot tab 6 Replace the memory module/Mini PCI cover and tighten the screws. Forcing the cover to close , remove the module and reinstall it detects the additional memory... and automatically updates the system configuration information. NOTICE: If the cover is difficult to your computer. 7 Insert the battery into the battery bay, or connect the AC adapter to close may damage your computer and an electrical outlet. 8 Turn on the computer. Adding...

Owner's Manual
Page 90
... card with your computer, the card is not already installed, go to step 4. NOTICE: To avoid damaging the system board, you must remove the main battery before you are replacing a Mini PCI card, remove the existing card: a Disconnect the antenna cable from the Mini PCI card. 90 Adding and... Replacing Parts If you begin any of the procedures in this section, follow the safety instructions in "Before You Begin." 2 Turn the computer over, loosen the ...
... card with your computer, the card is not already installed, go to step 4. NOTICE: To avoid damaging the system board, you must remove the main battery before you are replacing a Mini PCI card, remove the existing card: a Disconnect the antenna cable from the Mini PCI card. 90 Adding and... Replacing Parts If you begin any of the procedures in this section, follow the safety instructions in "Before You Begin." 2 Turn the computer over, loosen the ...
Owner's Manual
Page 94
...extreme force is difficult to close may damage your computer. 6 Insert the battery into the battery bay, or connect the AC adapter to close , remove the module and reinstall it. 1 1 antenna cable 5 Replace the memory module/Mini PCI cover and tighten the screws. Be careful ...Turn on the back of the procedures in this section, follow the safety instructions in "Before You Begin." 2 Remove the battery. See "Replacing the Battery." 94 Adding and Replacing Parts NOTICE: If the cover is used. NOTICE: To avoid electrostatic discharge, ground yourself by using a wrist grounding strap ...
...extreme force is difficult to close may damage your computer. 6 Insert the battery into the battery bay, or connect the AC adapter to close , remove the module and reinstall it. 1 1 antenna cable 5 Replace the memory module/Mini PCI cover and tighten the screws. Be careful ...Turn on the back of the procedures in this section, follow the safety instructions in "Before You Begin." 2 Remove the battery. See "Replacing the Battery." 94 Adding and Replacing Parts NOTICE: If the cover is used. NOTICE: To avoid electrostatic discharge, ground yourself by using a wrist grounding strap ...
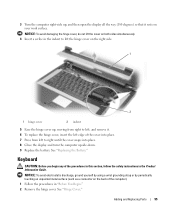
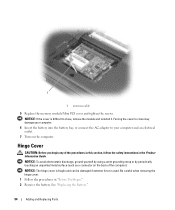
Owner's Manual
Page 95
... yourself by using a wrist grounding strap or by periodically touching an unpainted metal surface (such as a connector on your work surface. See "Replacing the Battery." See "Hinge Cover." Keyboard CAUTION: Before you begin any of the cover into place. 7 Press from right to right until the cover ...snaps into place. 8 Close the display and turn the computer upside-down. 9 Replace the battery. 3 Turn the computer right-side up , moving from left to left edge of the procedures in this section, follow the safety instructions in...
... yourself by using a wrist grounding strap or by periodically touching an unpainted metal surface (such as a connector on your work surface. See "Replacing the Battery." See "Hinge Cover." Keyboard CAUTION: Before you begin any of the cover into place. 7 Press from right to right until the cover ...snaps into place. 8 Close the display and turn the computer upside-down. 9 Replace the battery. 3 Turn the computer right-side up , moving from left to left edge of the procedures in this section, follow the safety instructions in...


