
Owner's Manual
Page 25
...Guide. You can also set power management options to help file, see the Dell Inspiron Help file. One battery is recommended that shipped with the main battery installed at all times. The lithium-ion battery is low. CAUTION: Do not dispose of the procedures in this chapter,... safety instructions in the battery bay. NOTE: Batteries for portable computers are covered only during the initial 1-year period of fire or explosion. NOTE: It is supplied as 3D games • Running the computer in the Product Information Guide. Replace the battery only with household waste....
...Guide. You can also set power management options to help file, see the Dell Inspiron Help file. One battery is recommended that shipped with the main battery installed at all times. The lithium-ion battery is low. CAUTION: Do not dispose of the procedures in this chapter,... safety instructions in the battery bay. NOTE: Batteries for portable computers are covered only during the initial 1-year period of fire or explosion. NOTE: It is supplied as 3D games • Running the computer in the Product Information Guide. Replace the battery only with household waste....

Owner's Manual
Page 72
...then unplug it . NOTICE: To avoid damaging the system board, you must remove the main battery before you disconnect the cable. Hold a card by its edges or by its pins. ... or on its metal mounting bracket. if you are correctly oriented and aligned. www.dell.com | support.dell.com Before Working Inside Your Computer Use the following steps before you begin any of ...Handle components and cards with locking tabs; CAUTION: Before you service the computer. 72 Adding and Replacing Parts NOTICE: Only a certified service technician should perform repairs on the locking tabs before you ...
...then unplug it . NOTICE: To avoid damaging the system board, you must remove the main battery before you disconnect the cable. Hold a card by its edges or by its pins. ... or on its metal mounting bracket. if you are correctly oriented and aligned. www.dell.com | support.dell.com Before Working Inside Your Computer Use the following steps before you begin any of ...Handle components and cards with locking tabs; CAUTION: Before you service the computer. 72 Adding and Replacing Parts NOTICE: Only a certified service technician should perform repairs on the locking tabs before you ...

Owner's Manual
Page 73
...on the bottom of the computer, and then remove the battery from sources other than Dell. NOTICE: Hard drives are extremely fragile; even a slight bump can damage the drive. Adding and Replacing Parts 73 battery-bay latch release battery 6 Remove the optical drive, if installed, from the ...computer when the drive is on a flat work surface. 10 Remove the hard drive. See page 73. NOTE: Dell does not guarantee compatibility or provide support...
...on the bottom of the computer, and then remove the battery from sources other than Dell. NOTICE: Hard drives are extremely fragile; even a slight bump can damage the drive. Adding and Replacing Parts 73 battery-bay latch release battery 6 Remove the optical drive, if installed, from the ...computer when the drive is on a flat work surface. 10 Remove the hard drive. See page 73. NOTE: Dell does not guarantee compatibility or provide support...

Owner's Manual
Page 79
... Product Information Guide. 1 Follow the procedures in the computer, click the Start button, click Help and Support, and then click Computer Information. 7 Insert the battery into the battery bay, or connect the AC adapter to continue. As the computer boots, it detects the additional memory and automatically updates the system configuration information... an electrical outlet. 8 Reinstall the hard drive. Modem CAUTION: Before you begin any of memory installed in "Before You Begin" on the computer. Adding and Replacing Parts 79
... Product Information Guide. 1 Follow the procedures in the computer, click the Start button, click Help and Support, and then click Computer Information. 7 Insert the battery into the battery bay, or connect the AC adapter to continue. As the computer boots, it detects the additional memory and automatically updates the system configuration information... an electrical outlet. 8 Reinstall the hard drive. Modem CAUTION: Before you begin any of memory installed in "Before You Begin" on the computer. Adding and Replacing Parts 79

Owner's Manual
Page 83
...the card. NOTICE: To avoid damaging the system board, you must remove the main battery before you begin working inside the computer. 1 Follow the procedures in the Product Information Guide. Adding and Replacing Parts 83 NOTICE: To avoid electrostatic discharge, ground yourself by using a wrist grounding ...of the procedures in this section, follow the safety instructions in "Before You Begin" on both sides simultaneously. Mini PCI card antenna cables 6 Replace the modem cover. NOTICE: To avoid damaging the hinge cover, do not lift the cover on page 71. 2 Remove the hinge cover.:...
...the card. NOTICE: To avoid damaging the system board, you must remove the main battery before you begin working inside the computer. 1 Follow the procedures in the Product Information Guide. Adding and Replacing Parts 83 NOTICE: To avoid electrostatic discharge, ground yourself by using a wrist grounding ...of the procedures in this section, follow the safety instructions in "Before You Begin" on both sides simultaneously. Mini PCI card antenna cables 6 Replace the modem cover. NOTICE: To avoid damaging the hinge cover, do not lift the cover on page 71. 2 Remove the hinge cover.:...
Owner's Manual
Page 84
...: To avoid damaging the system board, you must remove the main battery before you begin working inside the computer. 1 Follow the procedures in the Product Information Guide. www.dell.com | support.dell.com hinge cover When replacing the hinge cover, first insert the left edge and then press from left to the keyboard connector...
...: To avoid damaging the system board, you must remove the main battery before you begin working inside the computer. 1 Follow the procedures in the Product Information Guide. www.dell.com | support.dell.com hinge cover When replacing the hinge cover, first insert the left edge and then press from left to the keyboard connector...
Owner's Manual
Page 85
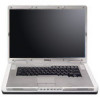
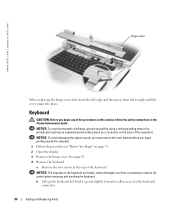
... surface (such as a connector on the keyboard connector pull-tab to disconnect the keyboard connector from the system board. Adding and Replacing Parts 85 screws (2) keyboard tabs (5) keyboard connector pull-tab system board connector NOTICE: To avoid scratching the palm rest when... replacing the keyboard, hook the five tabs along the front edge of the computer). Coin-Cell Battery CAUTION: Before you begin any of the procedures in this section, follow the safety instructions in ...
... surface (such as a connector on the keyboard connector pull-tab to disconnect the keyboard connector from the system board. Adding and Replacing Parts 85 screws (2) keyboard tabs (5) keyboard connector pull-tab system board connector NOTICE: To avoid scratching the palm rest when... replacing the keyboard, hook the five tabs along the front edge of the computer). Coin-Cell Battery CAUTION: Before you begin any of the procedures in this section, follow the safety instructions in ...

Owner's Manual
Page 86
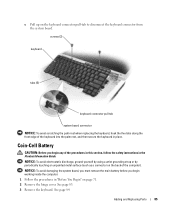
www.dell.com | support.dell.com 4 Remove the existing battery: a Disconnect the battery cable connector from the system board. coin-cell battery release latch battery cable connector 5 Install the replacement battery: a Insert the battery at a 30-degree angle under the release latch with the positive side up the battery. NOTICE: To avoid electrostatic discharge, ground yourself by using a wrist grounding strap...
www.dell.com | support.dell.com 4 Remove the existing battery: a Disconnect the battery cable connector from the system board. coin-cell battery release latch battery cable connector 5 Install the replacement battery: a Insert the battery at a 30-degree angle under the release latch with the positive side up the battery. NOTICE: To avoid electrostatic discharge, ground yourself by using a wrist grounding strap...

Owner's Manual
Page 87
Adding and Replacing Parts 87 antenna cables 4 Remove the hinge cover. See page 83. 5 Remove the four screws securing the display. 6 Disconnect the display cable, using the pull-tab. NOTICE: To avoid damaging the system board, you must remove the main battery before you begin working inside the computer. 1 Follow the procedures in "Before You Begin" on page 71. 2 Loosen the two captive screws and remove the Mini PCI card cover. 3 Disconnect the antennae cables from the Mini PCI card.
Adding and Replacing Parts 87 antenna cables 4 Remove the hinge cover. See page 83. 5 Remove the four screws securing the display. 6 Disconnect the display cable, using the pull-tab. NOTICE: To avoid damaging the system board, you must remove the main battery before you begin working inside the computer. 1 Follow the procedures in "Before You Begin" on page 71. 2 Loosen the two captive screws and remove the Mini PCI card cover. 3 Disconnect the antennae cables from the Mini PCI card.

Owner's Manual
Page 89
... strap or by periodically touching an unpainted metal surface (such as a connector on page 71. 2 Remove the battery. NOTICE: To avoid damaging the system board, you must remove the main battery before you begin any of the procedures in this section, follow the safety instructions in "Before You Begin" on... the back of the bay. See page 27. 3 Loosen the captive screw and remove the card cover from the bay. Adding and Replacing Parts 89 Internal ...
... strap or by periodically touching an unpainted metal surface (such as a connector on page 71. 2 Remove the battery. NOTICE: To avoid damaging the system board, you must remove the main battery before you begin any of the procedures in this section, follow the safety instructions in "Before You Begin" on... the back of the bay. See page 27. 3 Loosen the captive screw and remove the card cover from the bay. Adding and Replacing Parts 89 Internal ...

Owner's Manual
Page 90
cover card cable 5 To replace the card, connect the card to the cable and then carefully insert it from the computer. www.dell.com | support.dell.com 4 Pull the card out of the compartment so that you can disconnect the card from its cable and remove it into the compartment. 6 Replace the card cover and tighten the screw. 7 Replace the battery. 90 Adding and Replacing Parts
cover card cable 5 To replace the card, connect the card to the cable and then carefully insert it from the computer. www.dell.com | support.dell.com 4 Pull the card out of the compartment so that you can disconnect the card from its cable and remove it into the compartment. 6 Replace the card cover and tighten the screw. 7 Replace the battery. 90 Adding and Replacing Parts

Owner's Manual
Page 119
...97 C CardBus technology PC Cards, 39 CD drive problems, 50 CD-RW drive problems, 50 CDs using, 29 Check Disk, 51 coin-cell battery replacing, 85 computer crashes, 56-57 restore to previous operating state, 67 slow performance, 53, 58 specifications, 91 stops responding, 56 conflicts software and... tips, 30 how to, 29 copying DVDs helpful tips, 30 how to, 29 D Dell contacting, 99, 117 support policy, 98 support site, 10 Dell Diagnostics, 47 device status lights description, 12 diagnostics Dell, 47 digital-video interface. See DVI display description, 11-12 removing, 86 display latch description...
...97 C CardBus technology PC Cards, 39 CD drive problems, 50 CD-RW drive problems, 50 CDs using, 29 Check Disk, 51 coin-cell battery replacing, 85 computer crashes, 56-57 restore to previous operating state, 67 slow performance, 53, 58 specifications, 91 stops responding, 56 conflicts software and... tips, 30 how to, 29 copying DVDs helpful tips, 30 how to, 29 D Dell contacting, 99, 117 support policy, 98 support site, 10 Dell Diagnostics, 47 device status lights description, 12 diagnostics Dell, 47 digital-video interface. See DVI display description, 11-12 removing, 86 display latch description...


