Advanced Port Replicator User's Guide
Page 24
accessories or parts that are in performing warranty repairs and building 1-20 Dell Inspiron Advanced Port Replicator User's Guide Shipments to other locations will be free from Dell; Dell uses new and reconditioned parts made freight collect. This limited warranty does not cover ...NOTE: Before you is three years beginning on the hard-disk drive(s) and any removable media, such as specifically noted); Refer to the chapter titled "Getting Help" in your system's online guide to Dell's facility. Dell warrants that are returned to find the appropriate telephone ...
accessories or parts that are in performing warranty repairs and building 1-20 Dell Inspiron Advanced Port Replicator User's Guide Shipments to other locations will be free from Dell; Dell uses new and reconditioned parts made freight collect. This limited warranty does not cover ...NOTE: Before you is three years beginning on the hard-disk drive(s) and any removable media, such as specifically noted); Refer to the chapter titled "Getting Help" in your system's online guide to Dell's facility. Dell warrants that are returned to find the appropriate telephone ...
Advanced Port Replicator User's Guide
Page 27
... CONDITIONS OF MERCHANTABILITY AND FITNESS FOR A PARTICULAR PURPOSE. Dell Inspiron Advanced Port Replicator User's Guide 1-23 Dell does not accept liability for your use in returning the replaced part to Dell. Dell will include a prepaid shipping container with Dell's Exchange Policy in effect on the hard-disk drive(s) and any removable media, such as diskettes, CDs, or PC Cards...
... CONDITIONS OF MERCHANTABILITY AND FITNESS FOR A PARTICULAR PURPOSE. Dell Inspiron Advanced Port Replicator User's Guide 1-23 Dell does not accept liability for your use in returning the replaced part to Dell. Dell will include a prepaid shipping container with Dell's Exchange Policy in effect on the hard-disk drive(s) and any removable media, such as diskettes, CDs, or PC Cards...

Solutions Guide
Page 9
... room temperature before using the computer. Also, before removing the memory module or disconnecting the device to help avoid possible damage to the system board. • Before you clean your computer, battery, and hard drive from high-temperature conditions into a warmer environment or... As you connect a cable make sure both connectors are correctly oriented and aligned. • Handle components with the hard drive removed from its pins. • When removing a memory module from the system board or disconnecting an external device from the computer, wait 5 seconds after turning ...
... room temperature before using the computer. Also, before removing the memory module or disconnecting the device to help avoid possible damage to the system board. • Before you clean your computer, battery, and hard drive from high-temperature conditions into a warmer environment or... As you connect a cable make sure both connectors are correctly oriented and aligned. • Handle components with the hard drive removed from its pins. • When removing a memory module from the system board or disconnecting an external device from the computer, wait 5 seconds after turning ...

Solutions Guide
Page 17
Sett ing Up 17 Using the Media Bay Dell ships your computer with a floppy drive installed in the media bay. The media bay also supports the following devices: • CD drive • CD-RW drive • DVD drive • Zip drive • Second hard drive • Second battery • Dell TravelLite™ module NOTICE: To prevent irreparable damage to the docking connector, do not remove or replace devices while the computer is connected to an advanced port replicator (APR).
Sett ing Up 17 Using the Media Bay Dell ships your computer with a floppy drive installed in the media bay. The media bay also supports the following devices: • CD drive • CD-RW drive • DVD drive • Zip drive • Second hard drive • Second battery • Dell TravelLite™ module NOTICE: To prevent irreparable damage to the docking connector, do not remove or replace devices while the computer is connected to an advanced port replicator (APR).
Solutions Guide
Page 40
... electrical shock, verify that it is connected to an electrical outlet, Dell recommends that you are certain that the computer is thoroughly dry before attempting to dry. 7 Remove the hard drive (see page 57). 8 Remove the memory modules (see page 55). 9 Open the display and place... from the computer, and disconnect the AC adapter from the electrical outlet. 2 Turn off any installed PC Cards, and put them in a safe place to remove it . www.dell.com | support.dell.com E-Mail Problems E N S U R E T H A T Y O U A R E C O N N E C T E D T O T H E IN T E R N E T - If Work Offline has a...
... electrical shock, verify that it is connected to an electrical outlet, Dell recommends that you are certain that the computer is thoroughly dry before attempting to dry. 7 Remove the hard drive (see page 57). 8 Remove the memory modules (see page 55). 9 Open the display and place... from the computer, and disconnect the AC adapter from the electrical outlet. 2 Turn off any installed PC Cards, and put them in a safe place to remove it . www.dell.com | support.dell.com E-Mail Problems E N S U R E T H A T Y O U A R E C O N N E C T E D T O T H E IN T E R N E T - If Work Offline has a...

Solutions Guide
Page 41
... from the computer, and disconnect the AC adapter from the electrical outlet. 3 Turn off any PC Cards you cannot identify the damaged components, call Dell for technical assistance (see page 69). S olving Pr oblems 41 If the computer does not turn on, or if you cannot identify the damaged... memory module cover, and the screw (see page 55). 12 Replace the hard drive (see page 57). 13 Replace the media bay device (see page 17) and any attached external devices, and disconnect them from their power sources and then from the computer. 4 Remove and reinstall the battery. 5 Turn on the computer.
... from the computer, and disconnect the AC adapter from the electrical outlet. 3 Turn off any PC Cards you cannot identify the damaged components, call Dell for technical assistance (see page 69). S olving Pr oblems 41 If the computer does not turn on, or if you cannot identify the damaged... memory module cover, and the screw (see page 55). 12 Replace the hard drive (see page 57). 13 Replace the media bay device (see page 17) and any attached external devices, and disconnect them from their power sources and then from the computer. 4 Remove and reinstall the battery. 5 Turn on the computer.

Solutions Guide
Page 57
...computer (see page 16) before you remove the hard drive from sources other than Dell. As the computer boots, it will detect the additional memory and automatically update the system configuration information. Even a slight bump can damage the drive. NOTICE: To prevent data loss, ... in both connectors, install a memory module in the connector labeled "JDIM (DIMMA)" before removing or installing a hard drive. Replacing a Hard Drive NOTICE: Hard drives are extremely fragile and must be handled carefully. Do not remove the hard drive while the computer is lit. Addi ng Part s 57
...computer (see page 16) before you remove the hard drive from sources other than Dell. As the computer boots, it will detect the additional memory and automatically update the system configuration information. Even a slight bump can damage the drive. NOTICE: To prevent data loss, ... in both connectors, install a memory module in the connector labeled "JDIM (DIMMA)" before removing or installing a hard drive. Replacing a Hard Drive NOTICE: Hard drives are extremely fragile and must be handled carefully. Do not remove the hard drive while the computer is lit. Addi ng Part s 57
Solutions Guide
Page 58
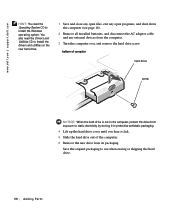
www.dell.com | support.dell.com HINT: You need the Drivers and Utilities CD to install the drivers and utilities on the new hard drive. 1 Save and close any open files, exit any open programs, and shut down the computer (see page 16). 2 Remove all installed batteries, and ...by storing it in protective antistatic packaging. 4 Lift up the hard drive cover until you hear a click. 5 Slide the hard drive out of the computer. 6 Remove the new drive from the computer. 3 Turn the computer over, and remove the hard drive screw. Save the original packaging to install the Windows operating system....
www.dell.com | support.dell.com HINT: You need the Drivers and Utilities CD to install the drivers and utilities on the new hard drive. 1 Save and close any open files, exit any open programs, and shut down the computer (see page 16). 2 Remove all installed batteries, and ...by storing it in protective antistatic packaging. 4 Lift up the hard drive cover until you hear a click. 5 Slide the hard drive out of the computer. 6 Remove the new drive from the computer. 3 Turn the computer over, and remove the hard drive screw. Save the original packaging to install the Windows operating system....
Solutions Guide
Page 59
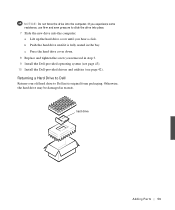
... and even pressure to Dell in transit. c Press the hard drive cover down. 8 Replace and tighten the screw you hear a click. hard drive Addi ng Part s 59 b Push the hard drive until you removed in the bay. Returning a Hard Drive to Dell Return your old hard drive to slide the drive into place. 7 Slide the new drive into the computer. Otherwise, the hard drive may be damaged...
... and even pressure to Dell in transit. c Press the hard drive cover down. 8 Replace and tighten the screw you hear a click. hard drive Addi ng Part s 59 b Push the hard drive until you removed in the bay. Returning a Hard Drive to Dell Return your old hard drive to slide the drive into place. 7 Slide the new drive into the computer. Otherwise, the hard drive may be damaged...


